

Owners Manual
Page 1
... number and serial number are on the back of your Toshiba dealer about this DVD Recorder. Record these numbers whenever you communicate with your DVD Recorder. Model number: Serial number: 1/22/2009 10:33:24 AM Others Introduction Connections Basic Setup TOSHIBA DVD VIDEO RECORDER / VIDEO CASSETTE RECORDER DKVR60KU DVD VIDEO RECORDER / VIDEO CASSETTE RECORDER DKVR60KU OWNER'S MANUAL Disc Management Recording Playback Editing Function Setup VCR Function Printed in the...
... number and serial number are on the back of your Toshiba dealer about this DVD Recorder. Record these numbers whenever you communicate with your DVD Recorder. Model number: Serial number: 1/22/2009 10:33:24 AM Others Introduction Connections Basic Setup TOSHIBA DVD VIDEO RECORDER / VIDEO CASSETTE RECORDER DKVR60KU DVD VIDEO RECORDER / VIDEO CASSETTE RECORDER DKVR60KU OWNER'S MANUAL Disc Management Recording Playback Editing Function Setup VCR Function Printed in the...

Owners Manual
Page 5
..., thinner, commercially available cleaners, detergent, abrasive cleaning agents or antistatic spray intended for higher video resolution or extended recording time on each DVD. Note • Remember to read the instructions along with operations, please stay near the ... . Dolby Digital Recording "Dolby® Digital Recording enables consumers to assist you. and worldwide patents issued & pending. This information is displayed on recordable DVD discs. and are having, and be happy to record high-quality video with actual recordable DVD discs. If a video head cleaner does ...
..., thinner, commercially available cleaners, detergent, abrasive cleaning agents or antistatic spray intended for higher video resolution or extended recording time on each DVD. Note • Remember to read the instructions along with operations, please stay near the ... . Dolby Digital Recording "Dolby® Digital Recording enables consumers to assist you. and worldwide patents issued & pending. This information is displayed on recordable DVD discs. and are having, and be happy to record high-quality video with actual recordable DVD discs. If a video head cleaner does ...

Owners Manual
Page 8
...finalize discs automatically after finishing all media. You cannot record on CD-RW/-R. Automatic title finalizing: For video mode DVD-RW/-R and DVD+R recording, you can copy a DVD to a cassette tape or copy a cassette tape to all timer recordings or at the end of the symbols listed above ...DVD-video Description refers to audio CD Description refers to CD-RW/-R with MP3 files Description refers to CD-RW/-R with WMA files Description refers to CD-RW/-R with JPEG files Description refers to DVD-RW/-R, DVD+RW/+R and CD-RW/-R with Dolby Digital or DTS, you can program the unit to record...
...finalize discs automatically after finishing all media. You cannot record on CD-RW/-R. Automatic title finalizing: For video mode DVD-RW/-R and DVD+R recording, you can copy a DVD to a cassette tape or copy a cassette tape to all timer recordings or at the end of the symbols listed above ...DVD-video Description refers to audio CD Description refers to CD-RW/-R with MP3 files Description refers to CD-RW/-R with WMA files Description refers to CD-RW/-R with JPEG files Description refers to DVD-RW/-R, DVD+RW/+R and CD-RW/-R with Dolby Digital or DTS, you can program the unit to record...

Owners Manual
Page 10
... manufacture of the following disc, the sound may not work with personal computer discs. • Discs recorded in this unit. DVD players with recorded in the device setup menu. DVD must be compatible with this DVD Video Recorder, please contact Toshiba Customer Service. are labeled for other color systems. Region Codes This unit has been designed to experience...
... manufacture of the following disc, the sound may not work with personal computer discs. • Discs recorded in this unit. DVD players with recorded in the device setup menu. DVD must be compatible with this DVD Video Recorder, please contact Toshiba Customer Service. are labeled for other color systems. Region Codes This unit has been designed to experience...
Owners Manual
Page 17
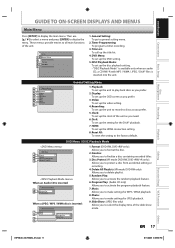
... Setting 2 Playback 3 Display 4 Video Recording 5 Clock 26 DivX HDMI 37 Reset All 48 General Setting Menu 1. These menus provide entries to all main functions of the unit as you to activate the program playback feature. 7. Timer Programming: To program a timer recording. 3. HDMI: To set up the title list. 4. Format (DVD-RW, DVD+RW only): Allows...
... Setting 2 Playback 3 Display 4 Video Recording 5 Clock 26 DivX HDMI 37 Reset All 48 General Setting Menu 1. These menus provide entries to all main functions of the unit as you to activate the program playback feature. 7. Timer Programming: To program a timer recording. 3. HDMI: To set up the title list. 4. Format (DVD-RW, DVD+RW only): Allows...

Owners Manual
Page 27
...JKL MNO TRACKING PQRS TUV WXYZ SAT.LINK SPACE TIMER PROG. General Setting Playback Display Video Recording Clock DivX HDMI Reset All Progressive TV Aspect Select VidSeeole-cLt1Vi(dReeoar) Video In S-Video In 6 Press [SETUP] to connect, then press [ENTER]. SETUP DISPLAY AUDIO DISC... FWD SKIP STOP SKIP PAUSE VCR DVD DUBBING REC MODE REC REPEAT TIMER SET SEARCH ZOOM SE-R0295 1 Press [SETUP]. 2 Use [K / L] to select "General Setting", then press [ENTER]. 3 Use [K / L] to select "Video", then press [ENTER]. 4 Use [K / L] to select "Select Video", then press [ENTER]. 5 Use...
...JKL MNO TRACKING PQRS TUV WXYZ SAT.LINK SPACE TIMER PROG. General Setting Playback Display Video Recording Clock DivX HDMI Reset All Progressive TV Aspect Select VidSeeole-cLt1Vi(dReeoar) Video In S-Video In 6 Press [SETUP] to connect, then press [ENTER]. SETUP DISPLAY AUDIO DISC... FWD SKIP STOP SKIP PAUSE VCR DVD DUBBING REC MODE REC REPEAT TIMER SET SEARCH ZOOM SE-R0295 1 Press [SETUP]. 2 Use [K / L] to select "General Setting", then press [ENTER]. 3 Use [K / L] to select "Video", then press [ENTER]. 4 Use [K / L] to select "Select Video", then press [ENTER]. 5 Use...

Owners Manual
Page 43
... PM Preparation on this unit • You must let the unit know which video input jack you want to "Recording Mode" on page 34 for DVD or "Recording" on page 100 for the satellite link timer recording: Preparation on page 27. LINK]. Refer to the tuner's manual on how to... goes into the standby mode automatically as it detects the video signal from the external tuner. LINK] or [TIMER SET]. OPEN/ INPUT CLOSE SELECT HDMI .@/: ABC DEF 1 Select whichever the component (DVD / VCR) you are using before making a recording. To cancel the satellite link function while in progress: ...
... PM Preparation on this unit • You must let the unit know which video input jack you want to "Recording Mode" on page 34 for DVD or "Recording" on page 100 for the satellite link timer recording: Preparation on page 27. LINK]. Refer to the tuner's manual on how to... goes into the standby mode automatically as it detects the video signal from the external tuner. LINK] or [TIMER SET]. OPEN/ INPUT CLOSE SELECT HDMI .@/: ABC DEF 1 Select whichever the component (DVD / VCR) you are using before making a recording. To cancel the satellite link function while in progress: ...

Owners Manual
Page 46
... tape: Press [VCR]. Select "L2 (Front)" or "L3 (DV-IN)" by using [INPUT SELECT ]. 4 Press [REC MODE] repeatedly to select a recording mode. RACKING DUBBING VCR DVD SELECT L2 L3 VIDEO L R DV IN 46 EN E9PKBUD_DKVR60KU_EN.indd 46 8/11/2009 4:00:39 PM Place the disc to open the disc tray. Press [OPEN... "L1 (Rear)" by using [INPUT SELECT ]. • To use the input jacks on the rear of this unit; Refer to "Recording Mode" on page 34 for DVD or "Recording" on page 100 for the connection on page 45. SETUP DISPLAY AUDIO DISC MENU TOP MENU CLEAR ENTER RETURN INSTANT 1.3x/0.8x...
... tape: Press [VCR]. Select "L2 (Front)" or "L3 (DV-IN)" by using [INPUT SELECT ]. 4 Press [REC MODE] repeatedly to select a recording mode. RACKING DUBBING VCR DVD SELECT L2 L3 VIDEO L R DV IN 46 EN E9PKBUD_DKVR60KU_EN.indd 46 8/11/2009 4:00:39 PM Place the disc to open the disc tray. Press [OPEN... "L1 (Rear)" by using [INPUT SELECT ]. • To use the input jacks on the rear of this unit; Refer to "Recording Mode" on page 34 for DVD or "Recording" on page 100 for the connection on page 45. SETUP DISPLAY AUDIO DISC MENU TOP MENU CLEAR ENTER RETURN INSTANT 1.3x/0.8x...

Owners Manual
Page 48
...Use [K / L] to select "DVC", then press [ENTER]. 1/ 1 1/ 1 Control DV Audio Start Rec DVD Stereo1 -RW VR ORG L3 (DV-IN) AB-1234 0:12:34 XP 1:00 Now you can operate your DVC is in video mode. 1 Use [INPUT SELECT ] to select "L3 (DV-IN)". The dubbing will start point. 6 Use ...]. Use [K / L] to start dubbing. L3 (DV-IN) AB-1234 0:00:00 2 Press [REC MODE] repeatedly to select a recording mode. (Refer to "Recording Mode" on page 34 for DVD or "Recording" on page 100 for VCR.) 3 Press [DISPLAY]. 4 With "Control" highlighted, press [ENTER] to display the available devices to control ...
...Use [K / L] to select "DVC", then press [ENTER]. 1/ 1 1/ 1 Control DV Audio Start Rec DVD Stereo1 -RW VR ORG L3 (DV-IN) AB-1234 0:12:34 XP 1:00 Now you can operate your DVC is in video mode. 1 Use [INPUT SELECT ] to select "L3 (DV-IN)". The dubbing will start point. 6 Use ...]. Use [K / L] to start dubbing. L3 (DV-IN) AB-1234 0:00:00 2 Press [REC MODE] repeatedly to select a recording mode. (Refer to "Recording Mode" on page 34 for DVD or "Recording" on page 100 for VCR.) 3 Press [DISPLAY]. 4 With "Control" highlighted, press [ENTER] to display the available devices to control ...

Owners Manual
Page 53
...the disc to the disc tray guide. 3 Press [OPEN/CLOSE A] to open the disc tray and insert your disc with its label facing up. Press [DVD]. 2 Press [OPEN/CLOSE A] to close the disc tray. Refer to "Using the Title/Disc Menu" on page 59. E9PKBUD_DKVR60KU_EN.indd 53 EN 53 8/... be sure to select the input to "Resume Playback" on page 58. 5 Press [STOP C] once to stop when you are playing back a DVD-video, a menu may appear. Recording Playback Editing Function Setup VCR Function Note • Some discs may take awhile to load the disc completely. 4 Press [PLAY B] to start playback ...
...the disc to the disc tray guide. 3 Press [OPEN/CLOSE A] to open the disc tray and insert your disc with its label facing up. Press [DVD]. 2 Press [OPEN/CLOSE A] to close the disc tray. Refer to "Using the Title/Disc Menu" on page 59. E9PKBUD_DKVR60KU_EN.indd 53 EN 53 8/... be sure to select the input to "Resume Playback" on page 58. 5 Press [STOP C] once to stop when you are playing back a DVD-video, a menu may appear. Recording Playback Editing Function Setup VCR Function Note • Some discs may take awhile to load the disc completely. 4 Press [PLAY B] to start playback ...

Owners Manual
Page 55
When selecting folder: The files in the folder will be displayed. This DVD Video Recorder requires discs/recordings to meet certain technical standards in this unit are recorded under the following specifications: • Sampling frequency : 44.1 kHz or 48 kHz. • Constant bit rate : 112 kbps - 320 ... or DAT deck. • Files whose extension is inserted, track list will operate or produce optimal playback quality. It is not recommended. Toshiba cannot and does not grant such permission. Use [K / L] to select the file or folder you insert a CD-RW/-R mixed with...
When selecting folder: The files in the folder will be displayed. This DVD Video Recorder requires discs/recordings to meet certain technical standards in this unit are recorded under the following specifications: • Sampling frequency : 44.1 kHz or 48 kHz. • Constant bit rate : 112 kbps - 320 ... or DAT deck. • Files whose extension is inserted, track list will operate or produce optimal playback quality. It is not recommended. Toshiba cannot and does not grant such permission. Use [K / L] to select the file or folder you insert a CD-RW/-R mixed with...

Owners Manual
Page 61
... start. Opening the disc tray - Zoom playback will appear. Turning the unit into the standby mode. - Recording on a recordable disc • You can mark up the display menu. e.g.) DVD-video to display the selection 1/ 5 1/ 5 0:01:00 / 1:23:45 DVD Video This feature allows you press [ZOOM], skip to step 3. 2) Use [{ / B] to select menu. There are four...
... start. Opening the disc tray - Zoom playback will appear. Turning the unit into the standby mode. - Recording on a recordable disc • You can mark up the display menu. e.g.) DVD-video to display the selection 1/ 5 1/ 5 0:01:00 / 1:23:45 DVD Video This feature allows you press [ZOOM], skip to step 3. 2) Use [{ / B] to select menu. There are four...

Owners Manual
Page 65
After the search, playback will be highlighted. Disc Management Recording Playback Editing Function Setup VCR Function Others E9PKBUD_DKVR60KU_EN.indd 65 EN 65 8/11/2009 4:01:08 PM If the display menu is already shown, skip... search is available only in the same track, file or title. Introduction Connections Basic Setup Time Search SEARCH Press [DVD] first. 1) During playback, press [DISPLAY] to will start automatically. e.g.) DVD-video 1/ 5 1/ 5 0:01:00 / 1:23:45 DVD Video e.g.) audio CD 1/ 5 0:00:15 / 0:05:00 CD The number next to bring up the display menu. To ...
After the search, playback will be highlighted. Disc Management Recording Playback Editing Function Setup VCR Function Others E9PKBUD_DKVR60KU_EN.indd 65 EN 65 8/11/2009 4:01:08 PM If the display menu is already shown, skip... search is available only in the same track, file or title. Introduction Connections Basic Setup Time Search SEARCH Press [DVD] first. 1) During playback, press [DISPLAY] to will start automatically. e.g.) DVD-video 1/ 5 1/ 5 0:01:00 / 1:23:45 DVD Video e.g.) audio CD 1/ 5 0:00:15 / 0:05:00 CD The number next to bring up the display menu. To ...

Owners Manual
Page 68
... on page 107. • For disc with 2 or more languages. e.g.) DVD-video to display the selection 1/ 5 1/ 5 0:01:00 / 1:23:45 DVD Video 3) Use [K / L] to the "LANGUAGE CODE" on the disc case. e.g.) DVD-video 1/ 5 1/ 5 0:01:00 / 1:23:45 DVD Video 1.Dolby Digital 2ch English 2.Dolby Digital 5.1ch English • If the title...:11 PM Press [DISC MENU] or [TOP MENU] to change the subtitle from the disc menu. When playing back a DVD-video recorded with DivX® files, the TV screen only displays the number of main and sub). Switching Subtitles Switching Audio Soundtrack...
... on page 107. • For disc with 2 or more languages. e.g.) DVD-video to display the selection 1/ 5 1/ 5 0:01:00 / 1:23:45 DVD Video 3) Use [K / L] to the "LANGUAGE CODE" on the disc case. e.g.) DVD-video 1/ 5 1/ 5 0:01:00 / 1:23:45 DVD Video 1.Dolby Digital 2ch English 2.Dolby Digital 5.1ch English • If the title...:11 PM Press [DISC MENU] or [TOP MENU] to change the subtitle from the disc menu. When playing back a DVD-video recorded with DivX® files, the TV screen only displays the number of main and sub). Switching Subtitles Switching Audio Soundtrack...

Owners Manual
Page 69
...]. 2) Use [{ / B] to select "OFF", "Type 1" or "Type 2", then press [ENTER]. e.g.) DVD-video to display the selection 1/ 5 1/ 5 0:01:00 / 1:23:45 DVD Video Recording Playback Editing E9PKBUD_DKVR60KU_EN.indd 69 Function Setup VCR Function 3) Use [K / L] to, select "Noise Reduction", then press [ENTER]. 1/ 5 1/ 5 0:01:00 / 1:23:45 DVD Video Noise Reduction OFF Black Level OFF 4) Use [K / L] to select a desired option...
...]. 2) Use [{ / B] to select "OFF", "Type 1" or "Type 2", then press [ENTER]. e.g.) DVD-video to display the selection 1/ 5 1/ 5 0:01:00 / 1:23:45 DVD Video Recording Playback Editing E9PKBUD_DKVR60KU_EN.indd 69 Function Setup VCR Function 3) Use [K / L] to, select "Noise Reduction", then press [ENTER]. 1/ 5 1/ 5 0:01:00 / 1:23:45 DVD Video Noise Reduction OFF Black Level OFF 4) Use [K / L] to select a desired option...

Owners Manual
Page 70
... [K / L] to select "Black Level", then press [ENTER]. 1/ 5 1/ 5 0:01:00 / 1:23:45 DVD Video Noise Reduction OFF Black Level OFF 4) Use [K / L] to select menu. Note • You can adjust the black level to control the brightness of the ...[{ / B] to select "OFF" or "ON", then press [ENTER]. Your setting will be activated. 1/ 5 1/ 5 OFF ON 0:01:00 / 1:23:45 DVD Video OFF : Shows the original picture as recorded. SELECTING THE FORMAT OF AUDIO AND VIDEO Adjusting Black Level You can adjust black level setting only during playback. • The setting will be kept even...
... [K / L] to select "Black Level", then press [ENTER]. 1/ 5 1/ 5 0:01:00 / 1:23:45 DVD Video Noise Reduction OFF Black Level OFF 4) Use [K / L] to select menu. Note • You can adjust the black level to control the brightness of the ...[{ / B] to select "OFF" or "ON", then press [ENTER]. Your setting will be activated. 1/ 5 1/ 5 OFF ON 0:01:00 / 1:23:45 DVD Video OFF : Shows the original picture as recorded. SELECTING THE FORMAT OF AUDIO AND VIDEO Adjusting Black Level You can adjust black level setting only during playback. • The setting will be kept even...

Owners Manual
Page 87
Set a picture size according to aspect ratio of Timer Rec ON OFF Aspect Ratio (Video mode) → page 36 Auto 4:3 16:9 Dubbing Mode → pages 50-51 VCR DVD DVD VCR Make Recording Compatible ON → page 35 OFF Clock Setting → page 26 DivX®VOD → page 96 DivX ...interval. Set the VCR to DVD (DVD to output the HDMI audio signal or not. Set the video input type for DivX® Subtitle. Set the color space for video mode recording. Set whether to VCR) duplication. Set to "OFF"). L1 (Rear) → page 27 Video In S-Video In Auto Chapter → page...
Set a picture size according to aspect ratio of Timer Rec ON OFF Aspect Ratio (Video mode) → page 36 Auto 4:3 16:9 Dubbing Mode → pages 50-51 VCR DVD DVD VCR Make Recording Compatible ON → page 35 OFF Clock Setting → page 26 DivX®VOD → page 96 DivX ...interval. Set the VCR to DVD (DVD to output the HDMI audio signal or not. Set the video input type for DivX® Subtitle. Set the color space for video mode recording. Set whether to VCR) duplication. Set to "OFF"). L1 (Rear) → page 27 Video In S-Video In Auto Chapter → page...

Owners Manual
Page 88
General Setting Playback Display Video Recording Clock DivX HDMI Reset All CLEAR ENTER RETURN INSTANT 1.3x/0.8x SKIP PLAY TIME SLIP REV PLAY FWD SKIP STOP SKIP PAUSE VCR DVD DUBBING REC MODE REC REPEAT TIMER SET SEARCH ZOOM SE-R0295 3 Use [K / L] to select a desired item, then press [ENTER]. 1 Parental Lock 2 Audio Out 3 Disc...
General Setting Playback Display Video Recording Clock DivX HDMI Reset All CLEAR ENTER RETURN INSTANT 1.3x/0.8x SKIP PLAY TIME SLIP REV PLAY FWD SKIP STOP SKIP PAUSE VCR DVD DUBBING REC MODE REC REPEAT TIMER SET SEARCH ZOOM SE-R0295 3 Use [K / L] to select a desired item, then press [ENTER]. 1 Parental Lock 2 Audio Out 3 Disc...

Owners Manual
Page 89
... all settings in "Parental Lock" menu, enter 4737 using [the Number buttons] in the unit when you set . • Record the password in case you forget it will require you have set up the parental lock, press [OPEN/CLOSE A] to find if...[G]: General Audience. • 1 [Kid Safe]: Suitable for children. Introduction Connections Basic Setup Disc Management GENERAL SETTING Playback (cont'd) 1 Parental Lock (Default: OFF) Some DVD-video feature a parental lock level. B A password has been set yet, proceed to select "Yes" then press [ENTER]. Use [K / L] to select "Yes", then ...
... all settings in "Parental Lock" menu, enter 4737 using [the Number buttons] in the unit when you set . • Record the password in case you forget it will require you have set up the parental lock, press [OPEN/CLOSE A] to find if...[G]: General Audience. • 1 [Kid Safe]: Suitable for children. Introduction Connections Basic Setup Disc Management GENERAL SETTING Playback (cont'd) 1 Parental Lock (Default: OFF) Some DVD-video feature a parental lock level. B A password has been set yet, proceed to select "Yes" then press [ENTER]. Use [K / L] to select "Yes", then ...

Owners Manual
Page 96
...]. SETUP DISPLAY AUDIO DISC MENU TOP MENU CLEAR ENTER RETURN INSTANT 1.3x/0.8x SKIP PLAY TIME SLIP REV PLAY FWD SKIP STOP SKIP PAUSE VCR DVD DUBBING REC MODE REC REPEAT TIMER SET SEARCH ZOOM SE-R0295 3 Use [K / L] to select a desired item, then press [ENTER]. 1 DivX R VOD... play it back on this unit before you with the setting, press [SETUP] to select a setting, then press [ENTER]. General Setting Playback Display Video Recording Clock DivX HDMI Reset All 2 DivX Subtitle (Default : OFF) Set the DivX® subtitle. DivX® GENERAL SETTING OPEN/ INPUT CLOSE SELECT ...
...]. SETUP DISPLAY AUDIO DISC MENU TOP MENU CLEAR ENTER RETURN INSTANT 1.3x/0.8x SKIP PLAY TIME SLIP REV PLAY FWD SKIP STOP SKIP PAUSE VCR DVD DUBBING REC MODE REC REPEAT TIMER SET SEARCH ZOOM SE-R0295 3 Use [K / L] to select a desired item, then press [ENTER]. 1 DivX R VOD... play it back on this unit before you with the setting, press [SETUP] to select a setting, then press [ENTER]. General Setting Playback Display Video Recording Clock DivX HDMI Reset All 2 DivX Subtitle (Default : OFF) Set the DivX® subtitle. DivX® GENERAL SETTING OPEN/ INPUT CLOSE SELECT ...


