Printable Spec Sheet
Page 2
...and the thumbnails to it comes to a component video equipped progressive scan TV. D-R4 TECHNOLOGY & BENEFITS VIDEO > > Multi-Drive Recorder - Recorded content remains easy to ...X EASY NAVI Menu X Timer Recordings 36 programs/2 month Auto Channel Setup X Parental Lock X Remote Control Universal with virtually anyone who has a DVD-Video player. · DVD-RW* can rewrite ...Dolby is a registered trademark of Gemstar Development Corporation. ColorStream is a registered trademark of Toshiba Corporation. Even more, re-record content approximately 100,000 times! · DVD-R is...
...and the thumbnails to it comes to a component video equipped progressive scan TV. D-R4 TECHNOLOGY & BENEFITS VIDEO > > Multi-Drive Recorder - Recorded content remains easy to ...X EASY NAVI Menu X Timer Recordings 36 programs/2 month Auto Channel Setup X Parental Lock X Remote Control Universal with virtually anyone who has a DVD-Video player. · DVD-RW* can rewrite ...Dolby is a registered trademark of Gemstar Development Corporation. ColorStream is a registered trademark of Toshiba Corporation. Even more, re-record content approximately 100,000 times! · DVD-R is...

Installation Guide - English
Page 10
... carefully "SAFETY PRECAUTIONS", "IMPORTANT SAFETY INSTRUCTIONS" and "Precautions". ( pages 2 to 9) Check the supplied accessories. (See right) Load the batteries in the remote control. ( page 18) Connect an antenna to the recorder. ( page 20) Connect a cable box or satellite system to the recorder. ( pages 22 to ... 26) Make the initial settings. ( page 30) Your recorder is ready. Read the separate volume "OPERATIONS GUIDE". 10 Accessories Remote control Batteries (AAA) x 2 Coaxial cable Video/audio cable • Owner's manual (INSTALLATION GUIDE) • Owner's manual (OPERATIONS GUIDE)
... carefully "SAFETY PRECAUTIONS", "IMPORTANT SAFETY INSTRUCTIONS" and "Precautions". ( pages 2 to 9) Check the supplied accessories. (See right) Load the batteries in the remote control. ( page 18) Connect an antenna to the recorder. ( page 20) Connect a cable box or satellite system to the recorder. ( pages 22 to ... 26) Make the initial settings. ( page 30) Your recorder is ready. Read the separate volume "OPERATIONS GUIDE". 10 Accessories Remote control Batteries (AAA) x 2 Coaxial cable Video/audio cable • Owner's manual (INSTALLATION GUIDE) • Owner's manual (OPERATIONS GUIDE)
Installation Guide - English
Page 17
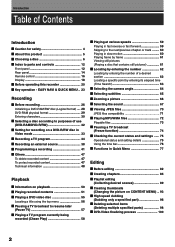
...IMPORTANT SAFETY INSTRUCTIONS 4 Precautions ...6 Installation procedure ...10 About this product ...11 Choosing a disc ...12 Preparation of the remote control 18 Connections Connecting an antenna and TV 20 Connecting to cable TV signal 22 Connecting to a satellite system 24 Connecting to ...Output sound setting ...38 C: TV shape setting ...40 D: Remote control settings 42 Operating a TV with the remote control of this recorder 42 Operating the second and third TOSHIBA DVD video recorders with the remote control of this recorder 44 Limited United States Warranty 46 CANADIAN ...
...IMPORTANT SAFETY INSTRUCTIONS 4 Precautions ...6 Installation procedure ...10 About this product ...11 Choosing a disc ...12 Preparation of the remote control 18 Connections Connecting an antenna and TV 20 Connecting to cable TV signal 22 Connecting to a satellite system 24 Connecting to ...Output sound setting ...38 C: TV shape setting ...40 D: Remote control settings 42 Operating a TV with the remote control of this recorder 42 Operating the second and third TOSHIBA DVD video recorders with the remote control of this recorder 44 Limited United States Warranty 46 CANADIAN ...
Installation Guide - English
Page 18
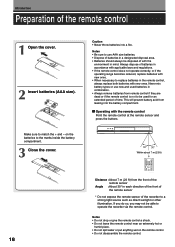
... disposal area. • Batteries should always be able to operate the recorder via the remote control. Operating with new ones. on the remote control. • Do not disassemble the remote control. Introduction Preparation of the recorder to a strong light source such as direct sunlight or other... mix battery types or use AAA size batteries. • Dispose of the remote sensor Angle : About 30° in the remote control, always replace both batteries with the remote control Point the remote control at the remote sensor and press the buttons. 30° 30° Within about 7 ...
... disposal area. • Batteries should always be able to operate the recorder via the remote control. Operating with new ones. on the remote control. • Do not disassemble the remote control. Introduction Preparation of the recorder to a strong light source such as direct sunlight or other... mix battery types or use AAA size batteries. • Dispose of the remote sensor Angle : About 30° in the remote control, always replace both batteries with the remote control Point the remote control at the remote sensor and press the buttons. 30° 30° Within about 7 ...
Installation Guide - English
Page 25
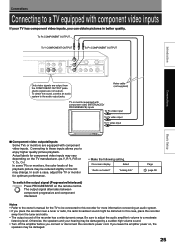
... level. In such a case, adjust the TV or monitor for more information concerning an audio system. • If you leave the amplifier power on the remote control. On-screen display Select "Audio out select" "Analog 2ch" Page page 38 Notes • Refer to the owner's manual for component video inputs may vary...
... level. In such a case, adjust the TV or monitor for more information concerning an audio system. • If you leave the amplifier power on the remote control. On-screen display Select "Audio out select" "Analog 2ch" Page page 38 Notes • Refer to the owner's manual for component video inputs may vary...
Installation Guide - English
Page 27
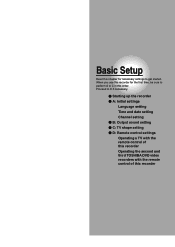
Proceed to get started. Basic Setup Read this order. When you use this recorder for the first time, be sure to perform A to C in this chapter for necessary settings to D if necessary. Starting up the recorder A: Initial settings Language setting Time and date setting Channel setting B: Output sound setting C: TV shape setting D: Remote control settings Operating a TV with the remote control of this recorder Operating the second and third TOSHIBA DVD video recorders with the remote control of this recorder
Proceed to get started. Basic Setup Read this order. When you use this recorder for the first time, be sure to perform A to C in this chapter for necessary settings to D if necessary. Starting up the recorder A: Initial settings Language setting Time and date setting Channel setting B: Output sound setting C: TV shape setting D: Remote control settings Operating a TV with the remote control of this recorder Operating the second and third TOSHIBA DVD video recorders with the remote control of this recorder
Installation Guide - English
Page 28
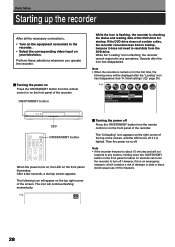
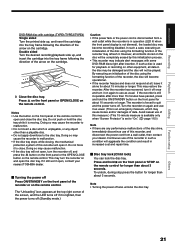
...STANDBY button When the power turns on, the LED on your television. Then the power turns off Press the ON/STANDBY button from the remote control or on for about 15 minutes and will be displayed after the icon has disappeared. Turning the power on Press the ON/STANDBY button ...from the remote control or on the front panel for the first time, the following icon will continue flashing momentarily. ON/STANDBY button While the icon is flashing,...
...STANDBY button When the power turns on, the LED on your television. Then the power turns off Press the ON/STANDBY button from the remote control or on for about 15 minutes and will be displayed after the icon has disappeared. Turning the power on Press the ON/STANDBY button ...from the remote control or on the front panel for the first time, the following icon will continue flashing momentarily. ON/STANDBY button While the icon is flashing,...
Installation Guide - English
Page 41
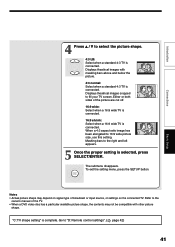
... with masking bars above and below the picture. 4:3 normal: Select when a standard 4:3 TV is complete. "C: TV shape setting" is connected. Displays theatrical images cropped to "D: Remote control settings". ( page 42) 41 The submenu disappears. Go to fill your TV screen. Refer to the right and left appears. 5 Once the proper setting is...
... with masking bars above and below the picture. 4:3 normal: Select when a standard 4:3 TV is complete. "C: TV shape setting" is connected. Displays theatrical images cropped to "D: Remote control settings". ( page 42) 41 The submenu disappears. Go to fill your TV screen. Refer to the right and left appears. 5 Once the proper setting is...
Installation Guide - English
Page 42
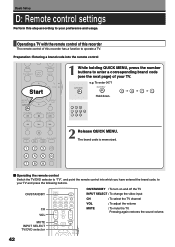
... code, to enter a corresponding brand code (see the next page) of this step according to operate a TV. Operating the remote control Switch the TV/DVD selector to "TV", and point the remote control into the remote control MUTE INPUT SELECT TOP MENU EASY NAVI MENU Start SELECT/ ENTER INSTANT REPLAY QUICK MENU TV DVD INSTANT SKIP... INPUT SELECT : To change the video input CH : To select the TV channel VOL : To adjust the volume MUTE : To mute the TV. Basic Setup D: Remote control settings Perform this recorder has a function to your TV. Operating a TV with the...
... code, to enter a corresponding brand code (see the next page) of this step according to operate a TV. Operating the remote control Switch the TV/DVD selector to "TV", and point the remote control into the remote control MUTE INPUT SELECT TOP MENU EASY NAVI MENU Start SELECT/ ENTER INSTANT REPLAY QUICK MENU TV DVD INSTANT SKIP... INPUT SELECT : To change the video input CH : To select the TV channel VOL : To adjust the volume MUTE : To mute the TV. Basic Setup D: Remote control settings Perform this recorder has a function to your TV. Operating a TV with the...
Installation Guide - English
Page 43
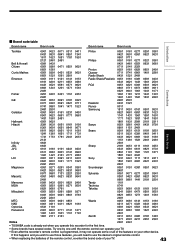
...this recorder for the first time. • Some brands have several codes. Try one by one until the remote control can operate your TV. • Even after the recorder's remote control is already set when you operate this happens and you wish to use those features, you will need to... use the device's original remote control. • When replacing the batteries of the remote control, re-enter the brand code of the features on your TV. 43 Brand code table Introduction Brand name Brand code Brand name Brand code Connections Basic Setup Toshiba 0001 0021 0071 0311 0411 Philco...
...this recorder for the first time. • Some brands have several codes. Try one by one until the remote control can operate your TV. • Even after the recorder's remote control is already set when you operate this happens and you wish to use those features, you will need to... use the device's original remote control. • When replacing the batteries of the remote control, re-enter the brand code of the features on your TV. 43 Brand code table Introduction Brand name Brand code Brand name Brand code Connections Basic Setup Toshiba 0001 0021 0071 0311 0411 Philco...
Installation Guide - English
Page 44
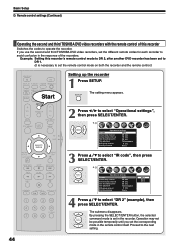
... interval Priority contents 3 sec. Photo SETUP 3 Press / to the next setting. 44 Basic Setup D: Remote control settings (Continued) Operating the second and third TOSHIBA DVD video recorders with the remote control of the recorders. SETUP The setting menu appears. 2 Press / to select "DR 2" (example), then...be possible temporarily until you use the second and third TOSHIBA DVD video recorders, set the different remote codes for each recorder to set the remote control mode on both the recorder and the remote control.) OPEN/CLOSE DISPLAY FL SELECT DIMMER PROGRESSIVE ANGLE SUBTITLE ...
... interval Priority contents 3 sec. Photo SETUP 3 Press / to the next setting. 44 Basic Setup D: Remote control settings (Continued) Operating the second and third TOSHIBA DVD video recorders with the remote control of the recorders. SETUP The setting menu appears. 2 Press / to select "DR 2" (example), then...be possible temporarily until you use the second and third TOSHIBA DVD video recorders, set the different remote codes for each recorder to set the remote control mode on both the recorder and the remote control.) OPEN/CLOSE DISPLAY FL SELECT DIMMER PROGRESSIVE ANGLE SUBTITLE ...
Installation Guide - English
Page 45
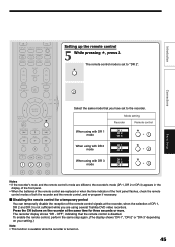
... the time indicator of the front panel flashes, check the remote control modes of DR 1, DR 2 and DR 3 is disabled. Disabling the remote control for a temporary period You can temporarily disable the reception of the remote control are using several Toshiba DVD video recorders. Mode setting Recorder Remote control When using with DR 1 mode DR 1 DR 2 DR 3 +1 When using...
... the time indicator of the front panel flashes, check the remote control modes of DR 1, DR 2 and DR 3 is disabled. Disabling the remote control for a temporary period You can temporarily disable the reception of the remote control are using several Toshiba DVD video recorders. Mode setting Recorder Remote control When using with DR 1 mode DR 1 DR 2 DR 3 +1 When using...
Owner's Manual - English
Page 2
... a DVD-RAM/RW disc (Logical format) .... 28 DVD-RAM physical format 29 Entering characters 30 Selecting a disc according to parts and controls 12 Front panel 12 Rear panel 14 Remote control 16 Display 18 Before operating this recorder 20 Key operation - Introduction Table of Contents Introduction Caution for recording on a DVD-R/RW disc...
... a DVD-RAM/RW disc (Logical format) .... 28 DVD-RAM physical format 29 Entering characters 30 Selecting a disc according to parts and controls 12 Front panel 12 Rear panel 14 Remote control 16 Display 18 Before operating this recorder 20 Key operation - Introduction Table of Contents Introduction Caution for recording on a DVD-R/RW disc...
Owner's Manual - English
Page 16
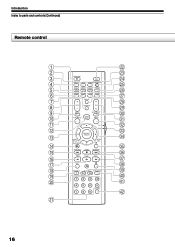
Introduction Index to parts and controls (Continued) Remote control 1 22 2 23 3 OPEN/CLOSE 24 4 DISPLAY FL SELECT DIMMER PROGRESSIVE 25 5 ANGLE SUBTITLE AUDIO/SAP FREEZE 26 REMAIN REC MODE EXTEND ZOOM 6 27 7 SETUP 28 8 VOL TIMESLIP CH 29 9 MUTE INPUT SELECT 30 EASY 10 TOP MENU NAVI MENU 31 11 TV 32 12 DVD 33 13 INSTANT REPLAY SELECT/ ENTER INSTANT SKIP 34 QUICK MENU 14 35 SKIP REV STOP SKIP FWD 15 36 REV PLAY FWD 16 37 17 REC 38 18 SEARCH ADJUST CHP DIVIDE 39 T 19 20 40 1 2 3 +10 41 4560 CLEAR 789 42 21 16
Introduction Index to parts and controls (Continued) Remote control 1 22 2 23 3 OPEN/CLOSE 24 4 DISPLAY FL SELECT DIMMER PROGRESSIVE 25 5 ANGLE SUBTITLE AUDIO/SAP FREEZE 26 REMAIN REC MODE EXTEND ZOOM 6 27 7 SETUP 28 8 VOL TIMESLIP CH 29 9 MUTE INPUT SELECT 30 EASY 10 TOP MENU NAVI MENU 31 11 TV 32 12 DVD 33 13 INSTANT REPLAY SELECT/ ENTER INSTANT SKIP 34 QUICK MENU 14 35 SKIP REV STOP SKIP FWD 15 36 REV PLAY FWD 16 37 17 REC 38 18 SEARCH ADJUST CHP DIVIDE 39 T 19 20 40 1 2 3 +10 41 4560 CLEAR 789 42 21 16
Owner's Manual - English
Page 19
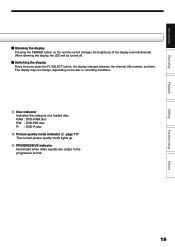
... mode lights up. !6 PROGRESSIVE indicator Illuminates when video signals are output in the progressive format. 19 Others The display may not change, depending on the remote control changes the brightness of a loaded disc.
... mode lights up. !6 PROGRESSIVE indicator Illuminates when video signals are output in the progressive format. 19 Others The display may not change, depending on the remote control changes the brightness of a loaded disc.
Owner's Manual - English
Page 20
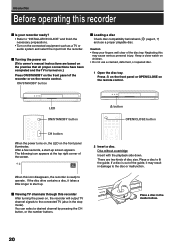
... equipment such as a TV or audio system and select the input from the recorder. Neglecting this recorder After turning the power on the remote control. Disc without a cartridge Insert with the playback side down. There are based on the premise that all proper connections have been completed and... disc is out of disc size. LED ON/STANDBY button button OPEN/CLOSE button CH button When the power turns on, the LED on the remote control. e.g. Press on the front panel or OPEN/CLOSE on the front panel illuminates. Keep a close watch on (This owner's manual instructions are...
... equipment such as a TV or audio system and select the input from the recorder. Neglecting this recorder After turning the power on the remote control. Disc without a cartridge Insert with the playback side down. There are based on the premise that all proper connections have been completed and... disc is out of disc size. LED ON/STANDBY button button OPEN/CLOSE button CH button When the power turns on, the LED on the remote control. e.g. Press on the front panel or OPEN/CLOSE on the front panel illuminates. Keep a close watch on (This owner's manual instructions are...
Owner's Manual - English
Page 21
... cartridge into the tray frame following the direction of the arrow on other than about 3 seconds. Notes • Use the button on the remote control for longer than 15 minutes have passed, press and hold the disc tray while it is an emergency measure, which is set to use of... the recorder off (Standby mode.) Caution • If the power fails or the power cord is disconnected from a wall outlet, then contact your nearest TOSHIBA dealer. Note • Turning the power off . Doing so may cause the recorder to malfunction. • If the disc tray stops while closing, ...
... cartridge into the tray frame following the direction of the arrow on other than about 3 seconds. Notes • Use the button on the remote control for longer than 15 minutes have passed, press and hold the disc tray while it is an emergency measure, which is set to use of... the recorder off (Standby mode.) Caution • If the power fails or the power cord is disconnected from a wall outlet, then contact your nearest TOSHIBA dealer. Note • Turning the power off . Doing so may cause the recorder to malfunction. • If the disc tray stops while closing, ...
Owner's Manual - English
Page 25
... recording automatically pauses and a message appears. You can use (DVD-RAM/ DVD-R/RW) Setting for many types of use the buttons on the remote control and those on remote control operation, unless otherwise noted. Hint on reading this manual The following icons show the playable discs for each function described on this instruction manual.
... recording automatically pauses and a message appears. You can use (DVD-RAM/ DVD-R/RW) Setting for many types of use the buttons on the remote control and those on remote control operation, unless otherwise noted. Hint on reading this manual The following icons show the playable discs for each function described on this instruction manual.
Owner's Manual - English
Page 30
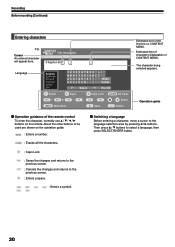
... by pressing / buttons. Then press / buttons to be used are shown on the remote. About the other buttons to select a language, then press SELECT/ENTER button. 30 Recording Before recording (Continued) Entering characters e.g. Operation guide Operation guidance of the remote control To enter the character, normally use / / / buttons on the operation guide. 10KEY...
... by pressing / buttons. Then press / buttons to be used are shown on the remote. About the other buttons to select a language, then press SELECT/ENTER button. 30 Recording Before recording (Continued) Entering characters e.g. Operation guide Operation guidance of the remote control To enter the character, normally use / / / buttons on the operation guide. 10KEY...
Owner's Manual - English
Page 116
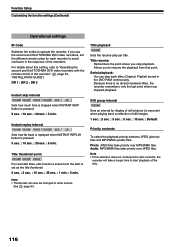
... the DVD-RAM continuously. Note • If this selection does not correspond to "Operating the second and third TOSHIBA DVD video recorders with the remote control of the recorders. For details about this recorder" ( page 44, "INSTALLATION GUIDE"). Title resume: Remembers the point... where you use the second and third TOSHIBA DVD video recorders, set as the title thumbnail. 0 sec. : 3 sec. : 10 sec. : 35 sec. : 1 min. : 5 min....
... the DVD-RAM continuously. Note • If this selection does not correspond to "Operating the second and third TOSHIBA DVD video recorders with the remote control of the recorders. For details about this recorder" ( page 44, "INSTALLATION GUIDE"). Title resume: Remembers the point... where you use the second and third TOSHIBA DVD video recorders, set as the title thumbnail. 0 sec. : 3 sec. : 10 sec. : 35 sec. : 1 min. : 5 min....


