

User Guide
Page 2
...cause harmful interference. (2) This device must accept any interference received. Operation is encouraged to try to correct the interference by TOSHIBA could void the user's authority to operate the equipment. Including interference that interference will not occur in a particular installation. ... receiver is no guarantee that may cause undesired operation. 2 Regulatory Information FCC Information FCC Information Product Name: Camcorder Model number: CAMILEO® AIR10 FCC notice "Declaration of Conformity Information" This equipment has been tested and found to comply with Part 15...
...cause harmful interference. (2) This device must accept any interference received. Operation is encouraged to try to correct the interference by TOSHIBA could void the user's authority to operate the equipment. Including interference that interference will not occur in a particular installation. ... receiver is no guarantee that may cause undesired operation. 2 Regulatory Information FCC Information FCC Information Product Name: Camcorder Model number: CAMILEO® AIR10 FCC notice "Declaration of Conformity Information" This equipment has been tested and found to comply with Part 15...

User Guide
Page 3
..., Inc. 9740 Irvine Boulevard Irvine, California 92618-1697 (949) 583-3000 Safety Instructions 1 Do not drop, puncture or disassemble the camcorder; About the battery ❖ Use only batteries recommended by TOSHIBA as required by an incorrect type. 12 Dispose of used batteries according to the potential for charging). ❖ Only use a battery...
..., Inc. 9740 Irvine Boulevard Irvine, California 92618-1697 (949) 583-3000 Safety Instructions 1 Do not drop, puncture or disassemble the camcorder; About the battery ❖ Use only batteries recommended by TOSHIBA as required by an incorrect type. 12 Dispose of used batteries according to the potential for charging). ❖ Only use a battery...

User Guide
Page 6
Contents Chapter 1: Getting to Know Your Camcorder 9 Overview 9 Check the Components 10 System Requirements 11 Front view 12 Underside view 12 Rear view 13 Chapter 2: Getting Started 14 Charging the battery 14 Charging the battery 16 Inserting and removing an SD™ Card (optional).....21 Protecting data on an SD™ Card 22 Turning the camcorder on and getting started ........22 Turning off the camcorder 22 Chapter 3: Record Mode 23 Button functions 23 LCD screen information 24 Notification icons 25 Video recording 26 6
Contents Chapter 1: Getting to Know Your Camcorder 9 Overview 9 Check the Components 10 System Requirements 11 Front view 12 Underside view 12 Rear view 13 Chapter 2: Getting Started 14 Charging the battery 14 Charging the battery 16 Inserting and removing an SD™ Card (optional).....21 Protecting data on an SD™ Card 22 Turning the camcorder on and getting started ........22 Turning off the camcorder 22 Chapter 3: Record Mode 23 Button functions 23 LCD screen information 24 Notification icons 25 Video recording 26 6
User Guide
Page 7
...Notification icons 41 Playback mode operations 42 Video Playback 43 Photo Playback 43 Delete a file in Playback mode 44 Chapter 5: Camcorder Settings 45 Setup menu 45 Menu Sound 46 TV 46 Language 47 Time settings 47 Format 48 Default setting 49 Chapter 6: CAMILEO&#...174; AIR10 Connect 50 Advanced operations on your computer (CAMILEO® AIR10 Connect 50 Installing CAMILEO® AIR10 Connect 50 Using CAMILEO® AIR10 Connect via Wi-Fi® (Infrastructure mode 52 Using CAMILEO AIR10 Connect via USB 55 Chapter 7: Wi-Fi®...
...Notification icons 41 Playback mode operations 42 Video Playback 43 Photo Playback 43 Delete a file in Playback mode 44 Chapter 5: Camcorder Settings 45 Setup menu 45 Menu Sound 46 TV 46 Language 47 Time settings 47 Format 48 Default setting 49 Chapter 6: CAMILEO&#...174; AIR10 Connect 50 Advanced operations on your computer (CAMILEO® AIR10 Connect 50 Installing CAMILEO® AIR10 Connect 50 Using CAMILEO® AIR10 Connect via Wi-Fi® (Infrastructure mode 52 Using CAMILEO AIR10 Connect via USB 55 Chapter 7: Wi-Fi®...
User Guide
Page 9
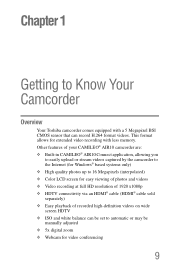
... with a 5 Megapixel BSI CMOS sensor that can be set to Know Your Camcorder Overview Your Toshiba camcorder comes equipped with less memory. This format allows for video conferencing 9 Other features of your CAMILEO® AIR10 camcorder are: ❖ Built-in CAMILEO® AIR10 Connect application, allowing you to easily upload or stream videos captured by the...
... with a 5 Megapixel BSI CMOS sensor that can be set to Know Your Camcorder Overview Your Toshiba camcorder comes equipped with less memory. This format allows for video conferencing 9 Other features of your CAMILEO® AIR10 camcorder are: ❖ Built-in CAMILEO® AIR10 Connect application, allowing you to easily upload or stream videos captured by the...
User Guide
Page 10
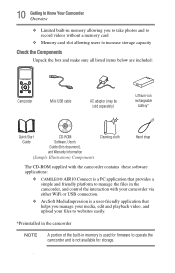
...), and Warranty information (Sample Illustration) Components Cleaning cloth Hand strap The CD-ROM supplied with the camcorder contains these software applications: ❖ CAMILEO® AIR10 Connect is a PC application that provides a simple and friendly platform to manage the files in the... camcorder, and control the interaction with your camcorder via either WiFi or USB connection. ❖ ArcSoft MediaImpression is a user-...
...), and Warranty information (Sample Illustration) Components Cleaning cloth Hand strap The CD-ROM supplied with the camcorder contains these software applications: ❖ CAMILEO® AIR10 Connect is a PC application that provides a simple and friendly platform to manage the files in the... camcorder, and control the interaction with your camcorder via either WiFi or USB connection. ❖ ArcSoft MediaImpression is a user-...

User Guide
Page 11
... recording. However, some tiny black and/or bright dots (white, red, blue or green) may appear on the LCD screen. 11 Getting to Know Your Camcorder Overview System Requirements ❖ Microsoft® Windows® XP/Windows Vista®/Windows® 7 ❖ Intel/AMD Dual-Core CPU or above ❖ 1 GB system...
... recording. However, some tiny black and/or bright dots (white, red, blue or green) may appear on the LCD screen. 11 Getting to Know Your Camcorder Overview System Requirements ❖ Microsoft® Windows® XP/Windows Vista®/Windows® 7 ❖ Intel/AMD Dual-Core CPU or above ❖ 1 GB system...
User Guide
Page 12
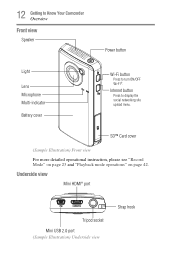
12 Getting to Know Your Camcorder Overview Front view Speaker Power button Light Lens Microphone Multi-indicator Battery cover Wi-Fi button Press to display the social networking site upload menu. SD™ Card cover (Sample Illustration) Front view For more detailed operational instruction, please see "Record Mode" on page 23 and "Playback mode operations" on page 42. Internet button Press to turn ON/OFF Wi-Fi®. Underside view Mini HDMI® port Tripod socket Mini USB 2.0 port (Sample Illustration) Underside view Strap hook
12 Getting to Know Your Camcorder Overview Front view Speaker Power button Light Lens Microphone Multi-indicator Battery cover Wi-Fi button Press to display the social networking site upload menu. SD™ Card cover (Sample Illustration) Front view For more detailed operational instruction, please see "Record Mode" on page 23 and "Playback mode operations" on page 42. Internet button Press to turn ON/OFF Wi-Fi®. Underside view Mini HDMI® port Tripod socket Mini USB 2.0 port (Sample Illustration) Underside view Strap hook

User Guide
Page 13
... volume. When playing a video, press to Playback mode. (Down) Zoom out/Delete button In Record mode: Zoom out. CAMILEO AIR10 Menu/OK button Menu ON. Rear view 13 Getting to Know Your Camcorder Overview LCD screen Photo button Press to the next video/photo. OK Left button Move between option items. In...
... volume. When playing a video, press to Playback mode. (Down) Zoom out/Delete button In Record mode: Zoom out. CAMILEO AIR10 Menu/OK button Menu ON. Rear view 13 Getting to Know Your Camcorder Overview LCD screen Photo button Press to the next video/photo. OK Left button Move between option items. In...

User Guide
Page 14
Chapter 2 Getting Started Charging the battery The battery comes pre-installed in the camcorder, and must be charged before use, however you must remove the protective film on the battery. 1 Slide the battery cover off. (Sample Illustration) Front view 2 Remove the battery. 14
Chapter 2 Getting Started Charging the battery The battery comes pre-installed in the camcorder, and must be charged before use, however you must remove the protective film on the battery. 1 Slide the battery cover off. (Sample Illustration) Front view 2 Remove the battery. 14

User Guide
Page 16
... up to 8.5 hours to charge the battery via USB and up to 4 hours via AC adaptor. (Actual time may be sold separately) to charge your camcorder before use the supplied Mini USB cable or AC adaptor (AC adaptor may vary.) (Sample Illustration) Charging the battery NOTE Be sure to remove the... Charging the battery Charging the battery You must use . A blinking light indicates active charging and a solid light indicates that charging is complete. Turn OFF the camcorder before using. In AC charging mode, the solid light will turn off automatically after a few minutes.
... up to 8.5 hours to charge the battery via USB and up to 4 hours via AC adaptor. (Actual time may be sold separately) to charge your camcorder before use the supplied Mini USB cable or AC adaptor (AC adaptor may vary.) (Sample Illustration) Charging the battery NOTE Be sure to remove the... Charging the battery Charging the battery You must use . A blinking light indicates active charging and a solid light indicates that charging is complete. Turn OFF the camcorder before using. In AC charging mode, the solid light will turn off automatically after a few minutes.
User Guide
Page 21
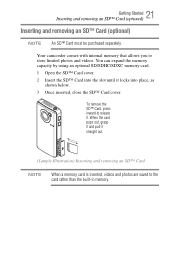
Your camcorder comes with internal memory that allows you to the card rather than the built-in memory. To remove the SD™ Card, press inward to ...
Your camcorder comes with internal memory that allows you to the card rather than the built-in memory. To remove the SD™ Card, press inward to ...
User Guide
Page 22
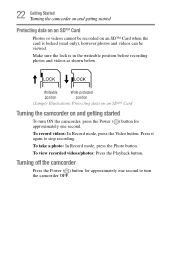
...data on an SD™ Card Photos or videos cannot be viewed. Turning off the camcorder Press the Power ( ) button for approximately one second to stop recording. Press it again to turn ON the camcorder, press the Power ( ) button for approximately one second. To record videos: In... videos/photos: Press the Playback button. Writeable position Write-protected position (Sample Illustration) Protecting data on an SD™ Card Turning the camcorder on an SD™ Card when the card is in the writeable position before recording photos and videos as shown below. To take a...
...data on an SD™ Card Photos or videos cannot be viewed. Turning off the camcorder Press the Power ( ) button for approximately one second to stop recording. Press it again to turn ON the camcorder, press the Power ( ) button for approximately one second. To record videos: In... videos/photos: Press the Playback button. Writeable position Write-protected position (Sample Illustration) Protecting data on an SD™ Card Turning the camcorder on an SD™ Card when the card is in the writeable position before recording photos and videos as shown below. To take a...

User Guide
Page 24
LCD screen information The indicators shown on the image below may appear on the LCD screen when videos and photos are recorded: 6 5 43 2 1 7 8 (Sample Image) LCD screen indicators 24 Record Mode LCD screen information Zoom in (Up) button: 1 Zoom in. 2 Move between option items. Zoom out (Down) button: 1 Zoom out. 2 Move between the option items. Left button: Move between the option items. Right button: Move between the option items. Menu/OK button: 1 Menu ON. 2 Validate the setting. Power button: Press for approximately one second to turn the camcorder ON/OFF.
LCD screen information The indicators shown on the image below may appear on the LCD screen when videos and photos are recorded: 6 5 43 2 1 7 8 (Sample Image) LCD screen indicators 24 Record Mode LCD screen information Zoom in (Up) button: 1 Zoom in. 2 Move between option items. Zoom out (Down) button: 1 Zoom out. 2 Move between the option items. Left button: Move between the option items. Right button: Move between the option items. Menu/OK button: 1 Menu ON. 2 Validate the setting. Power button: Press for approximately one second to turn the camcorder ON/OFF.

User Guide
Page 27
... Tracking Continuous Play Date Printing ISO Slideshow Scene Filter White Balance Menu Sound TV Language Time Setting Format Default Setting Available Networks (List) *Please see "Camcorder Settings" on page 45 or "Wi-Fi® Functions" on page 58 for more information about Setup.
... Tracking Continuous Play Date Printing ISO Slideshow Scene Filter White Balance Menu Sound TV Language Time Setting Format Default Setting Available Networks (List) *Please see "Camcorder Settings" on page 45 or "Wi-Fi® Functions" on page 58 for more information about Setup.

User Guide
Page 30
... ( ) icon, and then press the OK button, or press the Return/Exit button to automatically record videos when the camcorder detects movement. Screen Motion detection This option allows the camcorder to exit. The camcorder will begin recording automatically if movement is detected. It stops recording when movement stops. Screen Operation 1 In the Video... OK button, or press the Return/Exit button to help reduce blurry photos and create clearer videos. 30 Record Mode Menu options/operations Stabilization Your camcorder provides a feature that steadies the image to exit.
... ( ) icon, and then press the OK button, or press the Return/Exit button to automatically record videos when the camcorder detects movement. Screen Motion detection This option allows the camcorder to exit. The camcorder will begin recording automatically if movement is detected. It stops recording when movement stops. Screen Operation 1 In the Video... OK button, or press the Return/Exit button to help reduce blurry photos and create clearer videos. 30 Record Mode Menu options/operations Stabilization Your camcorder provides a feature that steadies the image to exit.

User Guide
Page 33
... and focuses on the screen. The self-timer light on the front of the camcorder blinks to capture portraits in Photo mode to indicate the feature is activated. Operation Screen 1 In the Photo Setting menu, select the Self-Timer icon, ... setting. 4 Select the Return/Exit ( ) icon, and then press the OK button, or press the Return/Exit button to exit. In Photo mode, when the camcorder is taken. Operation Screen 1 In the Photo Setting menu, select the Face Tracking icon, and then press the OK button to enter the settings menu...
... and focuses on the screen. The self-timer light on the front of the camcorder blinks to capture portraits in Photo mode to indicate the feature is activated. Operation Screen 1 In the Photo Setting menu, select the Self-Timer icon, ... setting. 4 Select the Return/Exit ( ) icon, and then press the OK button, or press the Return/Exit button to exit. In Photo mode, when the camcorder is taken. Operation Screen 1 In the Photo Setting menu, select the Face Tracking icon, and then press the OK button to enter the settings menu...

User Guide
Page 34
..., or for a subject moving at a high rate of speed. When this option, you can imprint the date on the corner of images. Screen ISO The camcorder automatically adjusts the ISO setting of each photo. Use the higher setting to exit. Auto Sets the ISO setting automatically according to conditions. 800 ISO...
..., or for a subject moving at a high rate of speed. When this option, you can imprint the date on the corner of images. Screen ISO The camcorder automatically adjusts the ISO setting of each photo. Use the higher setting to exit. Auto Sets the ISO setting automatically according to conditions. 800 ISO...

User Guide
Page 36
... then press the OK button to exit. Screen Scene You can select a mode according to appear more natural. Night Use in Night mode, place the camcorder on a flat, steady surface, or use a tripod. 36 Record Mode Menu options/operations Effects Operation 1 In Record mode, Press the MENU/OK button. Backlight Use...
... then press the OK button to exit. Screen Scene You can select a mode according to appear more natural. Night Use in Night mode, place the camcorder on a flat, steady surface, or use a tripod. 36 Record Mode Menu options/operations Effects Operation 1 In Record mode, Press the MENU/OK button. Backlight Use...
User Guide
Page 38
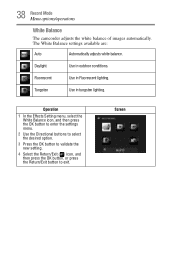
.../Exit ( ) icon, and then press the OK button, or press the Return/Exit button to exit. 38 Record Mode Menu options/operations White Balance The camcorder adjusts the white balance of images automatically.
.../Exit ( ) icon, and then press the OK button, or press the Return/Exit button to exit. 38 Record Mode Menu options/operations White Balance The camcorder adjusts the white balance of images automatically.


