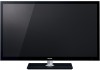
User Manual
Page 2
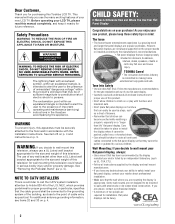
...the user to making home entertainment enjoyable and safe. The exclamation point within the product's enclosure that children can easily be heavy. 2 TOSHIBA Cares! • The consumer electronics industry is a reminder to call the CATV system installer's attention to the manufacturer's recommendations. •... NOT OPEN. If you decide to wall mount this television, always use a UL Listed wall bracket appropriate for wall mounting this manual completely, and keep these safety tips in serious bodily injury and/or property damage. See item 25 on p. 4 and instructions on...
...the user to making home entertainment enjoyable and safe. The exclamation point within the product's enclosure that children can easily be heavy. 2 TOSHIBA Cares! • The consumer electronics industry is a reminder to call the CATV system installer's attention to the manufacturer's recommendations. •... NOT OPEN. If you decide to wall mount this television, always use a UL Listed wall bracket appropriate for wall mounting this manual completely, and keep these safety tips in serious bodily injury and/or property damage. See item 25 on p. 4 and instructions on...

User Manual
Page 5
If these for installation. 2. If you need to clean the LCD screen, follow this manual to a Toshiba Authorized Service Center. 45) If you decide to wall mount your wall bracket. Leave the bottom of the unit protruding over the edge of ...result in safe operating condition. Remove the four screws. (Do not use these sounds become frequent or continuous, unplug the power cord and contact a Toshiba Authorized Service Center. 42) WARNING: RISK OF SERIOUS PERSONAL INJURY OR EQUIPMENT DAMAGE! Leave the stand protruding over the edge of the surface. When selecting...
If these for installation. 2. If you need to clean the LCD screen, follow this manual to a Toshiba Authorized Service Center. 45) If you decide to wall mount your wall bracket. Leave the bottom of the unit protruding over the edge of ...result in safe operating condition. Remove the four screws. (Do not use these sounds become frequent or continuous, unplug the power cord and contact a Toshiba Authorized Service Center. 42) WARNING: RISK OF SERIOUS PERSONAL INJURY OR EQUIPMENT DAMAGE! Leave the stand protruding over the edge of the surface. When selecting...
User Manual
Page 9
...Local Time Setting 28 Location 28 Smart Sound Equalizer 28 ANT/CABLE IN 28 Storing channels in memory (optional 28 Auto Tuning 28 Manual Tuning 29 Skipping channels 29 Skipping video inputs 29 Labeling video inputs 30 Configuring shared inputs 30 Setting the Auto Input feature 30 ... devices . . . . . 38 REGZA-LINK® input source selection 39 Adjusting the amplifier's audio 39 Other REGZA-LINK® functions 39 Connecting a Toshiba PC compatible to REGZA-LINK 40 Using the HDMI® settings feature 40 Setting the HDMI® audio mode 41 Viewing the HDMI® signal...
...Local Time Setting 28 Location 28 Smart Sound Equalizer 28 ANT/CABLE IN 28 Storing channels in memory (optional 28 Auto Tuning 28 Manual Tuning 29 Skipping channels 29 Skipping video inputs 29 Labeling video inputs 30 Configuring shared inputs 30 Setting the Auto Input feature 30 ... devices . . . . . 38 REGZA-LINK® input source selection 39 Adjusting the amplifier's audio 39 Other REGZA-LINK® functions 39 Connecting a Toshiba PC compatible to REGZA-LINK 40 Using the HDMI® settings feature 40 Setting the HDMI® audio mode 41 Viewing the HDMI® signal...
User Manual
Page 14
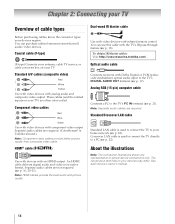
...with video devices with an HDMI output. Analog RGB (15-pin) computer cable Connects a PC to your TV. See each device's owner's manual. 14 Standard/Crossover LAN cable Standard LAN cable is used to connect the TV directly to the TV's DIGITAL AUDIO OUT terminal (- Crossover LAN... cable is Toshiba's brand.) Note: Component video cables provide better picture quality than composite video cable. HDMI® cable ( ) Use with devices with infrared remote...
...with video devices with an HDMI output. Analog RGB (15-pin) computer cable Connects a PC to your TV. See each device's owner's manual. 14 Standard/Crossover LAN cable Standard LAN cable is used to connect the TV directly to the TV's DIGITAL AUDIO OUT terminal (- Crossover LAN... cable is Toshiba's brand.) Note: Component video cables provide better picture quality than composite video cable. HDMI® cable ( ) Use with devices with infrared remote...
User Manual
Page 17
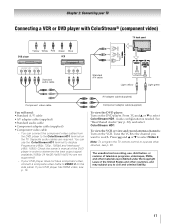
..., see p. 85. Press + and B or b to select ColorStream HD1. The unauthorized recording, use the ColorStream HD1 terminal to VIDEO 2 on the TV. Check the owner's manual of the United States and other devices, see p. 16. Note: To program the TV remote control to operate other countries, and may subject you want...
..., see p. 85. Press + and B or b to select ColorStream HD1. The unauthorized recording, use the ColorStream HD1 terminal to VIDEO 2 on the TV. Check the owner's manual of the United States and other devices, see p. 16. Note: To program the TV remote control to operate other countries, and may subject you want...
User Manual
Page 20
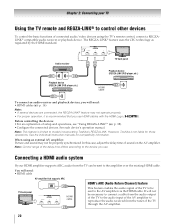
...ARC (Audio Return Channel) feature TV back panel HDMI cable This feature enables the audio signal of the delay time differs according to models incorporating Toshiba's REGZA-LINK. Before controlling the devices: •For an explanation of sound on the AV amplifier. p. 38). •Configure the connected devices...Note: Control range of the TV to be sent to the AV amplifier via the HDMI cable. However, Toshiba is limited to the device you use . See the individual instruction manuals for those operations. It will need : •HDMI cables (- The REGZA-LINK® feature uses the ...
...ARC (Audio Return Channel) feature TV back panel HDMI cable This feature enables the audio signal of the delay time differs according to models incorporating Toshiba's REGZA-LINK. Before controlling the devices: •For an explanation of sound on the AV amplifier. p. 38). •Configure the connected devices...Note: Control range of the TV to be sent to the AV amplifier via the HDMI cable. However, Toshiba is limited to the device you use . See the individual instruction manuals for those operations. It will need : •HDMI cables (- The REGZA-LINK® feature uses the ...

User Manual
Page 27
... Control 18 Energy Saving Settings 43 Blue Screen 43 Icon SETUP Item HDMI Information Display POWER LED Dimmer Menu Language ANT/CABLE In Auto Tuning Manual Tuning TV Settings Quick Setup Location Software Upgrade Software Licences System Information Reset TV Page 41 43 28 28 28 29 28, 29, 31, 34...
... Control 18 Energy Saving Settings 43 Blue Screen 43 Icon SETUP Item HDMI Information Display POWER LED Dimmer Menu Language ANT/CABLE In Auto Tuning Manual Tuning TV Settings Quick Setup Location Software Upgrade Software Licences System Information Reset TV Page 41 43 28 28 28 29 28, 29, 31, 34...

User Manual
Page 28
... . Press O. OK 2 Press B or b to select a desired menu. To cancel the selection or adjustment, select Cancel on the screen. Press O. p. 25). Press . Location You can manually store or skip individual channels from three different languages (English, Français and Español) for menus and messages 1 Y > SETUP > Menu Language. 2 Press...
... . Press O. OK 2 Press B or b to select a desired menu. To cancel the selection or adjustment, select Cancel on the screen. Press O. p. 25). Press . Location You can manually store or skip individual channels from three different languages (English, Français and Español) for menus and messages 1 Y > SETUP > Menu Language. 2 Press...

User Manual
Page 29
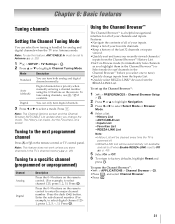
...stores all active channels in memory, use buttons 0-9 and = on Skip. Channel Options Ch. OK The box is known. 1 Y > SETUP > Manual Tuning > . OK Note: You cannot tune to repeat the setup unless your TV Option Cable Antenna Description Note: If you select Cable, auto tuning...2 Press B or b to enter the channel number (for example, 56) and press . Press . OK A confirmation screen appears. 2 Press OK to start Manual Tuning. OK 3 Press B or b to select Input Labeling. Chapter 5: Setting up your cable TV service's lineup changes significantly. Skipping video inputs You can set...
...stores all active channels in memory, use buttons 0-9 and = on Skip. Channel Options Ch. OK The box is known. 1 Y > SETUP > Manual Tuning > . OK Note: You cannot tune to repeat the setup unless your TV Option Cable Antenna Description Note: If you select Cable, auto tuning...2 Press B or b to enter the channel number (for example, 56) and press . Press . OK A confirmation screen appears. 2 Press OK to start Manual Tuning. OK 3 Press B or b to select Input Labeling. Chapter 5: Setting up your cable TV service's lineup changes significantly. Skipping video inputs You can set...
User Manual
Page 31
... mode. p. 28). 1 Y > SETUP > TV Settings > . Mode Standard Auto (default) Digital Description You can tune both analog and digital channels normally. Digital channels have priority when manually entering a channel number using the 0-9 buttons on the remote control or TV control panel. Tuning to select channel 125, press 1, 2, 5.) Press . Enter the sub-channel...
... mode. p. 28). 1 Y > SETUP > TV Settings > . Mode Standard Auto (default) Digital Description You can tune both analog and digital channels normally. Digital channels have priority when manually entering a channel number using the 0-9 buttons on the remote control or TV control panel. Tuning to select channel 125, press 1, 2, 5.) Press . Enter the sub-channel...
User Manual
Page 56
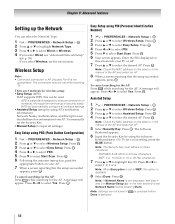
...characters 7 Press B or b to select 1, 2, 3 or 4. Note: Settings are decided based on this option is set the Security Key. •Manual Setup (to select Start Scan. Press . Press . OK Note: Check the MAC address on your AP. 7 When a screen reporting that the setup ... Name, Authentication, and Encryption are not saved if Done is pressed before pressing Done. Press C or c to select the desired AP. p. 58). You manually set to select Wireless Setup. Press . Press . OK 4 Press C or c to select PBC. 5 Press b to input all wireless settings. •...
...characters 7 Press B or b to select 1, 2, 3 or 4. Note: Settings are decided based on this option is set the Security Key. •Manual Setup (to select Start Scan. Press . Press . OK Note: Check the MAC address on your AP. 7 When a screen reporting that the setup ... Name, Authentication, and Encryption are not saved if Done is pressed before pressing Done. Press C or c to select the desired AP. p. 58). You manually set to select Wireless Setup. Press . Press . OK 4 Press C or c to select PBC. 5 Press b to input all wireless settings. •...

User Manual
Page 57
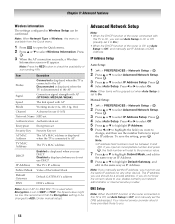
...to On, these features are attempted, a warning message will be displayed, and no connection attempt will appear. Press . Chapter 8: Advanced features Manual Setup 1 Y > PREFERENCES > Network Setup > . Note: • Certain encryption types are only compatible with specific authentication types. -When Authentication... or WPA2-PSK. 7 Press B or b to select None, WEP, TKIP or AES. Press . OK 4 Press B or b to select Manual Setup. Note: This item is grayed out when Encryption is selected. Press . p. 60). OK Note: Settings are compatible. -When Authentication is Shared...
...to On, these features are attempted, a warning message will be displayed, and no connection attempt will appear. Press . Chapter 8: Advanced features Manual Setup 1 Y > PREFERENCES > Network Setup > . Note: • Certain encryption types are only compatible with specific authentication types. -When Authentication... or WPA2-PSK. 7 Press B or b to select None, WEP, TKIP or AES. Press . OK 4 Press B or b to select Manual Setup. Note: This item is grayed out when Encryption is selected. Press . p. 60). OK Note: Settings are compatible. -When Authentication is Shared...
User Manual
Page 58
... B or b to highlight Default Gateway, and edit in the same way as IP Address. Press . Press C or c to select Advanced Network Setup. Manual Setup: 1 Y > PREFERENCES > Network Setup > . Note: When Network Type is Wireless, this TV is On, you do not know the correct values...will appear. IP Address Setup Auto Setup: 1 Y > PREFERENCES > Network Setup > . Note: Other items will be changed to AES (Under manual setup). Press . Chapter 8: Advanced features Wireless Information The settings configured in Wireless Setup can set Auto Setup to On or Off. (Usually set it...
... B or b to highlight Default Gateway, and edit in the same way as IP Address. Press . Press C or c to select Advanced Network Setup. Manual Setup: 1 Y > PREFERENCES > Network Setup > . Note: When Network Type is Wireless, this TV is On, you do not know the correct values...will appear. IP Address Setup Auto Setup: 1 Y > PREFERENCES > Network Setup > . Note: Other items will be changed to AES (Under manual setup). Press . Chapter 8: Advanced features Wireless Information The settings configured in Wireless Setup can set Auto Setup to On or Off. (Usually set it...

User Manual
Page 59
... be grayed out when Auto Setup is installed. 1 Y > PREFERENCES > Network Setup > . OK 3 Press B or b to select MAC Address. OK 3 Press B or b to select DNS Setup. Manual setup: 1 Y > PREFERENCES > Network Setup > . OK Note: • DNS address field numbers must be available. Chapter 8: Advanced features Auto setup: 1 Y > PREFERENCES > Network Setup > . OK 3 Press B or...
... be grayed out when Auto Setup is installed. 1 Y > PREFERENCES > Network Setup > . OK 3 Press B or b to select MAC Address. OK 3 Press B or b to select DNS Setup. Manual setup: 1 Y > PREFERENCES > Network Setup > . OK Note: • DNS address field numbers must be available. Chapter 8: Advanced features Auto setup: 1 Y > PREFERENCES > Network Setup > . OK 3 Press B or...
User Manual
Page 67
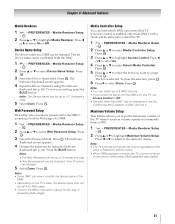
... b to control the TV. 1 Y > PREFERENCES > Media Renderer Setup > . Press . Press C or c to the desired volume. The set from Web page. • Confirm the DMCs instruction manual for the way of a DMR. 1 Y > PREFERENCES > Media Renderer Setup > . OK 3 Select the Device Name field. Press OK . Press . The Software Keyboard screen appears. 4 Change the...
... b to control the TV. 1 Y > PREFERENCES > Media Renderer Setup > . Press . Press C or c to the desired volume. The set from Web page. • Confirm the DMCs instruction manual for the way of a DMR. 1 Y > PREFERENCES > Media Renderer Setup > . OK 3 Select the Device Name field. Press OK . Press . The Software Keyboard screen appears. 4 Change the...
User Manual
Page 68
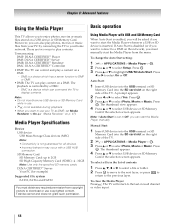
... return to the previous layer. SD Memory Card: SD Memory Card: up to select USB device or SD Memory Card if the selection screen appears. Toshiba cannot and does not grant such permission. Auto Start: 1 Insert USB device into the USB terminal or SD Memory Card into the SD card slot... with USB and SD Memory Card When Auto Start is not guaranteed for example) Supported file system FAT12, FAT16 and FAT32 You must manually start the Media Player manually. If Auto Start is disabled (or if you can start the Media Player from copyright owners to download or use . • Y is ...
... return to the previous layer. SD Memory Card: SD Memory Card: up to select USB device or SD Memory Card if the selection screen appears. Toshiba cannot and does not grant such permission. Auto Start: 1 Insert USB device into the USB terminal or SD Memory Card into the SD card slot... with USB and SD Memory Card When Auto Start is not guaranteed for example) Supported file system FAT12, FAT16 and FAT32 You must manually start the Media Player manually. If Auto Start is disabled (or if you can start the Media Player from copyright owners to download or use . • Y is ...
User Manual
Page 76
...). • Your TV's remote control may be on your local broadcast, cable, or satellite provider. Set the closed caption feature is connected to the owner's manual for a possible cause of the problem and some solutions you press + on another channel. • Check the Input mode when you connect a PC using a ColorStream...
...). • Your TV's remote control may be on your local broadcast, cable, or satellite provider. Set the closed caption feature is connected to the owner's manual for a possible cause of the problem and some solutions you press + on another channel. • Check the Input mode when you connect a PC using a ColorStream...
User Manual
Page 77
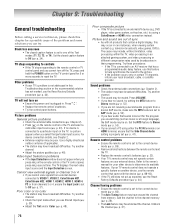
... or no captions appear. • If text is not available, a black rectangle may not operate properly. • Read the instruction manual furnished with the latest HDMI TV products due to the television and power it ON. or c) the signal reception is weak; The old .... p. 40). p. 22). • Confirm your modem's operation. • Ensure your router's documentation for Toshiba REGZA- No network connection • If using a wireless home-network connection: - Network Setup fails (Manual) • Ensure the TV IP address is not the same as the networked PC. Example of proper setup...
... or no captions appear. • If text is not available, a black rectangle may not operate properly. • Read the instruction manual furnished with the latest HDMI TV products due to the television and power it ON. or c) the signal reception is weak; The old .... p. 40). p. 22). • Confirm your modem's operation. • Ensure your router's documentation for Toshiba REGZA- No network connection • If using a wireless home-network connection: - Network Setup fails (Manual) • Ensure the TV IP address is not the same as the networked PC. Example of proper setup...

User Manual
Page 78
...the brightness of the TV indicate the TV's status, as described below. This TV's MAC Address can be able to the router/AP instruction manual. After trying the solutions, if the problem persists: •In the U.S., visit TACP Consumer Solutions on the front of the POWER LED, see... in the Network Setup portion of DMS or set . • Green blinks (if applicable) Abnormal operation of router/AP may take time to www.toshiba.ca; click "Home Entertainment," and then click "Support." 78 Chapter 9: Troubleshooting • If the router/AP does not support PBC or WPS, ...
...the brightness of the TV indicate the TV's status, as described below. This TV's MAC Address can be able to the router/AP instruction manual. After trying the solutions, if the problem persists: •In the U.S., visit TACP Consumer Solutions on the front of the POWER LED, see... in the Network Setup portion of DMS or set . • Green blinks (if applicable) Abnormal operation of router/AP may take time to www.toshiba.ca; click "Home Entertainment," and then click "Support." 78 Chapter 9: Troubleshooting • If the router/AP does not support PBC or WPS, ...
User Manual
Page 79
... This model may be compatible with two size "AA" carbon zinc batteries • Securement Clip Use this book) • Pedestal assembly installation manual • Stop/Quick set • Four Spacers Use these to clean the cabinet and control panel) • Tool set up guide • ...50-17/32 inches (1,283 mm) Height: 33-9/16 inches (852 mm) Depth: 14-1/32 inches (356 mm) Mass (weight) 46VX700U: 54.1 lbs (24.5 kg) 55VX700U: 73.9 lbs (33.5 kg) Operating conditions Temperature: 32ºF - 95ºF (0ºC - 35ºC) Humidity: 20 - 80% (no moisture condensation) Wireless ...
... This model may be compatible with two size "AA" carbon zinc batteries • Securement Clip Use this book) • Pedestal assembly installation manual • Stop/Quick set • Four Spacers Use these to clean the cabinet and control panel) • Tool set up guide • ...50-17/32 inches (1,283 mm) Height: 33-9/16 inches (852 mm) Depth: 14-1/32 inches (356 mm) Mass (weight) 46VX700U: 54.1 lbs (24.5 kg) 55VX700U: 73.9 lbs (33.5 kg) Operating conditions Temperature: 32ºF - 95ºF (0ºC - 35ºC) Humidity: 20 - 80% (no moisture condensation) Wireless ...


