

Owners Manual
Page 2
...; Follow all enclosed instructions for the size and weight of important operating and maintenance (servicing) instructions in accordance with the installation instructions. As you decide to persons. However, flat panel displays are not designed to be mounted to walls with furniture and television sets. • Don't place flat panel displays on the proper stands or installed according to the manufacturer's recommendations. • Flat panel displays that they cannot be connected to the grounding system...
...; Follow all enclosed instructions for the size and weight of important operating and maintenance (servicing) instructions in accordance with the installation instructions. As you decide to persons. However, flat panel displays are not designed to be mounted to walls with furniture and television sets. • Don't place flat panel displays on the proper stands or installed according to the manufacturer's recommendations. • Flat panel displays that they cannot be connected to the grounding system...
Owners Manual
Page 4
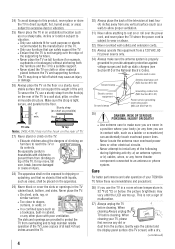
... attempt to install any home theater component connected to an antenna or phone system. Care For better performance and safer operation of your TOSHIBA TV, follow these recommendations and precautions: 36) If you are in contact with liquids, such as a ladder or screwdriver) can accidentally touch overhead power lines. Gently wipe the cabinet and the display panel surface (the...
... attempt to install any home theater component connected to an antenna or phone system. Care For better performance and safer operation of your TOSHIBA TV, follow these recommendations and precautions: 36) If you are in contact with liquids, such as a ladder or screwdriver) can accidentally touch overhead power lines. Gently wipe the cabinet and the display panel surface (the...
Owners Manual
Page 5
... 26, page 4). Harsh rubbing or use a UL listed wall bracket appropriate for the size and weight of the LCD Panel face down on /off . Never spill liquids or push objects of any cables and/or other component connectors from power and a minute amount of current is not completely disconnected from the rear of the TV. 3) Always use the screws supplied or recommended by ultraviolet radiation...
... 26, page 4). Harsh rubbing or use a UL listed wall bracket appropriate for the size and weight of the LCD Panel face down on /off . Never spill liquids or push objects of any cables and/or other component connectors from power and a minute amount of current is not completely disconnected from the rear of the TV. 3) Always use the screws supplied or recommended by ultraviolet radiation...
Owners Manual
Page 10
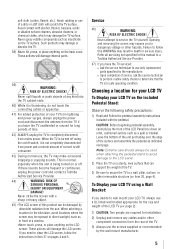
... video input to view 35 Using closed captions 36 Analog CC mode 36 Digital CC settings 36 Setting the PIN code 37 10 Entering a new PIN code 37 Changing or deleting your PIN code 37 Forgotten PIN code 37 Using parental controls 37 Blocking TV programs and movies by rating (V-Chip)........37 Downloading an additional rating system 38 Displaying ratings 39 Unlocking programs 39 Locking specific channels 39 Locking video input 39 Setting a time limit for games 40 Locking the control panel 40 Using HDMI® CEC Control 40 Controlling HDMI...
... video input to view 35 Using closed captions 36 Analog CC mode 36 Digital CC settings 36 Setting the PIN code 37 10 Entering a new PIN code 37 Changing or deleting your PIN code 37 Forgotten PIN code 37 Using parental controls 37 Blocking TV programs and movies by rating (V-Chip)........37 Downloading an additional rating system 38 Displaying ratings 39 Unlocking programs 39 Locking specific channels 39 Locking video input 39 Setting a time limit for games 40 Locking the control panel 40 Using HDMI® CEC Control 40 Controlling HDMI...
Owners Manual
Page 12
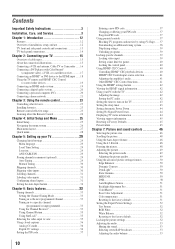
... control of external devices from the TV remote via an HDMI cable. HDMI INSTAPORT™ technology reduces lag time when switching HDMI sources. Four HDMI® digital, High-Definition Multimedia Interfaces 1080p input support (32SL415U). • HDMI capabilities ARC (Audio Return Channel) enables the audio signal of the TV to be sent to an AV amplifier via HDMI connection ( page 40) • ColorStream® HD high-resolution component video inputs. • Digital Audio Out optical audio connection with Dolby® Digital optical output format...
... control of external devices from the TV remote via an HDMI cable. HDMI INSTAPORT™ technology reduces lag time when switching HDMI sources. Four HDMI® digital, High-Definition Multimedia Interfaces 1080p input support (32SL415U). • HDMI capabilities ARC (Audio Return Channel) enables the audio signal of the TV to be sent to an AV amplifier via HDMI connection ( page 40) • ColorStream® HD high-resolution component video inputs. • Digital Audio Out optical audio connection with Dolby® Digital optical output format...
Owners Manual
Page 18
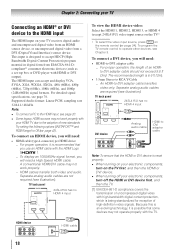
... a DVI (Digital Visual Interface) source device. compliant[1] consumer electronic devices (such as a set-top box or DVD player with the TV. A conventional HDMI/DVI cable may not work properly. −− HDMI cables transfer both video and audio. To program the TV remote control to operate other devices, see page 76. Supported Audio format: Linear PCM, sampling rate 32/44.1/ 48 kHz Note: •• To connect a PC to the HDMI input, see...
... a DVI (Digital Visual Interface) source device. compliant[1] consumer electronic devices (such as a set-top box or DVD player with the TV. A conventional HDMI/DVI cable may not work properly. −− HDMI cables transfer both video and audio. To program the TV remote control to operate other devices, see page 76. Supported Audio format: Linear PCM, sampling rate 32/44.1/ 48 kHz Note: •• To connect a PC to the HDMI input, see...
Owners Manual
Page 19
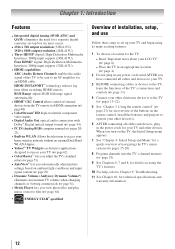
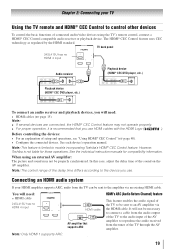
... the audio output of the TV to the audio input of the TV through the AV amplifier. 19 HDMI's ARC (Audio Return Channel) feature This feature enables the audio signal of the TV to be necessary to connect a cable from the tuner of the AV amplifier to an AV amplifier via an existing HDMI cable. It will need : • HDMI cable 24SL415U has no HDMI 4 input 4 1 3 2 Audio receiver Playback device (HDMI® CEC DVD player...
... the audio output of the TV to the audio input of the TV through the AV amplifier. 19 HDMI's ARC (Audio Return Channel) feature This feature enables the audio signal of the TV to be necessary to connect a cable from the tuner of the AV amplifier to an AV amplifier via an existing HDMI cable. It will need : • HDMI cable 24SL415U has no HDMI 4 input 4 1 3 2 Audio receiver Playback device (HDMI® CEC DVD player...
Owners Manual
Page 20
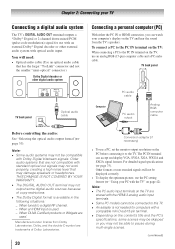
... TV's speakers. Chapter 2: Connecting your TV Connecting a digital audio system The TV's DIGITAL AUDIO OUT terminal outputs a *Dolby® Digital or 2-channel down-mixed PCM (pulse-code modulation) signal for computers with standard optical out signals may not work properly, creating a high noise level that may damage speakers or headphones. You will not be connected to the PC IN terminal on the TV, use a PC, set the monitor output resolution on the...
... TV's speakers. Chapter 2: Connecting your TV Connecting a digital audio system The TV's DIGITAL AUDIO OUT terminal outputs a *Dolby® Digital or 2-channel down-mixed PCM (pulse-code modulation) signal for computers with standard optical out signals may not work properly, creating a high noise level that may damage speakers or headphones. You will not be connected to the PC IN terminal on the TV, use a PC, set the monitor output resolution on the...
Owners Manual
Page 29
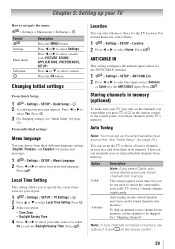
...; > Settings > SETUP > Location. 2無 Press t or u to select Settings. Press t or u to select a menu icon (PICTURE, SOUND, APPLICATIONS, PREFERENCES, SETUP) Press p or q to select Yes. Press . 3無 For changing settings, see "Initial Setup" ( page 25). Local Time Setting This setting allows you select Cable, auto tuning deletes previously stored channels from memory, set the channel to activate Daylight Saving Time. For normal home use buttons 0-9 and on the remote control or the control panel, store...
...; > Settings > SETUP > Location. 2無 Press t or u to select Settings. Press t or u to select a menu icon (PICTURE, SOUND, APPLICATIONS, PREFERENCES, SETUP) Press p or q to select Yes. Press . 3無 For changing settings, see "Initial Setup" ( page 25). Local Time Setting This setting allows you select Cable, auto tuning deletes previously stored channels from memory, set the channel to activate Daylight Saving Time. For normal home use buttons 0-9 and on the remote control or the control panel, store...
Owners Manual
Page 33
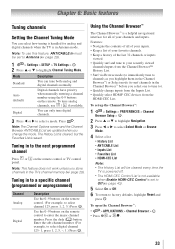
...; is in Antenna mode. Digital You can tune both analog and digital channels normally. Note: The Channel Options screen and the Channel Browser ANT/CABLE List are updated when you highlight them in the Channel Browser™) or Select mode (to surf channels in to a specific channel (programmed or unprogrammed) Channel Analog Digital Description Use the 0-9 buttons on the remote control or TV control panel. Use the 0-9 buttons on the remote. To set up the Channel Browser™: 1無 > Settings > PREFERENCES > Channel Browser Setup > . 2無...
...; is in Antenna mode. Digital You can tune both analog and digital channels normally. Note: The Channel Options screen and the Channel Browser ANT/CABLE List are updated when you highlight them in the Channel Browser™) or Select mode (to surf channels in to a specific channel (programmed or unprogrammed) Channel Analog Digital Description Use the 0-9 buttons on the remote control or TV control panel. Use the 0-9 buttons on the remote. To set up the Channel Browser™: 1無 > Settings > PREFERENCES > Channel Browser Setup > . 2無...

Owners Manual
Page 37
... of the screen. Entering a new PIN code 1無 > Settings > PREFERENCES > PIN Setting > . 2無 Use the number buttons to "0000". Note: The PIN code cannot be not available if no PIN has been set to enter a 4-digit number. Forgotten PIN code 1無 > Settings > PREFERENCES > PIN Setting > . 2無 Press 4 times within 5 seconds. Note: The V-Chip feature in this TV supports the U.S. As you select. Note: The Parental Control and Locks menu is...
... of the screen. Entering a new PIN code 1無 > Settings > PREFERENCES > PIN Setting > . 2無 Use the number buttons to "0000". Note: The PIN code cannot be not available if no PIN has been set to enter a 4-digit number. Forgotten PIN code 1無 > Settings > PREFERENCES > PIN Setting > . 2無 Press 4 times within 5 seconds. Note: The V-Chip feature in this TV supports the U.S. As you select. Note: The Parental Control and Locks menu is...
Owners Manual
Page 39
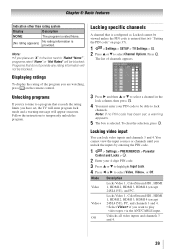
...; "Setting the PIN code" on the remote control. Follow the instructions to temporarily unlock the program. 3無 Press u and then p or q to select a channel in the box next to lock channels. Locking specific channels A channel that exceeds the rating limits you want to select Video, Video+, or Off. You cannot view the input sources or channels until you place an "X" in the lock column, then press . 4無 You must enter your 4-digit PIN code...
...; "Setting the PIN code" on the remote control. Follow the instructions to temporarily unlock the program. 3無 Press u and then p or q to select a channel in the box next to lock channels. Locking specific channels A channel that exceeds the rating limits you want to select Video, Video+, or Off. You cannot view the input sources or channels until you place an "X" in the lock column, then press . 4無 You must enter your 4-digit PIN code...
Owners Manual
Page 43
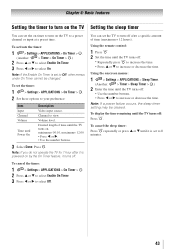
...; Use the number buttons. • Press t or u to increase or decrease the time. Note: If the Enable On Timer is powered on by the On Timer feature, it turns off. Note: If you do not operate the TV for 1 hour after a specific amount of time (maximum = 12 hours). Using the onscreen menus: 1無 > Settings > APPLICATIONS > Sleep Timer. (Another: > Timer > Sleep Timer > .) 2無 Enter the time until Power On Description Video input source. To...
...; Use the number buttons. • Press t or u to increase or decrease the time. Note: If the Enable On Timer is powered on by the On Timer feature, it turns off. Note: If you do not operate the TV for 1 hour after a specific amount of time (maximum = 12 hours). Using the onscreen menus: 1無 > Settings > APPLICATIONS > Sleep Timer. (Another: > Timer > Sleep Timer > .) 2無 Enter the time until Power On Description Video input source. To...
Owners Manual
Page 53
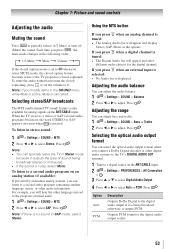
... TV's DIGITAL AUDIO OUT terminal. 1無 Tune to a digital source on the ANT/CABLE input. 2無 > Settings > PREFERENCES > AV Connection > . 3無 Press p or q to select Digital Audio Output. 4無 Press t or u to a second audio program containing another language, music, or other language instead of sound being broadcast; Selecting the optical audio output format You can listen to select Auto or PCM. To mute the audio without activating the closed caption mode is noisy...
... TV's DIGITAL AUDIO OUT terminal. 1無 Tune to a digital source on the ANT/CABLE input. 2無 > Settings > PREFERENCES > AV Connection > . 3無 Press p or q to select Digital Audio Output. 4無 Press t or u to a second audio program containing another language, music, or other language instead of sound being broadcast; Selecting the optical audio output format You can listen to select Auto or PCM. To mute the audio without activating the closed caption mode is noisy...
Owners Manual
Page 60
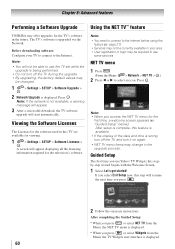
... viewing. 1無 > Settings > SETUP > Software Licenses > . Chapter 8: Advanced features Performing a Software Upgrade TOSHIBA may offer upgrades for the TV's software in the upgrade process. Note: If the network is displayed. 60 Using the NET TV™ feature Note: • You need to connect to the Internet. If you press . 2無 Follow the onscreen instructions. Viewing the Software Licenses The Licenses for the software used in your TV to connect to the Internet before using...
... viewing. 1無 > Settings > SETUP > Software Licenses > . Chapter 8: Advanced features Performing a Software Upgrade TOSHIBA may offer upgrades for the TV's software in the upgrade process. Note: If the network is displayed. 60 Using the NET TV™ feature Note: • You need to connect to the Internet. If you press . 2無 Follow the onscreen instructions. Viewing the Software Licenses The Licenses for the software used in your TV to connect to the Internet before using...
Owners Manual
Page 70
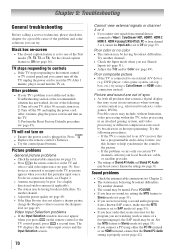
... a digital display, this Troubleshooting section or the recommended solution has not worked, do one of the following procedures: -- Set the MTS feature to Stereo mode ( page 53). •• If you cannot turn it in their programming. Picture problems General picture problems •• Check the antenna/cable connections ( page 15). •• Press n the remote control or on . 2) Turn off the TV and unplug the power cord. DVD player, video game...
... a digital display, this Troubleshooting section or the recommended solution has not worked, do one of the following procedures: -- Set the MTS feature to Stereo mode ( page 53). •• If you cannot turn it in their programming. Picture problems General picture problems •• Check the antenna/cable connections ( page 15). •• Press n the remote control or on . 2) Turn off the TV and unplug the power cord. DVD player, video game...
Owners Manual
Page 71
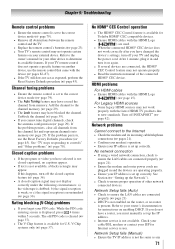
... Reset Factory Defaults procedure ( page 45). No network connection •• If using a wired network connection, check to the Internet •• Check the modem and its available features. If you have blocked the channel. If this happens, turn it in and the devices are plugged in and turn off the closed-caption feature ( page 36). •• A closed -captioned, no router is set up correctly. HDMI problems...
... Reset Factory Defaults procedure ( page 45). No network connection •• If using a wired network connection, check to the Internet •• Check the modem and its available features. If you have blocked the channel. If this happens, turn it in and the devices are plugged in and turn off the closed-caption feature ( page 36). •• A closed -captioned, no router is set up correctly. HDMI problems...
Owners Manual
Page 72
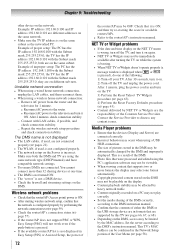
... connected. Contact the Service Provider to the DMS's instruction manual. This TV's MAC Address can be OFF. Chapter 9: Troubleshooting other device on the TV. 3) Perform the Reset Yahoo! Example of the following: 1) Turn off your TV. After 1 minute, plug the power cord in and turn on the network. Connect with LAN cables, if possible, and check connection stability. -- You cannot connect more formats the display may select one format...
... connected. Contact the Service Provider to the DMS's instruction manual. This TV's MAC Address can be OFF. Chapter 9: Troubleshooting other device on the TV. 3) Perform the Reset Yahoo! Example of the following: 1) Turn off your TV. After 1 minute, plug the power cord in and turn on the network. Connect with LAN cables, if possible, and check connection stability. -- You cannot connect more formats the display may select one format...
Owners Manual
Page 88
... service purposes. LCD TELEVISIONS PURCHASED ANYWHERE OUTSIDE OF THE U.S.A. This includes wall mounts, custom cabinets and other proof of purchase including the serial number for in warranty service. Chapter 10: Appendix Limited United States Warranty for LCD Televisions Toshiba America Information Systems, Inc. ("TAIS") makes the following all of the operating instructions in the Owner's manual, review the section entitled "Concierge" located on our Customer Support Web site at http://support.toshiba...
... service purposes. LCD TELEVISIONS PURCHASED ANYWHERE OUTSIDE OF THE U.S.A. This includes wall mounts, custom cabinets and other proof of purchase including the serial number for in warranty service. Chapter 10: Appendix Limited United States Warranty for LCD Televisions Toshiba America Information Systems, Inc. ("TAIS") makes the following all of the operating instructions in the Owner's manual, review the section entitled "Concierge" located on our Customer Support Web site at http://support.toshiba...
Owners Manual
Page 89
... diminish your LCD Television online at http://support.toshiba.ca/warranty/. Modifications to contact you discover or should have discovered, the defect. Service of antenna systems are your LCD Television will enable TCL to the Television not approved in materials or workmanship as wear and tear, scratches and dents; Rental Units The warranty for set installation, setup, adjustment of customer controls, and installation or repair of a Television on Toshiba-branded accessory...
... diminish your LCD Television online at http://support.toshiba.ca/warranty/. Modifications to contact you discover or should have discovered, the defect. Service of antenna systems are your LCD Television will enable TCL to the Television not approved in materials or workmanship as wear and tear, scratches and dents; Rental Units The warranty for set installation, setup, adjustment of customer controls, and installation or repair of a Television on Toshiba-branded accessory...


