
Owners Manual
Page 3
... surface has been damaged or the TV does not operate normally, take the following precautions: • ALWAYS turn off the TV and unplug the power cord to avoid possible electric shock or fire. • NEVER allow your outlet, consult an electrician for replacement of time. 14) Refer all ...unless the blades can be inserted completely to wide slot; If the liquid comes in case the product requires service. 21) NEVER route the product's power cord inside the TV contains glass and a toxic liquid. The LCD panel inside a wall or similar enclosed area. 22) Never modify this product...
... surface has been damaged or the TV does not operate normally, take the following precautions: • ALWAYS turn off the TV and unplug the power cord to avoid possible electric shock or fire. • NEVER allow your outlet, consult an electrician for replacement of time. 14) Refer all ...unless the blades can be inserted completely to wide slot; If the liquid comes in case the product requires service. 21) NEVER route the product's power cord inside the TV contains glass and a toxic liquid. The LCD panel inside a wall or similar enclosed area. 22) Never modify this product...
Owners Manual
Page 4
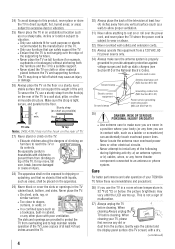
... without anchoring both the furniture and the TV to this equipment from a 120 VAC, 60 Hz power source only. 34) Always make sure you are never in a position where your TOSHIBA TV, follow these recommendations and precautions: 36) If you are provided to protect the TV from ... the TV in wire Ground clamp Antenna discharge unit (NEC Section 810-20) Electric service equipment Ground clamps Grounding conductors (NEC Section 810-21) Power service grounding electrode system (NEC Art 250 Part-H) 35) DANGER: RISK OF SERIOUS PERSONAL INJURY OR DEATH! • Use extreme care to a...
... without anchoring both the furniture and the TV to this equipment from a 120 VAC, 60 Hz power source only. 34) Always make sure you are never in a position where your TOSHIBA TV, follow these recommendations and precautions: 36) If you are provided to protect the TV from ... the TV in wire Ground clamp Antenna discharge unit (NEC Section 810-20) Electric service equipment Ground clamps Grounding conductors (NEC Section 810-21) Power service grounding electrode system (NEC Art 250 Part-H) 35) DANGER: RISK OF SERIOUS PERSONAL INJURY OR DEATH! • Use extreme care to a...
Owners Manual
Page 5
... determine that can be used when attaching the pedestal stand to avoid damage to clean the LCD screen, follow this manual to a Toshiba Authorized Service Provider. 47) If you leave the TV unattended or unused for long periods of time. 42) ALWAYS unplug the TV... window. •Never touch, press, or place anything on the LCD screen. If these sounds become frequent or continuous, unplug the power cord and contact a Toshiba Authorized Service Provider. 44) WARNING: RISK OF SERIOUS PERSONAL INJURY OR EQUIPMENT DAMAGE! Choosing a location for the television, avoid locations where ...
... determine that can be used when attaching the pedestal stand to avoid damage to clean the LCD screen, follow this manual to a Toshiba Authorized Service Provider. 47) If you leave the TV unattended or unused for long periods of time. 42) ALWAYS unplug the TV... window. •Never touch, press, or place anything on the LCD screen. If these sounds become frequent or continuous, unplug the power cord and contact a Toshiba Authorized Service Provider. 44) WARNING: RISK OF SERIOUS PERSONAL INJURY OR EQUIPMENT DAMAGE! Choosing a location for the television, avoid locations where ...
Owners Manual
Page 10
... the timer to turn on the TV 43 Setting the sleep timer 43 Setting Automatic Power Down 44 Setting No Signal Power Down 44 Displaying TV status information 44 Viewing support information 45 Resetting to Factory Defaults 45 Power failure 45 Chapter 7: Picture and sound controls 46 Selecting the picture size 46 Scrolling...
... the timer to turn on the TV 43 Setting the sleep timer 43 Setting Automatic Power Down 44 Setting No Signal Power Down 44 Displaying TV status information 44 Viewing support information 45 Resetting to Factory Defaults 45 Power failure 45 Chapter 7: Picture and sound controls 46 Selecting the picture size 46 Scrolling...
Owners Manual
Page 12
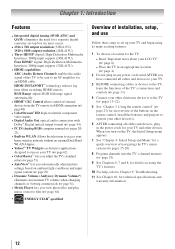
...Important notes about your LCD TV" ( page 8). • Place the TV in an appropriate location ( page 4) 2 Do not plug in any power cords until AFTER you view photo files and play music or movie files ( page 64). • ENERGY STAR® qualified Overview of external devices...enables the audio signal of the TV to be sent to operate your other device(s). 6 AFTER connecting all cables and devices, plug in the power cords for your TV and other devices. Chapter 1: Introduction Features • Integrated digital tuning (8VSB ATSC and QAM) eliminates the need for ...
...Important notes about your LCD TV" ( page 8). • Place the TV in an appropriate location ( page 4) 2 Do not plug in any power cords until AFTER you view photo files and play music or movie files ( page 64). • ENERGY STAR® qualified Overview of external devices...enables the audio signal of the TV to be sent to operate your other device(s). 6 AFTER connecting all cables and devices, plug in the power cords for your TV and other devices. Chapter 1: Introduction Features • Integrated digital tuning (8VSB ATSC and QAM) eliminates the need for ...
Owners Manual
Page 13
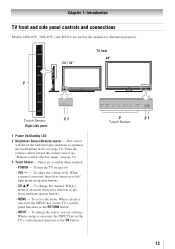
Chapter 1: Introduction TV front and side panel controls and connections Models 24SL415U, 32SL415U, and 40S51U are used in this remote sensor ( "Remote control effective range" on the TV's control panel functions as the RETURN button. - Point... the remote control toward this manual for illustration purposes. 24"/ 32" TV front 40" 3 Touch Sensor 21 Right side panel 1無 Power On/Standby LED 2無 Brightness Sensor/Remote sensor - VOL +- - MENU - INPUT - This sensor will detect the ambient light conditions to optimize the backlighting ...
Chapter 1: Introduction TV front and side panel controls and connections Models 24SL415U, 32SL415U, and 40S51U are used in this remote sensor ( "Remote control effective range" on the TV's control panel functions as the RETURN button. - Point... the remote control toward this manual for illustration purposes. 24"/ 32" TV front 40" 3 Touch Sensor 21 Right side panel 1無 Power On/Standby LED 2無 Brightness Sensor/Remote sensor - VOL +- - MENU - INPUT - This sensor will detect the ambient light conditions to optimize the backlighting ...
Owners Manual
Page 14
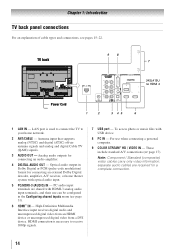
Chapter 1: Introduction TV back panel connections For an explanation of cable types and connections, see pages 15-22. TV back Power Cord 98 1 7 2 COLOR STREAM HD / VIDEO IN 4 1 PC/HDMI 3 (AUDIO) 3 2 AUDIO OUT 24SL415U no HDMI 4 1 2 3 45 6 1無 LAN IN - Analog audio outputs for connecting an ...
Chapter 1: Introduction TV back panel connections For an explanation of cable types and connections, see pages 15-22. TV back Power Cord 98 1 7 2 COLOR STREAM HD / VIDEO IN 4 1 PC/HDMI 3 (AUDIO) 3 2 AUDIO OUT 24SL415U no HDMI 4 1 2 3 45 6 1無 LAN IN - Analog audio outputs for connecting an ...
Owners Manual
Page 33
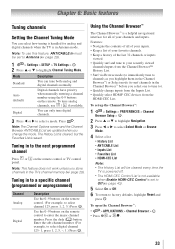
... to factory defaults, highlight Reset and press . To tune analog channels, use this feature, ANT/CABLE In must be cleared every time the TV is powered off. • The HDMI-CEC Control List is not available when Enable HDMI-CEC Control is set to Antenna ( page 29). 1無 > Settings > SETUP...
... to factory defaults, highlight Reset and press . To tune analog channels, use this feature, ANT/CABLE In must be cleared every time the TV is powered off. • The HDMI-CEC Control List is not available when Enable HDMI-CEC Control is set to Antenna ( page 29). 1無 > Settings > SETUP...
Owners Manual
Page 40
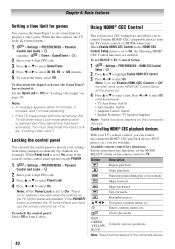
...Panel Lock" appears onscreen when the buttons on page 39). Rewinds/reverses. You must use the GameTimer® to control Toshiba HDMI® CEC compatible devices from being changed accidentally (by children, for example). When Enable HDMI-CEC Control in Step.../Off • Amplifier Control: On/Off • Speaker Preference: TV Speakers/Amplifier Note: These functions depend on the control panel operate except POWER. 1無 > Settings > PREFERENCES > Parental Control and Locks > . 2無 Enter your settings from the TV remote control via HDMI connection...
...Panel Lock" appears onscreen when the buttons on page 39). Rewinds/reverses. You must use the GameTimer® to control Toshiba HDMI® CEC compatible devices from being changed accidentally (by children, for example). When Enable HDMI-CEC Control in Step.../Off • Amplifier Control: On/Off • Speaker Preference: TV Speakers/Amplifier Note: These functions depend on the control panel operate except POWER. 1無 > Settings > PREFERENCES > Parental Control and Locks > . 2無 Enter your settings from the TV remote control via HDMI connection...
Owners Manual
Page 41
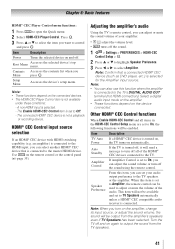
... Preference. 3無 Press t or u to output the sound from the amplifier's speakers even if TV Speakers has been selected. Item Description Power Turns the selected device on the amplifier, change its input source, or adjust the sound volume, the sound will be available and set to ... is not available under these conditions: - The connected HDMI® CEC device is selected. - Amplifier Control If Amplifier Control is turned on, Power the TV turns on again to select Amplifier. A non-HDMI input is not a playback or recording device. Item Description TV Auto If a ...
... Preference. 3無 Press t or u to output the sound from the amplifier's speakers even if TV Speakers has been selected. Item Description Power Turns the selected device on the amplifier, change its input source, or adjust the sound volume, the sound will be available and set to ... is not available under these conditions: - The connected HDMI® CEC device is selected. - Amplifier Control If Amplifier Control is turned on, Power the TV turns on again to select Amplifier. A non-HDMI input is not a playback or recording device. Item Description TV Auto If a ...
Owners Manual
Page 43
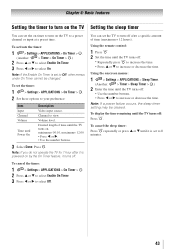
... off: Press . Note: If you do not operate the TV for 1 hour after a specific amount of time until the TV turns off after it is powered on the TV to a preset channel or input at a preset time. Using the remote control: 1無 Press 2無 Set the time until the TV... > .) 2無 Press p or q to select Enable On Timer. 3無 Press t or u to view. You can set to increase or decrease the time. Note: If a power failure occurs, the sleep timer setting may be changed. Channel to select On. Desired length of time (maximum = 12 hours). minimum= 00:10, maximum= 12...
... off: Press . Note: If you do not operate the TV for 1 hour after a specific amount of time until the TV turns off after it is powered on the TV to a preset channel or input at a preset time. Using the remote control: 1無 Press 2無 Set the time until the TV... > .) 2無 Press p or q to select Enable On Timer. 3無 Press t or u to view. You can set to increase or decrease the time. Note: If a power failure occurs, the sleep timer setting may be changed. Channel to select On. Desired length of time (maximum = 12 hours). minimum= 00:10, maximum= 12...

Owners Manual
Page 44
... after 1 hour of box; Pressing a third time will automatically turn itself off (after 14 minutes of no signal) Setting No Signal Power Down When an input's setting in this feature is detected. Press . Press . Note: • When the following features are set,... 2無 Press p or q to select On. Displaying TV status information To display TV status information: Press . Chapter 6: Basic features Setting Automatic Power Down The TV can change . 4無 Press t or u to select Off or On. The following additional information (only available for ANT/CABLE input...
... after 1 hour of box; Pressing a third time will automatically turn itself off (after 14 minutes of no signal) Setting No Signal Power Down When an input's setting in this feature is detected. Press . Press . Note: • When the following features are set,... 2無 Press p or q to select On. Displaying TV status information To display TV status information: Press . Chapter 6: Basic features Setting Automatic Power Down The TV can change . 4無 Press t or u to select Off or On. The following additional information (only available for ANT/CABLE input...
Owners Manual
Page 45
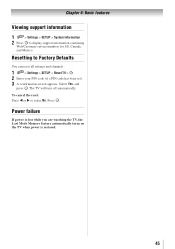
... lost while you are watching the TV, the Last Mode Memory feature automatically turns on the TV when power is restored. 45 Select Yes, and press . The TV will turn off automatically. To cancel the reset: Press t or u to display support information containing Web/...
... lost while you are watching the TV, the Last Mode Memory feature automatically turns on the TV when power is restored. 45 Select Yes, and press . The TV will turn off automatically. To cancel the reset: Press t or u to display support information containing Web/...
Owners Manual
Page 62
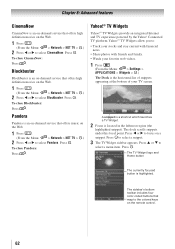
... is located in the leftmost region (the highlighted snippet). Press . Yahoo!® TV Widgets Yahoo!® TV Widgets provide an integrated Internet and TV experience powered by the Yahoo! Press t or u to focus on the Web. 1無 Press . (From the Menu: > Network > NET TV > .) 2無 Press t or u to select CinemaNow. Press...
... is located in the leftmost region (the highlighted snippet). Press . Yahoo!® TV Widgets Yahoo!® TV Widgets provide an integrated Internet and TV experience powered by the Yahoo! Press t or u to focus on the Web. 1無 Press . (From the Menu: > Network > NET TV > .) 2無 Press t or u to select CinemaNow. Press...

Owners Manual
Page 69
Press . The device selection screen appears. Press , A confirmation screen appears. Press . Auto Power Off 1無 > Settings > PREFERENCES > Wallpaper Setup > . Press . Press . 3無 Press p or q to rotate the image 90°clockwise. •Delete - Press to select Rotate or ... to the TV. The preview screen will appear. 2無 Press p or q to select Photo Edit. The preview screen appears. 2無 Press p or q to highlight Auto Power Off. 3無 Press t or u to select Off, 00:30, 01:00, 02:00, 04:00, 06:00, or 12:00. • If the Wallpaper window...
Press . The device selection screen appears. Press , A confirmation screen appears. Press . Auto Power Off 1無 > Settings > PREFERENCES > Wallpaper Setup > . Press . Press . 3無 Press p or q to rotate the image 90°clockwise. •Delete - Press to select Rotate or ... to the TV. The preview screen will appear. 2無 Press p or q to select Photo Edit. The preview screen appears. 2無 Press p or q to highlight Auto Power Off. 3無 Press t or u to select Off, 00:30, 01:00, 02:00, 04:00, 06:00, or 12:00. • If the Wallpaper window...
Owners Manual
Page 70
... in and turn on the TV, no device is connected to an input on •• Ensure the power cord is plugged in. If no picture appears when you use this may occur in this Troubleshooting section or the recommended solution has not worked, ... and turn the TV on . Possible causes may be on . Ensure the settings ( page 31). After 30 seconds, turn off the TV, unplug the power cord to reset the TV. Try another channel. •• Adjust the picture quality ( page 49). •• If the Edge Booster does not...
... in and turn on the TV, no device is connected to an input on •• Ensure the power cord is plugged in. If no picture appears when you use this may occur in this Troubleshooting section or the recommended solution has not worked, ... and turn the TV on . Possible causes may be on . Ensure the settings ( page 31). After 30 seconds, turn off the TV, unplug the power cord to reset the TV. Try another channel. •• Adjust the picture quality ( page 49). •• If the Edge Booster does not...
Owners Manual
Page 71
...wired network connection, check to ensure the LAN cables are connected properly ( pages 21). •• Ensure the modem and router power cords are connected, the HDMI® CEC Control feature may not display correctly under the following circumstances: a) the videotape is dubbed; If ...channels, check the antenna configuration ( page 29). Check your cable/DSL modem or contact your TV and unplug the power cord. Refer to the owner's manual for Toshiba HDMI® CEC compatible devices. •• Ensure HDMI cables with the HDMI Logo ( ) are operating properly....
...wired network connection, check to ensure the LAN cables are connected properly ( pages 21). •• Ensure the modem and router power cords are connected, the HDMI® CEC Control feature may not display correctly under the following circumstances: a) the videotape is dubbed; If ...channels, check the antenna configuration ( page 29). Check your cable/DSL modem or contact your TV and unplug the power cord. Refer to the owner's manual for Toshiba HDMI® CEC compatible devices. •• Ensure HDMI cables with the HDMI Logo ( ) are operating properly....
Owners Manual
Page 72
... 63). 4) Perform the Reset Factory Defaults procedure ( page 45). •• Content delivered by the DMS and improperly displayed. Remove AC power from the router and the television for available routers/APs. •• Refer to the router/AP's instruction manual. Contact the Service Provider to...Make sure the TV IP address is not displayed in the Network Setup portion of the following: 1) Turn off the TV and unplug the power cord. Make sure both are using a wireless home-network connection: -- Example: IP address 192.168.0.100 and IP address 192.168.0.101...
... 63). 4) Perform the Reset Factory Defaults procedure ( page 45). •• Content delivered by the DMS and improperly displayed. Remove AC power from the router and the television for available routers/APs. •• Refer to the router/AP's instruction manual. Contact the Service Provider to...Make sure the TV IP address is not displayed in the Network Setup portion of the following: 1) Turn off the TV and unplug the power cord. Make sure both are using a wireless home-network connection: -- Example: IP address 192.168.0.100 and IP address 192.168.0.101...
Owners Manual
Page 73
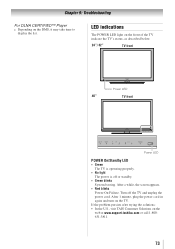
... list. After a while, the screen appears. • Red blinks Power-On Failure. Chapter 9: Troubleshooting For DLNA CERTIFIED™ Player •• Depending on the web at www.support.toshiba.com or call 1-800631-3811. 73 LED indications The POWER LED light on the TV. Turn off or standby. • Green... blinks System booting. After 1 minute, plug the power cord in again and turn on the front of the TV...
... list. After a while, the screen appears. • Red blinks Power-On Failure. Chapter 9: Troubleshooting For DLNA CERTIFIED™ Player •• Depending on the web at www.support.toshiba.com or call 1-800631-3811. 73 LED indications The POWER LED light on the TV. Turn off or standby. • Green... blinks System booting. After 1 minute, plug the power cord in again and turn on the front of the TV...
Owners Manual
Page 74
... control with features and/or specifications that may be added in standby mode Audio Power 24SL415U: 5 W + 5 W 32SL415U: 7 W + 7 W 40S51U: 10 W + 10 W Speaker Type 24SL415U: Two 3-5/8 × 1 × 7/8 inches (91 × 25 × 23 mm) 32SL415U/40S51U: Two 5-5/8 × 1 × 5/8 inches (142 × 25 ... ZZ, AAA, BBB) Ultra band (65 through 94, 100 through 135) Power Source 120 V AC, 60 Hz Power Consumption 24SL415U: 0.7 A (maximum current) 0.60 W in standby mode 32SL415U: 0.7 A (maximum current) 0.60 W in standby mode 40S51U: 0.9 A (maximum current) 0.6 W in the future. HDMI Audio: 2-...
... control with features and/or specifications that may be added in standby mode Audio Power 24SL415U: 5 W + 5 W 32SL415U: 7 W + 7 W 40S51U: 10 W + 10 W Speaker Type 24SL415U: Two 3-5/8 × 1 × 7/8 inches (91 × 25 × 23 mm) 32SL415U/40S51U: Two 5-5/8 × 1 × 5/8 inches (142 × 25 ... ZZ, AAA, BBB) Ultra band (65 through 94, 100 through 135) Power Source 120 V AC, 60 Hz Power Consumption 24SL415U: 0.7 A (maximum current) 0.60 W in standby mode 32SL415U: 0.7 A (maximum current) 0.60 W in standby mode 40S51U: 0.9 A (maximum current) 0.6 W in the future. HDMI Audio: 2-...


