
Owners Manual
Page 10
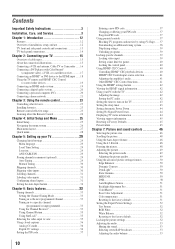
... and Service 3 Chapter 1: Introduction 12 Features 12 Overview of installation, setup, and use 12 TV front and side panel controls and connections 13 TV back panel connections 14 Chapter 2: Connecting your TV 15 Overview of cable types 15 About the connection ...Connecting a personal computer (PC 20 Connecting a home network 21 Chapter 3: Using the remote control 23 Controlling other devices 23 Installing batteries 23 Remote control effective range 23 Learning about the Remote Control 24 Chapter 4: Initial Setup and Menu 25 Initial Setup 25 Navigating the menu system ...
... and Service 3 Chapter 1: Introduction 12 Features 12 Overview of installation, setup, and use 12 TV front and side panel controls and connections 13 TV back panel connections 14 Chapter 2: Connecting your TV 15 Overview of cable types 15 About the connection ...Connecting a personal computer (PC 20 Connecting a home network 21 Chapter 3: Using the remote control 23 Controlling other devices 23 Installing batteries 23 Remote control effective range 23 Learning about the Remote Control 24 Chapter 4: Initial Setup and Menu 25 Initial Setup 25 Navigating the menu system ...
Owners Manual
Page 11
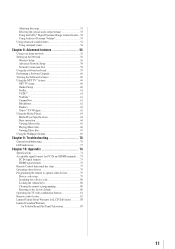
... formats for PC IN and HDMI terminals......75 PC IN signal formats 75 HDMI signal formats 76 Remote Control functional key chart 77 Operating other devices 79 Programming the remote to operate other devices 79 Device code setup 79 Searching for a device code 80 Locking the ...volume keys 80 Clearing the remote's programming 80 Resetting to the factory default 80 Operating the TV with combination buttons 81 Remote control codes 82 Limited United States Warranty for LCD Televisions 88 Limited Canadian Warranty for Toshiba Brand Flat Panel Televisions 89 11
... formats for PC IN and HDMI terminals......75 PC IN signal formats 75 HDMI signal formats 76 Remote Control functional key chart 77 Operating other devices 79 Programming the remote to operate other devices 79 Device code setup 79 Searching for a device code 80 Locking the ...volume keys 80 Clearing the remote's programming 80 Resetting to the factory default 80 Operating the TV with combination buttons 81 Remote control codes 82 Limited United States Warranty for LCD Televisions 88 Limited Canadian Warranty for Toshiba Brand Flat Panel Televisions 89 11
Owners Manual
Page 12
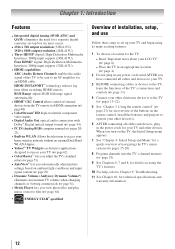
... adjust the TV's standard colors ( page 51). • AutoView® lets you automatically adjust picture settings based on the remote control, install the batteries and prepare to operate your other device(s). 6 AFTER connecting all cables and devices, plug in most cases). •...; pages 15-22). 5 See "Chapter 3: Using the remote control" ( page 23) for technical specifications and warranty information. 12 RGB Range adjusts RGB full range signal automatically. • HDMI® CEC Control allows control of installation, setup, and use Follow these steps to Chapter...
... adjust the TV's standard colors ( page 51). • AutoView® lets you automatically adjust picture settings based on the remote control, install the batteries and prepare to operate your other device(s). 6 AFTER connecting all cables and devices, plug in most cases). •...; pages 15-22). 5 See "Chapter 3: Using the remote control" ( page 23) for technical specifications and warranty information. 12 RGB Range adjusts RGB full range signal automatically. • HDMI® CEC Control allows control of installation, setup, and use Follow these steps to Chapter...
Owners Manual
Page 13
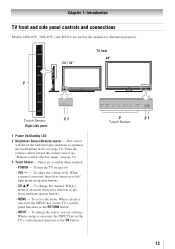
.... To change the source you are viewing. Chapter 1: Introduction TV front and side panel controls and connections Models 24SL415U, 32SL415U, and 40S51U are used in this remote sensor ( "Remote control effective range" on page 23). 3無 Touch Sensor - POWER - These are available when... touched. - To turn the TV on the TV's control panel functions as the OK button. 3 21...
.... To change the source you are viewing. Chapter 1: Introduction TV front and side panel controls and connections Models 24SL415U, 32SL415U, and 40S51U are used in this remote sensor ( "Remote control effective range" on page 23). 3無 Touch Sensor - POWER - These are available when... touched. - To turn the TV on the TV's control panel functions as the OK button. 3 21...

Owners Manual
Page 16
Use the Cable box controls to change channels. To view the VCR or camcorder video: Turn ON the VCR or camcorder video. The unauthorized recording, use, distribution, or revision of ... the antenna or Cable signal: Select the ANT/CABLE video input source on the remote control ( page 24). To program the TV remote control to operate other countries, and may subject you may not be able to use the remote control to program or access certain features on the TV. Chapter 2: Connecting your TV Connecting...
Use the Cable box controls to change channels. To view the VCR or camcorder video: Turn ON the VCR or camcorder video. The unauthorized recording, use, distribution, or revision of ... the antenna or Cable signal: Select the ANT/CABLE video input source on the remote control ( page 24). To program the TV remote control to operate other countries, and may subject you may not be able to use the remote control to program or access certain features on the TV. Chapter 2: Connecting your TV Connecting...
Owners Manual
Page 17
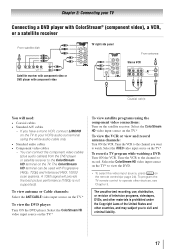
...) from ANT OUT to operate other materials is not supported). To view antenna or Cable channels: Select the ANT/CABLE video input source on the remote control ( page 24). Select the ColorStream HD video input source on the TV.* To record a TV program while watching a DVD: Turn ON the ... video input source on the TV.* To view the VCR or view and record antenna channels: Turn ON the VCR. To program the TV remote control to TV Coaxial cable You will provide the best picture performance (1080p is prohibited under the Copyright Laws of television programs, videotapes, DVDs, and...
...) from ANT OUT to operate other materials is not supported). To view antenna or Cable channels: Select the ANT/CABLE video input source on the remote control ( page 24). Select the ColorStream HD video input source on the TV.* To record a TV program while watching a DVD: Turn ON the ... video input source on the TV.* To view the VCR or view and record antenna channels: Turn ON the VCR. To program the TV remote control to TV Coaxial cable You will provide the best picture performance (1080p is prohibited under the Copyright Laws of television programs, videotapes, DVDs, and...
Owners Manual
Page 18
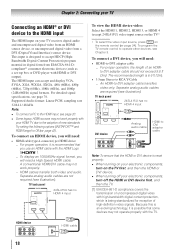
...is 6.6 ft (2m). • 3.5mm Stereo to RCA Y-Cable −− An HDMI-to operate other devices, see illustration). To program the TV remote control to -DVI adapter cable transfers video only. TV back panel 24SL415U has no HDMI 4 input 4 1 3 2 To view the HDMI device video: Select ... 1, HDMI 2, HDMI 3, or HDMI 4 (except 24SL415U) video input source on the TV.* ** To select the video input source, press on the remote control ( page 24). Because this is an evolving technology, it is recommended that you use an HDMI cable with the HDMI Logo ( ). −−...
...is 6.6 ft (2m). • 3.5mm Stereo to RCA Y-Cable −− An HDMI-to operate other devices, see illustration). To program the TV remote control to -DVI adapter cable transfers video only. TV back panel 24SL415U has no HDMI 4 input 4 1 3 2 To view the HDMI device video: Select ... 1, HDMI 2, HDMI 3, or HDMI 4 (except 24SL415U) video input source on the TV.* ** To select the video input source, press on the remote control ( page 24). Because this is an evolving technology, it is recommended that you use an HDMI cable with the HDMI Logo ( ). −−...
Owners Manual
Page 19
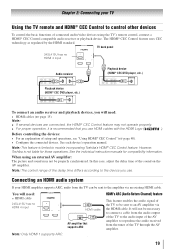
...Toshiba is limited to control other devices To control the basic functions of connected audio/video devices using an external AV amplifier: The picture and sound may not operate properly. •• For proper operation, it is recommended that supports ARC Note: Only HDMI 1 supports ARC. When using the TV's remote control...use . Connecting an HDMI audio system If your TV Using the TV remote and HDMI® CEC Control to models incorporating Toshiba's HDMI® CEC Control feature. Note: The control range of the TV through the AV amplifier. 19 See the individual ...
...Toshiba is limited to control other devices To control the basic functions of connected audio/video devices using an external AV amplifier: The picture and sound may not operate properly. •• For proper operation, it is recommended that supports ARC Note: Only HDMI 1 supports ARC. When using the TV's remote control...use . Connecting an HDMI audio system If your TV Using the TV remote and HDMI® CEC Control to models incorporating Toshiba's HDMI® CEC Control feature. Note: The control range of the TV through the AV amplifier. 19 See the individual ...

Owners Manual
Page 23
... programmed to open the cover. Caution: Do not expose batteries to operate: Program the remote ( page 79). Point remote control toward remote sensor on front of batteries. Toshiba devices: The remote is not programmed to excessive heat such as cable converter boxes, satellite receivers, VCRs, DVD players, and HTIBs (home theater in a designated disposal area...
... programmed to open the cover. Caution: Do not expose batteries to operate: Program the remote ( page 79). Point remote control toward remote sensor on front of batteries. Toshiba devices: The remote is not programmed to excessive heat such as cable converter boxes, satellite receivers, VCRs, DVD players, and HTIBs (home theater in a designated disposal area...

Owners Manual
Page 24
...to enter 2-part channel numbers ( p. 33) or edit the Favorites List ( p. 34). Chapter 3: Using the remote control Learning about the Remote Control The buttons described in the main menu system. Directly tune channels. Accesses the main TV menu system ( p. 26-28)....Scrolls the left. Returns to the previous / next page. Selects the audio mode. For the HDMI® CEC Control functions, see "Remote control functional key chart" ( Pages 77-78). To control the TV, press TV. Freezes the picture ( p. 48). Selects the video input source ( p....
...to enter 2-part channel numbers ( p. 33) or edit the Favorites List ( p. 34). Chapter 3: Using the remote control Learning about the Remote Control The buttons described in the main menu system. Directly tune channels. Accesses the main TV menu system ( p. 26-28)....Scrolls the left. Returns to the previous / next page. Selects the audio mode. For the HDMI® CEC Control functions, see "Remote control functional key chart" ( Pages 77-78). To control the TV, press TV. Freezes the picture ( p. 48). Selects the video input source ( p....
Owners Manual
Page 26
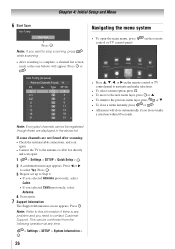
...(such as the one below) will close a menu instantly, press or . • All menus will appear. on the remote • Press p, q, t, or u on the remote control or TV control panel to navigate and make a selection within 60 seconds. This can be registered though these are not found after scanning: &#... Setup and Menu 6無 Start Scan Auto Tuning Start Scan Press . Navigating the menu system • To open the main menu, press control or TV control panel. Press or . If some channels are displayed in the above list. Press t or u to stop scanning, press while scanning. &#...
...(such as the one below) will close a menu instantly, press or . • All menus will appear. on the remote • Press p, q, t, or u on the remote control or TV control panel to navigate and make a selection within 60 seconds. This can be registered though these are not found after scanning: &#... Setup and Menu 6無 Start Scan Auto Tuning Start Scan Press . Navigating the menu system • To open the main menu, press control or TV control panel. Press or . If some channels are displayed in the above list. Press t or u to stop scanning, press while scanning. &#...
Owners Manual
Page 27
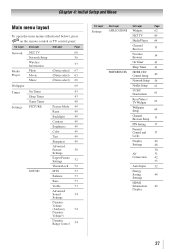
Chapter 4: Initial Setup and Menu Main menu layout To open the main menus (illustrated below), press on the remote control or TV control panel. 1st Layer 2nd Layer 3rd Layer Page Network Media Player NET TV 60 Network Setup 56 Wireless Information 57 Photo (Device ...TheaterLock 52 MTS 53 Balance 53 Bass 53 Treble 53 Advanced Sound 54 Settings Dynamic Volume (Audyssey 54 Dynamic Volume®) Dynamic Range Control 54 1st Layer Settings 2nd Layer APPLICATIONS PREFERENCES 3rd Layer Page Widgets 62 NET TV 60 Media Player 64 Channel Browser 33 Favorites ...
Chapter 4: Initial Setup and Menu Main menu layout To open the main menus (illustrated below), press on the remote control or TV control panel. 1st Layer 2nd Layer 3rd Layer Page Network Media Player NET TV 60 Network Setup 56 Wireless Information 57 Photo (Device ...TheaterLock 52 MTS 53 Balance 53 Bass 53 Treble 53 Advanced Sound 54 Settings Dynamic Volume (Audyssey 54 Dynamic Volume®) Dynamic Range Control 54 1st Layer Settings 2nd Layer APPLICATIONS PREFERENCES 3rd Layer Page Widgets 62 NET TV 60 Media Player 64 Channel Browser 33 Favorites ...
Owners Manual
Page 29
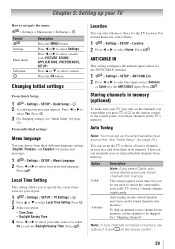
... zone for the TV location. Location You can choose from memory. For normal home use buttons 0-9 and on the remote control or the control panel, store those channels in your cable TV service's lineup changes significantly. Press . Option Cable Antenna Description Note: ...If you press or on the remote control. 29 See "Skipping channels". From individual settings: Menu language You can select Home or Store for your region. 1無 > Settings > ...
... zone for the TV location. Location You can choose from memory. For normal home use buttons 0-9 and on the remote control or the control panel, store those channels in your cable TV service's lineup changes significantly. Press . Option Cable Antenna Description Note: ...If you press or on the remote control. 29 See "Skipping channels". From individual settings: Menu language You can select Home or Store for your region. 1無 > Settings > ...
Owners Manual
Page 30
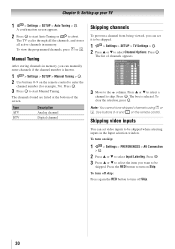
... inputs to be skipped when selecting inputs in the Input selection window. Press . To clear the selection, press . To turn on the remote control to abort. Manual Tuning After storing channels in memory. A confirmation screen appears. 2無 Press to start Manual Tuning. Press . 3無... set it to be skipped. 1無 > Settings > SETUP > TV Settings > . 2無 Press p or q to turn on the remote control. Skipping video inputs You can manually enter channels if the channel number is selected. Note: You cannot tune skipped channels using or . The TV ...
... inputs to be skipped when selecting inputs in the Input selection window. Press . To clear the selection, press . To turn on the remote control to abort. Manual Tuning After storing channels in memory. A confirmation screen appears. 2無 Press to start Manual Tuning. Press . 3無... set it to be skipped. 1無 > Settings > SETUP > TV Settings > . 2無 Press p or q to turn on the remote control. Skipping video inputs You can manually enter channels if the channel number is selected. Note: You cannot tune skipped channels using or . The TV ...

Owners Manual
Page 32
... Input: Select Reset. Chapter 5: Setting up your TV Setting the Auto Input feature You can change TV inputs using the MODE SELECT buttons on the remote control: TV, CABLE/SAT, BD/ DVD, AUX. After setting an input for a specific MODE SELECT button, the TV automatically switches to the ANT/CABLE input...
... Input: Select Reset. Chapter 5: Setting up your TV Setting the Auto Input feature You can change TV inputs using the MODE SELECT buttons on the remote control: TV, CABLE/SAT, BD/ DVD, AUX. After setting an input for a specific MODE SELECT button, the TV automatically switches to the ANT/CABLE input...
Owners Manual
Page 33
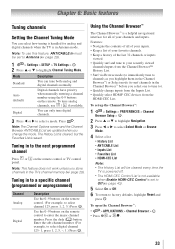
...to select a mode. Tuning in to a specific channel (programmed or unprogrammed) Channel Analog Digital Description Use the 0-9 buttons on the remote control. (For example, to select channel 125, press 1, 2, 5.) Press . Auto (default) Digital channels have priority when manually entering a ...channel number using the 0-9 buttons on the remote control or TV control panel. Tuning in to enter the major channel number. Mode Description Standard You can tune both analog and digital channels normally...
...to select a mode. Tuning in to a specific channel (programmed or unprogrammed) Channel Analog Digital Description Use the 0-9 buttons on the remote control. (For example, to select channel 125, press 1, 2, 5.) Press . Auto (default) Digital channels have priority when manually entering a ...channel number using the 0-9 buttons on the remote control or TV control panel. Tuning in to enter the major channel number. Mode Description Standard You can tune both analog and digital channels normally...

Owners Manual
Page 34
Note: • The History List opens by pressing t or u. 3無 Press and hold for at least 5 seconds using the numeric buttons on the remote control. • Channels that are added to surf back through the available lists: 1無 Open the Channel Browser™. 2無 Press p or q. After selecting another list, ...
Note: • The History List opens by pressing t or u. 3無 Press and hold for at least 5 seconds using the numeric buttons on the remote control. • Channels that are added to surf back through the available lists: 1無 Open the Channel Browser™. 2無 Press p or q. After selecting another list, ...

Owners Manual
Page 35
...two channels without entering a channel number each time. This feature also works for 32" / 40"). • Repeatedly press p or q. on the remote control or TV control 2無 Change the input: • Press 0-6 (for 24"), 0-7 (for external inputs. 1無 Select the first channel you want to ...32" / 40") Note: • You can label the video input sources according to the specific devices you can select a video input source with the remote control by repeatedly pressing or p or q. • You can be tuned. To select a HDMI® CEC device: 1無 Press p or q ...
...two channels without entering a channel number each time. This feature also works for 32" / 40"). • Repeatedly press p or q. on the remote control or TV control 2無 Change the input: • Press 0-6 (for 24"), 0-7 (for external inputs. 1無 Select the first channel you want to ...32" / 40") Note: • You can label the video input sources according to the specific devices you can select a video input source with the remote control by repeatedly pressing or p or q. • You can be tuned. To select a HDMI® CEC device: 1無 Press p or q ...
Owners Manual
Page 39
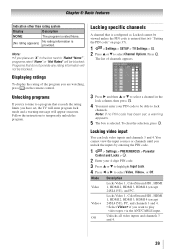
... Locks > . 2無 Enter your PIN code to be viewed unless the PIN code is entered first ( "Setting the PIN code" on the remote control. Off Unlocks all video inputs and channels 3 and 4. 39 You cannot view the input sources or channels until you try to tune to a program that ...
... Locks > . 2無 Enter your PIN code to be viewed unless the PIN code is entered first ( "Setting the PIN code" on the remote control. Off Unlocks all video inputs and channels 3 and 4. 39 You cannot view the input sources or channels until you try to tune to a program that ...
Owners Manual
Page 40
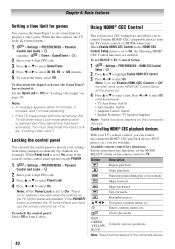
... using these key functions, set the MODE SELECT switch on the remote control to set to On, none of the controls on . Chapter 6: Basic features Setting a time limit for games You can use the remote control to turn it : Set the Input Lock to control Toshiba HDMI® CEC compatible devices from being changed accidentally (by children...
... using these key functions, set the MODE SELECT switch on the remote control to set to On, none of the controls on . Chapter 6: Basic features Setting a time limit for games You can use the remote control to turn it : Set the Input Lock to control Toshiba HDMI® CEC compatible devices from being changed accidentally (by children...


