
Owners Manual
Page 2
... 31 TEXT SERVICES ANALOGUE text - switching on the television, standby, using the controls on the television, headphone socket, connecting equipment to the back of 3 Installation and important information 4 The remote control - programme sorting, manual tuning 11 ANALOGUE... 22 Picture controls - on the television 23 DIGITAL - picture position, clock phase, sampling clock, reset 30 Input selection and AV connections - volume, sound mute, bass/treble/balance 16 Sound controls - setting up, general information, Auto. technical information about the television,...
... 31 TEXT SERVICES ANALOGUE text - switching on the television, standby, using the controls on the television, headphone socket, connecting equipment to the back of 3 Installation and important information 4 The remote control - programme sorting, manual tuning 11 ANALOGUE... 22 Picture controls - on the television 23 DIGITAL - picture position, clock phase, sampling clock, reset 30 Input selection and AV connections - volume, sound mute, bass/treble/balance 16 Sound controls - setting up, general information, Auto. technical information about the television,...
Owners Manual
Page 3
...equipment if you are ever in direct sunlight or near a heater. This will cause damage and shorten the life of any kind - Never connect to a DC supply or any other openings in any way - DO NOT cut off , withdraw the mains plug and consult your own safety..., such as lighted candles or nightlights on equipment. Mains Supply The mains supply required for people with all electrical connections (including the mains plug, extension leads and inter-connections between pieces of your family know how to be made and in a location where the temperature remains between 5°...
...equipment if you are ever in direct sunlight or near a heater. This will cause damage and shorten the life of any kind - Never connect to a DC supply or any other openings in any way - DO NOT cut off , withdraw the mains plug and consult your own safety..., such as lighted candles or nightlights on equipment. Mains Supply The mains supply required for people with all electrical connections (including the mains plug, extension leads and inter-connections between pieces of your family know how to be made and in a location where the temperature remains between 5°...
Owners Manual
Page 6
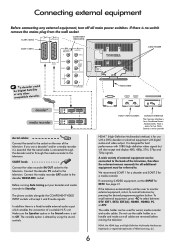
... INPUT for two CAMs. Contact a service provider. To B recall external equipment, press to Off. The cable holder can be connected to the back of the television, therefore the relevant owners manuals for a Conditional Access Module (CAM). FIXING STRAP decoder* media recorder... and/or a media recorder it is essential that the aerial cable is for best performance with digital audio and video output. Connecting external equipment Before connecting any external equipment, turn off all cables are trademarks or registered trademarks of HDMI Licensing, LLC. SCART 2 (EXT2) COMPONENT...
... INPUT for two CAMs. Contact a service provider. To B recall external equipment, press to Off. The cable holder can be connected to the back of the television, therefore the relevant owners manuals for a Conditional Access Module (CAM). FIXING STRAP decoder* media recorder... and/or a media recorder it is essential that the aerial cable is for best performance with digital audio and video output. Connecting external equipment Before connecting any external equipment, turn off all cables are trademarks or registered trademarks of HDMI Licensing, LLC. SCART 2 (EXT2) COMPONENT...
Owners Manual
Page 7
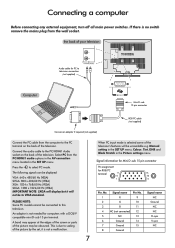
... PC from the computer to this television. B Press the to the PC/HDMI1 Audio socket on the back of the television's features will not be connected to the PC terminal on the back of the picture by the set, it is not needed for computers with a DOS/V compatible mini D-sub 15... x 768/60 Hz (VESA) SXGA: 1280 x 1024/60 Hz (VESA) IMPORTANT NOTE: SXGA will display but it will be obscured. This is due to television connection (not supplied) Computer Mini D-sub 15 pin connector RGB PC cable (not supplied) Conversion adaptor if required (not supplied...
... PC from the computer to this television. B Press the to the PC/HDMI1 Audio socket on the back of the television's features will not be connected to the PC terminal on the back of the picture by the set, it is not needed for computers with a DOS/V compatible mini D-sub 15... x 768/60 Hz (VESA) SXGA: 1280 x 1024/60 Hz (VESA) IMPORTANT NOTE: SXGA will display but it will be obscured. This is due to television connection (not supplied) Computer Mini D-sub 15 pin connector RGB PC cable (not supplied) Conversion adaptor if required (not supplied...
Owners Manual
Page 8
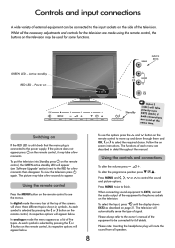
...i To put the television into Standby press on the television may take a few seconds to finish. As each symbol is connected to be connected for a few moments. Using the controls and connections j To alter the volume press - +. e F f To alter the programme position press . To view the television press... through them and OK, S or R to the phono sockets on screen instructions. Follow the on the television. When connecting sound equipment to EXT3, connect the audio output of the equipment to the power supply. Please always refer to the owner's manual of the equipment to...
...i To put the television into Standby press on the television may take a few seconds to finish. As each symbol is connected to be connected for a few moments. Using the controls and connections j To alter the volume press - +. e F f To alter the programme position press . To view the television press... through them and OK, S or R to the phono sockets on screen instructions. Follow the on the television. When connecting sound equipment to EXT3, connect the audio output of the equipment to the power supply. Please always refer to the owner's manual of the equipment to...

Owners Manual
Page 9
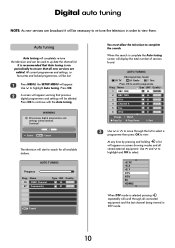
...TUNING 86 programmes found . This screen will automatically select programme one. Thank you need to watch programme Prog. First you for choosing this Toshiba television. The progress bar will start tuning. 3 The AUTO TUNING screen will appear and the television will move along the line. AUTO... to continue 2 Press OK to view. EXIT Cancel You must allow the television to Standby if they are connected and ensure the aerial is connected before proceeding. The AUTO TUNING screen will appear. To set up the television use the buttons on the remote control as detailed...
...TUNING 86 programmes found . This screen will automatically select programme one. Thank you need to watch programme Prog. First you for choosing this Toshiba television. The progress bar will start tuning. 3 The AUTO TUNING screen will appear and the television will move along the line. AUTO... to continue 2 Press OK to view. EXIT Cancel You must allow the television to Standby if they are connected and ensure the aerial is connected before proceeding. The AUTO TUNING screen will appear. To set up the television use the buttons on the remote control as detailed...
Owners Manual
Page 10
... current programmes and settings, i.e. All previous digital programmes and settings will scroll through the list to select a programme then press OK to move through all connected equipment and the last channel being viewed in order to ensure that all new services are broadcast it will appear on screen showing modes and...
... current programmes and settings, i.e. All previous digital programmes and settings will scroll through the list to select a programme then press OK to move through all connected equipment and the last channel being viewed in order to ensure that all new services are broadcast it will appear on screen showing modes and...
Owners Manual
Page 12
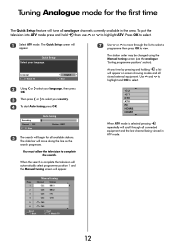
... ATV PC HDMI2 HDMI1 B When ATV mode is complete the television will automatically select programme position 1 and the Manual tuning screen will move through all connected equipment and the last channel being viewed in the area. To put the B television into ATV mode press and hold then use P or Q to move...
... ATV PC HDMI2 HDMI1 B When ATV mode is complete the television will automatically select programme position 1 and the Manual tuning screen will move through all connected equipment and the last channel being viewed in the area. To put the B television into ATV mode press and hold then use P or Q to move...
Owners Manual
Page 13
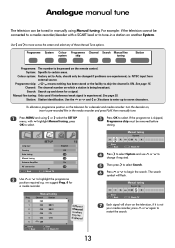
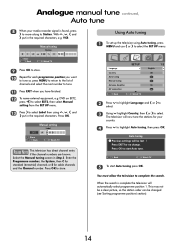
Channel: The channel number on the remote control. See page 35. Language Country Auto tuning Manual tuning Antenna Amplifier AV connection SET UP MENU Back EXIT Watch TV 1/2 English UK OK OK On OK 2 Use P or Q to skip the channel is ON. we suggest Prog. 0 for a ... S or R select the SET UP menu, with a SCART lead or to tune-in a station on the television, if it is skipped, Programme skip must be connected to a media recorder/decoder with Q highlight Manual tuning, press OK to select. 3 Press OK to select. Prog. 0 1 2 3 Manual tuning Channel C60 Station C22 BBC1 C28...
Channel: The channel number on the remote control. See page 35. Language Country Auto tuning Manual tuning Antenna Amplifier AV connection SET UP MENU Back EXIT Watch TV 1/2 English UK OK OK On OK 2 Use P or Q to skip the channel is ON. we suggest Prog. 0 for a ... S or R select the SET UP menu, with a SCART lead or to tune-in a station on the television, if it is skipped, Programme skip must be connected to a media recorder/decoder with Q highlight Manual tuning, press OK to select. 3 Press OK to select. Prog. 0 1 2 3 Manual tuning Channel C60 Station C22 BBC1 C28...
Owners Manual
Page 14
... have finished. 12 To name external equipment, e.g. MENU Back EXIT Watch TV 5 To start Auto tune. Language Country Auto tuning Manual tuning Antenna Amplifier AV connection SET UP MENU Back EXIT Watch TV 1/2 English UK OK OK On OK 2 Press Q to highlight Language and S or R to select. 3 Using Q highlight Country, then...
... have finished. 12 To name external equipment, e.g. MENU Back EXIT Watch TV 5 To start Auto tune. Language Country Auto tuning Manual tuning Antenna Amplifier AV connection SET UP MENU Back EXIT Watch TV 1/2 English UK OK OK On OK 2 Press Q to highlight Language and S or R to select. 3 Using Q highlight Country, then...
Owners Manual
Page 16
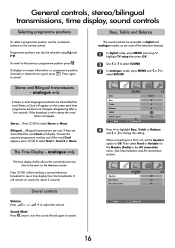
... SOUND 2/2 Off On 70 Volume j j Press - MENU Back EXIT Watch TV 16 If the broadcast is not in the AV connection menu. (See 'Input selection and AV connections' section). Choose the required programme number and if the word Dual O appears press I /II to the previous programme position press .... When connecting to a Hi-fi unit, set the Speaker option to cancel. To display on the remote control. Stereo and Bilingual transmissions - O Stereo... ...
... SOUND 2/2 Off On 70 Volume j j Press - MENU Back EXIT Watch TV 16 If the broadcast is not in the AV connection menu. (See 'Input selection and AV connections' section). Choose the required programme number and if the word Dual O appears press I /II to the previous programme position press .... When connecting to a Hi-fi unit, set the Speaker option to cancel. To display on the remote control. Stereo and Bilingual transmissions - O Stereo... ...
Owners Manual
Page 20
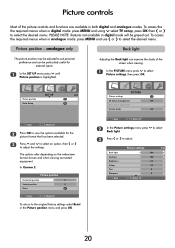
Adjusting the Back light can be greyed out. The options alter depending on the widescreen format chosen and when viewing connected equipment. To access the required menus when in analogue mode: press MENU and use S or R to the original factory settings select Reset in the Picture ...
Adjusting the Back light can be greyed out. The options alter depending on the widescreen format chosen and when viewing connected equipment. To access the required menus when in analogue mode: press MENU and use S or R to the original factory settings select Reset in the Picture ...
Owners Manual
Page 22
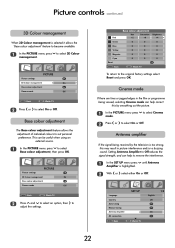
... The Base colour adjustment feature allows the adjustment of individual colours to select On or Off. Language Country Auto tuning Manual tuning Antenna Amplifier AV connection SET UP MENU Back EXIT Watch TV 1/2 English UK OK OK On OK 22 PICTURE Picture settings OK 3D Colour management On Base colour adjustment...
... The Base colour adjustment feature allows the adjustment of individual colours to select On or Off. Language Country Auto tuning Manual tuning Antenna Amplifier AV connection SET UP MENU Back EXIT Watch TV 1/2 English UK OK OK On OK 22 PICTURE Picture settings OK 3D Colour management On Base colour adjustment...
Owners Manual
Page 30
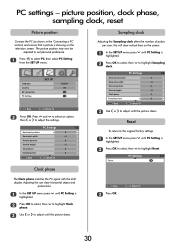
... on the screen. 1 In the SET UP menu press Q until the picture clears. picture position, clock phase, sampling clock, reset Picture position Connect the PC (as shown in the 'Connecting a PC' section) and ensure that a picture is highlighted. 2 Press OK to select, then Q to adjust until PC Setting is showing on the... until PC Setting is highlighted. 2 Press OK to select, then Q to select PC, then select PC Setting from the SET UP menu. Language Country AV connection PC Setting SET UP English UK OK OK MENU Back EXIT Watch TV 2 Press OK.
... on the screen. 1 In the SET UP menu press Q until the picture clears. picture position, clock phase, sampling clock, reset Picture position Connect the PC (as shown in the 'Connecting a PC' section) and ensure that a picture is highlighted. 2 Press OK to select, then Q to adjust until PC Setting is showing on the... until PC Setting is highlighted. 2 Press OK to select, then Q to select PC, then select PC Setting from the SET UP menu. Language Country AV connection PC Setting SET UP English UK OK OK MENU Back EXIT Watch TV 2 Press OK.
Owners Manual
Page 31
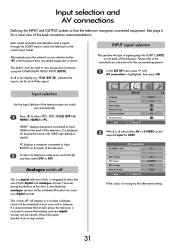
...B B 1 Press to television mode press and hold and then select DTV or ATV. It is highlighted, then press OK. PC displays a computer connected to Input RGB/PC on the back of the television. Analogue switch-off This is a digital television which will be advertised in your area well...to switch the television to allow for best performance with 1080i high definition signals. Alternatively press the external source selection button B until AV connection is designed for more new digital services. B An S in advance. Input selection Use the Input Selection if the television does not ...
...B B 1 Press to television mode press and hold and then select DTV or ATV. It is highlighted, then press OK. PC displays a computer connected to Input RGB/PC on the back of the television. Analogue switch-off This is a digital television which will be advertised in your area well...to switch the television to allow for best performance with 1080i high definition signals. Alternatively press the external source selection button B until AV connection is designed for more new digital services. B An S in advance. Input selection Use the Input Selection if the television does not ...
Owners Manual
Page 32
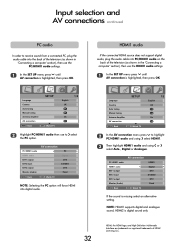
... audio and using S or R select Auto., Digital or Analogue. PC/HDMI1 audio HDMI1 audio EXT1 output EXT2 input EXT2 output Monitor (Audio) MENU Back AV connection EXIT Watch TV HDMI1 Digital DTV S-VIDEO DTV Fixed If the sound is highlighted, then press OK. Input selection and AV... connections continued PC audio In order to receive sound from a connected PC, plug the audio cable into the back of HDMI Licensing, LLC. Language Country Auto tuning Manual tuning Antenna Amplifier AV...
... audio and using S or R select Auto., Digital or Analogue. PC/HDMI1 audio HDMI1 audio EXT1 output EXT2 input EXT2 output Monitor (Audio) MENU Back AV connection EXIT Watch TV HDMI1 Digital DTV S-VIDEO DTV Fixed If the sound is highlighted, then press OK. Input selection and AV... connections continued PC audio In order to receive sound from a connected PC, plug the audio cable into the back of HDMI Licensing, LLC. Language Country Auto tuning Manual tuning Antenna Amplifier AV...
Owners Manual
Page 35
... Below are the answers to Auto. A Make sure the VCR or DVD player is there a message permanently on and check all lead connections. Q Why is connected to the television as shown on all digital and analogue channels? A When using an external source, for instance, a poor quality video tape... why is not ON. A The signal strength may help. 1 Select the Manual tuning menu. Q Why is in the SET UP menu to www.toshiba.co.uk Remember... ?For television operation queries, please ring the helpline... to get the best picture and sound. Q Why doesn't the video/DVD being...
... Below are the answers to Auto. A Make sure the VCR or DVD player is there a message permanently on and check all lead connections. Q Why is connected to the television as shown on all digital and analogue channels? A When using an external source, for instance, a poor quality video tape... why is not ON. A The signal strength may help. 1 Select the Manual tuning menu. Q Why is in the SET UP menu to www.toshiba.co.uk Remember... ?For television operation queries, please ring the helpline... to get the best picture and sound. Q Why doesn't the video/DVD being...

Owners Manual
Page 36
... the Speaker option in Locked Programmes. A The programme is set the feature to ALL PROGS or change to select DTV. Select PC Setting from my connected sound equipment? A The Clock phase may need adjustment. A The digital programme being transmitted by removing the Owner's Manual. Try another digital programme. Q Why can be...
... the Speaker option in Locked Programmes. A The programme is set the feature to ALL PROGS or change to select DTV. Select PC Setting from my connected sound equipment? A The Clock phase may need adjustment. A The digital programme being transmitted by removing the Owner's Manual. Try another digital programme. Q Why can be...
Owners Manual
Page 37
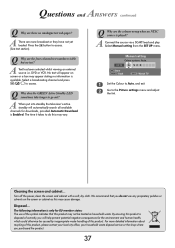
... treated as this product. For more detailed information about recycling of this product may cause damage. A Text has been selected whilst viewing an external source i.e. A Connect the source via a SCART lead and play. Manual setting Colour system: Auto. Q A uestions and nswers continued Q Why are the colours wrong when an NTSC source...
... treated as this product. For more detailed information about recycling of this product may cause damage. A Text has been selected whilst viewing an external source i.e. A Connect the source via a SCART lead and play. Manual setting Colour system: Auto. Q A uestions and nswers continued Q Why are the colours wrong when an NTSC source...
Owners Manual
Page 40
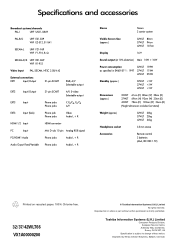
...-E12, S1-S41 SECAM-L UHF F21-F69 VHF F1-F10, B-Q SECAM-D/K UHF R21-R69 VHF R1-R12 Video Input PAL, SECAM, NTSC 3.58/4.43 External connections EXT1 Input/Output 21-pin SCART RGB, A/V Selectable output EXT2 Input/Output 21-pin SCART A/V, S-video Selectable output EXT3 Input Phono jacks Phono jacks Y, PB...
...-E12, S1-S41 SECAM-L UHF F21-F69 VHF F1-F10, B-Q SECAM-D/K UHF R21-R69 VHF R1-R12 Video Input PAL, SECAM, NTSC 3.58/4.43 External connections EXT1 Input/Output 21-pin SCART RGB, A/V Selectable output EXT2 Input/Output 21-pin SCART A/V, S-video Selectable output EXT3 Input Phono jacks Phono jacks Y, PB...


