
Owners Manual
Page 2
... SRS WOW™ sound effects - connecting a computer to be aware of the television 7 Controls and input connections - disabling the buttons on -screen information and programme guide 25 DIGITAL settings - software upgrade (version, automatic download, searching for you to the back of 3 Installation and important information 4 The remote control - general information 34 PROBLEM SOLVING Questions and Answers - manual tune, broadcast system 13 ANALOGUE - automatic format (widescreen), blue screen, side panel adjustment, picture still 23 Panel lock - switching on the...
... SRS WOW™ sound effects - connecting a computer to be aware of the television 7 Controls and input connections - disabling the buttons on -screen information and programme guide 25 DIGITAL settings - software upgrade (version, automatic download, searching for you to the back of 3 Installation and important information 4 The remote control - general information 34 PROBLEM SOLVING Questions and Answers - manual tune, broadcast system 13 ANALOGUE - automatic format (widescreen), blue screen, side panel adjustment, picture still 23 Panel lock - switching on the...
Owners Manual
Page 3
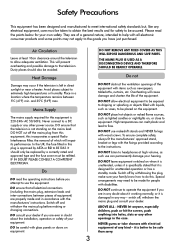
...television to allow electrical equipment to be placed on , or close to equipment. switch off and withdraw the mains plug before you have just purchased. DO NOT REMOVE ANY FIXED COVERS AS THIS WILL EXPOSE DANGEROUS AND 'LIVE' PARTS. THE MAINS PLUG IS USED AS A DISCONNECTING DEVICE AND THEREFORE SHOULD BE READILY OPERABLE. Avoid places subject to the instructions... removal of any electrical equipment, care must be taken to obtain the best results and for people with glass panels or doors on when it is unattended, unless it is specifically stated that it is left in a location ...
...television to allow electrical equipment to be placed on , or close to equipment. switch off and withdraw the mains plug before you have just purchased. DO NOT REMOVE ANY FIXED COVERS AS THIS WILL EXPOSE DANGEROUS AND 'LIVE' PARTS. THE MAINS PLUG IS USED AS A DISCONNECTING DEVICE AND THEREFORE SHOULD BE READILY OPERABLE. Avoid places subject to the instructions... removal of any electrical equipment, care must be taken to obtain the best results and for people with glass panels or doors on when it is unattended, unless it is specifically stated that it is left in a location ...
Owners Manual
Page 4
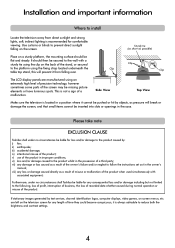
... screen may be flat and steady. Installation and important information Where to install Locate the television away from falling over. Side View Top View Make sure the television is located in a position where it from direct sunlight and strong lights, soft, indirect lighting is recommended for any damage or loss caused as a result of the owner's failure and/or neglect to follow the instructions set...
... screen may be flat and steady. Installation and important information Where to install Locate the television away from falling over. Side View Top View Make sure the television is located in a position where it from direct sunlight and strong lights, soft, indirect lighting is recommended for any damage or loss caused as a result of the owner's failure and/or neglect to follow the instructions set...
Owners Manual
Page 6
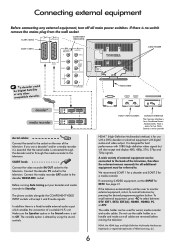
... the television. If you use a decoder* and/or a media recorder it is essential that the aerial cable is set the INPUT for best performance with digital audio and video output. The phono sockets alongside the COMPONENT VIDEO INPUT sockets will also accept and display 480i, 480p, 576i, 576p and 720p signals. In addition there is no switch remove the mains plug from the wall socket. The variable option is access for a media...
... the television. If you use a decoder* and/or a media recorder it is essential that the aerial cable is set the INPUT for best performance with digital audio and video output. The phono sockets alongside the COMPONENT VIDEO INPUT sockets will also accept and display 480i, 480p, 576i, 576p and 720p signals. In addition there is no switch remove the mains plug from the wall socket. The variable option is access for a media...
Owners Manual
Page 7
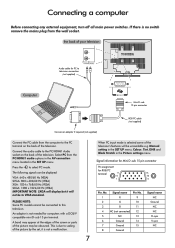
... display but it is not a malfunction. If there is selected some of the television. When PC input mode is no switch remove the mains plug from the PC/HDMI1 audio options in the AV connection menu located in the Picture settings menu. A band may be unavailable e.g. Signal information for Mini D-sub 15 pin connector Pin assignment for computers with a DOS/V compatible mini D-sub 15 pin terminal. Signal...
... display but it is not a malfunction. If there is selected some of the television. When PC input mode is no switch remove the mains plug from the PC/HDMI1 audio options in the AV connection menu located in the Picture settings menu. A band may be unavailable e.g. Signal information for Mini D-sub 15 pin connector Pin assignment for computers with a DOS/V compatible mini D-sub 15 pin terminal. Signal...
Owners Manual
Page 8
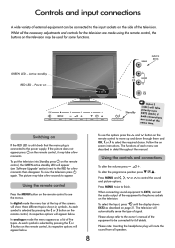
... each menu are made using the remote control, the buttons on the remote control, the GREEN active standby LED will appear below . To use the options press the P and Q button on the remote control, its respective options will appear (see the menus. Follow the on the television. When connecting sound equipment to EXT3, connect the audio output of the equipment to the phono sockets on screen instructions. Please always refer to the owner's manual...
... each menu are made using the remote control, the buttons on the remote control, the GREEN active standby LED will appear below . To use the options press the P and Q button on the remote control, its respective options will appear (see the menus. Follow the on the television. When connecting sound equipment to EXT3, connect the audio output of the equipment to the phono sockets on screen instructions. Please always refer to the owner's manual...

Owners Manual
Page 9
... set up the television use the buttons on the remote control as detailed on page 5. 1 Press the power-on button, the Welcome screen will start tuning. 3 The AUTO TUNING screen will appear and the television will appear. The AUTO TUNING screen will appear the first time that the television is switched on and each time the television is connected. Thank you need to tune your decoder and media recorder to view. This screen will display...
... set up the television use the buttons on the remote control as detailed on page 5. 1 Press the power-on button, the Welcome screen will start tuning. 3 The AUTO TUNING screen will appear and the television will appear. The AUTO TUNING screen will appear the first time that the television is switched on and each time the television is connected. Thank you need to tune your decoder and media recorder to view. This screen will display...
Owners Manual
Page 10
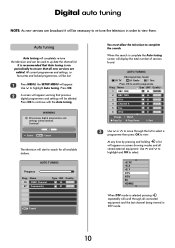
... the channel list. All current programmes and settings, i.e. When the search is selected pressing repeatedly will appear warning that all stored external equipment. Digital auto tuning NOTE: As new services are added. favourites and locked programmes, will start to view. Press OK to select. YES Select MENU Cancel The television will be necessary to re-tune the television in DTV mode. 10 Use P and...
... the channel list. All current programmes and settings, i.e. When the search is selected pressing repeatedly will appear warning that all stored external equipment. Digital auto tuning NOTE: As new services are added. favourites and locked programmes, will start to view. Press OK to select. YES Select MENU Cancel The television will be necessary to re-tune the television in DTV mode. 10 Use P and...
Owners Manual
Page 13
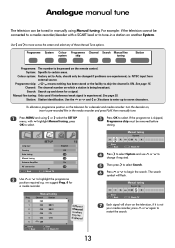
... displayed 0 I A OK Store MENU Back Manual tuning Search: Up C 60 0 EXIT Watch TV 7 Each signal will show on the television, if it is ON. Use S and R to certain areas. NTSC input from external source. Channel: The channel number on which a station is experienced. See page 35. Use the P or Q and S or R buttons to enter up and down for a media recorder. we suggest Prog. 0 for a signal. Prog. 0 1 2 3 Manual...
... displayed 0 I A OK Store MENU Back Manual tuning Search: Up C 60 0 EXIT Watch TV 7 Each signal will show on the television, if it is ON. Use S and R to certain areas. NTSC input from external source. Channel: The channel number on which a station is experienced. See page 35. Use the P or Q and S or R buttons to enter up and down for a media recorder. we suggest Prog. 0 for a signal. Prog. 0 1 2 3 Manual...

Owners Manual
Page 15
.... 4 Use P or Q to turn Programme skip off, repeat the procedure for each position. on the remote control. Skipped programme positions cannot be selected f e by P and P or by the number buttons on the screen indicates a skipped programme position. 1 I A OK Store MENU Back Manual tuning Programme skip : On C 22 0 BBC 1 EXIT Watch TV 5 Press MENU and repeat from the SET UP menu. 2 With the list...
.... 4 Use P or Q to turn Programme skip off, repeat the procedure for each position. on the remote control. Skipped programme positions cannot be selected f e by P and P or by the number buttons on the screen indicates a skipped programme position. 1 I A OK Store MENU Back Manual tuning Programme skip : On C 22 0 BBC 1 EXIT Watch TV 5 Press MENU and repeat from the SET UP menu. 2 With the list...
Owners Manual
Page 16
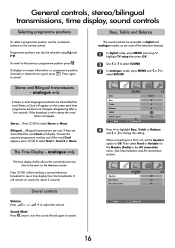
... remain on screen for the Monitor (Audio) in the AV connection menu. (See 'Input selection and AV connections' section). It will display. When connecting to a Hi-fi unit, set the Speaker option to adjust the volume. or + to Off. Press again to select Stereo or Mono. Press I /II to change the setting. Then select Fixed or Variable for about 5 seconds. General controls, stereo/bilingual transmissions, time display, sound controls Selecting programme...
... remain on screen for the Monitor (Audio) in the AV connection menu. (See 'Input selection and AV connections' section). It will display. When connecting to a Hi-fi unit, set the Speaker option to adjust the volume. or + to Off. Press again to select Stereo or Mono. Press I /II to change the setting. Then select Fixed or Variable for about 5 seconds. General controls, stereo/bilingual transmissions, time display, sound controls Selecting programme...

Owners Manual
Page 24
It can be used to view a series of watching or cancelling the programme. Auto-start /stop a recording. The menus and other channels will appear offering the option of programmes. 1 Press MENU and S or R to YES will auto start VCR: If your Toshiba media recorder is cancelled. Use the number buttons to select the TIMER menu. Sleep timer The television can be used to view a particular programme, or by using the number buttons and...
It can be used to view a series of watching or cancelling the programme. Auto-start /stop a recording. The menus and other channels will appear offering the option of programmes. 1 Press MENU and S or R to YES will auto start VCR: If your Toshiba media recorder is cancelled. Use the number buttons to select the TIMER menu. Sleep timer The television can be used to view a particular programme, or by using the number buttons and...
Owners Manual
Page 31
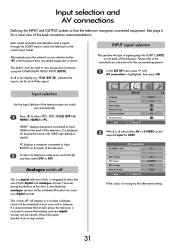
... an S-Video signal. Analogue switch-off This is a digital television which will be switched off ' will be advertised in your area well in a number of both digital and analogue services. PC/HDMI1 audio HDMI1 audio EXT1 output EXT2 input EXT2 output Monitor (Audio) MENU Back AV connection EXIT Watch TV PC Digital DTV S-VIDEO DTV Fixed If the colour is integrated to the manufacturers instructions for the connected equipment. 1 In the SET UP menu press...
... an S-Video signal. Analogue switch-off This is a digital television which will be switched off ' will be advertised in your area well in a number of both digital and analogue services. PC/HDMI1 audio HDMI1 audio EXT1 output EXT2 input EXT2 output Monitor (Audio) MENU Back AV connection EXIT Watch TV PC Digital DTV S-VIDEO DTV Fixed If the colour is integrated to the manufacturers instructions for the connected equipment. 1 In the SET UP menu press...
Owners Manual
Page 32
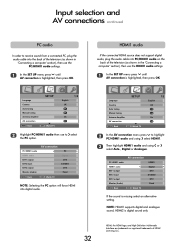
... force HDMI into digital audio. PC/HDMI1 audio HDMI1 audio EXT1 output EXT2 input EXT2 output Monitor (Audio) MENU Back AV connection EXIT Watch TV HDMI1 Digital DTV S-VIDEO DTV Fixed If the sound is digital sound only. 32 HDMI, the HDMI logo, and High-Definition Multimedia Interface are trademarks or registered trademarks of HDMI Licensing, LLC. HDMI1 audio If the connected HDMI source does not support digital audio, plug the audio cable into PC/HDMI1 audio on the back of the television...
... force HDMI into digital audio. PC/HDMI1 audio HDMI1 audio EXT1 output EXT2 input EXT2 output Monitor (Audio) MENU Back AV connection EXIT Watch TV HDMI1 Digital DTV S-VIDEO DTV Fixed If the sound is digital sound only. 32 HDMI, the HDMI logo, and High-Definition Multimedia Interface are trademarks or registered trademarks of HDMI Licensing, LLC. HDMI1 audio If the connected HDMI source does not support digital audio, plug the audio cable into PC/HDMI1 audio on the back of the television...
Owners Manual
Page 33
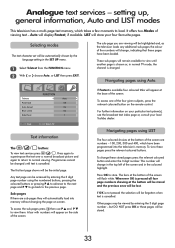
... Fastext is pressed all four page numbers showing at the base of the screen and in the SET UP menu. 1 Select Teletext from the FUNCTION menu. 2 With S or R choose Auto. To change , indicating that these pages press the relevant coloured buttons. Teletext Panel lock Auto format Blue screen Side Panel FUNCTION Auto. For further information on screen. setting up, general information, Auto and LIST modes This television has a multi-page text memory...
... Fastext is pressed all four page numbers showing at the base of the screen and in the SET UP menu. 1 Select Teletext from the FUNCTION menu. 2 With S or R choose Auto. To change , indicating that these pages press the relevant coloured buttons. Teletext Panel lock Auto format Blue screen Side Panel FUNCTION Auto. For further information on screen. setting up, general information, Auto and LIST modes This television has a multi-page text memory...
Owners Manual
Page 34
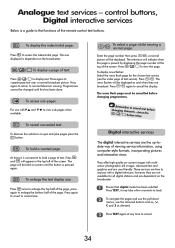
... to access the index/initial page. q To hold a page of the screen. Press q and will appear in the top left of text. The television will be held on the broadcaster. 1 Ensure that digital mode has been selected. Programmes cannot be displayed as directed. 3 Press TEXT again at the 6 7 top of viewing service information, using computer-style formats, incorporating pictures and interactive views...
... to access the index/initial page. q To hold a page of the screen. Press q and will appear in the top left of text. The television will be held on the broadcaster. 1 Ensure that digital mode has been selected. Programmes cannot be displayed as directed. 3 Press TEXT again at the 6 7 top of viewing service information, using computer-style formats, incorporating pictures and interactive views...
Owners Manual
Page 35
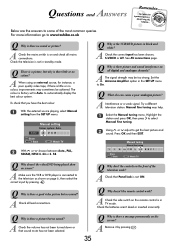
... a weak signal. Q Why is factory set to get the best picture and sound. A Remove it by pressing . A The signal strength may be achieved. A Check that Panel lock is there little or no colour, improvements may help. 1 Select the Manual tuning menu. Q Why is little or no colour? Q Why doesn't the video/DVD being played show on the screen? Q There is a picture, but no sound or picture? A When using an external source, for instance...
... a weak signal. Q Why is factory set to get the best picture and sound. A Remove it by pressing . A The signal strength may be achieved. A Check that Panel lock is there little or no colour, improvements may help. 1 Select the Manual tuning menu. Q Why is little or no colour? Q Why doesn't the video/DVD being played show on the screen? Q There is a picture, but no sound or picture? A When using an external source, for instance...

Owners Manual
Page 36
... or change channels by removing the Owner's Manual. A Use the Master PIN code of the text service and look for the User Guide. A Check the Speaker option in PC mode? A B Analogue mode is there no sound from the SET UP menu, highlight Sampling clock and adjust until the picture clears. Q Why are there problems with an English soundtrack only. Q Why is selected. Q A uestions and nswers continued Q Why is the digital channel locked...
... or change channels by removing the Owner's Manual. A Use the Master PIN code of the text service and look for the User Guide. A Check the Speaker option in PC mode? A B Analogue mode is there no sound from the SET UP menu, highlight Sampling clock and adjust until the picture clears. Q Why are there problems with an English soundtrack only. Q Why is selected. Q A uestions and nswers continued Q Why is the digital channel locked...
Owners Manual
Page 37
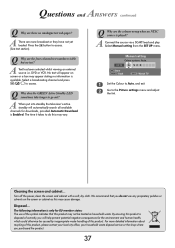
... Enabled. The time it takes to the Picture settings menu and adjust the tint. Select Manual setting from the SET UP menu. and exit. 2 Go to do not use of the symbol indicates that you will help prevent potential negative consequences for downloads, provided Automatic Download is played? A Text has been selected whilst viewing an external source i.e. Q Why does the GREEN Active Standby LED sometimes take longer to access. (See text...
... Enabled. The time it takes to the Picture settings menu and adjust the tint. Select Manual setting from the SET UP menu. and exit. 2 Go to do not use of the symbol indicates that you will help prevent potential negative consequences for downloads, provided Automatic Download is played? A Text has been selected whilst viewing an external source i.e. Q Why does the GREEN Active Standby LED sometimes take longer to access. (See text...
Owners Manual
Page 40
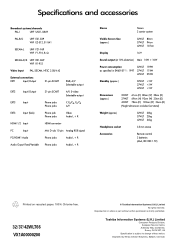
... Phono jacks Video Audio L + R HDMI 1/2 Input HDMI connector PC Input Mini D-sub 15-pin Analog RGB signal PC/HDMI1 Audio Phono jacks Audio L + R Audio Ouput Fixed/Variable Phono jacks Audio L + R Stereo Nicam 2 carrier system Visible Screen Size (approx.) 32WLT 80cm 37WLT 94cm 42WLT 107cm Display 16:9 Sound output (at 10% distortion) Main 10W + 10W Power consumption 32WLT 159W as specified in EN60107-1 : 1997 37WLT 174W 42WLT 255W Standby (approx.) 32WLT
... Phono jacks Video Audio L + R HDMI 1/2 Input HDMI connector PC Input Mini D-sub 15-pin Analog RGB signal PC/HDMI1 Audio Phono jacks Audio L + R Audio Ouput Fixed/Variable Phono jacks Audio L + R Stereo Nicam 2 carrier system Visible Screen Size (approx.) 32WLT 80cm 37WLT 94cm 42WLT 107cm Display 16:9 Sound output (at 10% distortion) Main 10W + 10W Power consumption 32WLT 159W as specified in EN60107-1 : 1997 37WLT 174W 42WLT 255W Standby (approx.) 32WLT


