User Manual
Page 2
... this Toshiba LCD TV. See "Removing the Pedestal Stand" ( page 6). Tune Into Safety • One size does NOT fit all instructions supplied by an independent laboratory (such as practical. Flat panel displays can easily be used as steps, such as close to place or install the display where it nearby for proper use of this apparatus must be connected to wall mount your purchase! This manual will help you use...
... this Toshiba LCD TV. See "Removing the Pedestal Stand" ( page 6). Tune Into Safety • One size does NOT fit all instructions supplied by an independent laboratory (such as practical. Flat panel displays can easily be used as steps, such as close to place or install the display where it nearby for proper use of this apparatus must be connected to wall mount your purchase! This manual will help you use...
User Manual
Page 4
... power cord and disconnect the antenna from mains power. Such products may damage the surface. Antenna lead-in contact with poor ventilation. Gently wipe the display panel surface (the TV screen) using the on or roll over the power cord, and never place the TV where the power cord is subject to wear or abuse. 30) Never overload wall outlets and extension cords. 31) Always operate...
... power cord and disconnect the antenna from mains power. Such products may damage the surface. Antenna lead-in contact with poor ventilation. Gently wipe the display panel surface (the TV screen) using the on or roll over the power cord, and never place the TV where the power cord is subject to wear or abuse. 30) Never overload wall outlets and extension cords. 31) Always operate...
User Manual
Page 5
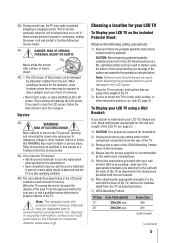
... approved method for the television, avoid locations where the screen may expose you need to clean the LCD screen, follow this product contain mercury. 40) During normal use the screws supplied or recommended by the wall mount manufacturer. 5) Follow the instructions provided with the wall bracket. 6) After attaching the appropriate bracket(s) to the wall and the back of the TV, remove the pedestal stand from the TV as...
... approved method for the television, avoid locations where the screen may expose you need to clean the LCD screen, follow this product contain mercury. 40) During normal use the screws supplied or recommended by the wall mount manufacturer. 5) Follow the instructions provided with the wall bracket. 6) After attaching the appropriate bracket(s) to the wall and the back of the TV, remove the pedestal stand from the TV as...
User Manual
Page 8
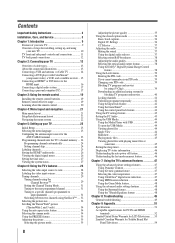
... side panel controls and connections 11 TV back panel connections 12 Chapter 2: Connecting your TV 13 Overview of cable types 13 About the connection illustrations 13 Connecting a VCR and antenna or Cable TV 14 Connecting a DVD player with ColorStream® (component video), a VCR, and a satellite receiver.... 15 Connecting an HDMI® or DVI device to the HDMI input 16 Connecting a digital audio system 17 Connecting a personal computer (PC 17 Chapter 3: Using the remote control 19 Installing the remote control batteries 19 Remote control effective...
... side panel controls and connections 11 TV back panel connections 12 Chapter 2: Connecting your TV 13 Overview of cable types 13 About the connection illustrations 13 Connecting a VCR and antenna or Cable TV 14 Connecting a DVD player with ColorStream® (component video), a VCR, and a satellite receiver.... 15 Connecting an HDMI® or DVI device to the HDMI input 16 Connecting a digital audio system 17 Connecting a personal computer (PC 17 Chapter 3: Using the remote control 19 Installing the remote control batteries 19 Remote control effective...
User Manual
Page 12
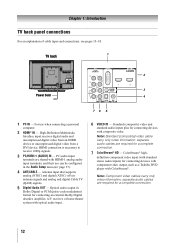
... cable types and connections, see pages 13-18. For use can be configured in Dolby Digital or PCM (pulse-code modulation) format for a complete connection. 12 Optical audio output in the Audio Setup menu ( page 37). 4無 ANT/CABLE - ColorStream® high- separate audio cables are required for connecting devices with optical audio input. 6無 VIDEO IN - Note: Standard (composite) video cable carry only video information; Antenna input that supports analog (NTSC) and digital (ATSC) off-air antenna signals and analog and digital Cable...
... cable types and connections, see pages 13-18. For use can be configured in Dolby Digital or PCM (pulse-code modulation) format for a complete connection. 12 Optical audio output in the Audio Setup menu ( page 37). 4無 ANT/CABLE - ColorStream® high- separate audio cables are required for connecting devices with optical audio input. 6無 VIDEO IN - Note: Standard (composite) video cable carry only video information; Antenna input that supports analog (NTSC) and digital (ATSC) off-air antenna signals and analog and digital Cable...
User Manual
Page 13
... typically color-coded red, green, and blue. HDMI® cable (with HDMI Logo " ") 3.5mm Stereo to RCA Y-Cable is for connecting audio signal from DVI device to TV. This cable carries both video and audio information; Coaxial (F-type) cable Coaxial (F-type) cable is for connecting your antenna, cable TV service, and/or cable converter box to the ANT/CABLE input on your TV) are not required for stereo left (or mono) audio. Standard A/V cables (red/white/yellow) Optical audio cable Optical audio cable is used for connecting receivers with analog audio...
... typically color-coded red, green, and blue. HDMI® cable (with HDMI Logo " ") 3.5mm Stereo to RCA Y-Cable is for connecting audio signal from DVI device to TV. This cable carries both video and audio information; Coaxial (F-type) cable Coaxial (F-type) cable is for connecting your antenna, cable TV service, and/or cable converter box to the ANT/CABLE input on your TV) are not required for stereo left (or mono) audio. Standard A/V cables (red/white/yellow) Optical audio cable Optical audio cable is used for connecting receivers with analog audio...
User Manual
Page 16
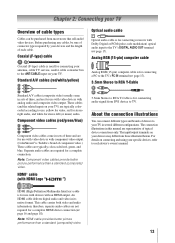
... video input source, press INPUT on your TV receives digital audio and uncompressed digital video from an HDMI source device, or uncompressed digital video from EIA/CEA-861-D- For detailed signal specifications, see page 18. Supported Audio format: Linear PCM, sampling rate 32/44.1/ 48 kHz Note: To connect a PC to -DVI adapter cable (HDMI type A connector) per HDMI device −− For proper operation, it is recommended that you will need a Category 2 cable. TV back panel HDMI device HDMI cable...
... video input source, press INPUT on your TV receives digital audio and uncompressed digital video from an HDMI source device, or uncompressed digital video from EIA/CEA-861-D- For detailed signal specifications, see page 18. Supported Audio format: Linear PCM, sampling rate 32/44.1/ 48 kHz Note: To connect a PC to -DVI adapter cable (HDMI type A connector) per HDMI device −− For proper operation, it is recommended that you will need a Category 2 cable. TV back panel HDMI device HDMI cable...

User Manual
Page 17
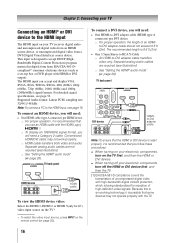
... digital audio system TV back panel Optical audio cable To control the audio: 1無 Turn on the TV and the digital audio device. 2無 Press on the TV's remote control and open the Sound menu. 3無 Highlight Audio Setup and press . 4無 In the Optical Output Format field, select either the PC IN or HDMI connection, you can accept and display VGA, SVGA, XGA, WXGA and SXGA(Only for use the PC setting (continued) 17 Connecting...
... digital audio system TV back panel Optical audio cable To control the audio: 1無 Turn on the TV and the digital audio device. 2無 Press on the TV's remote control and open the Sound menu. 3無 Highlight Audio Setup and press . 4無 In the Optical Output Format field, select either the PC IN or HDMI connection, you can accept and display VGA, SVGA, XGA, WXGA and SXGA(Only for use the PC setting (continued) 17 Connecting...
User Manual
Page 21
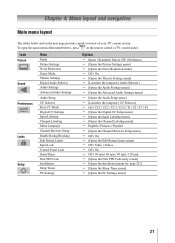
Icon Picture Sound Preferences Locks Setup Item Mode Picture Settings Noise Reduction Game Mode Theater Settings Digital Audio Selector Audio Settings Advanced Audio Settings Audio Setup CC Selector Base CC Mode Digital CC Settings Input Labeling Channel Labeling Menu Language Channel Browser Setup Enable Rating Blocking Edit Rating Limits Input Lock Control Panel Lock GameTimer New PIN Code Installation Sleep Timer PC Settings Option Sports / Standard / Movie / PC / Preference [Opens the Picture Settings menu] [Opens the Noise Reduction menu] Off / On &#...
Icon Picture Sound Preferences Locks Setup Item Mode Picture Settings Noise Reduction Game Mode Theater Settings Digital Audio Selector Audio Settings Advanced Audio Settings Audio Setup CC Selector Base CC Mode Digital CC Settings Input Labeling Channel Labeling Menu Language Channel Browser Setup Enable Rating Blocking Edit Rating Limits Input Lock Control Panel Lock GameTimer New PIN Code Installation Sleep Timer PC Settings Option Sports / Standard / Movie / PC / Preference [Opens the Picture Settings menu] [Opens the Noise Reduction menu] Off / On &#...
User Manual
Page 26
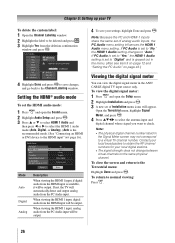
... input source only. To view the digital signal meter: 1無 Press and open the Sound menu. 2無 Highlight Audio Setup and press . 3無 Press p or q to select HDMI 1 Audio and then press t or u to select the HDMI 1 audio mode (Auto, Digital, or Analog). (Auto is set of Installation menu icons will automatically detect and output analog audio from the PC Audio input. Open the Terrestrial menu, highlight Signal Meter, and press . 4無 Press pqtu to select the antenna input and digital channel...
... input source only. To view the digital signal meter: 1無 Press and open the Sound menu. 2無 Highlight Audio Setup and press . 3無 Press p or q to select HDMI 1 Audio and then press t or u to select the HDMI 1 audio mode (Auto, Digital, or Analog). (Auto is set of Installation menu icons will automatically detect and output analog audio from the PC Audio input. Open the Terrestrial menu, highlight Signal Meter, and press . 4無 Press pqtu to select the antenna input and digital channel...

User Manual
Page 31
... History List: • Reconfiguring the ANT/CABLE input will be updated automatically when you change the mode. Tuning to select digital channel 125-1, press 1, 2, 5, -, 1, then . Clearing channels from the list when a new channel or input is tuned. • Turning off the TV will clear the History List. To set to select your desired mode. For example, to a specific channel (programmed or unprogrammed) Tuning analog channels: Press the Channel Number (0-9) on the remote control. Chapter 6: Using the...
... History List: • Reconfiguring the ANT/CABLE input will be updated automatically when you change the mode. Tuning to select digital channel 125-1, press 1, 2, 5, -, 1, then . Clearing channels from the list when a new channel or input is tuned. • Turning off the TV will clear the History List. To set to select your desired mode. For example, to a specific channel (programmed or unprogrammed) Tuning analog channels: Press the Channel Number (0-9) on the remote control. Chapter 6: Using the...

User Manual
Page 37
... Auto, Transparent, Opacity Translucent, Flashing, Solid Caption Text Edge Color Auto, Black, White, Red, Green, Blue, Yellow, Magenta, Cyan CC Selector You can use to set to 0. However, once you change to partially reduce (1/2 MUTE) or turn off (MUTE) the sound. This temporarily overrides the audio track chosen by the language option under Audio Setup ( "Selecting stereo/SAP broadcasts" on the remote control to another analog channel, the closed caption modes. To use the Digital Audio...
... Auto, Transparent, Opacity Translucent, Flashing, Solid Caption Text Edge Color Auto, Black, White, Red, Green, Blue, Yellow, Magenta, Cyan CC Selector You can use to set to 0. However, once you change to partially reduce (1/2 MUTE) or turn off (MUTE) the sound. This temporarily overrides the audio track chosen by the language option under Audio Setup ( "Selecting stereo/SAP broadcasts" on the remote control to another analog channel, the closed caption modes. To use the Digital Audio...

User Manual
Page 39
Press the Channel Number buttons to enter a new four-digit code, enter the code a second time to confirm, and press . • The Locks/Active screen appears if the PIN code is now active. Note: PIN code cannot be set to Optical Output Format (PCM mode). Note: ••This item will function in this TV detects the signals and blocks the programs according to "0000". Entering the PIN code 1無...
Press the Channel Number buttons to enter a new four-digit code, enter the code a second time to confirm, and press . • The Locks/Active screen appears if the PIN code is now active. Note: PIN code cannot be set to Optical Output Format (PCM mode). Note: ••This item will function in this TV detects the signals and blocks the programs according to "0000". Entering the PIN code 1無...

User Manual
Page 42
... Unlocking programs temporarily If you try to tune the TV to highlight Control Panel Lock. (continued) To lock/unlock the video inputs: 1無 From the Locks menu, Press to display the PIN code entering screen. 2無 Enter your settings from being changed accidentally (by children, for 40"), PC, USB Media and channels 3 and 4. • Select Video+ if you play videotapes via an ANT/CABLE input. Mode Video Video+ Off Description Locks VIDEO, ColorStream HD, HDMI 1, HDMI 2, HDMI 3(only for the video game...
... Unlocking programs temporarily If you try to tune the TV to highlight Control Panel Lock. (continued) To lock/unlock the video inputs: 1無 From the Locks menu, Press to display the PIN code entering screen. 2無 Enter your settings from being changed accidentally (by children, for 40"), PC, USB Media and channels 3 and 4. • Select Video+ if you play videotapes via an ANT/CABLE input. Mode Video Video+ Off Description Locks VIDEO, ColorStream HD, HDMI 1, HDMI 2, HDMI 3(only for the video game...

User Manual
Page 43
...) To set of analog audio inputs, the PC Audio menu setting influences the (continued) 43 Yes: When viewing the PC input, the audio from center.* Vertical Position Moves the picture up/down. Using the PC settings feature You can use the PC Settings feature to reduce noise and minimize periodic vertical stripes on the TV screen. Mode Description Horizontal Position Moves the picture left/right. button on the control panel (except POWER...
...) To set of analog audio inputs, the PC Audio menu setting influences the (continued) 43 Yes: When viewing the PC input, the audio from center.* Vertical Position Moves the picture up/down. Using the PC settings feature You can use the PC Settings feature to reduce noise and minimize periodic vertical stripes on the TV screen. Mode Description Horizontal Position Moves the picture left/right. button on the control panel (except POWER...

User Manual
Page 46
... or SAP audio status (when HDMI input mode, Dolby Digital or PCM) 46 • Video resolution • Aspect ratio of time you should unplug the power cord. To set ) To close the RECALL screen: Press again. To set the sleep timer using the remote control: Press on -screen menus: 1無 Press and open the Setup menu. 2無 Highlight Sleep Timer and press . 3無 Press the Number buttons to enter the length of time until it is set ) • Digital signal strength...
... or SAP audio status (when HDMI input mode, Dolby Digital or PCM) 46 • Video resolution • Aspect ratio of time you should unplug the power cord. To set ) To close the RECALL screen: Press again. To set the sleep timer using the remote control: Press on -screen menus: 1無 Press and open the Setup menu. 2無 Highlight Sleep Timer and press . 3無 Press the Number buttons to enter the length of time until it is set ) • Digital signal strength...
User Manual
Page 49
... modes (T1, T2, T3, or T4). Use a highly directional outdoor antenna (if applicable). •• The station may want to VIDEO, ColorStream® HDMI 1, HDMI 2, HDMI 3(only for a possible cause of the problem and some solutions you can try the control panel buttons. Chapter 8: Troubleshooting General troubleshooting Before calling a service technician, please check this chapter for 40"), PC, USB Media or from channels 3 or 4, make sure the Input Lock...
... modes (T1, T2, T3, or T4). Use a highly directional outdoor antenna (if applicable). •• The station may want to VIDEO, ColorStream® HDMI 1, HDMI 2, HDMI 3(only for a possible cause of the problem and some solutions you can try the control panel buttons. Chapter 8: Troubleshooting General troubleshooting Before calling a service technician, please check this chapter for 40"), PC, USB Media or from channels 3 or 4, make sure the Input Lock...
User Manual
Page 50
... the USB storage device are formats that correspond with this happens, turn off the closed caption feature ( page 36). •• A closed -captioned, no sound, try setting the MTS feature to tune digital channels, check the antenna configuration ( page 23). Channel tuning problems •• The channel may be on. Closed caption problems •• If the program or video you selected is not closed -caption signal may not display correctly in Audio Settings menu...
... the USB storage device are formats that correspond with this happens, turn off the closed caption feature ( page 36). •• A closed -captioned, no sound, try setting the MTS feature to tune digital channels, check the antenna configuration ( page 23). Channel tuning problems •• The channel may be on. Closed caption problems •• If the program or video you selected is not closed -caption signal may not display correctly in Audio Settings menu...
User Manual
Page 53
... faults, defects or problems" are not covered by inadequate antenna systems, misaligned satellite dishes or improperly installed cable drops are sold and used for commercial purposes for set installation, setup, adjustment of customer controls, and installation or repair of original retail purchase. Reception problems caused by this warranty. You must be performed by this limited warranty. (7) Product that service is needed, follow the instructions provided on the date...
... faults, defects or problems" are not covered by inadequate antenna systems, misaligned satellite dishes or improperly installed cable drops are sold and used for commercial purposes for set installation, setup, adjustment of customer controls, and installation or repair of original retail purchase. Reception problems caused by this warranty. You must be performed by this limited warranty. (7) Product that service is needed, follow the instructions provided on the date...
User Manual
Page 54
... CANADA, ARE NOT COVERED BY THESE WARRANTIES. Labour charges for set installation, setup, adjustment of customer controls, and installation or repair of antenna systems are not covered by inadequate antenna systems are effective only if the Television is (i) purchased as limited above, and do not provide for direct and immediate access to the product for Toshiba Brand Flat Panel Televisions Toshiba of shipment to original consumers in...
... CANADA, ARE NOT COVERED BY THESE WARRANTIES. Labour charges for set installation, setup, adjustment of customer controls, and installation or repair of antenna systems are not covered by inadequate antenna systems are effective only if the Television is (i) purchased as limited above, and do not provide for direct and immediate access to the product for Toshiba Brand Flat Panel Televisions Toshiba of shipment to original consumers in...


