User Manual
Page 7
...equipment. The afterimage is not covered under license from a normal viewing distance. FCC Declaration of Conformity Compliance Statement (Part 15): The Toshiba 32DT1U and 40FT1U Televisions comply with the instructions, may not cause harmful interference, and (2) this TV. The party responsible for help. Ph...authority to provide reasonable protection against harmful interference in the United States and other countries. • MPEG Layer-3 audio coding technology licensed from that to which can radiate radio frequency energy and, if not installed and used in accordance...
...equipment. The afterimage is not covered under license from a normal viewing distance. FCC Declaration of Conformity Compliance Statement (Part 15): The Toshiba 32DT1U and 40FT1U Televisions comply with the instructions, may not cause harmful interference, and (2) this TV. The party responsible for help. Ph...authority to provide reasonable protection against harmful interference in the United States and other countries. • MPEG Layer-3 audio coding technology licensed from that to which can radiate radio frequency energy and, if not installed and used in accordance...
User Manual
Page 8
...and a satellite receiver.... 15 Connecting an HDMI® or DVI device to the HDMI input 16 Connecting a digital audio system 17 Connecting a personal computer (PC 17 Chapter 3: Using the remote control 19 Installing the remote control batteries ... digital noise reduction 47 Using MPEG noise reduction 48 Using the Game Mode feature 48 Using the advanced audio settings features 48 Using the Surround feature 48 Using the 7 Bands Equalizer feature 48 Chapter 8: Troubleshooting 49...Warranty for LCD Televisions....... 53 Limited Canadian Warranty for Toshiba Brand Flat Panel Televisions 54
...and a satellite receiver.... 15 Connecting an HDMI® or DVI device to the HDMI input 16 Connecting a digital audio system 17 Connecting a personal computer (PC 17 Chapter 3: Using the remote control 19 Installing the remote control batteries ... digital noise reduction 47 Using MPEG noise reduction 48 Using the Game Mode feature 48 Using the advanced audio settings features 48 Using the Surround feature 48 Using the 7 Bands Equalizer feature 48 Chapter 8: Troubleshooting 49...Warranty for LCD Televisions....... 53 Limited Canadian Warranty for Toshiba Brand Flat Panel Televisions 54
User Manual
Page 9
... the Call Letters (e.g. Chapter 1: Introduction Features of your new TV The following are just a few of the many exciting features of your new Toshiba widescreen, integrated HD, LCD TV: • Integrated digital tuning (8VSB ATSC and QAM) eliminates the need for a separate digital converter set-top...( page 16). • One set of ColorStream® HD high-resolution component video inputs ( page 15). • Digital Audio Out optical audio connection with the station numbers, so you always know what you're watching ( page 25). • Media Player allows you to play...
... the Call Letters (e.g. Chapter 1: Introduction Features of your new TV The following are just a few of the many exciting features of your new Toshiba widescreen, integrated HD, LCD TV: • Integrated digital tuning (8VSB ATSC and QAM) eliminates the need for a separate digital converter set-top...( page 16). • One set of ColorStream® HD high-resolution component video inputs ( page 15). • Digital Audio Out optical audio connection with the station numbers, so you always know what you're watching ( page 25). • Media Player allows you to play...
User Manual
Page 11
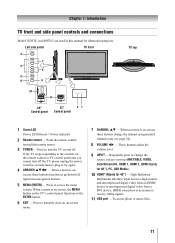
.... 11無 USB port - When no menu is necessary to access the menu system. High-Definition Multimedia Interface input receives digital audio and uncompressed digital video from an HDMI device or uncompressed digital video from a DVI device. Press to instantly close an on the...functions as up/down/left/ right menu navigation buttons. 5無 MENU (ENTER) - Chapter 1: Introduction TV front and side panel controls and connections Model 32DT1U and 40FT1U are viewing (ANT/CABLE, VIDEO, ColorStream HD, HDMI 1, HDMI 2, HDMI 3(only for 40"), PC, USB Media). 10無 HDMI&#...
.... 11無 USB port - When no menu is necessary to access the menu system. High-Definition Multimedia Interface input receives digital audio and uncompressed digital video from an HDMI device or uncompressed digital video from a DVI device. Press to instantly close an on the...functions as up/down/left/ right menu navigation buttons. 5無 MENU (ENTER) - Chapter 1: Introduction TV front and side panel controls and connections Model 32DT1U and 40FT1U are viewing (ANT/CABLE, VIDEO, ColorStream HD, HDMI 1, HDMI 2, HDMI 3(only for 40"), PC, USB Media). 10無 HDMI&#...
User Manual
Page 12
... menu ( page 37). 4無 ANT/CABLE - definition component video input (with standard stereo audio inputs) for connecting devices with component video output, such as a Toshiba DVD player with composite video. High-Definition Multimedia Interface input receives digital audio and uncompressed digital video from an HDMI device or uncompressed digital video from a DVI...
... menu ( page 37). 4無 ANT/CABLE - definition component video input (with standard stereo audio inputs) for connecting devices with component video output, such as a Toshiba DVD player with composite video. High-Definition Multimedia Interface input receives digital audio and uncompressed digital video from an HDMI device or uncompressed digital video from a DVI...
User Manual
Page 13
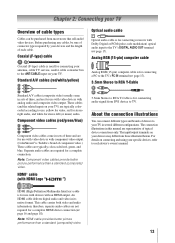
... of three and are for use with video devices with component video output. (ColorStream® is Toshiba's brand of component video.) These cables are for stereo left (or mono) audio. About the connection illustrations You can be sure of connector types required by your devices and the ...TV) are representative of typical device connections only. These cables (and the related inputs on your devices may differ from most stores that sell audio/ video devices. HDMI® cable (with an HDMI output. HDMI (High-Definition Multimedia Interface) cable is for use with video devices ...
... of three and are for use with video devices with component video output. (ColorStream® is Toshiba's brand of component video.) These cables are for stereo left (or mono) audio. About the connection illustrations You can be sure of connector types required by your devices and the ...TV) are representative of typical device connections only. These cables (and the related inputs on your devices may differ from most stores that sell audio/ video devices. HDMI® cable (with an HDMI output. HDMI (High-Definition Multimedia Interface) cable is for use with video devices ...

User Manual
Page 14
... and antenna or Cable TV TV back panel From Cable TV or antenna From Cable TV Cable box IN CH 3 CH 4 OUT Stereo VCR VIDEO AUDIO L R IN CH 3 CH 4 OUT L R IN from ANT OUT to TV You will need: • Coaxial cables • Standard A/V cables −− If you have a mono... VCR, connect L/MONO on the TV to your VCR's audio out terminal using the white audio cable only. • Standard audio cables (If you have a mono VCR) Note: When you use a Cable box, you to change channels. To view the VCR: Turn...
... and antenna or Cable TV TV back panel From Cable TV or antenna From Cable TV Cable box IN CH 3 CH 4 OUT Stereo VCR VIDEO AUDIO L R IN CH 3 CH 4 OUT L R IN from ANT OUT to TV You will need: • Coaxial cables • Standard A/V cables −− If you have a mono... VCR, connect L/MONO on the TV to your VCR's audio out terminal using the white audio cable only. • Standard audio cables (If you have a mono VCR) Note: When you use a Cable box, you to change channels. To view the VCR: Turn...
User Manual
Page 15
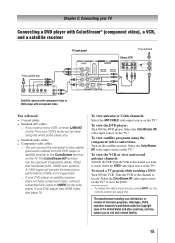
... page 20). If your DVD player or satellite receiver does not have a mono VCR, connect L/MONO on the TV to your VCR's audio out terminal using the component video connections: Turn on the satellite receiver. Select the VIDEO video input source on the TV.* To view the ... TV Connecting a DVD player with ColorStream® (component video), a VCR, and a satellite receiver From satellite dish TV back panel From antenna Stereo VCR VIDEO AUDIO L R IN CH 3 CH 4 OUT L R IN from the DVD player or satellite receiver to the ColorStream terminal on the TV. The unauthorized recording, ...
... page 20). If your DVD player or satellite receiver does not have a mono VCR, connect L/MONO on the TV to your VCR's audio out terminal using the component video connections: Turn on the satellite receiver. Select the VIDEO video input source on the TV.* To view the ... TV Connecting a DVD player with ColorStream® (component video), a VCR, and a satellite receiver From satellite dish TV back panel From antenna Stereo VCR VIDEO AUDIO L R IN CH 3 CH 4 OUT L R IN from the DVD player or satellite receiver to the ColorStream terminal on the TV. The unauthorized recording, ...
User Manual
Page 16
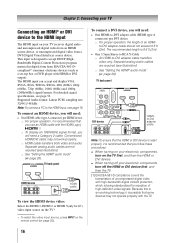
... cable with high-bandwidth digital content protection, which is recommended that some devices may not work properly. −− HDMI cable transfers both video and audio. The HDMI input can accept and display VGA, SVGA, XGA, WXGA, SXGA, 480i (60Hz), 480p (60Hz), 720p (60Hz), 1080i (60Hz) and 1080p (24Hz... HDMI 1, HDMI 2 or HDMI 3(only for reception of an HDMIto-DVI adapter cable should not exceed 9.8 ft (3m). TV back panel DVI device VIDEO AUDIO L R IN IN OUT L R DVI / HDCP OUT HDMIto-DVI adapter cable Note: To ensure that the HDMI or DVI device is reset properly, it...
... cable with high-bandwidth digital content protection, which is recommended that some devices may not work properly. −− HDMI cable transfers both video and audio. The HDMI input can accept and display VGA, SVGA, XGA, WXGA, SXGA, 480i (60Hz), 480p (60Hz), 720p (60Hz), 1080i (60Hz) and 1080p (24Hz... HDMI 1, HDMI 2 or HDMI 3(only for reception of an HDMIto-DVI adapter cable should not exceed 9.8 ft (3m). TV back panel DVI device VIDEO AUDIO L R IN IN OUT L R DVI / HDCP OUT HDMIto-DVI adapter cable Note: To ensure that the HDMI or DVI device is reset properly, it...

User Manual
Page 17
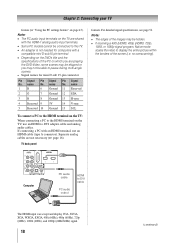
... computer (PC) With either Dolby Digital or PCM, depending on your computer's display on page 38). Chapter 2: Connecting your TV Connecting a digital audio system The TV's DIGITAL AUDIO OUT terminal outputs a *Dolby® Digital or 2-channel down-mixed PCM (pulse-code modulation) signal for 40") signal formats. Older...XGA, WXGA and SXGA(Only for use the PC setting (continued) 17 The PC IN terminal can watch your device ("Selecting the optical audio output format" on the TV and hear the sound from Dolby Laboratories. To connect a PC to the PC IN terminal on the TV: ...
... computer (PC) With either Dolby Digital or PCM, depending on your computer's display on page 38). Chapter 2: Connecting your TV Connecting a digital audio system The TV's DIGITAL AUDIO OUT terminal outputs a *Dolby® Digital or 2-channel down-mixed PCM (pulse-code modulation) signal for 40") signal formats. Older...XGA, WXGA and SXGA(Only for use the PC setting (continued) 17 The PC IN terminal can watch your device ("Selecting the optical audio output format" on the TV and hear the sound from Dolby Laboratories. To connect a PC to the PC IN terminal on the TV: ...
User Manual
Page 18
... compatible mini D-sub15-pin terminal. •• Depending on the TV, use an HDMI cable (type A connector). TV back panel formats. Computer PC audio cable PC audio output HDMI to the HDMI terminal on the DVD's title and the specifications of the screen (i.e. Note: •• The PC...able to pause during multi-angle scenes. • Signal names for computers with an HDMI terminal, use an HDMI-to DVI adapter cable and analog audio cables. For detailed signal specifications, see page 52. Note: •• The edges of the images may not be hidden. •• ...
... compatible mini D-sub15-pin terminal. •• Depending on the TV, use an HDMI cable (type A connector). TV back panel formats. Computer PC audio cable PC audio output HDMI to the HDMI terminal on the DVD's title and the specifications of the screen (i.e. Note: •• The PC...able to pause during multi-angle scenes. • Signal names for computers with an HDMI terminal, use an HDMI-to DVI adapter cable and analog audio cables. For detailed signal specifications, see page 52. Note: •• The edges of the images may not be hidden. •• ...
User Manual
Page 21
... Sound Preferences Locks Setup Item Mode Picture Settings Noise Reduction Game Mode Theater Settings Digital Audio Selector Audio Settings Advanced Audio Settings Audio Setup CC Selector Base CC Mode Digital CC Settings Input Labeling Channel Labeling Menu Language ...Reduction menu] Off / On [Opens the Theater Settings menu] [Launches the temporary Audio Selector] [Opens the Audio Settings menu] [Opens the Advanced Audio Settings menu] [Opens the Audio Setup menu] [Launches the temporary CC Selector] Off / CC1 / CC2 / CC3 /...
... Sound Preferences Locks Setup Item Mode Picture Settings Noise Reduction Game Mode Theater Settings Digital Audio Selector Audio Settings Advanced Audio Settings Audio Setup CC Selector Base CC Mode Digital CC Settings Input Labeling Channel Labeling Menu Language ...Reduction menu] Off / On [Opens the Theater Settings menu] [Launches the temporary Audio Selector] [Opens the Audio Settings menu] [Opens the Advanced Audio Settings menu] [Opens the Audio Setup menu] [Launches the temporary CC Selector] Off / CC1 / CC2 / CC3 /...
User Manual
Page 26
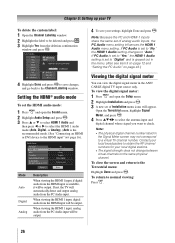
.... 2無 Highlight Installation and press . 3無 A new set of Installation menu icons will be output. When viewing the HDMI 1 input, digital audio from the HDMI input will be output. 4無 To save changes, and go back to the HDMI input" ( page 16). Contact your local... and is available, it will appear. Note: Because the PC and HDMI-1 inputs share the same set of analog audio inputs, the PC Audio menu setting influences the HDMI 1 Audio menu setting. Open the Terrestrial menu, highlight Signal Meter, and press . 4無 Press pqtu to select the antenna ...
.... 2無 Highlight Installation and press . 3無 A new set of Installation menu icons will be output. When viewing the HDMI 1 input, digital audio from the HDMI input will be output. 4無 To save changes, and go back to the HDMI input" ( page 16). Contact your local... and is available, it will appear. Note: Because the PC and HDMI-1 inputs share the same set of analog audio inputs, the PC Audio menu setting influences the HDMI 1 Audio menu setting. Open the Terrestrial menu, highlight Signal Meter, and press . 4無 Press pqtu to select the antenna ...

User Manual
Page 28
... or TV control 2無 And then either: a) Press 0-6 or 7; The current signal source displays in the top right corner of labels: • - - (default label) • Audio Receiver • Cable • Compact Disc • DTV • DVD • Game Console • HDMI Switch (HDMI inputs only) • Laser Disc • Satellite/DSS...
... or TV control 2無 And then either: a) Press 0-6 or 7; The current signal source displays in the top right corner of labels: • - - (default label) • Audio Receiver • Cable • Compact Disc • DTV • DVD • Game Console • HDMI Switch (HDMI inputs only) • Laser Disc • Satellite/DSS...

User Manual
Page 37
...press , the mute mode will change in Base CC Mode) for those channels that have multiple audio tracks). This temporarily overrides the audio track chosen by the language option under Audio Setup ( "Selecting stereo/SAP broadcasts" on the remote control to the current Base CC..., the next best service will automatically change back to partially reduce (1/2 MUTE) or turn off (MUTE) the sound. To mute the audio without automatically activating the closed caption services (if available). Chapter 6: Using the TV's features Caption Size Auto, Small, Standard, Large Caption...
...press , the mute mode will change in Base CC Mode) for those channels that have multiple audio tracks). This temporarily overrides the audio track chosen by the language option under Audio Setup ( "Selecting stereo/SAP broadcasts" on the remote control to the current Base CC..., the next best service will automatically change back to partially reduce (1/2 MUTE) or turn off (MUTE) the sound. To mute the audio without automatically activating the closed caption services (if available). Chapter 6: Using the TV's features Caption Size Auto, Small, Standard, Large Caption...
User Manual
Page 38
...step 3 above , and then press or to select the language you connect a Dolby Digital decoder or other digital audio system to the Optical Audio Out terminal on the TV (see the current program on the ANT/CABLE input. Chapter 6: Using the TV's features Selecting stereo/SAP ... SAP on your device. 4無 To save the new settings, highlight Done and press . Note: You can typically leave the TV in Audio Settings. Using the Dolby® Digital Dynamic Range Control feature This dynamic range control feature causes the ATSC dynamic range to the factory defaults,...
...step 3 above , and then press or to select the language you connect a Dolby Digital decoder or other digital audio system to the Optical Audio Out terminal on the TV (see the current program on the ANT/CABLE input. Chapter 6: Using the TV's features Selecting stereo/SAP ... SAP on your device. 4無 To save the new settings, highlight Done and press . Note: You can typically leave the TV in Audio Settings. Using the Dolby® Digital Dynamic Range Control feature This dynamic range control feature causes the ATSC dynamic range to the factory defaults,...

User Manual
Page 39
...buttons to "0000". If you can use the Dolby Digital Dynamic Range Control: 1無 Press and open the Sound menu. 2無 Highlight Audio Setup and press . 3無 In the Dolby Digital Dynamic Range Control field, select Compressed. Reenter the PIN code to the factory defaults, highlight...rating descriptions, see the tables on the next page.) (continued) 39 The V-Chip feature in relation to "0000". When Standard is selected, the audio is entered, the message "Incorrect PIN code, please try again!" You can enter a new PIN code. Highlight Retry and press . Changing your PIN...
...buttons to "0000". If you can use the Dolby Digital Dynamic Range Control: 1無 Press and open the Sound menu. 2無 Highlight Audio Setup and press . 3無 In the Dolby Digital Dynamic Range Control field, select Compressed. Reenter the PIN code to the factory defaults, highlight...rating descriptions, see the tables on the next page.) (continued) 39 The V-Chip feature in relation to "0000". When Standard is selected, the audio is entered, the message "Incorrect PIN code, please try again!" You can enter a new PIN code. Highlight Retry and press . Changing your PIN...

User Manual
Page 43
... or to make adjustments to make the appropriate adjustments. Note: Because the PC and HDMI-1 inputs share the same set the PC Audio: 1無 Press and open the Setup menu. 3無 Highlight PC Settings and press . Using the PC settings feature You can be grayed out... to the image. The adjustment range is pressed, the message "NOT AVAILABLE" appears. Yes: When viewing the PC input, the audio from the PC Audio input can view an image from center.* Sampling Clock Helps to reduce noise and minimize periodic vertical stripes on the control panel (except...
... or to make adjustments to make the appropriate adjustments. Note: Because the PC and HDMI-1 inputs share the same set the PC Audio: 1無 Press and open the Setup menu. 3無 Highlight PC Settings and press . Using the PC settings feature You can be grayed out... to the image. The adjustment range is pressed, the message "NOT AVAILABLE" appears. Yes: When viewing the PC input, the audio from the PC Audio input can view an image from center.* Sampling Clock Helps to reduce noise and minimize periodic vertical stripes on the control panel (except...
User Manual
Page 44
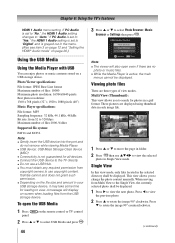
...(MSC) ••Connectivity is not guaranteed for photos in the menu. (Also see item 3 on page 12 and "Setting the HDMI® Audio mode" on page 26.) Using the USB Media Using the Media Player with USB You can enjoy photos or music contents stored on a USB storage... a grid format. This view allows you to select Photo Browser, Music Browser or Settings then press . Chapter 6: Using the TV's features HDMI 1 Audio menu setting. Toshiba cannot and does not grant such permission. ••Depending on the remote control or TV control 2無 Press or to select...
...(MSC) ••Connectivity is not guaranteed for photos in the menu. (Also see item 3 on page 12 and "Setting the HDMI® Audio mode" on page 26.) Using the USB Media Using the Media Player with USB You can enjoy photos or music contents stored on a USB storage... a grid format. This view allows you to select Photo Browser, Music Browser or Settings then press . Chapter 6: Using the TV's features HDMI 1 Audio menu setting. Toshiba cannot and does not grant such permission. ••Depending on the remote control or TV control 2無 Press or to select...

User Manual
Page 46
... should unplug the power cord. To set to turn itself off feature The TV will display for ATSC signal only) • Stereo, Mono or SAP audio status (when HDMI input mode, Dolby Digital or PCM) 46 • Video resolution • Aspect ratio of incoming video signal (4:3 or 16:9) • V-Chip rating...
... should unplug the power cord. To set to turn itself off feature The TV will display for ATSC signal only) • Stereo, Mono or SAP audio status (when HDMI input mode, Dolby Digital or PCM) 46 • Video resolution • Aspect ratio of incoming video signal (4:3 or 16:9) • V-Chip rating...


