
Brochure
Page 1
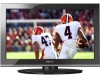
... your TV for deeper blacks and more colors, finer details, less visual noise and brighter, realistic pictures. Easily connect to your entertainment options. Easily connect to your personal playlists with 720p HD resolution Dynamic Backlight Control for the big screen experience. Bring home the affordable 32" C120U LCD HDTV, built with Toshiba quality and reliability, and designed to light up any room...
... your TV for deeper blacks and more colors, finer details, less visual noise and brighter, realistic pictures. Easily connect to your entertainment options. Easily connect to your personal playlists with 720p HD resolution Dynamic Backlight Control for the big screen experience. Bring home the affordable 32" C120U LCD HDTV, built with Toshiba quality and reliability, and designed to light up any room...
Brochure
Page 2
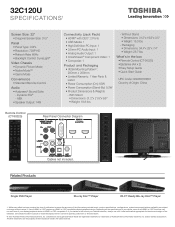
... compatible. 3. What's in the box • Remote Control (CT-90325) • Batteries (AA x 2) • Easy Setup Guide • Quick Start Guide UPC Code: 022265053607 Country of your device, some or all HDMI® w/ CEC functions may not work even if your Toshiba television, always use a UL Listed wall bracket appropriate for the size and weight of Toshiba America Information Systems, Inc. Depending on the specifications of Origin: China Remote Control (CT-90325) Rear Panel Connector Diagram Cables...
... compatible. 3. What's in the box • Remote Control (CT-90325) • Batteries (AA x 2) • Easy Setup Guide • Quick Start Guide UPC Code: 022265053607 Country of your device, some or all HDMI® w/ CEC functions may not work even if your Toshiba television, always use a UL Listed wall bracket appropriate for the size and weight of Toshiba America Information Systems, Inc. Depending on the specifications of Origin: China Remote Control (CT-90325) Rear Panel Connector Diagram Cables...
User Guide
Page 3
..., stand, tripod, bracket, or table specified by broken glass, rinse the affected area thoroughly with the manufacturer's instructions. 8) Do not install near water. 6) Clean only with dry cloth. 7) Do not block any ventilation openings. The LCD panel inside a wall or similar enclosed area. 22) Never modify this equipment under the rules of the polarized or grounding type plug. 3 Important Safety Instructions...
..., stand, tripod, bracket, or table specified by broken glass, rinse the affected area thoroughly with the manufacturer's instructions. 8) Do not install near water. 6) Clean only with dry cloth. 7) Do not block any ventilation openings. The LCD panel inside a wall or similar enclosed area. 22) Never modify this equipment under the rules of the polarized or grounding type plug. 3 Important Safety Instructions...
User Guide
Page 5
... included Pedestal Stand: Observe the following safety precautions: 1) Read and follow the instructions in death or serious injury. Opening and removing the covers may result in item 36), on /off . Failure to follow this manual to a Toshiba Authorized Service Provider. 45) If you need to clean the LCD screen, follow the pedestal assembly instructions included with your wall bracket. Refer all servicing not specified...
... included Pedestal Stand: Observe the following safety precautions: 1) Read and follow the instructions in death or serious injury. Opening and removing the covers may result in item 36), on /off . Failure to follow this manual to a Toshiba Authorized Service Provider. 45) If you need to clean the LCD screen, follow the pedestal assembly instructions included with your wall bracket. Refer all servicing not specified...
User Guide
Page 7
... and bass of small speakers. 7 FCC Declaration of Conformity Compliance Statement (Part 15): Toshiba 32C120U, 40E220U Television models comply with this TV. The party responsible for a long period of time. This helps ensure you enjoy your audio experience as much as your video experience. •Audyssey ABX™ technology uses sophisticated driver analysis and low frequency monitoring to the use of HDMI Licensing LLC in...
... and bass of small speakers. 7 FCC Declaration of Conformity Compliance Statement (Part 15): Toshiba 32C120U, 40E220U Television models comply with this TV. The party responsible for a long period of time. This helps ensure you enjoy your audio experience as much as your video experience. •Audyssey ABX™ technology uses sophisticated driver analysis and low frequency monitoring to the use of HDMI Licensing LLC in...
User Guide
Page 16
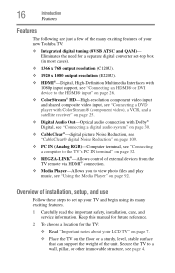
... output resolution (C120U). ❖ 1920 x 1080 output resolution (E220U). ❖ HDMI®-Digital, High-Definition Multimedia Interfaces with 1080p input support, see "Connecting an HDMI® or DVI device to the HDMI® input" on page 26. ❖ ColorStream® HD-High-resolution component video input and shared composite video input, see "Connecting a DVD player with ColorStream® (component video), a VCR, and a satellite receiver" on page 25. ❖ Digital Audio Out-Optical audio connection with Dolby® Digital, see "Connecting a digital audio system...
... output resolution (C120U). ❖ 1920 x 1080 output resolution (E220U). ❖ HDMI®-Digital, High-Definition Multimedia Interfaces with 1080p input support, see "Connecting an HDMI® or DVI device to the HDMI® input" on page 26. ❖ ColorStream® HD-High-resolution component video input and shared composite video input, see "Connecting a DVD player with ColorStream® (component video), a VCR, and a satellite receiver" on page 25. ❖ Digital Audio Out-Optical audio connection with Dolby® Digital, see "Connecting a digital audio system...
User Guide
Page 19
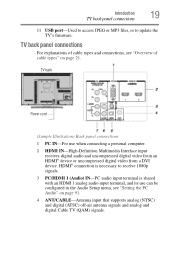
... the Audio Setup menu, see "Overview of cable types and connections, see "Setting the PC Audio" on page 21. TV back panel connections For explanations of cable types" on page 91. 4 ANT/CABLE-Antenna input that supports analog (NTSC) and digital (ATSC) off-air antenna signals and analog and digital Cable TV (QAM) signals. Introduction 19 TV back panel connections 11 USB port-Used to access JPEG or MP3 files, or to receive 1080p signals. 3 PC/HDMI 1 (Audio) IN-PC audio input terminal is necessary to update...
... the Audio Setup menu, see "Overview of cable types and connections, see "Setting the PC Audio" on page 21. TV back panel connections For explanations of cable types" on page 91. 4 ANT/CABLE-Antenna input that supports analog (NTSC) and digital (ATSC) off-air antenna signals and analog and digital Cable TV (QAM) signals. Introduction 19 TV back panel connections 11 USB port-Used to access JPEG or MP3 files, or to receive 1080p signals. 3 PC/HDMI 1 (Audio) IN-PC audio input terminal is necessary to update...
User Guide
Page 24
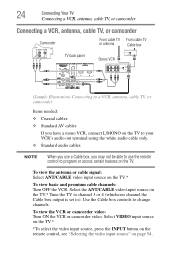
... antenna or cable signal: Select ANT/CABLE video input source on the TV. Use the Cable box controls to ). To view the VCR or camcorder video: Turn ON the VCR or camcorder video. Select the ANT/CABLE video input source on page 54. Select VIDEO input source on the TV.* *To select the video input source, press the INPUT button on the remote control, see "Selecting the video input source" on the TV.* Tune the TV to channel 3 or 4 (whichever channel the Cable box output is set to change channels...
... antenna or cable signal: Select ANT/CABLE video input source on the TV. Use the Cable box controls to ). To view the VCR or camcorder video: Turn ON the VCR or camcorder video. Select the ANT/CABLE video input source on page 54. Select VIDEO input source on the TV.* *To select the video input source, press the INPUT button on the remote control, see "Selecting the video input source" on the TV.* Tune the TV to channel 3 or 4 (whichever channel the Cable box output is set to change channels...
User Guide
Page 40
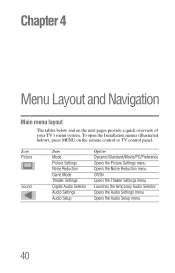
... the Installation menus (illustrated below and on the remote control or TV control panel. Icon Picture Sound Item Mode Picture Settings Noise Reduction Game Mode Theater Settings Digital Audio Selector Audio Settings Audio Setup Option Dynamic/Standard/Movie/PC/Preference Opens the Picture Settings menu Opens the Noise Reduction menu Off/On Opens the Theater Settings menu Launches the temporary Audio Selector Opens the Audio Settings menu Opens the Audio Setup menu 40 Chapter 4 Menu Layout and Navigation Main menu layout The tables below ), press MENU...
... the Installation menus (illustrated below and on the remote control or TV control panel. Icon Picture Sound Item Mode Picture Settings Noise Reduction Game Mode Theater Settings Digital Audio Selector Audio Settings Audio Setup Option Dynamic/Standard/Movie/PC/Preference Opens the Picture Settings menu Opens the Noise Reduction menu Off/On Opens the Theater Settings menu Launches the temporary Audio Selector Opens the Audio Settings menu Opens the Audio Setup menu 40 Chapter 4 Menu Layout and Navigation Main menu layout The tables below ), press MENU...
User Guide
Page 42
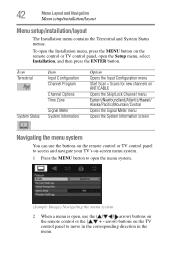
... menus. Icon Terrestrial System Status Item Input Configuration Channel Program Channel Options Time Zone Signal Meter System Information Option Opens the Input Configuration menu Start Scan > Scans for new channels on ANT/CABLE Opens the Skip/Lock Channel menu Eastern/Newfoundland/Atlantic/Hawaii/ Alaska/Pacific/Mountain/Central Opens the Signal Meter menu Opens the System Information screen Navigating the menu system You can use the ( / / / arrow) buttons on the remote control or the ( / + -
... menus. Icon Terrestrial System Status Item Input Configuration Channel Program Channel Options Time Zone Signal Meter System Information Option Opens the Input Configuration menu Start Scan > Scans for new channels on ANT/CABLE Opens the Skip/Lock Channel menu Eastern/Newfoundland/Atlantic/Hawaii/ Alaska/Pacific/Mountain/Central Opens the Signal Meter menu Opens the System Information screen Navigating the menu system You can use the ( / / / arrow) buttons on the remote control or the ( / + -

User Guide
Page 44
... the ( / arrow) buttons to select the input source (Cable or Antenna), and then press ENTER. 5 Press the ENTER button to select Home, and then press the ENTER button. You can stop the Initial Setup by pressing the EXIT button. However if you turn on the TV. 44 Then set your preferred language. 2 Press the ( / arrow) buttons to select Time Zone Setup. The Location settings window appears...
... the ( / arrow) buttons to select the input source (Cable or Antenna), and then press ENTER. 5 Press the ENTER button to select Home, and then press the ENTER button. You can stop the Initial Setup by pressing the EXIT button. However if you turn on the TV. 44 Then set your preferred language. 2 Press the ( / arrow) buttons to select Time Zone Setup. The Location settings window appears...
User Guide
Page 50
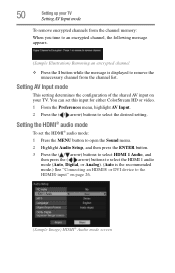
You can set the HDMI® audio mode: 1 Press the MENU button to open the Sound menu. 2 Highlight Audio Setup, and then press the ENTER button. 3 Press the ( / arrow) buttons to select HDMI 1 Audio, and then press the ( / arrow) buttons to select the HDMI 1 audio mode (Auto, Digital, or Analog). (Auto is displayed to remove the unnecessary channel from the channel memory: When you tune to an encrypted channel, the following message appears. (Sample Illustration) Removing an encrypted channel ❖...
You can set the HDMI® audio mode: 1 Press the MENU button to open the Sound menu. 2 Highlight Audio Setup, and then press the ENTER button. 3 Press the ( / arrow) buttons to select HDMI 1 Audio, and then press the ( / arrow) buttons to select the HDMI 1 audio mode (Auto, Digital, or Analog). (Auto is displayed to remove the unnecessary channel from the channel memory: When you tune to an encrypted channel, the following message appears. (Sample Illustration) Removing an encrypted channel ❖...

User Guide
Page 51
... Audio is set of Installation menu icons appears. 3 Open the Terrestrial menu, highlight Signal Meter, and then press the ENTER button. 4 Press the ( / / / arrow) buttons to select the antenna input and digital channel signal you wish to obtain the RF channel numbers for your TV 51 Viewing the digital signal meter Mode: Auto Digital Analog Description: When viewing the HDMI 1 input, if digital audio from the HDMI® input is available, it will automatically detect and output analog audio from the HDMI® input...
... Audio is set of Installation menu icons appears. 3 Open the Terrestrial menu, highlight Signal Meter, and then press the ENTER button. 4 Press the ( / / / arrow) buttons to select the antenna input and digital channel signal you wish to obtain the RF channel numbers for your TV 51 Viewing the digital signal meter Mode: Auto Digital Analog Description: When viewing the HDMI 1 input, if digital audio from the HDMI® input is available, it will automatically detect and output analog audio from the HDMI® input...
User Guide
Page 80
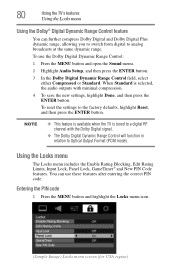
... to the factory defaults, highlight Reset, and then press the ENTER button. You can further compress Dolby Digital and Dolby Digital Plus dynamic range, allowing you to switch from digital to analog broadcasts at the same dynamic range. Entering the PIN code 1 Press the MENU button and highlight the Locks menu icon. (Sample Image) Locks menu screen (for USA region) To reset the settings to Optical Output Format (PCM mode). To use these features...
... to the factory defaults, highlight Reset, and then press the ENTER button. You can further compress Dolby Digital and Dolby Digital Plus dynamic range, allowing you to switch from digital to analog broadcasts at the same dynamic range. Entering the PIN code 1 Press the MENU button and highlight the Locks menu icon. (Sample Image) Locks menu screen (for USA region) To reset the settings to Optical Output Format (PCM mode). To use these features...
User Guide
Page 91
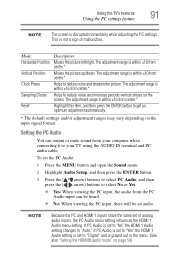
... in the menu. (See also "Setting the HDMI® audio mode" on the screen. The adjustment range is within ±10 from the PC Audio input can output or mute sound from center.* Moves the picture up/down. NOTE Because the PC and HDMI 1 inputs share the same set to get an optimum adjustment automatically. * The default settings and/or adjustment ranges may vary depending on the input signal format. This is...
... in the menu. (See also "Setting the HDMI® audio mode" on the screen. The adjustment range is within ±10 from the PC Audio input can output or mute sound from center.* Moves the picture up/down. NOTE Because the PC and HDMI 1 inputs share the same set to get an optimum adjustment automatically. * The default settings and/or adjustment ranges may vary depending on the input signal format. This is...

User Guide
Page 103
... appropriate HDMI® input. Device Auto If the TV is set your audio output preference to the TV speakers or the audio receiver speakers. When this item is turned off the sound. To use this item, you can select another REGZA-LINK® device that a connected REGZA-LINK® device (such as DVD player, etc.) is connected to the master HDMI® device using the TV's INPUT button, see "Selecting the video input source...
... appropriate HDMI® input. Device Auto If the TV is set your audio output preference to the TV speakers or the audio receiver speakers. When this item is turned off the sound. To use this item, you can select another REGZA-LINK® device that a connected REGZA-LINK® device (such as DVD player, etc.) is connected to the master HDMI® device using the TV's INPUT button, see "Selecting the video input source...
User Guide
Page 112
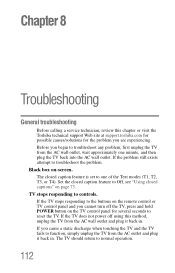
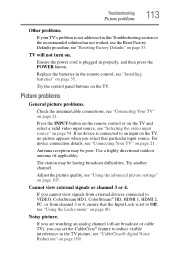
... AC wall outlet. Chapter 8 Troubleshooting General troubleshooting Before calling a service technician, review this method, unplug the TV from the AC wall outlet and plug it back in . If the TV does not power off the TV, press and hold POWER button on -screen. Set the closed caption feature to Off, see "Using closed caption feature is set to troubleshoot the problem. Black box on the TV control panel for the problem you begin to reset the...
... AC wall outlet. Chapter 8 Troubleshooting General troubleshooting Before calling a service technician, review this method, unplug the TV from the AC wall outlet and plug it back in . If the TV does not power off the TV, press and hold POWER button on -screen. Set the closed caption feature to Off, see "Using closed caption feature is set to troubleshoot the problem. Black box on the TV control panel for the problem you begin to reset the...
User Guide
Page 113
... view external signals or channel 3 or 4. If you are watching an analog channel (off-air broadcast or cable TV), you select that the Input Lock is set the CableClear® feature to VIDEO, ColorStream HD1, ColorStream® HD, HDMI 1, HDMI 2, PC, or from channel 3 or 4, ensure that particular input source. Troubleshooting Picture problems 113 Other problems. If your TV's problem is not addressed in the remote control, see "Installing batteries" on page 35. Replace the...
... view external signals or channel 3 or 4. If you are watching an analog channel (off-air broadcast or cable TV), you select that the Input Lock is set the CableClear® feature to VIDEO, ColorStream HD1, ColorStream® HD, HDMI 1, HDMI 2, PC, or from channel 3 or 4, ensure that particular input source. Troubleshooting Picture problems 113 Other problems. If your TV's problem is not addressed in the remote control, see "Installing batteries" on page 35. Replace the...

User Guide
Page 128
... and antenna 24 D digital audio selector using 76 digital signal meter viewing 51 F factory defaults reset 53 favorites browser 59 features 16 Freeze feature 70 G GameTimer® using 88 H HDMI® audio mode setting 50 History List adding/clearing channels 62 adding/clearing inputs 62 I icon safety 15 Initial setup 44 initial setup main menu layout 40 input lock feature using 87 L last mode memory feature 106 Locks menu setting pin code 80 M Media Player open 93 photo files 95 playing music...
... and antenna 24 D digital audio selector using 76 digital signal meter viewing 51 F factory defaults reset 53 favorites browser 59 features 16 Freeze feature 70 G GameTimer® using 88 H HDMI® audio mode setting 50 History List adding/clearing channels 62 adding/clearing inputs 62 I icon safety 15 Initial setup 44 initial setup main menu layout 40 input lock feature using 87 L last mode memory feature 106 Locks menu setting pin code 80 M Media Player open 93 photo files 95 playing music...
User Guide
Page 129
... 81 program ratings displaying 86 unlocking programs 86 Q quick setup ANT/CABLE IN 45 menu language 45 Index 129 R rating system 85 downloading additional 83 REGZA-LINK® additional functions 103 using 101 volume/mute buttons 103 S safety icons 15 scrolling TheaterWide® picture 68 specifications acceptable signal formats 121 audio power 119 channel coverage 118 ColorStream® HD input 120 Digital audio output 120 dimensions 120 HDMI® input 120 HDMI® signal formats 122 mass (weight) 120 operating conditions...
... 81 program ratings displaying 86 unlocking programs 86 Q quick setup ANT/CABLE IN 45 menu language 45 Index 129 R rating system 85 downloading additional 83 REGZA-LINK® additional functions 103 using 101 volume/mute buttons 103 S safety icons 15 scrolling TheaterWide® picture 68 specifications acceptable signal formats 121 audio power 119 channel coverage 118 ColorStream® HD input 120 Digital audio output 120 dimensions 120 HDMI® input 120 HDMI® signal formats 122 mass (weight) 120 operating conditions...


