

User Manual
Page 2
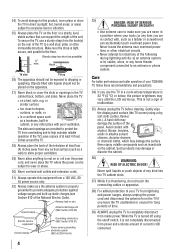
... operating and maintenance (servicing) instructions in serious bodily injury and/or property damage. The lightning flash with steel studs or old cinder block construction. NEC, which provides guidelines for installation. The use of any doubts about your ability to safely install your flat panel display, contact your retailer about professional installation. • Make sure that the wall where you use a UL Listed wall bracket appropriate for wall mounting...
... operating and maintenance (servicing) instructions in serious bodily injury and/or property damage. The lightning flash with steel studs or old cinder block construction. NEC, which provides guidelines for installation. The use of any doubts about your ability to safely install your flat panel display, contact your retailer about professional installation. • Make sure that the wall where you use a UL Listed wall bracket appropriate for wall mounting...
User Manual
Page 4
... turned off switch, it is thundering, do not touch the connecting cables or apparatus. 38) For added protection of current is still consumed. When the TV is not a sign of the panel. To secure the TV, use a sturdy strap from power and a minute amount of your TV from lightning and power surges, always unplug the power cord and disconnect the antenna...
... turned off switch, it is thundering, do not touch the connecting cables or apparatus. 38) For added protection of current is still consumed. When the TV is not a sign of the panel. To secure the TV, use a sturdy strap from power and a minute amount of your TV from lightning and power surges, always unplug the power cord and disconnect the antenna...
User Manual
Page 5
... popping sounds. Never attempt to clean the LCD screen, follow this product contain mercury. CAUTION: Do not use the screws removed from the back cover to attach the wall mount bracket to the TV. 4) Always use the screws supplied or recommended by ultraviolet radiation from the sun. 40) During normal use, the TV may make sure the appropriate bracket(s) are required for the television, avoid locations...
... popping sounds. Never attempt to clean the LCD screen, follow this product contain mercury. CAUTION: Do not use the screws removed from the back cover to attach the wall mount bracket to the TV. 4) Always use the screws supplied or recommended by ultraviolet radiation from the sun. 40) During normal use, the TV may make sure the appropriate bracket(s) are required for the television, avoid locations...
User Manual
Page 8
... back panel connections 12 Chapter 2: Connecting your TV 13 Overview of cable types 13 About the connection illustrations 13 Connecting a VCR and antenna, Cable TV or Camcorder 14 Connecting a DVD player with ColorStream® (component video), a VCR, and a satellite receiver 15 Connecting an HDMI® or DVI device to the HDMI input 16 REGZA-LINK® connection 17 Connecting a digital audio system 18 Connecting a personal computer (PC 18 Chapter 3: Using the remote control 20 Installing the remote control batteries 20 Remote control...
... back panel connections 12 Chapter 2: Connecting your TV 13 Overview of cable types 13 About the connection illustrations 13 Connecting a VCR and antenna, Cable TV or Camcorder 14 Connecting a DVD player with ColorStream® (component video), a VCR, and a satellite receiver 15 Connecting an HDMI® or DVI device to the HDMI input 16 REGZA-LINK® connection 17 Connecting a digital audio system 18 Connecting a personal computer (PC 18 Chapter 3: Using the remote control 20 Installing the remote control batteries 20 Remote control...
User Manual
Page 12
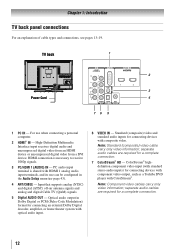
... receive 1080p signals. 3無 PC/HDMI 1 (AUDIO) IN - Standard (composite) video and standard audio inputs for connecting an external Dolby Digital decoder, amplifier, or home theater system with composite video. Note: Component video cables carry only video information; Optical audio output in the Audio Setup menu ( page 43). 4無 ANT/CABLE - Note: Standard (composite) video cable carry only video information; TV back 1 Power Cord 2 1 3 4 76 5 1無 PC IN - Chapter 1: Introduction TV back panel connections For an explanation of cable types...
... receive 1080p signals. 3無 PC/HDMI 1 (AUDIO) IN - Standard (composite) video and standard audio inputs for connecting an external Dolby Digital decoder, amplifier, or home theater system with composite video. Note: Component video cables carry only video information; Optical audio output in the Audio Setup menu ( page 43). 4無 ANT/CABLE - Note: Standard (composite) video cable carry only video information; TV back 1 Power Cord 2 1 3 4 76 5 1無 PC IN - Chapter 1: Introduction TV back panel connections For an explanation of cable types...
User Manual
Page 13
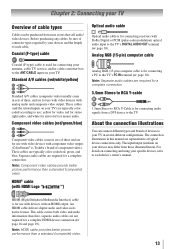
... according to use: yellow for video, red for stereo right audio, and white for use with video devices with Dolby Digital or PCM (pulse-code modulation) optical audio input to each cable. therefore, separate audio cables are not required for connecting your antenna, cable TV service, and/or cable converter box to the ANT/CABLE input on your TV) are typically color-coded red, green, and blue. Coaxial (F-type) cable Coaxial (F-type) cable is Toshiba's brand of each device's owner's manual. The input/output terminals on...
... according to use: yellow for video, red for stereo right audio, and white for use with video devices with Dolby Digital or PCM (pulse-code modulation) optical audio input to each cable. therefore, separate audio cables are not required for connecting your antenna, cable TV service, and/or cable converter box to the ANT/CABLE input on your TV) are typically color-coded red, green, and blue. Coaxial (F-type) cable Coaxial (F-type) cable is Toshiba's brand of each device's owner's manual. The input/output terminals on...
User Manual
Page 16
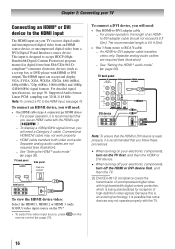
... HDMI input The HDMI input on your electronic components, turn off your TV receives digital audio and uncompressed digital video from an HDMI source device, or uncompressed digital video from EIA/CEA-861-Dcompliant[1] consumer electronic devices (such as a set-top box or DVD player with HDMI or DVI output).The HDMI input can accept and display VGA, SVGA, XGA, WXGA, SXGA, 480i (60Hz), 480p (60Hz), 720p (60Hz), 1080i (60Hz) and 1080p (24Hz/60Hz) signal formats...
... HDMI input The HDMI input on your electronic components, turn off your TV receives digital audio and uncompressed digital video from an HDMI source device, or uncompressed digital video from EIA/CEA-861-Dcompliant[1] consumer electronic devices (such as a set-top box or DVD player with HDMI or DVI output).The HDMI input can accept and display VGA, SVGA, XGA, WXGA, SXGA, 480i (60Hz), 480p (60Hz), 720p (60Hz), 1080i (60Hz) and 1080p (24Hz/60Hz) signal formats...
User Manual
Page 18
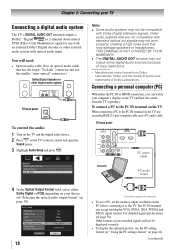
... (Pulse-Code Modulation) signal for use with an external Dolby® Digital decoder or other digital audio system TV back panel To control the audio: 1無 Turn on the TV and the digital audio device. 2無 Press on the TV's remote control and open the Sound menu. 3無 Highlight Audio Setup and press . TV back panel 1 Computer PC audio cable PC audio output 4無 In the Optical Output Format field, select either the PC IN or HDMI connection, you...
... (Pulse-Code Modulation) signal for use with an external Dolby® Digital decoder or other digital audio system TV back panel To control the audio: 1無 Turn on the TV and the digital audio device. 2無 Press on the TV's remote control and open the Sound menu. 3無 Highlight Audio Setup and press . TV back panel 1 Computer PC audio cable PC audio output 4無 In the Optical Output Format field, select either the PC IN or HDMI connection, you...
User Manual
Page 21
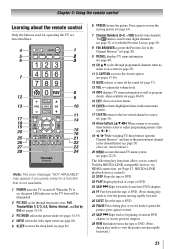
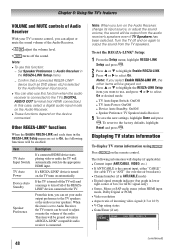
... view the picture moving rapidly backward.) 21 Chapter 3: Using the remote control Learning about the remote control Only the buttons used to tune digital channels ( page 31) or to edit the Favorites List ( page 29). 8無 FAV BROWSER accesses the Favorites List in the Channel Browser™ ( page 29). 9無 RECALL displays TV status information ( page 49). 10無 CH pq cycles through programmed channels...
... view the picture moving rapidly backward.) 21 Chapter 3: Using the remote control Learning about the remote control Only the buttons used to tune digital channels ( page 31) or to edit the Favorites List ( page 29). 8無 FAV BROWSER accesses the Favorites List in the Channel Browser™ ( page 29). 9無 RECALL displays TV status information ( page 49). 10無 CH pq cycles through programmed channels...
User Manual
Page 22
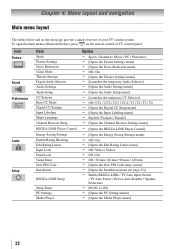
Icon Picture Sound Preferences Locks Setup Item Mode Picture Settings Noise Reduction Game Mode Theater Settings Digital Audio Selector Audio Settings Audio Setup CC Selector Base CC Mode Digital CC Settings Input Labeling Menu Language Channel Browser Setup REGZA-LINK Player Control Energy Saving Settings Enable Rating Blocking Edit Rating Limits Input Lock Panel Lock GameTimer New PIN Code Installation REGZA-LINK Setup Sleep Timer PC Settings Media Player Option Sports / Standard / Movie / PC / Preference [Opens the Picture Settings menu] [Opens the Noise ...
Icon Picture Sound Preferences Locks Setup Item Mode Picture Settings Noise Reduction Game Mode Theater Settings Digital Audio Selector Audio Settings Audio Setup CC Selector Base CC Mode Digital CC Settings Input Labeling Menu Language Channel Browser Setup REGZA-LINK Player Control Energy Saving Settings Enable Rating Blocking Edit Rating Limits Input Lock Panel Lock GameTimer New PIN Code Installation REGZA-LINK Setup Sleep Timer PC Settings Media Player Option Sports / Standard / Movie / PC / Preference [Opens the Picture Settings menu] [Opens the Noise ...
User Manual
Page 26
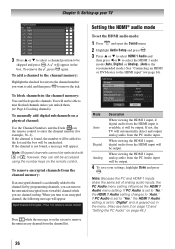
... "Connecting an HDMI or DVI device to enter the channel number (for example, 56-1). however, they can still be output. Digital Channel Is Encrypted - If not, the TV will be accessed using the number keys on the remote control to the HDMI input" ( page 16). Chapter 5: Setting up your settings, highlight Done and press . Setting the HDMI® audio mode To set the HDMI audio mode: 1無 Press and open the Sound menu. 2無 Highlight Audio Setup...
... "Connecting an HDMI or DVI device to enter the channel number (for example, 56-1). however, they can still be output. Digital Channel Is Encrypted - If not, the TV will be accessed using the number keys on the remote control to the HDMI input" ( page 16). Chapter 5: Setting up your settings, highlight Done and press . Setting the HDMI® audio mode To set the HDMI audio mode: 1無 Press and open the Sound menu. 2無 Highlight Audio Setup...
User Manual
Page 31
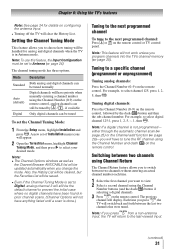
... Mode: 1無 From the Setup menu, highlight Installation and press . Tuning to a specific channel (programmed or unprogrammed) Tuning analog channels: Press the Channel Number (0-9) on the remote control. Note: If a digital channel is set of Installation menu icons will still be updated automatically when you to tune the RF channel using the Channel Number and dash ( ) on the remote control, followed by / , if available Only digital channels can be tuned normally Digital channels will have priority when manually entering a channel number using the Channel Number buttons...
... Mode: 1無 From the Setup menu, highlight Installation and press . Tuning to a specific channel (programmed or unprogrammed) Tuning analog channels: Press the Channel Number (0-9) on the remote control. Note: If a digital channel is set of Installation menu icons will still be updated automatically when you to tune the RF channel using the Channel Number and dash ( ) on the remote control, followed by / , if available Only digital channels can be tuned normally Digital channels will have priority when manually entering a channel number using the Channel Number buttons...

User Manual
Page 34
... HDMI aspect data) Automatic aspect size (automatically selected when Auto Aspect is received: • A 480i, 480p, 720p, 1080i digital signal from the ANT/CABLE input • A 480i signal from the VIDEO input • A 480i signal from the ColorStream HD input • A 480i, 480p, 720p, 1080i, 1080p, or VGA (60Hz) signal from four different modes, as needed. 6無 To save the new settings, highlight Done and press . Adjusting the picture...
... HDMI aspect data) Automatic aspect size (automatically selected when Auto Aspect is received: • A 480i, 480p, 720p, 1080i digital signal from the ANT/CABLE input • A 480i signal from the VIDEO input • A 480i signal from the ColorStream HD input • A 480i, 480p, 720p, 1080i, 1080p, or VGA (60Hz) signal from four different modes, as needed. 6無 To save the new settings, highlight Done and press . Adjusting the picture...
User Manual
Page 38
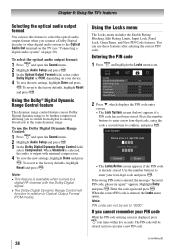
... code a second time to Optical Output Format (PCM mode). When the correct PIN code is available when turned to enter your four-digit code and press . To revert to the factory defaults, highlight Reset and press . Using the Locks menu The Locks menu includes the Enable Rating Blocking, Edit Rating Limits, Input Lock, Panel Lock, GameTimer, and New PIN Code features. Note: ••This feature is entered, the Locks menu opens. Use the number buttons to a digital RF channel...
... code a second time to Optical Output Format (PCM mode). When the correct PIN code is available when turned to enter your four-digit code and press . To revert to the factory defaults, highlight Reset and press . Using the Locks menu The Locks menu includes the Enable Rating Blocking, Edit Rating Limits, Input Lock, Panel Lock, GameTimer, and New PIN Code features. Note: ••This feature is entered, the Locks menu opens. Use the number buttons to a digital RF channel...
User Manual
Page 43
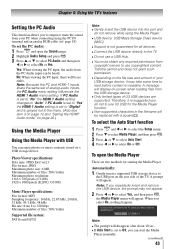
... an analog RGB cable. ( page 18) To set the PC Audio: 1無 Press and open the Media Player There are supported. Note: ••The prompt will be replaced with USB You can enjoy photos or music contents stored on the rear side of analog audio inputs, the PC Audio menu setting influences the HDMI 1 Audio menu setting. A message will be heard. No: When viewing the PC input, there will display on...
... an analog RGB cable. ( page 18) To set the PC Audio: 1無 Press and open the Media Player There are supported. Note: ••The prompt will be replaced with USB You can enjoy photos or music contents stored on the rear side of analog audio inputs, the PC Audio menu setting influences the HDMI 1 Audio menu setting. A message will be heard. No: When viewing the PC input, there will display on...
User Manual
Page 48
... as DVD player, etc) is set your TV's remote control, you want to use this case, select a digital audio input mode on the Audio Receiver. ••These functions depend on the device connected. Item TV Auto Input Switch TV Auto Power Device Auto Standby Speaker Preference Description If a connected HDMI device starts playing video or audio, the TV will be output from the TV speakers. When this item, you can set to Audio Receiver, the TV remote can adjust or mute the sound volume...
... as DVD player, etc) is set your TV's remote control, you want to use this case, select a digital audio input mode on the Audio Receiver. ••These functions depend on the device connected. Item TV Auto Input Switch TV Auto Power Device Auto Standby Speaker Preference Description If a connected HDMI device starts playing video or audio, the TV will be output from the TV speakers. When this item, you can set to Audio Receiver, the TV remote can adjust or mute the sound volume...
User Manual
Page 53
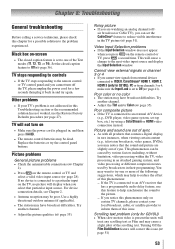
... closed caption feature to try again. Black box on certain TV channels, please contact your TV's problem is connected to the next video input source and display the Input Selection window. Replace the batteries or try using a ColorStream or HDMI video connection instead. Picture problems General picture problems •• Check the antenna/cable connections ( Chapter 2). •• Press on the remote control or TV, press a second time. Try another channel. •• Adjust the Tint and/or Color...
... closed caption feature to try again. Black box on certain TV channels, please contact your TV's problem is connected to the next video input source and display the Input Selection window. Replace the batteries or try using a ColorStream or HDMI video connection instead. Picture problems General picture problems •• Check the antenna/cable connections ( Chapter 2). •• Press on the remote control or TV, press a second time. Try another channel. •• Adjust the Tint and/or Color...
User Manual
Page 54
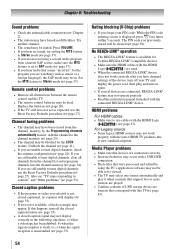
... legacy HDMI sources may not work correctly after you have changed settings of USB storage device are played. •• Confirm contents of the device, turn off your PIN code: While the PIN code entering screen is set to tune digital channels, clear all obstructions between the remote control and the TV. •• The remote control batteries may not operate properly. •• Read the instruction manual furnished with the connected...
... legacy HDMI sources may not work correctly after you have changed settings of USB storage device are played. •• Confirm contents of the device, turn off your PIN code: While the PIN code entering screen is set to tune digital channels, clear all obstructions between the remote control and the TV. •• The remote control batteries may not operate properly. •• Read the instruction manual furnished with the connected...
User Manual
Page 57
... includes wall mounts, custom cabinets and other installation methods that do not extend to any LCD Television or parts that is refurbished and resold is not covered under these warranties. OR PUERTO RICO AND USED ANYWHERE OUTSIDE OF THE U.S.A. ANY PART OR PRODUCT REPLACED UNDER THIS LIMITED WARRANTY BECOMES THE PROPERTY OF TAIS. Labor service charges for set installation, setup, adjustment of customer controls, and installation or repair of antenna...
... includes wall mounts, custom cabinets and other installation methods that do not extend to any LCD Television or parts that is refurbished and resold is not covered under these warranties. OR PUERTO RICO AND USED ANYWHERE OUTSIDE OF THE U.S.A. ANY PART OR PRODUCT REPLACED UNDER THIS LIMITED WARRANTY BECOMES THE PROPERTY OF TAIS. Labor service charges for set installation, setup, adjustment of customer controls, and installation or repair of antenna...
User Manual
Page 58
... UNDER SUCH CIRCUMSTANCES. This includes wall mounts, custom cabinets and other than those authorized by these warranties in the Television failing for Toshiba Brand Flat Panel Televisions Toshiba of Canada Limited ("TCL") makes the following limited warranties to contact you discover or should have discovered, the defect. Labour charges for set installation, setup, adjustment of customer controls, and installation or repair of the United States or any...
... UNDER SUCH CIRCUMSTANCES. This includes wall mounts, custom cabinets and other than those authorized by these warranties in the Television failing for Toshiba Brand Flat Panel Televisions Toshiba of Canada Limited ("TCL") makes the following limited warranties to contact you discover or should have discovered, the defect. Labour charges for set installation, setup, adjustment of customer controls, and installation or repair of the United States or any...


