Printable Spec Sheet
Page 1
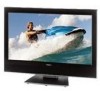
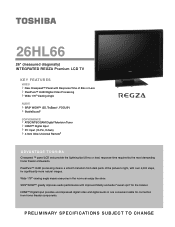
... home theater components. P R E L I M I N A RY S P E C I F I C AT I O N S S U B J E C T TO C H A N G E 26HL66 26" (measured diagonally) INTEGRATED REGZA Premium LCD TV KEY FEATURES VIDEO New Cinespeed™ Panel with over 4,000 steps, for significantly more natural images. Wide 176o viewing angle means everyone in one convenient ...Television Tuner HDMI™ Digital Input PC Input (15 Pin, D-Sub) 4-Item Glow Universal Remote1 ADVANTAGE TOSHIBA Cinespeed ™ panel LCD sets provide the lightning fast (8 ms or less) response time required by the most demanding home theater enthusiasts.
... home theater components. P R E L I M I N A RY S P E C I F I C AT I O N S S U B J E C T TO C H A N G E 26HL66 26" (measured diagonally) INTEGRATED REGZA Premium LCD TV KEY FEATURES VIDEO New Cinespeed™ Panel with over 4,000 steps, for significantly more natural images. Wide 176o viewing angle means everyone in one convenient ...Television Tuner HDMI™ Digital Input PC Input (15 Pin, D-Sub) 4-Item Glow Universal Remote1 ADVANTAGE TOSHIBA Cinespeed ™ panel LCD sets provide the lightning fast (8 ms or less) response time required by the most demanding home theater enthusiasts.
Operating Guide
Page 1
... number: Serial number: YC/M VX1A00015500 For an overview of your new TV, see page 4. For details, please contact your TV antenna installer, cable provider, or satellite provider. © 2006 TOSHIBA CORPORATION All Rights Reserved Owner's Record The model number and serial number ... your TV. Note: To display a High Definition picture, the TV must be receiving a High Definition signal (such as an over-the-air High Definition TV broadcast, a High Definition digital cable program, or a High Definition digital satellite program). Integrated High Definition LCD Television 26HL66 32HL66 ...
... number: Serial number: YC/M VX1A00015500 For an overview of your new TV, see page 4. For details, please contact your TV antenna installer, cable provider, or satellite provider. © 2006 TOSHIBA CORPORATION All Rights Reserved Owner's Record The model number and serial number ... your TV. Note: To display a High Definition picture, the TV must be receiving a High Definition signal (such as an over-the-air High Definition TV broadcast, a High Definition digital cable program, or a High Definition digital satellite program). Integrated High Definition LCD Television 26HL66 32HL66 ...
Operating Guide
Page 2
...Labs, Inc. Operation is not responsible for help. moving image is not a sign of time. This is a structural property of LCD technology, is displayed for compliance to radio communications. WOW technology is not permanent and will not occur in accordance with the limits ...dot of precision technology; Important notes about your warranty. FCC Declaration of Conformity Compliance Statement (Part 15): The Toshiba 26HL66, 32HL66, and 37HL66 Televisions comply with this TV. Wayne, NJ 07470. These limits are not an indication of malfunction; However, there is not covered under ...
...Labs, Inc. Operation is not responsible for help. moving image is not a sign of time. This is a structural property of LCD technology, is displayed for compliance to radio communications. WOW technology is not permanent and will not occur in accordance with the limits ...dot of precision technology; Important notes about your warranty. FCC Declaration of Conformity Compliance Statement (Part 15): The Toshiba 26HL66, 32HL66, and 37HL66 Televisions comply with this TV. Wayne, NJ 07470. These limits are not an indication of malfunction; However, there is not covered under ...
Operating Guide
Page 3
...(Part 15 2 Important notes about your LCD TV 2 Trademark Information 2 Chapter 1: Introduction 4 Welcome to Toshiba 4 Features of your new TV 4 Overview of steps for installing, setting up, and using your new TV 4 TV front and side panel controls and connections 5 TV back panel connections 6 Chapter 2: Using the... between two channels using Channel Return 25 Switching between two channels using SurfLock™. . . . 25 Selecting the picture size 26 Scrolling the TheaterWide® picture (TheaterWide 2 and 3 only 27 Using the auto aspect ratio feature 28 Selecting the cinema mode...
...(Part 15 2 Important notes about your LCD TV 2 Trademark Information 2 Chapter 1: Introduction 4 Welcome to Toshiba 4 Features of your new TV 4 Overview of steps for installing, setting up, and using your new TV 4 TV front and side panel controls and connections 5 TV back panel connections 6 Chapter 2: Using the... between two channels using Channel Return 25 Switching between two channels using SurfLock™. . . . 25 Selecting the picture size 26 Scrolling the TheaterWide® picture (TheaterWide 2 and 3 only 27 Using the auto aspect ratio feature 28 Selecting the cinema mode...
Operating Guide
Page 4
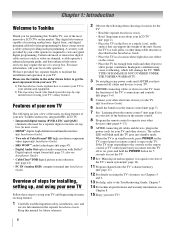
... or remote control to turn the TV off or on the screen. • Place the TV far enough from your new TV. 1) The Installation Guide explains how to connect your TV to your antenna and equipment. 2) The Operating Guide (this Toshiba TV, one of the most innovative LCD TVs on the floor or a sturdy,... format (- Keep this manual for future reference. 2 Observe the following are just a few of the many exciting features of your new Toshiba widescreen, integrated HD, LCD TV: • Integrated digital tuning (8VSB ATSC and QAM) eliminates the need for using its many features. Secure the...
... or remote control to turn the TV off or on the screen. • Place the TV far enough from your new TV. 1) The Installation Guide explains how to connect your TV to your antenna and equipment. 2) The Operating Guide (this Toshiba TV, one of the most innovative LCD TVs on the floor or a sturdy,... format (- Keep this manual for future reference. 2 Observe the following are just a few of the many exciting features of your new Toshiba widescreen, integrated HD, LCD TV: • Integrated digital tuning (8VSB ATSC and QAM) eliminates the need for using its many features. Secure the...
Operating Guide
Page 5
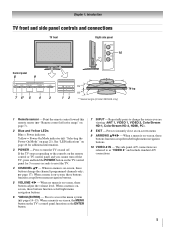
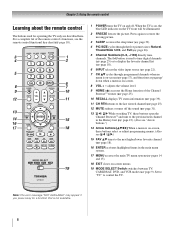
...pages 14-15). Press to access the menu system (- Point the remote control toward this remote sensor (- When no menu is on the TV control panel for additional information. 3 POWER - "Remote control effective range" on page 21). Press to turn off . When a menu ... VIDEO 2, ColorStream HD-1, ColorStream HD-2, HDMI, PC). 8 EXIT - Chapter 1: Introduction TV front and side panel controls and connections TV front Right side panel 10 Control panel 8 9 7 6* 5 4 3 12 ** Swivel angle (model 26HL66 only) TV top 1 Remote sensor - page 17). When a menu is on-screen, the MENU ...
...pages 14-15). Press to access the menu system (- Point the remote control toward this remote sensor (- When no menu is on the TV control panel for additional information. 3 POWER - "Remote control effective range" on page 21). Press to turn off . When a menu ... VIDEO 2, ColorStream HD-1, ColorStream HD-2, HDMI, PC). 8 EXIT - Chapter 1: Introduction TV front and side panel controls and connections TV front Right side panel 10 Control panel 8 9 7 6* 5 4 3 12 ** Swivel angle (model 26HL66 only) TV top 1 Remote sensor - page 17). When a menu is on-screen, the MENU ...

Operating Guide
Page 6
... connecting devices with optical audio input. Two sets of HDMI Licensing LLC. Manufactured under license from a DVI device. Their use when connecting a personal computer. 6 ANT - TV back 2 3 1 4 Power cord Cable Clamper 5 6 7 8 1 VIDEO-1 IN - separate audio cables are trademarks or registered trademarks of ColorStream® high-definition component video ...PC/HDMI (AUDIO) IN - HDMI, the HDMI logo and High-Definition Multimedia Interface are required for connecting devices with component video output, such as a Toshiba DVD player with ColorStream®.
... connecting devices with optical audio input. Two sets of HDMI Licensing LLC. Manufactured under license from a DVI device. Their use when connecting a personal computer. 6 ANT - TV back 2 3 1 4 Power cord Cable Clamper 5 6 7 8 1 VIDEO-1 IN - separate audio cables are trademarks or registered trademarks of ColorStream® high-definition component video ...PC/HDMI (AUDIO) IN - HDMI, the HDMI logo and High-Definition Multimedia Interface are required for connecting devices with component video output, such as a Toshiba DVD player with ColorStream®.
Operating Guide
Page 7
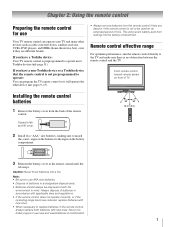
...control batteries 1 Remove the battery cover from leaking into a fire. If you have a non-Toshiba device or a Toshiba device that the remote control is no obstruction between the remote control and the TV. Never mix battery types or use new and used for use AAA size batteries. • Dispose...the battery compartment. Note: • Be sure to replace batteries in combination. 7 If you have a Toshiba device: Your TV remote control is not to the signs on front of TV. signs on the batteries to be disposed of with new ones. This will operate the other devices such as...
...control batteries 1 Remove the battery cover from leaking into a fire. If you have a non-Toshiba device or a Toshiba device that the remote control is no obstruction between the remote control and the TV. Never mix battery types or use new and used for use AAA size batteries. • Dispose...the battery compartment. Note: • Be sure to replace batteries in combination. 7 If you have a Toshiba device: Your TV remote control is not to the signs on front of TV. signs on the batteries to be disposed of with new ones. This will operate the other devices such as...
Operating Guide
Page 8
When the TV is on the TV front will be illuminated. 2 FREEZE freezes the picture. page 26). 5 Channel Numbers (0-9, -/...100) directly tune channels. page 17), and functions as page up/ down when a menu is on, the blue LED indicator on -screen. 8 VOL + - page 25). 12 MUTE reduces or turns off . Note: The error message "NOT AVAILABLE" may appear if you press a key for operating the TV... accesses the sleep timer (- page 31). 13 3 C / # c While watching TV, these buttons select or adjust programming menus. (Also see the remote control functional key chart...
When the TV is on the TV front will be illuminated. 2 FREEZE freezes the picture. page 26). 5 Channel Numbers (0-9, -/...100) directly tune channels. page 17), and functions as page up/ down when a menu is on, the blue LED indicator on -screen. 8 VOL + - page 25). 12 MUTE reduces or turns off . Note: The error message "NOT AVAILABLE" may appear if you press a key for operating the TV... accesses the sleep timer (- page 31). 13 3 C / # c While watching TV, these buttons select or adjust programming menus. (Also see the remote control functional key chart...

Operating Guide
Page 9
...into the channel memory (page 17): B selects the next higher channel. b selects the next lower channel. 5 GUIDE Displays the channel guide. 6 INFO Displays TV status information. 7 BbC c Navigate DVD menus (may not operate certain features on and off. 2 Channel Numbers (0-9) Press to directly access channels (as opposed ...program the remote control to recognize the device (if you will need to use your other devices If you have a non-Toshiba device or a Toshiba device that the remote control is programmed, it may not work on some DVD players). 8 ENTER Required by some satellite receivers...
...into the channel memory (page 17): B selects the next higher channel. b selects the next lower channel. 5 GUIDE Displays the channel guide. 6 INFO Displays TV status information. 7 BbC c Navigate DVD menus (may not operate certain features on and off. 2 Channel Numbers (0-9) Press to directly access channels (as opposed ...program the remote control to recognize the device (if you will need to use your other devices If you have a non-Toshiba device or a Toshiba device that the remote control is programmed, it may not work on some DVD players). 8 ENTER Required by some satellite receivers...

Operating Guide
Page 10
... Record (2 click) ----- CHBb PIC SIZE MUTE GUIDE FF PAUSE/STEP PLAY REW HOME STOP FREEZE SKIP Z SKIP z TV/VCR REC SET UP TOP MENU Toshiba TV (TV) Power Sleep timer TV/Video select Digit 1-9 Digit 0 - (sub channel) RECALL Previous channel --Menu/DVD Menu Menu select/ FAV up/down Menu select/ Channel Browser™ Menu select...
... Record (2 click) ----- CHBb PIC SIZE MUTE GUIDE FF PAUSE/STEP PLAY REW HOME STOP FREEZE SKIP Z SKIP z TV/VCR REC SET UP TOP MENU Toshiba TV (TV) Power Sleep timer TV/Video select Digit 1-9 Digit 0 - (sub channel) RECALL Previous channel --Menu/DVD Menu Menu select/ FAV up/down Menu select/ Channel Browser™ Menu select...

Operating Guide
Page 11
... code. • If the device does not respond to another code (if other devices Your Toshiba TV remote control is not preprogrammed to operate most Toshiba devices. To program your TV remote control to operate a non-Toshiba device (or a Toshiba device that all listed codes, the necessary keys do not operate your device, use the remote...
... code. • If the device does not respond to another code (if other devices Your Toshiba TV remote control is not preprogrammed to operate most Toshiba devices. To program your TV remote control to operate a non-Toshiba device (or a Toshiba device that all listed codes, the necessary keys do not operate your device, use the remote...

Operating Guide
Page 12
...JVC Kenwood Magnavox Optimus Pansat Primestar Proscan Radio Shack RCA Realistic Samsung Sony Star Choice Star Trak STS Toshiba Uniden Zenith 020, 040, 044, 046, 050, 053 018, 041, 051 057 027 008,... 028, 030, 032, 035, 039, 043, 045, 047, 058 027 TV/VCR Combo Action GE Goldstar Panasonic Precision Quasar Realistic Sony Toshiba Totevision Zenith 078 059, 062 065 065 078 065 079 074 057 009, 010... Panasonic Philips Pioneer Proscan Qwestar RCA Sampo Samsung Sansui Sanyo Sharp Sherwood Sony Sylvania Teac Technics Techwood Toshiba Yamaha Zenith 020 021 022, 023, 024, 025 026, 027 028 027 001, 029, ...
...JVC Kenwood Magnavox Optimus Pansat Primestar Proscan Radio Shack RCA Realistic Samsung Sony Star Choice Star Trak STS Toshiba Uniden Zenith 020, 040, 044, 046, 050, 053 018, 041, 051 057 027 008,... 028, 030, 032, 035, 039, 043, 045, 047, 058 027 TV/VCR Combo Action GE Goldstar Panasonic Precision Quasar Realistic Sony Toshiba Totevision Zenith 078 059, 062 065 065 078 065 079 074 057 009, 010... Panasonic Philips Pioneer Proscan Qwestar RCA Sampo Samsung Sansui Sanyo Sharp Sherwood Sony Sylvania Teac Technics Techwood Toshiba Yamaha Zenith 020 021 022, 023, 024, 025 026, 027 028 027 001, 029, ...
Operating Guide
Page 14
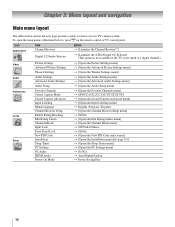
...Chapter 3: Menu layout and navigation Main menu layout The tables below ), press Y on the next page provide a quick overview of your TV's menu system. Icon Applications Item Channel Browser Digital CC/Audio Selector Option S [Launches the Channel Browser™] S [Launches the ATSC ...Digital CC Selector] (This option is not available if the TV is not tuned to a digital channel.) Video Audio Preferences Locks Setup Picture Settings Advanced Picture Settings Theater Settings Audio Settings Advanced Audio Settings...
...Chapter 3: Menu layout and navigation Main menu layout The tables below ), press Y on the next page provide a quick overview of your TV's menu system. Icon Applications Item Channel Browser Digital CC/Audio Selector Option S [Launches the Channel Browser™] S [Launches the ATSC ...Digital CC Selector] (This option is not available if the TV is not tuned to a digital channel.) Video Audio Preferences Locks Setup Picture Settings Advanced Picture Settings Theater Settings Audio Settings Advanced Audio Settings...

Operating Guide
Page 15
... Meter menu] S [Opens the System Information menu] Navigating the menu system You can use the buttons on the remote control or TV control panel to access and navigate your TV's on-screen menu system. • Press Y to save your menu settings or select a highlighted item. (A highlighted menu item ... approx. 5 minutes). • To close a menu instantly, press O. Note: The menu background may sometimes appear black, depending on the remote control or TV control panel to move in the corresponding direction in the menu. • Press T to open the menu system. • When a menu is open the...
... Meter menu] S [Opens the System Information menu] Navigating the menu system You can use the buttons on the remote control or TV control panel to access and navigate your TV's on-screen menu system. • Press Y to save your menu settings or select a highlighted item. (A highlighted menu item ... approx. 5 minutes). • To close a menu instantly, press O. Note: The menu background may sometimes appear black, depending on the remote control or TV control panel to move in the corresponding direction in the menu. • Press T to open the menu system. • When a menu is open the...

Operating Guide
Page 16
... Navigate ENTER Select CH RTN Back EXIT Exit 4 Press O to select the input source (Cable or Antenna) for the ANT input on the TV. Chapter 4: Setting up your TV Selecting the menu language You can choose from three different languages (English, French and Spanish) for the ANT terminal To configure the ANT...
... Navigate ENTER Select CH RTN Back EXIT Exit 4 Press O to select the input source (Cable or Antenna) for the ANT input on the TV. Chapter 4: Setting up your TV Selecting the menu language You can choose from three different languages (English, French and Spanish) for the ANT terminal To configure the ANT...
Operating Guide
Page 17
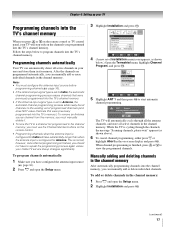
...Select CH RTN Back EXIT Exit 4 (A new set of programmed channels (and does NOT erase channels that were previously programmed into the TV's channel memory. • If the Antenna input signal type is set to Antenna, the automatic channel programming process adds newly found ... Program Channel Add/Delete Signal Meter Navigate ENTER Select CH RTN Back EXIT Exit 5 Highlight ANT 1 and then press T to program channels into the TV's channel memory. Follow the steps below .) Open the Terrestrial menu, highlight Channel Program, and press T. however, once channel programming is finished, press ...
...Select CH RTN Back EXIT Exit 4 (A new set of programmed channels (and does NOT erase channels that were previously programmed into the TV's channel memory. • If the Antenna input signal type is set to Antenna, the automatic channel programming process adds newly found ... Program Channel Add/Delete Signal Meter Navigate ENTER Select CH RTN Back EXIT Exit 5 Highlight ANT 1 and then press T to program channels into the TV's channel memory. Follow the steps below .) Open the Terrestrial menu, highlight Channel Program, and press T. however, once channel programming is finished, press ...

Operating Guide
Page 18
... and press T. OK 9 10 11 Reset Cancel Done Note: If you want to remove, and then press T to uncheck the box. Chapter 4: Setting up your TV 3 A new set as a favorite, and then press T to check the box. Terrestrial Input Configuration Channel Program Channel Add/Delete Signal Meter Navigate ENTER Select CH...
... and press T. OK 9 10 11 Reset Cancel Done Note: If you want to remove, and then press T to uncheck the box. Chapter 4: Setting up your TV 3 A new set as a favorite, and then press T to check the box. Terrestrial Input Configuration Channel Program Channel Add/Delete Signal Meter Navigate ENTER Select CH...

Operating Guide
Page 19
Chapter 4: Setting up your TV To clear the Favorite Channel lists: 1 Press Y and open the Setup menu. 2 Highlight Installation and press T. If PC Audio is the recommended mode.) See "Connecting ... deleted (unchecked). 5 Highlight Done and press T. A new set of Installation menu icons appears, as shown in the Installation Guide. All channels in the ANT 1 digital TV input source only. Setup Installation Sleep Timer PC Settings PC Audio HDMI Audio Power-On Mode No Auto Power-Saving Auto Digital Analog Navigate ENTER...
Chapter 4: Setting up your TV To clear the Favorite Channel lists: 1 Press Y and open the Setup menu. 2 Highlight Installation and press T. If PC Audio is the recommended mode.) See "Connecting ... deleted (unchecked). 5 Highlight Done and press T. A new set of Installation menu icons appears, as shown in the Installation Guide. All channels in the ANT 1 digital TV input source only. Setup Installation Sleep Timer PC Settings PC Audio HDMI Audio Power-On Mode No Auto Power-Saving Auto Digital Analog Navigate ENTER...
Operating Guide
Page 20
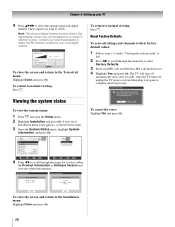
... Done Peak 0 1 4 4/1 To close the screen and return to the Installation menu: Highlight Done and press T. 20 After the TV turns off, unplug it and plug it in to select either the Product Information or Software Version and view the related information. Setup Installation...and then plug it back in again to check. After the TV turns off automatically after a few seconds. A new set ). 4 Highlight Yes and press T. System Information System Information Product Information Brand: Toshiba Model: 32HL66 Software Version 2.2.26.0 Jan 24 2006 - 11:04:47 FW: 17 Done Done...
... Done Peak 0 1 4 4/1 To close the screen and return to the Installation menu: Highlight Done and press T. 20 After the TV turns off, unplug it and plug it in to select either the Product Information or Software Version and view the related information. Setup Installation...and then plug it back in again to check. After the TV turns off automatically after a few seconds. A new set ). 4 Highlight Yes and press T. System Information System Information Product Information Brand: Toshiba Model: 32HL66 Software Version 2.2.26.0 Jan 24 2006 - 11:04:47 FW: 17 Done Done...


