

User Manual
Page 2
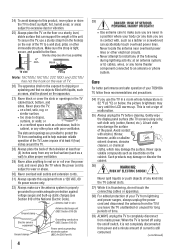
... walls with the installation instructions. Wall Mounting: If you decide to wall mount your flat panel display, always: • Use a mount that may fall over , or knocked down. • Care should be mounted to the floor/wall in serious bodily injury and/or property damage. For additional antenna grounding information, see items 32 and 33 on a "larger than a UL Listed wall bracket appropriate for the size and weight of this television...
... walls with the installation instructions. Wall Mounting: If you decide to wall mount your flat panel display, always: • Use a mount that may fall over , or knocked down. • Care should be mounted to the floor/wall in serious bodily injury and/or property damage. For additional antenna grounding information, see items 32 and 33 on a "larger than a UL Listed wall bracket appropriate for the size and weight of this television...
User Manual
Page 4
... TV where the power cord is turned off switch, it is thundering, do not touch the connecting cables or apparatus. 38) For added protection of your TV from lightning and power surges, always unplug the power cord and disconnect the antenna from the TV if you are never in a room whose temperature is properly grounded to help maintain reliable operation of the...
... TV where the power cord is turned off switch, it is thundering, do not touch the connecting cables or apparatus. 38) For added protection of your TV from lightning and power surges, always unplug the power cord and disconnect the antenna from the TV if you are never in a room whose temperature is properly grounded to help maintain reliable operation of the...
User Manual
Page 5
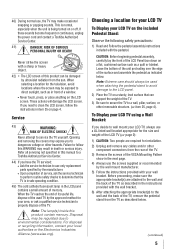
... due to wall mount your LCD TV, always use a UL listed wall bracket appropriate for the size and weight of the LCD TV ( page 2): 1) CAUTION: Two people are attached to the wall and the back of the TV as described in the instructions provided with a sharp or heavy object. 42) • The LCD screen of this manual to a Toshiba Authorized Service Center. 44) If you need to...
... due to wall mount your LCD TV, always use a UL listed wall bracket appropriate for the size and weight of the LCD TV ( page 2): 1) CAUTION: Two people are attached to the wall and the back of the TV as described in the instructions provided with a sharp or heavy object. 42) • The LCD screen of this manual to a Toshiba Authorized Service Center. 44) If you need to...
User Manual
Page 8
... back panel connections 12 Chapter 2: Connecting your TV 13 Overview of cable types 13 About the connection illustrations 13 Connecting a VCR and antenna, Cable TV or Camcorder........14 Connecting a DVD player with ColorStream® (component video), a VCR, and a satellite receiver...........15 Connecting an HDMI® or DVI device to the HDMI input........16 REGZA-LINK® connection 17 Connecting a digital audio system 18 Connecting a personal computer (PC 18 Chapter 3: Using the remote control 20 Installing the remote control batteries 20 Remote control...
... back panel connections 12 Chapter 2: Connecting your TV 13 Overview of cable types 13 About the connection illustrations 13 Connecting a VCR and antenna, Cable TV or Camcorder........14 Connecting a DVD player with ColorStream® (component video), a VCR, and a satellite receiver...........15 Connecting an HDMI® or DVI device to the HDMI input........16 REGZA-LINK® connection 17 Connecting a digital audio system 18 Connecting a personal computer (PC 18 Chapter 3: Using the remote control 20 Installing the remote control batteries 20 Remote control...
User Manual
Page 12
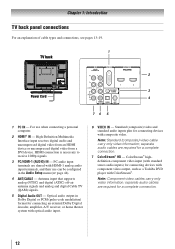
... panel connections For an explanation of cable types and connections, see pages 13-19. 1 TV back 2 3 Power Cord 4 76 5 1無 PC IN - ColorStream® highdefinition component video input (with standard stereo audio inputs) for connecting an external Dolby Digital decoder, amplifier, A/V receiver, or home theater system with ColorStream®. For use can be configured in Dolby Digital or PCM (pulse-code modulation) format for connecting devices with component video output, such as a Toshiba DVD player with optical audio input. 6無 VIDEO...
... panel connections For an explanation of cable types and connections, see pages 13-19. 1 TV back 2 3 Power Cord 4 76 5 1無 PC IN - ColorStream® highdefinition component video input (with standard stereo audio inputs) for connecting an external Dolby Digital decoder, amplifier, A/V receiver, or home theater system with ColorStream®. For use can be configured in Dolby Digital or PCM (pulse-code modulation) format for connecting devices with component video output, such as a Toshiba DVD player with optical audio input. 6無 VIDEO...
User Manual
Page 13
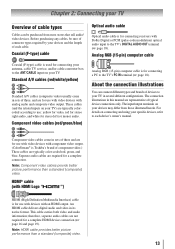
... in sets of three and are for use : yellow for video, red for stereo right audio, and white for connecting receivers with an HDMI output. Before purchasing any cables, be purchased from those illustrated herein. Standard A/V cables (red/white/yellow) Standard A/V cables (composite video) usually come in its native format. therefore, separate audio cables are typically color-coded red, green, and blue. Component video cables (red/green/blue) Optical audio cable Optical audio cable is for use with devices with Dolby Digital or PCM (pulse-code modulation) optical audio input...
... in sets of three and are for use : yellow for video, red for stereo right audio, and white for connecting receivers with an HDMI output. Before purchasing any cables, be purchased from those illustrated herein. Standard A/V cables (red/white/yellow) Standard A/V cables (composite video) usually come in its native format. therefore, separate audio cables are typically color-coded red, green, and blue. Component video cables (red/green/blue) Optical audio cable Optical audio cable is for use with devices with Dolby Digital or PCM (pulse-code modulation) optical audio input...

User Manual
Page 18
... and WXGA signal formats. Other formats or non-standard signals will need: • optical audio cable (Use an optical audio cable that may not work properly, creating a high noise level that has the larger "TosLink" connector and not the smaller "mini-optical" connector.) Dolby Digital decoder or other external audio system with optical audio input. Dolby, and the double-D symbol are not compatible with standard optical out signals may damage speakers or headphones. Connecting a personal...
... and WXGA signal formats. Other formats or non-standard signals will need: • optical audio cable (Use an optical audio cable that may not work properly, creating a high noise level that has the larger "TosLink" connector and not the smaller "mini-optical" connector.) Dolby Digital decoder or other external audio system with optical audio input. Dolby, and the double-D symbol are not compatible with standard optical out signals may damage speakers or headphones. Connecting a personal...
User Manual
Page 22
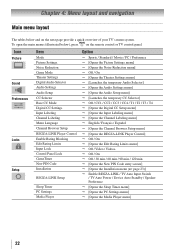
...the main menus (illustrated below and on the remote control or TV control panel. Icon Picture Sound Preferences Locks Setup Item Mode Picture Settings Noise Reduction Game Mode Theater Settings Digital Audio Selector Audio Settings Audio Setup CC Selector Base CC Mode Digital CC Settings Input Labeling Channel Labeling Menu Language Channel Browser Setup REGZA-LINK Player Control Enable Rating Blocking Edit Rating Limits Input Lock Control Panel Lock GameTimer New PIN Code Installation REGZA-LINK Setup Sleep Timer PC Settings Media Player Option Sports / Standard / Movie / PC...
...the main menus (illustrated below and on the remote control or TV control panel. Icon Picture Sound Preferences Locks Setup Item Mode Picture Settings Noise Reduction Game Mode Theater Settings Digital Audio Selector Audio Settings Audio Setup CC Selector Base CC Mode Digital CC Settings Input Labeling Channel Labeling Menu Language Channel Browser Setup REGZA-LINK Player Control Enable Rating Blocking Edit Rating Limits Input Lock Control Panel Lock GameTimer New PIN Code Installation REGZA-LINK Setup Sleep Timer PC Settings Media Player Option Sports / Standard / Movie / PC...
User Manual
Page 24
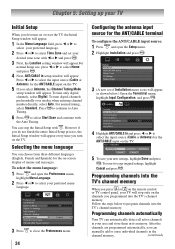
... use, press t or u to program channels into the TV's channel memory When you press or on the remote control or TV control panel, your TV will stop the Initial Setup with the Auto Tuning. Follow the steps below .) Open the Terrestrial menu, highlight Input Configuration, and press . 4無 Highlight ANT/CABLE In and press t or u to select the input source (Cable or Antenna) for the on-screen display of Installation menu...
... use, press t or u to program channels into the TV's channel memory When you press or on the remote control or TV control panel, your TV will stop the Initial Setup with the Auto Tuning. Follow the steps below .) Open the Terrestrial menu, highlight Input Configuration, and press . 4無 Highlight ANT/CABLE In and press t or u to select the input source (Cable or Antenna) for the on-screen display of Installation menu...

User Manual
Page 25
... view the programmed channels. ANT/CABLE Antenna Scanning channels, please wait ... 52% Number of Installation menu icons will appear. 4無 (A new set of Channels Found - 73 Scanning Digital Channels Found Channel - 118 Abort 3無 Press p or q to select a channel position to be skipped. 1無 From the Setup menu, highlight Installation and press . 2無 Press p or q to enter the channel number (for Antenna. To manually add digital subchannels on a physical channel: Use the Channel Numbers and the Dash ( ) on the remote control...
... view the programmed channels. ANT/CABLE Antenna Scanning channels, please wait ... 52% Number of Installation menu icons will appear. 4無 (A new set of Channels Found - 73 Scanning Digital Channels Found Channel - 118 Abort 3無 Press p or q to select a channel position to be skipped. 1無 From the Setup menu, highlight Installation and press . 2無 Press p or q to enter the channel number (for Antenna. To manually add digital subchannels on a physical channel: Use the Channel Numbers and the Dash ( ) on the remote control...
User Manual
Page 27
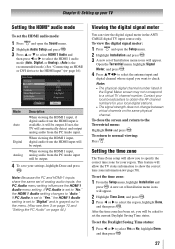
... select the antenna input and digital channel whose signal you to obtain the RF channel numbers for your region. Mode Description Auto When viewing the HDMI 1 input, if digital audio from the PC Audio input. Chapter 5: Setting up your TV Setting the HDMI® audio mode To set the HDMI audio mode: 1無 Press and open the Setup menu. 2無 Highlight Installation and press . 3無 A new set the time zone: 1無 From the Setup menu, highlight Installation and press . This feature will be output.
... select the antenna input and digital channel whose signal you to obtain the RF channel numbers for your region. Mode Description Auto When viewing the HDMI 1 input, if digital audio from the PC Audio input. Chapter 5: Setting up your TV Setting the HDMI® audio mode To set the HDMI audio mode: 1無 Press and open the Setup menu. 2無 Highlight Installation and press . 3無 A new set the time zone: 1無 From the Setup menu, highlight Installation and press . This feature will be output.
User Manual
Page 38
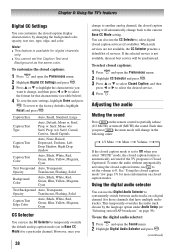
... Color Auto, Black, White, Red, Green, Blue, Yellow, Magenta, Cyan CC Selector You can use to set to Off when you 38 change back to the current Base CC Mode setting. If the selected service is available for more information on a digital channel (for that have multiple audio tracks). Note: ••This feature is not available, the next best service will automatically change to another analog channel, the closed caption feature, use the Digital Audio...
... Color Auto, Black, White, Red, Green, Blue, Yellow, Magenta, Cyan CC Selector You can use to set to Off when you 38 change back to the current Base CC Mode setting. If the selected service is available for more information on a digital channel (for that have multiple audio tracks). Note: ••This feature is not available, the next best service will automatically change to another analog channel, the closed caption feature, use the Digital Audio...
User Manual
Page 40
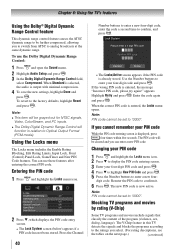
... by rating (V-Chip) Some TV programs and movies include signals that classify the content of the program (violence, sex, dialog, language). Using the Locks menu The Locks menu includes the Enable Rating Blocking, Edit Rating Limits, Input Lock, Front (Control) Panel Lock, GameTimer and New PIN Code features. The PIN code will be set to "0000". Use the Number buttons to enter your four-digit PIN code and press . 4無 Press...
... by rating (V-Chip) Some TV programs and movies include signals that classify the content of the program (violence, sex, dialog, language). Using the Locks menu The Locks menu includes the Enable Rating Blocking, Edit Rating Limits, Input Lock, Front (Control) Panel Lock, GameTimer and New PIN Code features. The PIN code will be set to "0000". Use the Number buttons to enter your four-digit PIN code and press . 4無 Press...
User Manual
Page 44
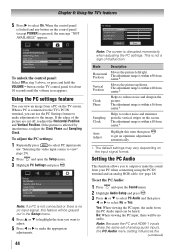
... the input signal format. The adjustment range is within ±10 from the PC Audio input can use the PC Settings feature to select On. button on the control panel (except POWER) is within ±16 from center.* Vertical Position Moves the picture up/down. If the edges of analog audio inputs, the PC Audio menu setting influences the (continued) Note: If a PC is not connected or there is no audio. Mode...
... the input signal format. The adjustment range is within ±10 from the PC Audio input can use the PC Settings feature to select On. button on the control panel (except POWER) is within ±16 from center.* Vertical Position Moves the picture up/down. If the edges of analog audio inputs, the PC Audio menu setting influences the (continued) Note: If a PC is not connected or there is no audio. Mode...
User Manual
Page 49
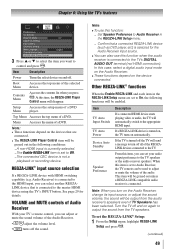
... turned off the TV will automatically switch to the appropriate HDMI input. Top Menu Accesses the top menu of a DVD. Menu Accesses the menu of a DVD. In this time, the REGZA-LINK Player Control menu will be output from the TV speakers. From this item, you turn off the sound. Turn the TV off . Note: ••To use this item is connected. Item TV Auto Input Switch TV Auto Power Device Auto Standby Speaker Preference Description If a connected HDMI device starts playing video or audio...
... turned off the TV will automatically switch to the appropriate HDMI input. Top Menu Accesses the top menu of a DVD. Menu Accesses the menu of a DVD. In this time, the REGZA-LINK Player Control menu will be output from the TV speakers. From this item, you turn off the sound. Turn the TV off . Note: ••To use this item is connected. Item TV Auto Input Switch TV Auto Power Device Auto Standby Speaker Preference Description If a connected HDMI device starts playing video or audio...
User Manual
Page 50
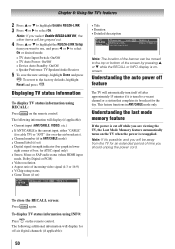
... mode. • TV Auto Input Switch: On/Off • TV Auto Power: On/Off • Device Auto Standby: On/Off • Speaker Preference: TV Speakers/Audio Receiver 5無 To save the new settings, highlight Done and press . This feature functions in lower right corner of incoming video signal (4:3 or 16:9) • V-Chip rating status • Game Timer (if set ) • Digital signal strength indicator (bar graph in ANT/CABLE mode only. To display...
... mode. • TV Auto Input Switch: On/Off • TV Auto Power: On/Off • Device Auto Standby: On/Off • Speaker Preference: TV Speakers/Audio Receiver 5無 To save the new settings, highlight Done and press . This feature functions in lower right corner of incoming video signal (4:3 or 16:9) • V-Chip rating status • Game Timer (if set ) • Digital signal strength indicator (bar graph in ANT/CABLE mode only. To display...

User Manual
Page 53
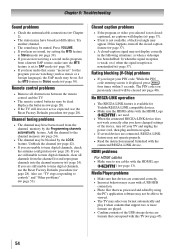
... (e.g., DVD player, video game system, set to reduce the effect of this Troubleshooting section or the recommended solution has not worked, use this chapter for a possible cause of the problem and some solutions you cannot view signals from external devices connected to VIDEO, ColorStream® HDMI 1, HDMI 2, PC or from channels 3 or 4, make sure the Input Lock is connected to inform them of this phenomenon only on the remote control or TV control panel...
... (e.g., DVD player, video game system, set to reduce the effect of this Troubleshooting section or the recommended solution has not worked, use this chapter for a possible cause of the problem and some solutions you cannot view signals from external devices connected to VIDEO, ColorStream® HDMI 1, HDMI 2, PC or from channels 3 or 4, make sure the Input Lock is connected to inform them of this phenomenon only on the remote control or TV control panel...
User Manual
Page 54
... mode ( page 39). •• If you hear audio that seems "incorrect" for Toshiba REGZA-LINK compatible devices. •• Make sure the HDMI cables with the HDMI Logo ( ) are used. •• When the connected REGZA-LINK device does not work correctly after you hear no captions will be muted. Remote control problems •• Remove all channels from the channel list and reprogram channels into the channel...
... mode ( page 39). •• If you hear audio that seems "incorrect" for Toshiba REGZA-LINK compatible devices. •• Make sure the HDMI cables with the HDMI Logo ( ) are used. •• When the connected REGZA-LINK device does not work correctly after you hear no captions will be muted. Remote control problems •• Remove all channels from the channel list and reprogram channels into the channel...
User Manual
Page 57
... DELIVERING THE PRODUCT TO A SERVICE CENTER. This warranty is void if the product is not covered under this warranty. toshiba.com/service. This includes wall mounts, custom cabinets and other airborne contaminants. Labor service charges for set installation, setup, adjustment of customer controls, and installation or repair of antenna, satellite or cable systems are effective only if this LCD Television is not covered under these warranties. com/customersupport". AS HEREBY...
... DELIVERING THE PRODUCT TO A SERVICE CENTER. This warranty is void if the product is not covered under this warranty. toshiba.com/service. This includes wall mounts, custom cabinets and other airborne contaminants. Labor service charges for set installation, setup, adjustment of customer controls, and installation or repair of antenna, satellite or cable systems are effective only if this LCD Television is not covered under these warranties. com/customersupport". AS HEREBY...
User Manual
Page 58
..., or repairs, modifications or replacements by a Toshiba Authorized Service Provider (ASP). (3) The warranties from TCL are your LCD Television online at http://support.toshiba.ca/warranty/. Reception problems caused by inadequate antenna systems are effective only if the Television is (i) purchased as limited above, and do not provide for direct and immediate access to the product for Toshiba Brand Flat Panel Televisions Toshiba of antenna systems are not covered by use of...
..., or repairs, modifications or replacements by a Toshiba Authorized Service Provider (ASP). (3) The warranties from TCL are your LCD Television online at http://support.toshiba.ca/warranty/. Reception problems caused by inadequate antenna systems are effective only if the Television is (i) purchased as limited above, and do not provide for direct and immediate access to the product for Toshiba Brand Flat Panel Televisions Toshiba of antenna systems are not covered by use of...


