

Users Guide for 19SL410U 24SL410U 32SL410U
Page 2
... size and weight of important operating and maintenance (servicing) instructions in mind: The Issue • The home theater entertainment experience is a growing trend and larger flat panel displays are not designed to be heavy. 2 Flat panel displays can become excited while watching a program, especially on the proper stands or installed according to the manufacturer's recommendations. • Flat panel displays that has been recommended by the display manufacturer and/or listed...
... size and weight of important operating and maintenance (servicing) instructions in mind: The Issue • The home theater entertainment experience is a growing trend and larger flat panel displays are not designed to be heavy. 2 Flat panel displays can become excited while watching a program, especially on the proper stands or installed according to the manufacturer's recommendations. • Flat panel displays that has been recommended by the display manufacturer and/or listed...

Users Guide for 19SL410U 24SL410U 32SL410U
Page 5
... screws of the VESA Mounting Pattern show in front of a window. • Never touch, press, or place anything on / off . If you have the TV serviced: • Ask the service technician to use a UL listed wall bracket appropriate for the size and weight of the LCD TV ( page 2): 1) CAUTION: Two people are attached to the wall and the back of the TV, remove the pedestal stand...
... screws of the VESA Mounting Pattern show in front of a window. • Never touch, press, or place anything on / off . If you have the TV serviced: • Ask the service technician to use a UL listed wall bracket appropriate for the size and weight of the LCD TV ( page 2): 1) CAUTION: Two people are attached to the wall and the back of the TV, remove the pedestal stand...

Users Guide for 19SL410U 24SL410U 32SL410U
Page 6
... stand in a residential installation. To ensure your television is : Toshiba America Information Systems, Inc. 9740 Irvine Blvd.; Operation is subject to which the receiver is no guarantee that interference will allow removal of this television meet ENERGY STAR requirements. The party responsible for a Class B digital device, pursuant to radio communications. ENERGY STAR® User Information ENERGY STAR User Information Statement: the factory default settings...
... stand in a residential installation. To ensure your television is : Toshiba America Information Systems, Inc. 9740 Irvine Blvd.; Operation is subject to which the receiver is no guarantee that interference will allow removal of this television meet ENERGY STAR requirements. The party responsible for a Class B digital device, pursuant to radio communications. ENERGY STAR® User Information ENERGY STAR User Information Statement: the factory default settings...
Users Guide for 19SL410U 24SL410U 32SL410U
Page 8
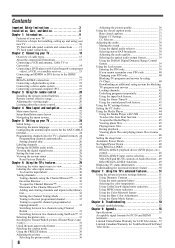
... (V-Chip 40 Downloading an additional rating system for blocking TV programs and movies 41 Locking channels 42 Unlocking programs temporarily 42 Using the input lock feature 42 Using the Game Timer 43 Using the control panel lock feature 43 Using the PC settings feature 43 Setting the PC Audio 44 Using the Media Player 44 Using the Media Player with USB 44 To select the Auto Start function 45 To open the Media Player 45 Viewing photo files 45 Playing music files...
... (V-Chip 40 Downloading an additional rating system for blocking TV programs and movies 41 Locking channels 42 Unlocking programs temporarily 42 Using the input lock feature 42 Using the Game Timer 43 Using the control panel lock feature 43 Using the PC settings feature 43 Setting the PC Audio 44 Using the Media Player 44 Using the Media Player with USB 44 To select the Auto Start function 45 To open the Media Player 45 Viewing photo files 45 Playing music files...

Users Guide for 19SL410U 24SL410U 32SL410U
Page 12
... a Toshiba DVD player with composite video. TV back Power Cord 1 HDMI® IN High-Definition Multimedia Interface input receives digital audio and uncompressed digital video from an HDMI device or uncompressed digital video from a DVI device. 2 DIGITAL AUDIO OUT Optical audio output in the Audio Setup menu ( page 44). 8 RGB/PC IN For use can be configured in Dolby Digital or PCM (pulse-code modulation) format for connecting an external Dolby Digital decoder, amplifier, A/V receiver, or home theater system with optical audio input. 3 ANT/CABLE Antenna input that supports analog...
... a Toshiba DVD player with composite video. TV back Power Cord 1 HDMI® IN High-Definition Multimedia Interface input receives digital audio and uncompressed digital video from an HDMI device or uncompressed digital video from a DVI device. 2 DIGITAL AUDIO OUT Optical audio output in the Audio Setup menu ( page 44). 8 RGB/PC IN For use can be configured in Dolby Digital or PCM (pulse-code modulation) format for connecting an external Dolby Digital decoder, amplifier, A/V receiver, or home theater system with optical audio input. 3 ANT/CABLE Antenna input that supports analog...

Users Guide for 19SL410U 24SL410U 32SL410U
Page 13
... cable types Cables can connect different types and brands of each device's owner's manual. For details on your TV) are required for a complete connection. This cable carries both video and audio information; Standard A/V cables (red/white/yellow) Standard A/V cables (composite video) usually come in sets of component video.) These cables are for stereo left (or mono) audio. HDMI® cable (with an HDMI output. The input/output terminals on your TV in its native format. Separate audio cables are typically color-coded...
... cable types Cables can connect different types and brands of each device's owner's manual. For details on your TV) are required for a complete connection. This cable carries both video and audio information; Standard A/V cables (red/white/yellow) Standard A/V cables (composite video) usually come in sets of component video.) These cables are for stereo left (or mono) audio. HDMI® cable (with an HDMI output. The input/output terminals on your TV in its native format. Separate audio cables are typically color-coded...

Users Guide for 19SL410U 24SL410U 32SL410U
Page 19
... -DVI adapter cable and analog audio cables. To connect a PC to the RGB/PC IN terminal on the TV: When connecting a PC to the RGB/PC IN terminal on the TV, use an HDMI-to the HDMI IN terminal on the TV, use a PC, set the monitor output resolution on the TV and hear the sound from the TV's speakers. Other formats or nonstandard signals will not be displayed correctly...
... -DVI adapter cable and analog audio cables. To connect a PC to the RGB/PC IN terminal on the TV: When connecting a PC to the RGB/PC IN terminal on the TV, use an HDMI-to the HDMI IN terminal on the TV, use a PC, set the monitor output resolution on the TV and hear the sound from the TV's speakers. Other formats or nonstandard signals will not be displayed correctly...

Users Guide for 19SL410U 24SL410U 32SL410U
Page 21
... C.CAPTION accesses the closed caption ( page 37). 12 MUTE reduces or turns off . However, actual functions will be prohibited under the Copyright Laws of current DVD chapter, or locates previous chapters. 28 REW Rewinds/reverses the tape or DVD. (Press during play mode to view the picture moving picture ( page 36). 7 Channel Numbers (0-9, -/100) directly tune channels. Chapter 3: Using the remote control Learning about the remote control Only the buttons used to tune digital channels...
... C.CAPTION accesses the closed caption ( page 37). 12 MUTE reduces or turns off . However, actual functions will be prohibited under the Copyright Laws of current DVD chapter, or locates previous chapters. 28 REW Rewinds/reverses the tape or DVD. (Press during play mode to view the picture moving picture ( page 36). 7 Channel Numbers (0-9, -/100) directly tune channels. Chapter 3: Using the remote control Learning about the remote control Only the buttons used to tune digital channels...

Users Guide for 19SL410U 24SL410U 32SL410U
Page 22
... erences Locks Set up I t em Mode Picture Settings Noise Reduction Game Mode Theater Settings Digital Audio Selector Audio Settings Audio Setup CC Selector Base CC Mode Digital CC Settings Input Labeling Channel Labeling Menu Language Channel Browser Setup REGZA-LINK Player Control Energy Saving Settings Enable Rating Blocking Edit Rating Limits Input Lock Control Panel Lock Game Timer New PIN Code Installation REGZA-LINK Setup Sleep Timer PC Settings Media Player Opt i on the remote control or TV control panel. To open the main menus (illustrated below and on the next page provide a quick...
... erences Locks Set up I t em Mode Picture Settings Noise Reduction Game Mode Theater Settings Digital Audio Selector Audio Settings Audio Setup CC Selector Base CC Mode Digital CC Settings Input Labeling Channel Labeling Menu Language Channel Browser Setup REGZA-LINK Player Control Energy Saving Settings Enable Rating Blocking Edit Rating Limits Input Lock Control Panel Lock Game Timer New PIN Code Installation REGZA-LINK Setup Sleep Timer PC Settings Media Player Opt i on the remote control or TV control panel. To open the main menus (illustrated below and on the next page provide a quick...

Users Guide for 19SL410U 24SL410U 32SL410U
Page 23
... Input Configuration Channel Program Channel Options Channel Tuning Mode Time Zone Signal Meter System Information Opt i on J [Opens the Input Configuration menu] J [Start Scan] J [Scans for new channels on ANT/CABLE] J [Opens the Skip / Lock Channel menu] J Standard / Auto / Digital J Eastern / Newfoundland / Atlantic / Hawaii / Alaska / Pacific / Mountain / Central J [Opens the Signal Meter menu] J [Opens the System Information screen] Navigating the menu system You can use the up/down/left/right arrow buttons (STWX) on the remote control...
... Input Configuration Channel Program Channel Options Channel Tuning Mode Time Zone Signal Meter System Information Opt i on J [Opens the Input Configuration menu] J [Start Scan] J [Scans for new channels on ANT/CABLE] J [Opens the Skip / Lock Channel menu] J Standard / Auto / Digital J Eastern / Newfoundland / Atlantic / Hawaii / Alaska / Pacific / Mountain / Central J [Opens the Signal Meter menu] J [Opens the System Information screen] Navigating the menu system You can use the up/down/left/right arrow buttons (STWX) on the remote control...
Users Guide for 19SL410U 24SL410U 32SL410U
Page 24
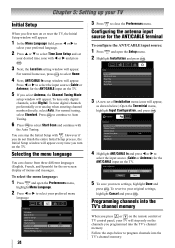
... close the Preferences menu. To select the menu language: 1 Press and open the Setup menu. 2 Highlight Installation and press . Setup Installation REGZA-LINK Setup Sleep Timer PC Settings Media Player 3 (A new set your desired time zone with the Auto Tuning. Configuring the antenna input source for the ANT/CABLE input on the TV. 5 If you select Antenna, the Channel Tuning Mode setup window will appear every time you press or on the remote control or TV control panel, your preferred menu language. Programming channels...
... close the Preferences menu. To select the menu language: 1 Press and open the Setup menu. 2 Highlight Installation and press . Setup Installation REGZA-LINK Setup Sleep Timer PC Settings Media Player 3 (A new set your desired time zone with the Auto Tuning. Configuring the antenna input source for the ANT/CABLE input on the TV. 5 If you select Antenna, the Channel Tuning Mode setup window will appear every time you press or on the remote control or TV control panel, your preferred menu language. Programming channels...
Users Guide for 19SL410U 24SL410U 32SL410U
Page 25
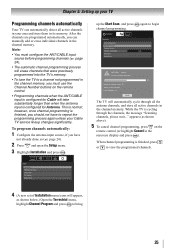
... service lineup changes significantly. To program channels automatically: 1 Configure the antenna input source, if you should not have not already done so ( page 24). 2 Press and open the Setup menu. 3 Highlight Installation and press . Setup Installation REGZA-LINK Setup Sleep Timer PC Settings Media Player 4 (A new set of Channels Found - 73 Scanning Digital Channels Found Channels - 118 Cancel The TV will appear, as shown above). 5 To cancel channel programming, press on the remote control. • Programming channels when the ANT/CABLE input...
... service lineup changes significantly. To program channels automatically: 1 Configure the antenna input source, if you should not have not already done so ( page 24). 2 Press and open the Setup menu. 3 Highlight Installation and press . Setup Installation REGZA-LINK Setup Sleep Timer PC Settings Media Player 4 (A new set of Channels Found - 73 Scanning Digital Channels Found Channels - 118 Cancel The TV will appear, as shown above). 5 To cancel channel programming, press on the remote control. • Programming channels when the ANT/CABLE input...

Users Guide for 19SL410U 24SL410U 32SL410U
Page 27
... automatically detect and output analog audio from the HDMI input will be output. 4 To save changes, and go back to indicate that they are custom. change channels. When viewing the HDMI 1 input, digital audio from the PC Audio input. When viewing the HDMI 1 input, analog audio from the HDMI input is set the HDMI audio mode: 1 Press and open the Sound menu. 2 Highlight Audio Setup and press . 3 Press S or T to select HDMI 1 Audio and then press W or X to select the HDMI 1 audio mode (Auto, Digital, or Analog). (Auto is grayed...
... automatically detect and output analog audio from the HDMI input will be output. 4 To save changes, and go back to indicate that they are custom. change channels. When viewing the HDMI 1 input, digital audio from the PC Audio input. When viewing the HDMI 1 input, analog audio from the HDMI input is set the HDMI audio mode: 1 Press and open the Sound menu. 2 Highlight Audio Setup and press . 3 Press S or T to select HDMI 1 Audio and then press W or X to select the HDMI 1 audio mode (Auto, Digital, or Analog). (Auto is grayed...

Users Guide for 19SL410U 24SL410U 32SL410U
Page 44
... menu. (Also see item 1 on page 12 and "Setting the HDMI® audio mode" on the screen. Setup Installation REGZA-LINK Setup Sleep Timer PC Settings Media Player Note: If a PC is not connected or there is no audio. Mode Descri pt i on the input signal format. 44 Setting the PC Audio This function allows you want to adjust. 5 Press W or X to "Auto." Note: Because the PC and HDMI 1 inputs share the same set to "No," the HDMI 1 Audio setting changes...
... menu. (Also see item 1 on page 12 and "Setting the HDMI® audio mode" on the screen. Setup Installation REGZA-LINK Setup Sleep Timer PC Settings Media Player Note: If a PC is not connected or there is no audio. Mode Descri pt i on the input signal format. 44 Setting the PC Audio This function allows you want to adjust. 5 Press W or X to "Auto." Note: Because the PC and HDMI 1 inputs share the same set to "No," the HDMI 1 Audio setting changes...

Users Guide for 19SL410U 24SL410U 32SL410U
Page 48
... on and off. Preferences CC Selector Base CC Mode Digital CC Settings Input Labeling Channel Labeling Menu Language Channel Browser Setup REGZA-LINK Player Control Off Auto English 3 Press S or T to select On or Off. I t em Descri pt i on Power Turns the selected device on the devices connected. Menu LINK Player Control menu will be away from the TV remote via HDMI connection ( page 17). No Signal Power Down (after approximately 15 minutes if...
... on and off. Preferences CC Selector Base CC Mode Digital CC Settings Input Labeling Channel Labeling Menu Language Channel Browser Setup REGZA-LINK Player Control Off Auto English 3 Press S or T to select On or Off. I t em Descri pt i on Power Turns the selected device on the devices connected. Menu LINK Player Control menu will be away from the TV remote via HDMI connection ( page 17). No Signal Power Down (after approximately 15 minutes if...

Users Guide for 19SL410U 24SL410U 32SL410U
Page 49
...-LINK Setup menu. - To set to the TV speakers or the audio receiver speakers. Confirm that are set the REGZA-LINK® Setup: 1 From the Setup menu, highlight REGZA-LINK Setup and press . 2 Press S or T to highlight Enable REGZA-LINK. 3 Press W or X to the TV's DIGITAL AUDIO OUT terminal (not HDMI connection). Turn the TV off and on If a connected HDMI device starts TV Auto Input playing video or audio, the TV will be output...
...-LINK Setup menu. - To set to the TV speakers or the audio receiver speakers. Confirm that are set the REGZA-LINK® Setup: 1 From the Setup menu, highlight REGZA-LINK Setup and press . 2 Press S or T to highlight Enable REGZA-LINK. 3 Press W or X to the TV's DIGITAL AUDIO OUT terminal (not HDMI connection). Turn the TV off and on If a connected HDMI device starts TV Auto Input playing video or audio, the TV will be output...

Users Guide for 19SL410U 24SL410U 32SL410U
Page 53
... TV is set to an external A/V device (e.g., DVD player, video game system, set to the problem experienced. TV st ops respondi ng t o cont rol s • If the TV stops responding to the remote control or TV control panel and you cannot turn off -air broadcast or Cable TV), you cannot view signals from external devices connected to Video, ColorStream HD, HDMI 1, HDMI 2, PC, or from channels 3 or 4, make sure the Input Lock is connected to...
... TV is set to an external A/V device (e.g., DVD player, video game system, set to the problem experienced. TV st ops respondi ng t o cont rol s • If the TV stops responding to the remote control or TV control panel and you cannot turn off -air broadcast or Cable TV), you cannot view signals from external devices connected to Video, ColorStream HD, HDMI 1, HDMI 2, PC, or from channels 3 or 4, make sure the Input Lock is connected to...
Users Guide for 19SL410U 24SL410U 32SL410U
Page 54
..." for Toshiba REGZA-LINK compatible devices. • Make sure the HDMI cables with the HDMI Logo ( ) are used. • When the connected REGZA-LINK device does not work correctly after you have changed settings of the USB storage device are formats that correspond with the connected REGZA-LINK device. Remot e cont rol probl ems • Remove all channels from the channel list and reprogram channels into the channel memory ( page...
..." for Toshiba REGZA-LINK compatible devices. • Make sure the HDMI cables with the HDMI Logo ( ) are used. • When the connected REGZA-LINK device does not work correctly after you have changed settings of the USB storage device are formats that correspond with the connected REGZA-LINK device. Remot e cont rol probl ems • Remove all channels from the channel list and reprogram channels into the channel memory ( page...
Users Guide for 19SL410U 24SL410U 32SL410U
Page 57
... required for warranty service. (3) All warranty servicing of this limited warranty. (11) Product that is mounted in such a manner as outlined in the product's specification listed in the Owner's manual, or if the product is exposed to excessive smoke, dust, or other proof of the operating instructions in the unlikely event a safety notification is required under the U.S. How to the LCD Television or parts caused...
... required for warranty service. (3) All warranty servicing of this limited warranty. (11) Product that is mounted in such a manner as outlined in the product's specification listed in the Owner's manual, or if the product is exposed to excessive smoke, dust, or other proof of the operating instructions in the unlikely event a safety notification is required under the U.S. How to the LCD Television or parts caused...
Users Guide for 19SL410U 24SL410U 32SL410U
Page 58
... should have been defaced or removed; g. Service of a Television on third party products or service made necessary by the end user via a USB stick or SD card type media. Firmware updates that are not covered by the simultaneous use of this LCD Television. THESE LIMITED WARRANTIES EXTEND TO THE ORIGINAL CONSUMER PURCHASER OR ANY PERSON RECEIVING THIS TOSHIBA BRAND FLAT PANEL TELEVISION (the "TELEVISION(S)" or "Television(s)") AS A GIFT FROM THE ORIGINAL...
... should have been defaced or removed; g. Service of a Television on third party products or service made necessary by the end user via a USB stick or SD card type media. Firmware updates that are not covered by the simultaneous use of this LCD Television. THESE LIMITED WARRANTIES EXTEND TO THE ORIGINAL CONSUMER PURCHASER OR ANY PERSON RECEIVING THIS TOSHIBA BRAND FLAT PANEL TELEVISION (the "TELEVISION(S)" or "Television(s)") AS A GIFT FROM THE ORIGINAL...


