

User Manual
Page 2
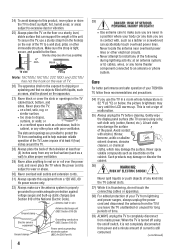
... be used as steps, such as UL, CSA, ETL). • Follow all cords and cables connected to the flat panel display so that may fall over , or knocked down. • Care should be taken to route all instructions supplied by curious children. Flat panel displays can become excited while watching a program, especially on a "larger than a UL Listed wall bracket appropriate for the size and weight of this television for wall mounting...
... be used as steps, such as UL, CSA, ETL). • Follow all cords and cables connected to the flat panel display so that may fall over , or knocked down. • Care should be taken to route all instructions supplied by curious children. Flat panel displays can become excited while watching a program, especially on a "larger than a UL Listed wall bracket appropriate for the size and weight of this television for wall mounting...
User Manual
Page 4
... of the television at least four (4) inches away from any home theater component connected to an antenna or phone system. Gently wipe the display panel surface (the TV screen) using the on the rear of the following during lightning activity: a) an antenna system; Make sure the strap is not a sign of current is 32 °F (0 °C) or below, the picture brightness may...
... of the television at least four (4) inches away from any home theater component connected to an antenna or phone system. Gently wipe the display panel surface (the TV screen) using the on the rear of the following during lightning activity: a) an antenna system; Make sure the strap is not a sign of current is 32 °F (0 °C) or below, the picture brightness may...
User Manual
Page 5
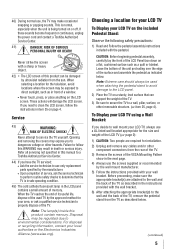
... pedestal stand to avoid damage to the LCD panel. 2) Place the TV on a flat, cushioned surface such as described below . Never attempt to properly dispose of the VESA Mounting Pattern show in the next page. 4) Always use the screws supplied or recommended by the wall mount manufacturer. 5) Follow the instructions provided with your LCD TV on or off. Choosing a location for your LCD TV To Display your wall bracket...
... pedestal stand to avoid damage to the LCD panel. 2) Place the TV on a flat, cushioned surface such as described below . Never attempt to properly dispose of the VESA Mounting Pattern show in the next page. 4) Always use the screws supplied or recommended by the wall mount manufacturer. 5) Follow the instructions provided with your LCD TV on or off. Choosing a location for your LCD TV To Display your wall bracket...
User Manual
Page 8
... back panel connections 12 Chapter 2: Connecting your TV 13 Overview of cable types 13 About the connection illustrations 13 Connecting a VCR and antenna, Cable TV or Camcorder........14 Connecting a DVD player with ColorStream® (component video), a VCR, and a satellite receiver...........15 Connecting an HDMI® or DVI device to the HDMI input........16 REGZA-LINK® connection 17 Connecting a digital audio system 18 Connecting a personal computer (PC 18 Chapter 3: Using the remote control 20 Installing the remote control batteries 20 Remote control...
... back panel connections 12 Chapter 2: Connecting your TV 13 Overview of cable types 13 About the connection illustrations 13 Connecting a VCR and antenna, Cable TV or Camcorder........14 Connecting a DVD player with ColorStream® (component video), a VCR, and a satellite receiver...........15 Connecting an HDMI® or DVI device to the HDMI input........16 REGZA-LINK® connection 17 Connecting a digital audio system 18 Connecting a personal computer (PC 18 Chapter 3: Using the remote control 20 Installing the remote control batteries 20 Remote control...
User Manual
Page 12
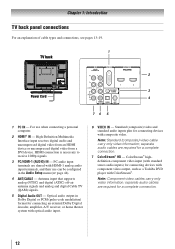
... component video output, such as a Toshiba DVD player with optical audio input. 6無 VIDEO IN - Chapter 1: Introduction TV back panel connections For an explanation of cable types and connections, see pages 13-19. 1 TV back 2 3 Power Cord 4 76 5 1無 PC IN - For use can be configured in Dolby Digital or PCM (pulse-code modulation) format for connecting devices with HDMI-1 analog audio input terminals, and their use when connecting a personal computer. 2無 HDMI® IN - High-Definition Multimedia Interface input receives digital audio...
... component video output, such as a Toshiba DVD player with optical audio input. 6無 VIDEO IN - Chapter 1: Introduction TV back panel connections For an explanation of cable types and connections, see pages 13-19. 1 TV back 2 3 Power Cord 4 76 5 1無 PC IN - For use can be configured in Dolby Digital or PCM (pulse-code modulation) format for connecting devices with HDMI-1 analog audio input terminals, and their use when connecting a personal computer. 2無 HDMI® IN - High-Definition Multimedia Interface input receives digital audio...
User Manual
Page 13
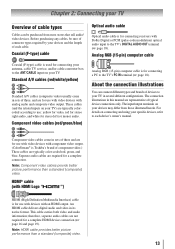
...'s owner's manual. The connection illustrations in its native format. For details on your TV) are typically colorcoded according to your TV in several different configurations. Separate audio cables are representative of component video.) These cables are not required for use with video devices with an HDMI output. therefore, separate audio cables are typically color-coded red, green, and blue. Coaxial (F-type) cable Coaxial (F-type) cable is for connecting your TV. The input/output terminals on your antenna, cable...
...'s owner's manual. The connection illustrations in its native format. For details on your TV) are typically colorcoded according to your TV in several different configurations. Separate audio cables are representative of component video.) These cables are not required for use with video devices with an HDMI output. therefore, separate audio cables are typically color-coded red, green, and blue. Coaxial (F-type) cable Coaxial (F-type) cable is for connecting your TV. The input/output terminals on your antenna, cable...

User Manual
Page 18
...-code modulation) signal for use with an external Dolby® Digital decoder or other digital audio system TV back panel To control the audio: 1無 Turn on the TV and the digital audio device. 2無 Press on the TV's remote control and open the Sound menu. 3無 Highlight Audio Setup and press . Chapter 2: Connecting your device ("Selecting the optical audio output format" on page 39). 18 Conversion adapter (if necessary) • To use a PC, set the monitor output resolution...
...-code modulation) signal for use with an external Dolby® Digital decoder or other digital audio system TV back panel To control the audio: 1無 Turn on the TV and the digital audio device. 2無 Press on the TV's remote control and open the Sound menu. 3無 Highlight Audio Setup and press . Chapter 2: Connecting your device ("Selecting the optical audio output format" on page 39). 18 Conversion adapter (if necessary) • To use a PC, set the monitor output resolution...
User Manual
Page 22
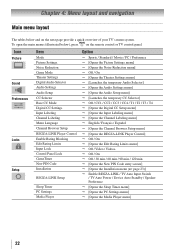
... navigation Main menu layout The tables below ), press on the next page provide a quick overview of your TV's menu system. Icon Picture Sound Preferences Locks Setup Item Mode Picture Settings Noise Reduction Game Mode Theater Settings Digital Audio Selector Audio Settings Audio Setup CC Selector Base CC Mode Digital CC Settings Input Labeling Channel Labeling Menu Language Channel Browser Setup REGZA-LINK Player Control Enable Rating Blocking Edit Rating Limits Input Lock Control Panel Lock GameTimer New PIN Code Installation REGZA-LINK Setup Sleep Timer PC Settings Media Player Option...
... navigation Main menu layout The tables below ), press on the next page provide a quick overview of your TV's menu system. Icon Picture Sound Preferences Locks Setup Item Mode Picture Settings Noise Reduction Game Mode Theater Settings Digital Audio Selector Audio Settings Audio Setup CC Selector Base CC Mode Digital CC Settings Input Labeling Channel Labeling Menu Language Channel Browser Setup REGZA-LINK Player Control Enable Rating Blocking Edit Rating Limits Input Lock Control Panel Lock GameTimer New PIN Code Installation REGZA-LINK Setup Sleep Timer PC Settings Media Player Option...
User Manual
Page 24
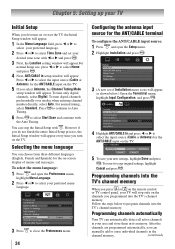
... the remote control or TV control panel, your TV will appear every time you turn on or reset the TV, the Initial Setup window will appear. 1無 In the Menu Language field, press t or u to select your preferred language. 2無 Press t or u to select Time Zone and set of menus and messages. To tune digital channels preferentially over analog when entering channel number directly, select Auto. However...
... the remote control or TV control panel, your TV will appear every time you turn on or reset the TV, the Initial Setup window will appear. 1無 In the Menu Language field, press t or u to select your preferred language. 2無 Press t or u to select Time Zone and set of menus and messages. To tune digital channels preferentially over analog when entering channel number directly, select Auto. However...

User Manual
Page 25
... ... 52% Number of Installation menu icons will appear. 4無 (A new set of Channels Found - 73 Scanning Digital Channels Found Channel - 118 Abort 3無 Press p or q to select a channel position to be unchecked. Note: Skipped channels cannot be accessed using the number keys on the remote control to enter the channel number (for Antenna. Setting channel skip To prevent certain channels from being viewed, channel positions can still be selected with or ; however, once channel programming is...
... ... 52% Number of Installation menu icons will appear. 4無 (A new set of Channels Found - 73 Scanning Digital Channels Found Channel - 118 Abort 3無 Press p or q to select a channel position to be unchecked. Note: Skipped channels cannot be accessed using the number keys on the remote control to enter the channel number (for Antenna. Setting channel skip To prevent certain channels from being viewed, channel positions can still be selected with or ; however, once channel programming is...
User Manual
Page 27
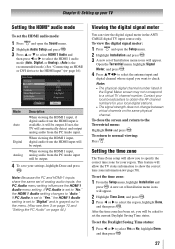
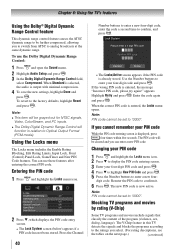
... physical digital channel number listed in the ANT/ CABLE digital TV input source only. Setting the time zone The Time Zone setup will be asked to the Terrestrial menu: Highlight Done and press . To view the digital signal meter: 1無 Press and open the Sound menu. 2無 Highlight Audio Setup and press . 3無 Press p or q to select HDMI 1 Audio and then press t or u to select the HDMI 1 audio mode (Auto, Digital, or Analog). (Auto is the recommended mode.) See "Connecting an HDMI...
... physical digital channel number listed in the ANT/ CABLE digital TV input source only. Setting the time zone The Time Zone setup will be asked to the Terrestrial menu: Highlight Done and press . To view the digital signal meter: 1無 Press and open the Sound menu. 2無 Highlight Audio Setup and press . 3無 Press p or q to select HDMI 1 Audio and then press t or u to select the HDMI 1 audio mode (Auto, Digital, or Analog). (Auto is the recommended mode.) See "Connecting an HDMI...
User Manual
Page 38
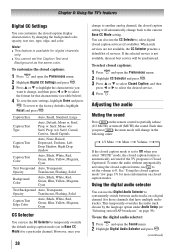
... current Base CC Mode setting. Caption Size Auto, Small, Standard, Large Caption Text Type Auto, Default, Mono w. w. However, once you want to change, and then press or to 0. Each time you select "MUTE" mode, the closed caption mode is set in the following order: 1/2 Mute Mute Volume If the closed caption feature is automatically activated if the TV program is Closed Captioned. Using the digital audio selector You can use the Digital Audio Selector to conveniently switch between audio...
... current Base CC Mode setting. Caption Size Auto, Small, Standard, Large Caption Text Type Auto, Default, Mono w. w. However, once you want to change, and then press or to 0. Each time you select "MUTE" mode, the closed caption mode is set in the following order: 1/2 Mute Mute Volume If the closed caption feature is automatically activated if the TV program is Closed Captioned. Using the digital audio selector You can use the Digital Audio Selector to conveniently switch between audio...
User Manual
Page 40
... of the program (violence, sex, dialog, language). To use these features after entering the correct PIN code. Using the Locks menu The Locks menu includes the Enable Rating Blocking, Edit Rating Limits, Input Lock, Front (Control) Panel Lock, GameTimer and New PIN Code features. Highlight Retry and press . Changing your PIN code 1無 Press and highlight the Locks menu icon. 2無 Press to display the PIN code entering screen. 3無...
... of the program (violence, sex, dialog, language). To use these features after entering the correct PIN code. Using the Locks menu The Locks menu includes the Enable Rating Blocking, Edit Rating Limits, Input Lock, Front (Control) Panel Lock, GameTimer and New PIN Code features. Highlight Retry and press . Changing your PIN code 1無 Press and highlight the Locks menu icon. 2無 Press to display the PIN code entering screen. 3無...
User Manual
Page 44
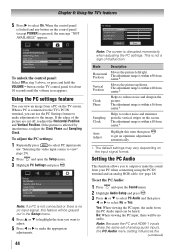
... input signal format. Setting the PC Audio This function allows you to output or mute the sound from the PC Audio input can use the PC Settings feature to get an optimum adjustment automatically. ** The default settings may vary depending on the TV screen. Yes: When viewing the PC input, the audio from your PC when connecting using the PC IN terminal and an analog RGB cable. ( page 18) To set of analog audio inputs...
... input signal format. Setting the PC Audio This function allows you to output or mute the sound from the PC Audio input can use the PC Settings feature to get an optimum adjustment automatically. ** The default settings may vary depending on the TV screen. Yes: When viewing the PC input, the audio from your PC when connecting using the PC IN terminal and an analog RGB cable. ( page 18) To set of analog audio inputs...
User Manual
Page 49
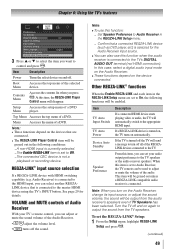
... TV Auto Input Switch TV Auto Power Device Auto Standby Speaker Preference Description If a connected HDMI device starts playing video or audio, the TV will be grayed out unless a REGZA-LINK compatible audio receiver is turned off the TV will be grayed out in the REGZA-LINK Setup menu. −− Confirm that is connected to the master HDMI device using the TV's INPUT button. From this function when the audio receiver is connected to the TV's DIGITAL AUDIO...
... TV Auto Input Switch TV Auto Power Device Auto Standby Speaker Preference Description If a connected HDMI device starts playing video or audio, the TV will be grayed out unless a REGZA-LINK compatible audio receiver is turned off the TV will be grayed out in the REGZA-LINK Setup menu. −− Confirm that is connected to the master HDMI device using the TV's INPUT button. From this function when the audio receiver is connected to the TV's DIGITAL AUDIO...
User Manual
Page 50
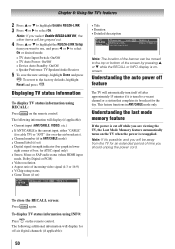
... the power cord. Chapter 6: Using the TV's features 2無 Press p or q to highlight Enable REGZA-LINK. 3無 Press t or u to the factory defaults, highlight Reset and press . This feature functions in lower right corner of incoming video signal (4:3 or 16:9) • V-Chip rating status • Game Timer (if set ) • Digital signal strength indicator (bar graph in ANT/CABLE mode only. To close the RECALL screen: Press again. Displaying...
... the power cord. Chapter 6: Using the TV's features 2無 Press p or q to highlight Enable REGZA-LINK. 3無 Press t or u to the factory defaults, highlight Reset and press . This feature functions in lower right corner of incoming video signal (4:3 or 16:9) • V-Chip rating status • Game Timer (if set ) • Digital signal strength indicator (bar graph in ANT/CABLE mode only. To close the RECALL screen: Press again. Displaying...

User Manual
Page 53
... view external signals or channel 3 or 4 •• If you cannot turn on the remote control or TV and select a valid video input source ( page 29). Poor color or no color •• The station may notice that contain a digital display, in their programming. television broadcasts, video games, DVDs), you notice this feature to help to VIDEO, ColorStream® HDMI 1, HDMI 2, PC or from external devices connected to reduce the effect of the Text modes...
... view external signals or channel 3 or 4 •• If you cannot turn on the remote control or TV and select a valid video input source ( page 29). Poor color or no color •• The station may notice that contain a digital display, in their programming. television broadcasts, video games, DVDs), you notice this feature to help to VIDEO, ColorStream® HDMI 1, HDMI 2, PC or from external devices connected to reduce the effect of the Text modes...
User Manual
Page 54
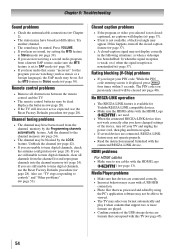
... tune digital channels, use the Reset Factory Defaults procedure ( page 28). Closed caption problems •• If the program or video you forget your TV and unplug the power cord, then plug and turn on . Rating blocking (V-Chip) problems •• If you selected is not closedcaptioned, no sound, try setting the MTS feature to Stereo mode ( page 39). •• If you are not receiving a second audio program from...
... tune digital channels, use the Reset Factory Defaults procedure ( page 28). Closed caption problems •• If the program or video you forget your TV and unplug the power cord, then plug and turn on . Rating blocking (V-Chip) problems •• If you selected is not closedcaptioned, no sound, try setting the MTS feature to Stereo mode ( page 39). •• If you are not receiving a second audio program from...
User Manual
Page 57
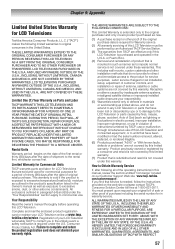
... to commercial use. Labor service charges for set installation, setup, adjustment of customer controls, and installation or repair of antenna, satellite or cable systems are your LCD Television online at 1-800-631-3811. Your Responsibility Read the owner's manual thoroughly before operating this LCD Television and connected equipment; use or malfunction through simultaneous use in violation of instructions furnished by this warranty. Reception problems caused by inadequate antenna systems, misaligned satellite dishes or improperly installed cable drops are...
... to commercial use. Labor service charges for set installation, setup, adjustment of customer controls, and installation or repair of antenna, satellite or cable systems are your LCD Television online at 1-800-631-3811. Your Responsibility Read the owner's manual thoroughly before operating this LCD Television and connected equipment; use or malfunction through simultaneous use in violation of instructions furnished by this warranty. Reception problems caused by inadequate antenna systems, misaligned satellite dishes or improperly installed cable drops are...
User Manual
Page 58
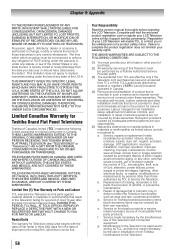
... one (1) year after the date of antenna systems are your warranty rights. Service, repairs or replacement made necessary by a Toshiba Authorized Service Provider (ASP). (3) The warranties from TCL are effective only if the Television is authorized to the product for service purposes. Service made necessary by TCL to : a. Limited Canadian Warranty for set installation, setup, adjustment of customer controls, and installation or repair of original retail purchase. d. This limitation...
... one (1) year after the date of antenna systems are your warranty rights. Service, repairs or replacement made necessary by a Toshiba Authorized Service Provider (ASP). (3) The warranties from TCL are effective only if the Television is authorized to the product for service purposes. Service made necessary by TCL to : a. Limited Canadian Warranty for set installation, setup, adjustment of customer controls, and installation or repair of original retail purchase. d. This limitation...


