Owner's Manual - English
Page 6
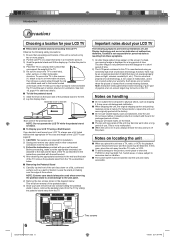
... with your LCD TV ■ Retractable pedestal stand and locating the LCD TV Observe the following symptoms are technical limitations of LCD Display technology and are not visible when the picture is not covered under your LCD TV The following safety precautions: 1) Ensure that does not operate properly (does not light, remains constantly lit, etc.). therefore, Toshiba is not...
... with your LCD TV ■ Retractable pedestal stand and locating the LCD TV Observe the following symptoms are technical limitations of LCD Display technology and are not visible when the picture is not covered under your LCD TV The following safety precautions: 1) Ensure that does not operate properly (does not light, remains constantly lit, etc.). therefore, Toshiba is not...
Owner's Manual - English
Page 7
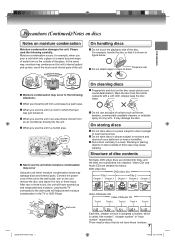
... following situations: When you use the unit when moisture condensation may occur Using the unit when moisture condensation exists may occur in the TV or DVD Player. When you move the unit from the center outwards with a soft cloth. Always keep the disc clean. Introduction ...Precautions (Continued)/Notes on discs Notes on the disc cause picture and sound deterioration. When you use any moisture. Exacmopnldeeonfsmatoioisnt!ure Optical pick-up lens, one of the most crucial internal parts of ...
... following situations: When you use the unit when moisture condensation may occur Using the unit when moisture condensation exists may occur in the TV or DVD Player. When you move the unit from the center outwards with a soft cloth. Always keep the disc clean. Introduction ...Precautions (Continued)/Notes on discs Notes on the disc cause picture and sound deterioration. When you use any moisture. Exacmopnldeeonfsmatoioisnt!ure Optical pick-up lens, one of the most crucial internal parts of ...
Owner's Manual - English
Page 8
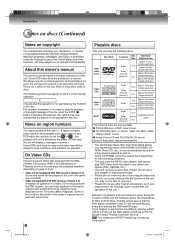
... of an irregular shape into the unit, as a DVD. • Video CD equipped with search function by the player. (In this may appear on the TV screen during the creation of DVD and CD Software and/or the manufacture of this ownerʼs manual This ownerʼs manual explains the basic.... 74 minutes (single sided disc) 8 cm Approx. 20 minutes (single sided disc) DivX® Audio + Video (moving pictures) 12 cm It depends on region numbers The region number of DVD and CD discs, Toshiba cannot assure that have no region code label may still be allowed by using the menu displayed on...
... of an irregular shape into the unit, as a DVD. • Video CD equipped with search function by the player. (In this may appear on the TV screen during the creation of DVD and CD Software and/or the manufacture of this ownerʼs manual This ownerʼs manual explains the basic.... 74 minutes (single sided disc) 8 cm Approx. 20 minutes (single sided disc) DivX® Audio + Video (moving pictures) 12 cm It depends on region numbers The region number of DVD and CD discs, Toshiba cannot assure that have no region code label may still be allowed by using the menu displayed on...
Owner's Manual - English
Page 9
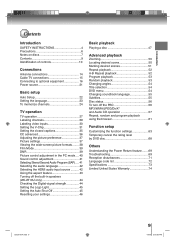
...;cation of controls 10 Connections Antenna connections 14 Cable TV connections 15 Connecting to optional equipment 16 Power source 21 Basic setup Auto Setup 22 Setting the language 23 To memorize channels 24 TV operation TV operation 27 Labeling channels 29 Labeling video inputs 30 Setting... the V-Chip 31 Setting the closed captions 35 CC advanced 36 Adjusting the picture preference 37 Picture settings 37 Viewing the wide-screen picture formats........ 38 Film Mode 39 DNR 39 Picture control...
...;cation of controls 10 Connections Antenna connections 14 Cable TV connections 15 Connecting to optional equipment 16 Power source 21 Basic setup Auto Setup 22 Setting the language 23 To memorize channels 24 TV operation TV operation 27 Labeling channels 29 Labeling video inputs 30 Setting... the V-Chip 31 Setting the closed captions 35 CC advanced 36 Adjusting the picture preference 37 Picture settings 37 Viewing the wide-screen picture formats........ 38 Film Mode 39 DNR 39 Picture control...

Owner's Manual - English
Page 17
... with ColorStream® (Component video) output Your TV/DVD is separated. laced signals and 480p, 720p progressive signals. • Refer to the ownerʼs manual of the connected equipment as a Toshiba DVD player with ColorStream® can greatly enhance picture quality and performance. The S-Video cable only carries... the Component video cable, an Audio cable must also connect the audio cables to the AUDIO IN jacks as shown below. Connecting your TV/DVD to a component video compatible DVD player, such as well. • When you connect the unit to other equipment, be sure...
... with ColorStream® (Component video) output Your TV/DVD is separated. laced signals and 480p, 720p progressive signals. • Refer to the ownerʼs manual of the connected equipment as a Toshiba DVD player with ColorStream® can greatly enhance picture quality and performance. The S-Video cable only carries... the Component video cable, an Audio cable must also connect the audio cables to the AUDIO IN jacks as shown below. Connecting your TV/DVD to a component video compatible DVD player, such as well. • When you connect the unit to other equipment, be sure...
Owner's Manual - English
Page 18
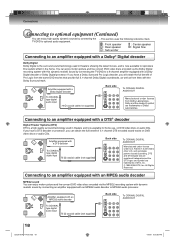
...MPEG2 audio decoder Back side To COAXIAL DIGITAL AUDIO OUT To COAXIAL type digital audio input 75 Ω coaxial cable (not supplied) 18 52G0101A P14-29.indd 18 1/5/09 3:02:55 PM Amplifier equipped with a Dolby Digital decoder or Dolby Digital processor. All Rights Reserved. Connecting to... (DTS) DTS is now available to reproduce this dynamic realistic sound by connecting the TV/DVD to an amplifier equipped with an MPEG audio decoder MPEG2 sound You can enjoy motion picture and live concert DVD video discs encoded via the MPEG2 recording system with dynamic realistic...
...MPEG2 audio decoder Back side To COAXIAL DIGITAL AUDIO OUT To COAXIAL type digital audio input 75 Ω coaxial cable (not supplied) 18 52G0101A P14-29.indd 18 1/5/09 3:02:55 PM Amplifier equipped with a Dolby Digital decoder or Dolby Digital processor. All Rights Reserved. Connecting to... (DTS) DTS is now available to reproduce this dynamic realistic sound by connecting the TV/DVD to an amplifier equipped with an MPEG audio decoder MPEG2 sound You can enjoy motion picture and live concert DVD video discs encoded via the MPEG2 recording system with dynamic realistic...
Owner's Manual - English
Page 22
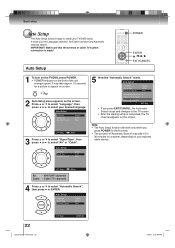
...▲ or ▼ to select "Signal Type", then press ◀ or ▶ to select "Automatic Search", then press ▶ or ENTER. Cable TV channels 4 Press ▲ or ▼ to select "Air" or "Cable". Auto Setup Language Signal Type Automatic Search English Cable Start Analog Channel Found : 0...appears on the screen. Basic setup Auto Setup The Auto Setup function helps to the TV screen. • After the starting setup is made! It leads you press POWER for a picture to complete, depending on your desired language. Auto Setup Language Signal Type Automatic Search ...
...▲ or ▼ to select "Signal Type", then press ◀ or ▶ to select "Automatic Search", then press ▶ or ENTER. Cable TV channels 4 Press ▲ or ▼ to select "Air" or "Cable". Auto Setup Language Signal Type Automatic Search English Cable Start Analog Channel Found : 0...appears on the screen. Basic setup Auto Setup The Auto Setup function helps to the TV screen. • After the starting setup is made! It leads you press POWER for a picture to complete, depending on your desired language. Auto Setup Language Signal Type Automatic Search ...

Owner's Manual - English
Page 23
... 23 1/5/09 3:03:00 PM Setup Closed Caption Language Video Label Auto Shut Off Aspect TOSHIBA Logo Light Reset >> English >> Off On On >> : Select : Adjust 5 Press EXIT/CANCEL to return to select "Language". Main Menu Picture Audio Channel Lock Setup : Select ENTER:Set 3 Press ▲ or ▼ to... the normal screen. Note: • If no buttons are pressed for a picture to appear on screen. 4 Press ◀ or ▶ to select "Setup", then press ▶ or ENTER. Basic setup Setting the language This TV/DVD can display the on the front of the unit changes green. It may...
... 23 1/5/09 3:03:00 PM Setup Closed Caption Language Video Label Auto Shut Off Aspect TOSHIBA Logo Light Reset >> English >> Off On On >> : Select : Adjust 5 Press EXIT/CANCEL to return to select "Language". Main Menu Picture Audio Channel Lock Setup : Select ENTER:Set 3 Press ▲ or ▼ to... the normal screen. Note: • If no buttons are pressed for a picture to appear on screen. 4 Press ◀ or ▶ to select "Setup", then press ▶ or ENTER. Basic setup Setting the language This TV/DVD can display the on the front of the unit changes green. It may...

Owner's Manual - English
Page 24
... Search Air Start 2 Press ▲ or ▼ to the normal screen. 24 52G0101A P14-29.indd 24 1/5/09 3:03:02 PM Main Menu Picture Audio Channel Lock Setup : Select ENTER:Set 1 Press MENU in your area. Channel Add/Delete >> DTV Signal >> Auto Ch Memory >> Ch Label ... will begin memorizing all the channels available in the TV mode. Air - Before selecting channels, they must be programmed into memory, skipping over unwanted channels. Press ▲ or ▼ to select "Signal Type". Main Menu Picture Audio Channel Lock Setup : Select ENTER:Set 2 Press ▲ or...
... Search Air Start 2 Press ▲ or ▼ to the normal screen. 24 52G0101A P14-29.indd 24 1/5/09 3:03:02 PM Main Menu Picture Audio Channel Lock Setup : Select ENTER:Set 1 Press MENU in your area. Channel Add/Delete >> DTV Signal >> Auto Ch Memory >> Ch Label ... will begin memorizing all the channels available in the TV mode. Air - Before selecting channels, they must be programmed into memory, skipping over unwanted channels. Press ▲ or ▼ to select "Signal Type". Main Menu Picture Audio Channel Lock Setup : Select ENTER:Set 2 Press ▲ or...
Owner's Manual - English
Page 25
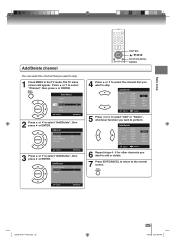
.... Basic setup Add/Delete channel You can select the channel that you want to select "Channel", then press ▶ or ENTER. Main Menu Picture Audio Channel Lock Setup : Select ENTER:Set 2 Press ▲ or ▼ to select "Add/Delete", then press ▶ or ENTER. Channel... Add Add Delete Add Delete : Select : Adjust 5 Press ◀ or ▶ to select "Add" or "Delete", whichever function you want to perform. The TV menu screen will appear. Press ▲ or ▼ to skip. Add/Delete Adding Channel >> Add/Delete >> Clear All >> ENTER / / / EXIT/CANCEL MENU...
.... Basic setup Add/Delete channel You can select the channel that you want to select "Channel", then press ▶ or ENTER. Main Menu Picture Audio Channel Lock Setup : Select ENTER:Set 2 Press ▲ or ▼ to select "Add/Delete", then press ▶ or ENTER. Channel... Add Add Delete Add Delete : Select : Adjust 5 Press ◀ or ▶ to select "Add" or "Delete", whichever function you want to perform. The TV menu screen will appear. Press ▲ or ▼ to skip. Add/Delete Adding Channel >> Add/Delete >> Clear All >> ENTER / / / EXIT/CANCEL MENU...

Owner's Manual - English
Page 26
...:Set 5 Press EXIT/CANCEL to return to select "Add/Delete", then press ▶ or ENTER. Main Menu Picture Audio Channel Lock Setup : Select ENTER:Set 2 Press ▲ or ▼ to the normal screen. The TV menu screen will appear. Add/Delete Adding Channel >> Add/Delete >> Clear All >> : Select ENTER:Set 4 Press EXIT...
...:Set 5 Press EXIT/CANCEL to return to select "Add/Delete", then press ▶ or ENTER. Main Menu Picture Audio Channel Lock Setup : Select ENTER:Set 2 Press ▲ or ▼ to the normal screen. The TV menu screen will appear. Add/Delete Adding Channel >> Add/Delete >> Clear All >> : Select ENTER:Set 4 Press EXIT...
Owner's Manual - English
Page 27
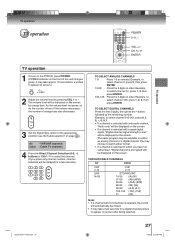
...displayed on screen after being selected. 52G0101A P14-29.indd 27 27 1/5/09 3:03:07 PM It may take approx. 10 seconds for a digital channel picture to appear on page 24 ). Example, to select channel 12, press 1, 2, then press ENTER. 100-125: Press the 3 digits in order. ... same program may choose to which you press only channel number, channel selection will be available on the front of the unit changes green. TV operation TV operation POWER 0-9, - Example, to the appropriate position (see "Air/Cable selection" on screen.) 2 Adjust the volume level by the remaining...
...displayed on screen after being selected. 52G0101A P14-29.indd 27 27 1/5/09 3:03:07 PM It may take approx. 10 seconds for a digital channel picture to appear on page 24 ). Example, to select channel 12, press 1, 2, then press ENTER. 100-125: Press the 3 digits in order. ... same program may choose to which you press only channel number, channel selection will be available on the front of the unit changes green. TV operation TV operation POWER 0-9, - Example, to the appropriate position (see "Air/Cable selection" on screen.) 2 Adjust the volume level by the remaining...
Owner's Manual - English
Page 28
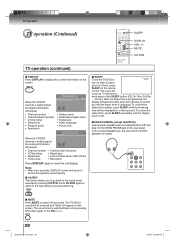
... program name • Signal type • Audio language • Picture size 14 Analog Cable Sleep Timer Off When the TV/DVD receives a analog signal, the analog information Mono Full 480i will return to normal TV-operation automatically. ■ CH RTN This button allows you that the...Channel label (if preset) • V-Chip rating • Signal type • Sleep timer • Audio information (Stereo, SAP or Mono) • Picture size • Resolution Press DISPLAY again to switch off after a preset amount of the SLEEP button (Off, 0h 10m, 0h 20m, ..., 2h 0m). ...
... program name • Signal type • Audio language • Picture size 14 Analog Cable Sleep Timer Off When the TV/DVD receives a analog signal, the analog information Mono Full 480i will return to normal TV-operation automatically. ■ CH RTN This button allows you that the...Channel label (if preset) • V-Chip rating • Signal type • Sleep timer • Audio information (Stereo, SAP or Mono) • Picture size • Resolution Press DISPLAY again to switch off after a preset amount of the SLEEP button (Off, 0h 10m, 0h 20m, ..., 2h 0m). ...
Owner's Manual - English
Page 29
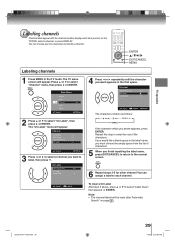
...24 . 52G0101A P14-29.indd 29 29 1/5/09 3:03:09 PM Main Menu Picture Audio Channel Lock Setup : Select ENTER:Set 2 Press ▲ or ▼ to select "Channel" menu..., then press ▶ or ENTER. TV operation Labeling channels Channel label appear with the channel number display each channel. : Select : Adjust To ...then press ▶ or ENTER. Note: • The channel labels will be reset after "Automatic Search" on the TV/DVD, select a channel, or press DISPLAY. Ch Label Channel Number Ch Label Label Clear 15-1 >> 4 Press &#...
...24 . 52G0101A P14-29.indd 29 29 1/5/09 3:03:09 PM Main Menu Picture Audio Channel Lock Setup : Select ENTER:Set 2 Press ▲ or ▼ to select "Channel" menu..., then press ▶ or ENTER. TV operation Labeling channels Channel label appear with the channel number display each channel. : Select : Adjust To ...then press ▶ or ENTER. Note: • The channel labels will be reset after "Automatic Search" on the TV/DVD, select a channel, or press DISPLAY. Ch Label Channel Number Ch Label Label Clear 15-1 >> 4 Press &#...
Owner's Manual - English
Page 30
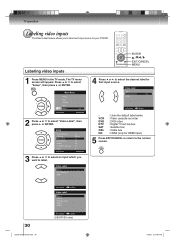
Main Menu Picture Audio Channel Lock Setup : Select ENTER:Set 2 Press ▲ or ▼ to select "Setup", then press ▶ or ENTER. HDMI 2 - : Select : Adjust (26LV610U only) 1/5/09 3:04:00 PM Labeling video inputs 1 Press MENU in the TV mode. The TV menu screen will ...appear. Setup Closed Caption Language Video Label Auto Shut Off Aspect TOSHIBA Logo Light Reset : Select >> English >> Off On On >> ENTER:Set 3 Press ▲ or ▼...
Main Menu Picture Audio Channel Lock Setup : Select ENTER:Set 2 Press ▲ or ▼ to select "Setup", then press ▶ or ENTER. HDMI 2 - : Select : Adjust (26LV610U only) 1/5/09 3:04:00 PM Labeling video inputs 1 Press MENU in the TV mode. The TV menu screen will ...appear. Setup Closed Caption Language Video Label Auto Shut Off Aspect TOSHIBA Logo Light Reset : Select >> English >> Off On On >> ENTER:Set 3 Press ▲ or ▼...
Owner's Manual - English
Page 31
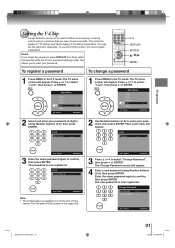
...If you forget the password, press DISPLAY four times within five seconds while the TV is transmitted. Press ▲ or ▼ to confirm, then press ENTER. The TV menu screen will appear. Main Menu Picture Audio Channel Lock Setup : Select ENTER:Set 2 Select and enter your password (4 digits... the V-Chip An age limitation can be set to restrict children from viewing or hearing violent scenes or pictures that you may set this data is in the TV mode. Main Menu Picture Audio Channel Lock Setup : Select ENTER:Set 1 Press MENU in password entering mode. Lock New Password ...
...If you forget the password, press DISPLAY four times within five seconds while the TV is transmitted. Press ▲ or ▼ to confirm, then press ENTER. The TV menu screen will appear. Main Menu Picture Audio Channel Lock Setup : Select ENTER:Set 2 Select and enter your password (4 digits... the V-Chip An age limitation can be set to restrict children from viewing or hearing violent scenes or pictures that you may set this data is in the TV mode. Main Menu Picture Audio Channel Lock Setup : Select ENTER:Set 1 Press MENU in password entering mode. Lock New Password ...
Owner's Manual - English
Page 32
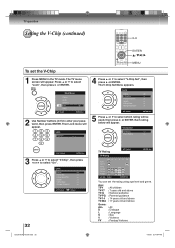
...press ▶ or ENTER. Then Lock menu will appear. Lock Password ---- 4 Press ▲ or ▼ to select "On" . Age: TV-Y TV-Y7 TV-G TV-PG TV-14 TV-MA : All children : 7 years old and above : General audience : Parental guidance : 14 years old and above : 17 years old and ...Dialogue L : Language S : Sex V : Violence FV : Fantasy Violence 1/5/09 3:04:04 PM The TV menu screen will be used, then press ▶ or ENTER. The V-Chip Set Menu appears. Main Menu Picture Audio Channel Lock Setup : Select ENTER:Set 2 Use Number buttons (0-9) to enter your password, then press...
...press ▶ or ENTER. Then Lock menu will appear. Lock Password ---- 4 Press ▲ or ▼ to select "On" . Age: TV-Y TV-Y7 TV-G TV-PG TV-14 TV-MA : All children : 7 years old and above : General audience : Parental guidance : 14 years old and above : 17 years old and ...Dialogue L : Language S : Sex V : Violence FV : Fantasy Violence 1/5/09 3:04:04 PM The TV menu screen will be used, then press ▶ or ENTER. The V-Chip Set Menu appears. Main Menu Picture Audio Channel Lock Setup : Select ENTER:Set 2 Use Number buttons (0-9) to enter your password, then press...
Owner's Manual - English
Page 33
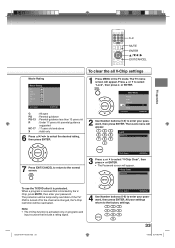
Main Menu Picture Audio Channel Lock Setup : Select ENTER:Set 2 Use Number buttons (0-9) to enter your settings return to the factory settings. 52G0101A P30-36.indd 33 33 1/5/09 3:04:05 PM To use the TV/DVD after it is blocked by the VChip, press MUTE, then enter your... password, then press ENTER. Then Lock menu will appear. V-Chip Clear Password ---- All your password, then press ENTER. If the TV/ DVD is turned off or the channel is received that include a rating signal. [0-9] : Select ENTER:Set 4 Use Number buttons (0-9) to select "V-Chip...
Main Menu Picture Audio Channel Lock Setup : Select ENTER:Set 2 Use Number buttons (0-9) to enter your settings return to the factory settings. 52G0101A P30-36.indd 33 33 1/5/09 3:04:05 PM To use the TV/DVD after it is blocked by the VChip, press MUTE, then enter your... password, then press ENTER. Then Lock menu will appear. V-Chip Clear Password ---- All your password, then press ENTER. If the TV/ DVD is turned off or the channel is received that include a rating signal. [0-9] : Select ENTER:Set 4 Use Number buttons (0-9) to select "V-Chip...
Owner's Manual - English
Page 34
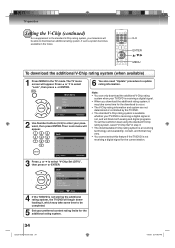
... >> Change Password >> : Select : Adjust 4 If the TV/DVD is not receiving a digital signal for the current station. [0-9] : Select ENTER:Set 3 Press ▲ or ▼ to be able to enter your password, then press ENTER. Main Menu Picture Audio Channel Lock Setup : Select ENTER:Set 2 Use Number buttons... system, it , which may take some time to select "V-Chip Set (DTV)", then press ▶ or ENTER. The TV menu screen will appear. TV operation Setting the V-Chip (continued) As a supplement to the standard V-Chip rating system, your television will be completed. 5...
... >> Change Password >> : Select : Adjust 4 If the TV/DVD is not receiving a digital signal for the current station. [0-9] : Select ENTER:Set 3 Press ▲ or ▼ to be able to enter your password, then press ENTER. Main Menu Picture Audio Channel Lock Setup : Select ENTER:Set 2 Use Number buttons... system, it , which may take some time to select "V-Chip Set (DTV)", then press ▶ or ENTER. The TV menu screen will appear. TV operation Setting the V-Chip (continued) As a supplement to the standard V-Chip rating system, your television will be completed. 5...
Owner's Manual - English
Page 35
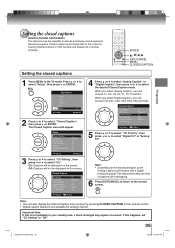
... Closed Caption menu screen by pressing CLOSED CAPTION on the screen for analog channel. Main Menu Picture Audio Channel Lock Setup : Select ENTER:Set 2 Press ▲ or ▼ to select "...On". Setup Closed Caption Language Video Label Auto Shut Off Aspect TOSHIBA Logo Light Reset : Select >> English >> Off On On >> ENTER:Set 3 Press ▲ or &#... capability to select "Setup", then press ▶ or ENTER. TV operation Setting the closed captions 1 Press MENU in the TV mode. Press ▲ or ▼ to decode and display closed...
... Closed Caption menu screen by pressing CLOSED CAPTION on the screen for analog channel. Main Menu Picture Audio Channel Lock Setup : Select ENTER:Set 2 Press ▲ or ▼ to select "...On". Setup Closed Caption Language Video Label Auto Shut Off Aspect TOSHIBA Logo Light Reset : Select >> English >> Off On On >> ENTER:Set 3 Press ▲ or &#... capability to select "Setup", then press ▶ or ENTER. TV operation Setting the closed captions 1 Press MENU in the TV mode. Press ▲ or ▼ to decode and display closed...


