

Datasheet
Page 1
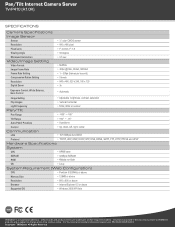
... Pan/Tilt Internet Camera Server TV-IP410 (A1.0R) The Pan/Tilt Internet Camera Server (TV-IP410) provides real-time security surveillance over a secure connection. Advanced intuitive software includes motion detection recording, email alerts and scheduled recordings. The TV-IP410 provides high quality video streams over a large viewing area. This camera's brilliant image quality, pan and tilt functionality and low light recording capabilities make it ideal for home, small office and business use. See more with up to 30 frames per second • Supports TCP/IP networking, SMTP email, HTTP...
... Pan/Tilt Internet Camera Server TV-IP410 (A1.0R) The Pan/Tilt Internet Camera Server (TV-IP410) provides real-time security surveillance over a secure connection. Advanced intuitive software includes motion detection recording, email alerts and scheduled recordings. The TV-IP410 provides high quality video streams over a large viewing area. This camera's brilliant image quality, pan and tilt functionality and low light recording capabilities make it ideal for home, small office and business use. See more with up to 30 frames per second • Supports TCP/IP networking, SMTP email, HTTP...
Datasheet
Page 2
..., DNS, DDNS, SMTP, FTP, HTTP, PPPoE and UPnP Hardware Specifications System CPU • ARM9 base SDRAM • 32Mbyte SDRAM ROM • 4Mbyte nor flash OS • Linux System Requirement (Web Configuration) CPU • Pentium III 350MHz or above Memory Size • 128MB or above Resolution • 800 x 600 or above Browser • Internet Explorer 6.0 or above Supported OS • Windows 2000/XP/Vista TRENDnet is subject to change at any time, without...
..., DNS, DDNS, SMTP, FTP, HTTP, PPPoE and UPnP Hardware Specifications System CPU • ARM9 base SDRAM • 32Mbyte SDRAM ROM • 4Mbyte nor flash OS • Linux System Requirement (Web Configuration) CPU • Pentium III 350MHz or above Memory Size • 128MB or above Resolution • 800 x 600 or above Browser • Internet Explorer 6.0 or above Supported OS • Windows 2000/XP/Vista TRENDnet is subject to change at any time, without...
Datasheet
Page 3
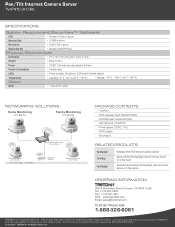
...), link (green), LED enable/ disable support • Operating 0° C ~45° C (32° F ~113° F • Storage -10° C ~-60° C (14° F ~ 140° F) GPIO • 1 input and 1 output NETWORKING SOLUTIONS Home Monitoring (TV-IP410) Family Monitoring (TV-IP410) Wireless N Gigabit Router (TEW-633GR) Property Monitoring (TV-IP410W) Wireless 54Mbps Internet 100Mbps Cable/DSL Modem Business Monitoring (TV-IP410W) PACKAGE CONTENTS • TV-IP410 • Multi-Language Quick installation Guide • CD-ROM (User's Guide and Utility) • Cat.5 Ethernet...
...), link (green), LED enable/ disable support • Operating 0° C ~45° C (32° F ~113° F • Storage -10° C ~-60° C (14° F ~ 140° F) GPIO • 1 input and 1 output NETWORKING SOLUTIONS Home Monitoring (TV-IP410) Family Monitoring (TV-IP410) Wireless N Gigabit Router (TEW-633GR) Property Monitoring (TV-IP410W) Wireless 54Mbps Internet 100Mbps Cable/DSL Modem Business Monitoring (TV-IP410W) PACKAGE CONTENTS • TV-IP410 • Multi-Language Quick installation Guide • CD-ROM (User's Guide and Utility) • Cat.5 Ethernet...
User's Guide
Page 2
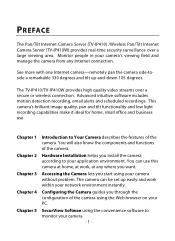
... recordings. Hardware Installation helps you through the configuration of the camera using the Web browser on your network environment instantly. Chapter 1 Chapter 2 Chapter 3 Chapter 4 Chapter 5 Introduction to monitor your camera without problem. See more with one Internet camera-remotely pan the camera side-toside a remarkable 330 degrees and tilt up easily and work , at work within your PC. Accessing the Camera lets you want. PREFACE The Pan/Tilt Internet Camera Server (TV-IP410) /Wireless Pan/Tilt Internet Camera Server (TV-IP410W) provides real-time security surveillance...
... recordings. Hardware Installation helps you through the configuration of the camera using the Web browser on your network environment instantly. Chapter 1 Chapter 2 Chapter 3 Chapter 4 Chapter 5 Introduction to monitor your camera without problem. See more with one Internet camera-remotely pan the camera side-toside a remarkable 330 degrees and tilt up easily and work , at work within your PC. Accessing the Camera lets you want. PREFACE The Pan/Tilt Internet Camera Server (TV-IP410) /Wireless Pan/Tilt Internet Camera Server (TV-IP410W) provides real-time security surveillance...
User's Guide
Page 4
... 2 10 HARDWARE INSTALLATION 10 2.1 INSTALLING THE WALL MOUNT KIT 10 2.2 CONNECTING THE CAMERA TO LAN/WLAN 11 2.3 APPLICATIONS OF THE CAMERA 12 CHAPTER 3 13 ACCESSING THE CAMERA 13 3.1 USING IPSETUP 13 3.2 ACCESSING TO THE CAMERA 18 3.3 CONFIGURING THE IP ADDRESS OF THE PC 22 CHAPTER 4 24 CONFIGURING THE CAMERA 24 4.1 USING THE WEB CONFIGURATION 24 4.2 USING SMART WIZARD 25 4.3 BASIC SETUP 29 4.4 NETWORK SETTINGS 33 4.5 PAN/TILT SETTINGS 40 4.6 SETTING UP VIDEO 41 4.7 EVENT SERVER CONFIGURATION 45 4.8 MOTION DETECT 48 4.9 EVENT CONFIG 49...
... 2 10 HARDWARE INSTALLATION 10 2.1 INSTALLING THE WALL MOUNT KIT 10 2.2 CONNECTING THE CAMERA TO LAN/WLAN 11 2.3 APPLICATIONS OF THE CAMERA 12 CHAPTER 3 13 ACCESSING THE CAMERA 13 3.1 USING IPSETUP 13 3.2 ACCESSING TO THE CAMERA 18 3.3 CONFIGURING THE IP ADDRESS OF THE PC 22 CHAPTER 4 24 CONFIGURING THE CAMERA 24 4.1 USING THE WEB CONFIGURATION 24 4.2 USING SMART WIZARD 25 4.3 BASIC SETUP 29 4.4 NETWORK SETTINGS 33 4.5 PAN/TILT SETTINGS 40 4.6 SETTING UP VIDEO 41 4.7 EVENT SERVER CONFIGURATION 45 4.8 MOTION DETECT 48 4.9 EVENT CONFIG 49...

User's Guide
Page 8
External Antenna Connects the external antenna. DC Power Connector connects the AC power adapter, in order to supply power to restart the camera. Reset Button Press it quickly to the camera. GPIO Connectors It is used to factory default. Press and hold for 5 seconds to set to connect the external device. Rear View - 7 - It also support the NWay protocol. Ethernet Cable Connector Connecto to network by using the RJ-45 Cable.
External Antenna Connects the external antenna. DC Power Connector connects the AC power adapter, in order to supply power to restart the camera. Reset Button Press it quickly to the camera. GPIO Connectors It is used to factory default. Press and hold for 5 seconds to set to connect the external device. Rear View - 7 - It also support the NWay protocol. Ethernet Cable Connector Connecto to network by using the RJ-45 Cable.
User's Guide
Page 9
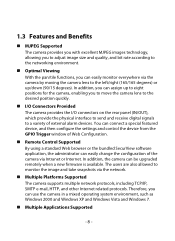
... Viewing With the pan/tile functions, you can easily monitor everywhere via the camera by moving the camera lens to monitor the image and take snapshots via Intranet or Internet. You can connect a special featured device, and then configure the settings and control the device from the GPIO Trigger window of the camera via the network. Multiple Platforms Supported The camera supports multiple network protocols, including TCP/IP, SMTP e-mail, HTTP, and other Internet...
... Viewing With the pan/tile functions, you can easily monitor everywhere via the camera by moving the camera lens to monitor the image and take snapshots via Intranet or Internet. You can connect a special featured device, and then configure the settings and control the device from the GPIO Trigger window of the camera via the network. Multiple Platforms Supported The camera supports multiple network protocols, including TCP/IP, SMTP e-mail, HTTP, and other Internet...

User's Guide
Page 12
When you connect the AC power adapter, the camera is on automatically. Once connected, the Link LED starts flashing green light and the camera is powered on standby and ready for use a wireless network in LAN and proceed with "default" SSID. Connecting the External Antenna NOTE If the camera cannot to your wireless network, you need to attach the included external antenna to install the camera in your local area network (LAN). When the camera is powered on...
When you connect the AC power adapter, the camera is on automatically. Once connected, the Link LED starts flashing green light and the camera is powered on standby and ready for use a wireless network in LAN and proceed with "default" SSID. Connecting the External Antenna NOTE If the camera cannot to your wireless network, you need to attach the included external antenna to install the camera in your local area network (LAN). When the camera is powered on...
User's Guide
Page 21
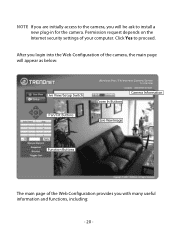
NOTE If you are initially access to the camera, you with many useful information and functions, including: - 20 - After you login into the Web Configuration of the camera, the main page will be ask to proceed. Click Yes to install a new plug-in for the camera. Permission request depends on the Internet security settings of the Web Configuration provides you will appear as below: Live View/Setup Switch Pan/Tilt Buttons Zoom In Buttons Camera Information Live View Image Function Buttons The main page of your computer.
NOTE If you are initially access to the camera, you with many useful information and functions, including: - 20 - After you login into the Web Configuration of the camera, the main page will be ask to proceed. Click Yes to install a new plug-in for the camera. Permission request depends on the Internet security settings of the Web Configuration provides you will appear as below: Live View/Setup Switch Pan/Tilt Buttons Zoom In Buttons Camera Information Live View Image Function Buttons The main page of your computer.
User's Guide
Page 25
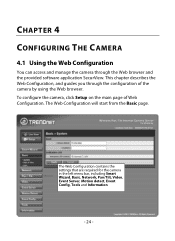
... the Web browser and the provided software application SecurView. CHAPTER 4 CONFIGURING THE CAMERA 4.1 Using the Web Configuration You can access and manage the camera through the configuration of Web Configuration. The Web Configuration will start from the Basic page. To configure the camera, click Setup on the main page of the camera by using the Web browser. The Web Configuration contains the settings that are required for the camera in the left menu bar, including Smart Wizard, Basic, Network, Pan/Tilt, Video, Event Server, Motion detect, Event...
... the Web browser and the provided software application SecurView. CHAPTER 4 CONFIGURING THE CAMERA 4.1 Using the Web Configuration You can access and manage the camera through the configuration of Web Configuration. The Web Configuration will start from the Basic page. To configure the camera, click Setup on the main page of the camera by using the Web browser. The Web Configuration contains the settings that are required for the camera in the left menu bar, including Smart Wizard, Basic, Network, Pan/Tilt, Video, Event Server, Motion detect, Event...

User's Guide
Page 33
... to the video stream prompts for the new guest. - Password: Enter the password for authentication. - When you are finished, click Add/Modify to add the new user to modify from the main page of the camera's Web Configuration; To modify the user's information, select the one you want to video: MJPEG Mode http://camera_ip_address:port number/jpgview.htm NOTE The "General User" can only view the live view image from UserList...
... to the video stream prompts for the new guest. - Password: Enter the password for authentication. - When you are finished, click Add/Modify to add the new user to modify from the main page of the camera's Web Configuration; To modify the user's information, select the one you want to video: MJPEG Mode http://camera_ip_address:port number/jpgview.htm NOTE The "General User" can only view the live view image from UserList...

User's Guide
Page 35
... the IP address for DDNS service with the service provider first. - 34 - The camera will be assigned an IP address from the ISP as starting up the email or DDNS configuration in the Host Name, User Name, and Password boxes. Enter the Default Gateway of the camera. NOTE Once the camera get an IP address from the ISP as your Internet service provider. Select the Enable option to enable this option...
... the IP address for DDNS service with the service provider first. - 34 - The camera will be assigned an IP address from the ISP as starting up the email or DDNS configuration in the Host Name, User Name, and Password boxes. Enter the Default Gateway of the camera. NOTE Once the camera get an IP address from the ISP as your Internet service provider. Select the Enable option to enable this option...
User's Guide
Page 57
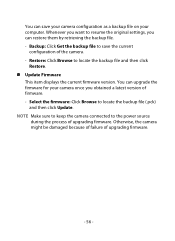
... Make sure to keep the camera connected to the power source during the process of upgrading firmware. - 56 - Otherwise, the camera might be damaged because of failure of upgrading firmware. Backup: Click Get the backup file to resume the original settings, you obtained a latest version of the camera. - Whenever you want to save your camera configuration as a backup file on your camera once you can restore...
... Make sure to keep the camera connected to the power source during the process of upgrading firmware. - 56 - Otherwise, the camera might be damaged because of failure of upgrading firmware. Backup: Click Get the backup file to resume the original settings, you obtained a latest version of the camera. - Whenever you want to save your camera configuration as a backup file on your camera once you can restore...
User's Guide
Page 60
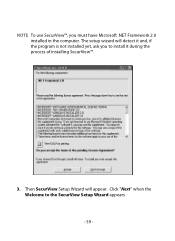
The setup wizard will appear. Click "Next" when the Welcome to install it during the process of installing SecurView™. 3. Then SecurView Setup Wizard will detect it and, if the program is not installed yet, ask you must have Microsoft .NET Framework 2.0 installed in the computer. NOTE To use SecurView™, you to the SecurView Setup Wizard appears - 59 -
The setup wizard will appear. Click "Next" when the Welcome to install it during the process of installing SecurView™. 3. Then SecurView Setup Wizard will detect it and, if the program is not installed yet, ask you must have Microsoft .NET Framework 2.0 installed in the computer. NOTE To use SecurView™, you to the SecurView Setup Wizard appears - 59 -

User's Guide
Page 66
... Password boxes are "blank." View mode buttons: SecurView™ provides multiple view modes, including 1/4/9/16 windows and Full screen mode. - To stop recording, please click Record button to display the video views between cameras. - PREV: When multiple cameras connected, click this button to stop the manual recording camera. SCAN: When multiple cameras connected, click this button to switch the video view to stop scanning. - ALL RECORD: Click to change the setting on configuration. Click SETTING > Account to start recording video clips using ALL connected cameras...
... Password boxes are "blank." View mode buttons: SecurView™ provides multiple view modes, including 1/4/9/16 windows and Full screen mode. - To stop recording, please click Record button to display the video views between cameras. - PREV: When multiple cameras connected, click this button to stop the manual recording camera. SCAN: When multiple cameras connected, click this button to switch the video view to stop scanning. - ALL RECORD: Click to change the setting on configuration. Click SETTING > Account to start recording video clips using ALL connected cameras...

User's Guide
Page 67
RECORD: Click to start recording a video clip using the selected camera and save the file in the computer. - - Please note only one user is used to control the external device connected to use this button to switch the video view to speak out through the camera. NEXT: When multiple cameras connected, click this function at the same time. - This button is available only when the connected camera supports the trigger out connector, which is allowed to the...
RECORD: Click to start recording a video clip using the selected camera and save the file in the computer. - - Please note only one user is used to control the external device connected to use this button to switch the video view to speak out through the camera. NEXT: When multiple cameras connected, click this function at the same time. - This button is available only when the connected camera supports the trigger out connector, which is allowed to the...
Quick Installation Guide
Page 5
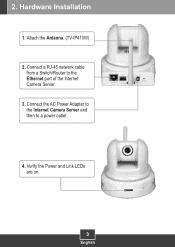
2. Attach the Antenna. (TV-IP410W) 2. Connect the AC Power Adapter to the Internet Camera Server and then to the Ethernet port of the Internet Camera Server. 3. Hardware Installation 1. Verify the Power and Link LEDs are on. 3 English Connect a RJ-45 network cable from a Switch/Router to a power outlet. 4.
2. Attach the Antenna. (TV-IP410W) 2. Connect the AC Power Adapter to the Internet Camera Server and then to the Ethernet port of the Internet Camera Server. 3. Hardware Installation 1. Verify the Power and Link LEDs are on. 3 English Connect a RJ-45 network cable from a Switch/Router to a power outlet. 4.
Quick Installation Guide
Page 8
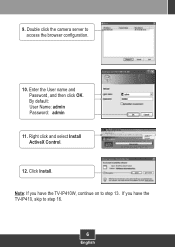
Right click and select Install ActiveX Control. 12. By default: User Name: admin Password: admin 11. If you have the TV-IP410, skip to step 16. 6 English Note: If you have the TV-IP410W, continue on to access the browser configuration. 10. Enter the User name and Password, and then click OK. 9. Click Install. Double click the camera server to step 13.
Right click and select Install ActiveX Control. 12. By default: User Name: admin Password: admin 11. If you have the TV-IP410, skip to step 16. 6 English Note: If you have the TV-IP410W, continue on to access the browser configuration. 10. Enter the User name and Password, and then click OK. 9. Click Install. Double click the camera server to step 13.
Quick Installation Guide
Page 10
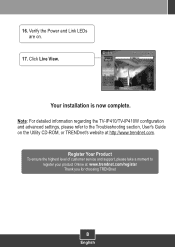
16. Note: For detailed information regarding the TV-IP410/TV-IP410W configuration and advanced settings, please refer to register your product Online at http://www.trendnet.com. Register Your Product To ensure the highest level of customer service and support, please take a moment to the Troubleshooting section, User's Guide on . 17. Click Live View. Verify the Power and Link LEDs are on the Utility CD-ROM, or TRENDnet's website at : www.trendnet.com/register Thank you for choosing TRENDnet 8 English Your installation is now complete.
16. Note: For detailed information regarding the TV-IP410/TV-IP410W configuration and advanced settings, please refer to register your product Online at http://www.trendnet.com. Register Your Product To ensure the highest level of customer service and support, please take a moment to the Troubleshooting section, User's Guide on . 17. Click Live View. Verify the Power and Link LEDs are on the Utility CD-ROM, or TRENDnet's website at : www.trendnet.com/register Thank you for choosing TRENDnet 8 English Your installation is now complete.
Quick Installation Guide
Page 11
...'s network adapter in firewall. Q5: How do not have the same SSID, encryption mode and key (if enabled). What should I can not connect to my wireless router or access point? Second, disable any questions regarding the TV-IP410/TV-IP410W, please contact TRENDnet's Technical Support Department. 9 If you configure the camera to configure the TV-IP410/W. Q2: I do I adjust the focus on the back of the browser configuration that supports ActiveX. Since default IP address of...
...'s network adapter in firewall. Q5: How do not have the same SSID, encryption mode and key (if enabled). What should I can not connect to my wireless router or access point? Second, disable any questions regarding the TV-IP410/TV-IP410W, please contact TRENDnet's Technical Support Department. 9 If you configure the camera to configure the TV-IP410/W. Q2: I do I adjust the focus on the back of the browser configuration that supports ActiveX. Since default IP address of...


