
Datasheet
Page 1
kvm Port DVI USB KVM Switch with Audio Kit TK-204UK(1.0R) The 2-Port DVI USB KVM Switch with Audio Kit (TK-204UK) allows you to music on one set of both of USB keyboard, USB mouse, DVI monitor, microphone and speakers. With Hot-...DVI USB KVM switch with one computer while working on PC platform. • Channel selection by push button, keyboard hotkeys and switching software client (for Windows/Mac) • USB interface power LED indicators for non-Windows OS on the other. for easy status monitoring • Digital video resolution 1920 x 1200 • 2-Year Warranty TK-204UK...
kvm Port DVI USB KVM Switch with Audio Kit TK-204UK(1.0R) The 2-Port DVI USB KVM Switch with Audio Kit (TK-204UK) allows you to music on one set of both of USB keyboard, USB mouse, DVI monitor, microphone and speakers. With Hot-...DVI USB KVM switch with one computer while working on PC platform. • Channel selection by push button, keyboard hotkeys and switching software client (for Windows/Mac) • USB interface power LED indicators for non-Windows OS on the other. for easy status monitoring • Digital video resolution 1920 x 1200 • 2-Year Warranty TK-204UK...
Datasheet
Page 2
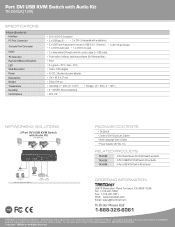
...Condensing • FCC, CE NETWORKING SOLUTIONS 2-Port DVI USB KVM Switch with Audio Kit (TK-204UK) PC 1 PC 2 Microphone Speakers KVM USB Monitor USB USB Keyboard Mouse DVI PACKAGE CONTENTS • TK-204UK • 2 sets of their respective holders....trendnet.com. Port DVI USB KVM Switch with audio&mic) • 2 x USB Type A (keyboard & mouse & USB 2.0/1.1 Devices) • 1x DVI 15-pin female • 1 x 3.5mm audio jack • 1 x 3.5mm mic jack • 2 x detachable DVI/audio and mic combo cable 2 x USB cable • Push button, hotkeys, switching software (for Windows...
...Condensing • FCC, CE NETWORKING SOLUTIONS 2-Port DVI USB KVM Switch with Audio Kit (TK-204UK) PC 1 PC 2 Microphone Speakers KVM USB Monitor USB USB Keyboard Mouse DVI PACKAGE CONTENTS • TK-204UK • 2 sets of their respective holders....trendnet.com. Port DVI USB KVM Switch with audio&mic) • 2 x USB Type A (keyboard & mouse & USB 2.0/1.1 Devices) • 1x DVI 15-pin female • 1 x 3.5mm audio jack • 1 x 3.5mm mic jack • 2 x detachable DVI/audio and mic combo cable 2 x USB cable • Push button, hotkeys, switching software (for Windows...
Quick Installation Guide
Page 3
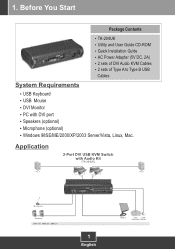
TK-204UK ? USB Keyboard ? Speakers (optional) ? Utility and User Guide CD-ROM ? Quick Installation Guide ? AC Power Adapter (5V DC, 2A) ? 2 sets of DVI Audio KVM Cables ? 2 sets of Type A to Type B USB Cables System Requirements ? PC with Audio Kit (TK-204UK) PC 1 PC 2 Microphone Speakers KVM USB DVI 1 English Monitor USB USB Keyboard Mouse Microphone (optional) ? 1. USB Mouse ? Application 2-Port DVI USB KVM Switch with DVI port ? DVI Monitor ? Windows 98SE/ME/2000/XP/2003 Server/Vista, Linux, Mac. Before You Start Package Contents ?
TK-204UK ? USB Keyboard ? Speakers (optional) ? Utility and User Guide CD-ROM ? Quick Installation Guide ? AC Power Adapter (5V DC, 2A) ? 2 sets of DVI Audio KVM Cables ? 2 sets of Type A to Type B USB Cables System Requirements ? PC with Audio Kit (TK-204UK) PC 1 PC 2 Microphone Speakers KVM USB DVI 1 English Monitor USB USB Keyboard Mouse Microphone (optional) ? 1. USB Mouse ? Application 2-Port DVI USB KVM Switch with DVI port ? DVI Monitor ? Windows 98SE/ME/2000/XP/2003 Server/Vista, Linux, Mac. Before You Start Package Contents ?
Quick Installation Guide
Page 6
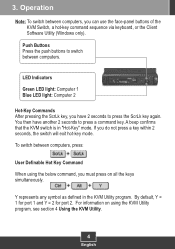
... the ScrLk key again. If you can use the face-panel buttons of the KVM Switch, a hot-key command sequence via keyboard, or the Client Software Utility (Windows only). Operation Note: To switch between computers. A beep confirms that the KVM switch is in the KVM Utility program. Y represents any symbol as defined in "Hot-Key" mode. To...
... the ScrLk key again. If you can use the face-panel buttons of the KVM Switch, a hot-key command sequence via keyboard, or the Client Software Utility (Windows only). Operation Note: To switch between computers. A beep confirms that the KVM switch is in the KVM Utility program. Y represents any symbol as defined in "Hot-Key" mode. To...

Quick Installation Guide
Page 7
4. Click Utility Install. 2. Then follow the Setup Wizard instructions. 3. Click Finish. 4. Double click on the KVM Utility icon. 5 English Using the KVM Utility For Windows Users 1. Click Next.
4. Click Utility Install. 2. Then follow the Setup Wizard instructions. 3. Click Finish. 4. Double click on the KVM Utility icon. 5 English Using the KVM Utility For Windows Users 1. Click Next.
