
Datasheet
Page 1
...; Hot-plugging PCs for maintenance without powering down the KVM switch or PCs • Switching software client for easy software switching on Windows and Mac platform • User definable hotkeys additional universal port switching hotkey - kvm Port DVI USB KVM Switch with Audio Kit TK-204UK(1.0R) The 2-Port DVI USB KVM Switch with Audio Kit (TK-204UK) allows you to music on one computer while working on...
...; Hot-plugging PCs for maintenance without powering down the KVM switch or PCs • Switching software client for easy software switching on Windows and Mac platform • User definable hotkeys additional universal port switching hotkey - kvm Port DVI USB KVM Switch with Audio Kit TK-204UK(1.0R) The 2-Port DVI USB KVM Switch with Audio Kit (TK-204UK) allows you to music on one computer while working on...
Datasheet
Page 2
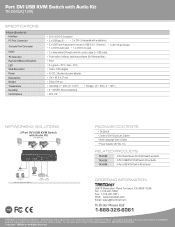
... and product names are trademarks of DVI-I (integrated with Audio Kit (TK-204UK) PC 1 PC 2 Microphone Speakers KVM USB Monitor USB USB Keyboard Mouse DVI PACKAGE CONTENTS • TK-204UK • 2 sets of their respective holders. Copyright © TRENDnet. Information provided in this document pertain to change at any time, without notice. Port DVI USB KVM Switch with Audio Kit TK-204UK(1.0R) SPECIFICATIONS Hardware Interface PC...
... and product names are trademarks of DVI-I (integrated with Audio Kit (TK-204UK) PC 1 PC 2 Microphone Speakers KVM USB Monitor USB USB Keyboard Mouse DVI PACKAGE CONTENTS • TK-204UK • 2 sets of their respective holders. Copyright © TRENDnet. Information provided in this document pertain to change at any time, without notice. Port DVI USB KVM Switch with Audio Kit TK-204UK(1.0R) SPECIFICATIONS Hardware Interface PC...

Quick Installation Guide
Page 2
Using the KVM Utility 5 Specifications 8 Troubleshooting 9 Before You Start 1 2. Operation 4 4. English ...1 1. How to Install 2 3.
Using the KVM Utility 5 Specifications 8 Troubleshooting 9 Before You Start 1 2. Operation 4 4. English ...1 1. How to Install 2 3.
Quick Installation Guide
Page 3
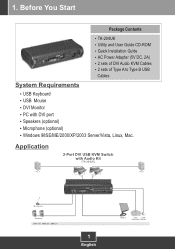
TK-204UK ? Speakers (optional) ? Microphone (optional) ? Application 2-Port DVI USB KVM Switch with DVI port ? Utility and User Guide CD-ROM ? USB Mouse ? USB Keyboard ? Before You Start Package Contents ? Quick Installation Guide ? DVI Monitor ? 1. AC Power Adapter (5V DC, 2A) ? 2 sets of DVI Audio KVM Cables ? 2 sets of Type A to Type B USB Cables System Requirements ? PC with Audio Kit (TK-204UK) PC 1 PC 2 Microphone Speakers KVM USB DVI 1 English Monitor USB USB Keyboard Mouse Windows 98SE/ME/2000/XP/2003 Server/Vista, Linux, Mac.
TK-204UK ? Speakers (optional) ? Microphone (optional) ? Application 2-Port DVI USB KVM Switch with DVI port ? Utility and User Guide CD-ROM ? USB Mouse ? USB Keyboard ? Before You Start Package Contents ? Quick Installation Guide ? DVI Monitor ? 1. AC Power Adapter (5V DC, 2A) ? 2 sets of DVI Audio KVM Cables ? 2 sets of Type A to Type B USB Cables System Requirements ? PC with Audio Kit (TK-204UK) PC 1 PC 2 Microphone Speakers KVM USB DVI 1 English Monitor USB USB Keyboard Mouse Windows 98SE/ME/2000/XP/2003 Server/Vista, Linux, Mac.
Quick Installation Guide
Page 4
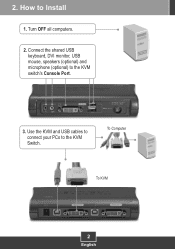
Use the KVM and USB cables to connect your PCs to Install 1. To Computer To KVM 2 English Turn OFF all computers. 2. How to the KVM Switch. Connect the shared USB keyboard, DVI monitor, USB mouse, speakers (optional) and microphone (optional) to the KVM switch's Console Port. 3. 2.
Use the KVM and USB cables to connect your PCs to Install 1. To Computer To KVM 2 English Turn OFF all computers. 2. How to the KVM Switch. Connect the shared USB keyboard, DVI monitor, USB mouse, speakers (optional) and microphone (optional) to the KVM switch's Console Port. 3. 2.
Quick Installation Guide
Page 5
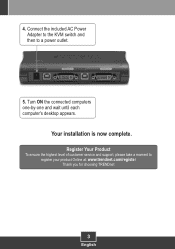
Register Your Product To ensure the highest level of customer service and support, please take a moment to a power outlet. 5. Turn ON the connected computers one-by-one and wait until each computer's desktop appears. 4. Connect the included AC Power Adapter to the KVM switch and then to register your product Online at: www.trendnet.com/register Thank you for choosing TRENDnet 3 English Your installation is now complete.
Register Your Product To ensure the highest level of customer service and support, please take a moment to a power outlet. 5. Turn ON the connected computers one-by-one and wait until each computer's desktop appears. 4. Connect the included AC Power Adapter to the KVM switch and then to register your product Online at: www.trendnet.com/register Thank you for choosing TRENDnet 3 English Your installation is now complete.
Quick Installation Guide
Page 6
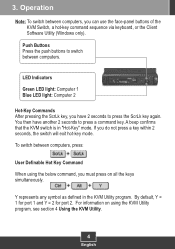
...Commands After pressing the ScrLk key, you must press on all the keys simultaneously. If you can use the face-panel buttons of the KVM Switch, a hot-key command sequence via keyboard, or the Client Software Utility (Windows only). For information on using the below command, you ... again. You then have 2 seconds to switch between computers, you do not press a key within 2 seconds, the switch will exit hot-key mode. To switch between computers, press: User Definable Hot Key Command When using the KVM Utility program, see section 4 Using the KVM Utility. 4 English Y represents any symbol...
...Commands After pressing the ScrLk key, you must press on all the keys simultaneously. If you can use the face-panel buttons of the KVM Switch, a hot-key command sequence via keyboard, or the Client Software Utility (Windows only). For information on using the below command, you ... again. You then have 2 seconds to switch between computers, you do not press a key within 2 seconds, the switch will exit hot-key mode. To switch between computers, press: User Definable Hot Key Command When using the KVM Utility program, see section 4 Using the KVM Utility. 4 English Y represents any symbol...

Quick Installation Guide
Page 7
Click Finish. 4. Click Next. Then follow the Setup Wizard instructions. 3. Using the KVM Utility For Windows Users 1. Double click on the KVM Utility icon. 5 English 4. Click Utility Install. 2.
Click Finish. 4. Click Next. Then follow the Setup Wizard instructions. 3. Using the KVM Utility For Windows Users 1. Double click on the KVM Utility icon. 5 English 4. Click Utility Install. 2.
Quick Installation Guide
Page 8
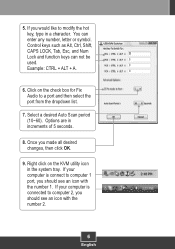
... such as Alt, Ctrl, Shift, CAPS LOCK, Tab, Esc, and Num Lock and function keys can enter any number, letter or symbol. Click on the KVM utility icon in the system tray. Select a desired Auto Scan period (10~60). If you should see an icon with the number 2. 6 English Options are...
... such as Alt, Ctrl, Shift, CAPS LOCK, Tab, Esc, and Num Lock and function keys can enter any number, letter or symbol. Click on the KVM utility icon in the system tray. Select a desired Auto Scan period (10~60). If you should see an icon with the number 2. 6 English Options are...
Quick Installation Guide
Page 9
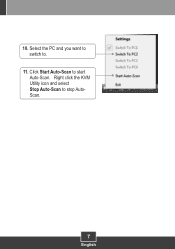
Right click the KVM Utility icon and select Stop Auto-Scan to start Auto-Scan. Click Start Auto-Scan to stop AutoScan. 7 English Select the PC and you want to switch to. 11. 10.
Right click the KVM Utility icon and select Stop Auto-Scan to start Auto-Scan. Click Start Auto-Scan to stop AutoScan. 7 English Select the PC and you want to switch to. 11. 10.
