
User's Guide
Page 2
... Chapter 1 Introduction 1 Features...1 Safety Instructions ...2 Packaging Contents ...2 Physical Details ...2 LED Indicators ...5 Reset Button ...6 Chapter 2 LAN Installation 7 Procedure ...7 Chapter 3 Print Server Configuration 9 Overview ...9 Using the Windows Setup Wizard 9 Chapter 4 Client PC Configuration 20 Overview ...20 Windows Peer-to-peer Printing 22 Windows SMB Printing 30 Windows with Server-based Print Queues 31...
... Chapter 1 Introduction 1 Features...1 Safety Instructions ...2 Packaging Contents ...2 Physical Details ...2 LED Indicators ...5 Reset Button ...6 Chapter 2 LAN Installation 7 Procedure ...7 Chapter 3 Print Server Configuration 9 Overview ...9 Using the Windows Setup Wizard 9 Chapter 4 Client PC Configuration 20 Overview ...20 Windows Peer-to-peer Printing 22 Windows SMB Printing 30 Windows with Server-based Print Queues 31...
User's Guide
Page 4
... can interoperate with it easy to configure the Print Server for a variety of software tools are supplied to simplify setup. Windows IPP Client software is packed with features, including: ¾ Wireless LAN Support. (TEW-P11G only) Wireless stations supporting the IEEE 802.11b or IEEE 802.11g standard can act as a SNMP agent... your new Print Server. The Web-based interface provides an easy method of configuration in TCP/IP networks, regardless of your network simple. ¾ Easy Setup. Page 1
... can interoperate with it easy to configure the Print Server for a variety of software tools are supplied to simplify setup. Windows IPP Client software is packed with features, including: ¾ Wireless LAN Support. (TEW-P11G only) Wireless stations supporting the IEEE 802.11b or IEEE 802.11g standard can act as a SNMP agent... your new Print Server. The Web-based interface provides an easy method of configuration in TCP/IP networks, regardless of your network simple. ¾ Easy Setup. Page 1
User's Guide
Page 12
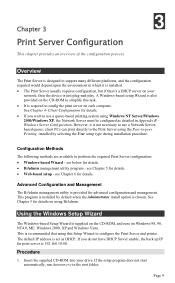
...client PCs can print directly to the Print Server using BiAdmin. See Chapter 5 for details. • Web-based setup - Using the Windows Setup Wizard The Windows-based Setup Wizard is supplied on the CD-ROM, and runs on your drive. Insert the supplied CD-ROM into your ... queue-based printing system using this task. • It is just plug-and-play. This program is installed by selecting the User setup type during installation procedure. Page 9 Configuration Methods The following methods are available to -peer Printing installed by default when the Administrator install ...
...client PCs can print directly to the Print Server using BiAdmin. See Chapter 5 for details. • Web-based setup - Using the Windows Setup Wizard The Windows-based Setup Wizard is supplied on the CD-ROM, and runs on your drive. Insert the supplied CD-ROM into your ... queue-based printing system using this task. • It is just plug-and-play. This program is installed by selecting the User setup type during installation procedure. Page 9 Configuration Methods The following methods are available to -peer Printing installed by default when the Administrator install ...

User's Guide
Page 13
2. If the Router does not have DHCP enable, it will take around 20 seconds to store the backup IP (192.168.10.40) to view a list of Print Servers on your LAN. Page 10 On the first screen, shown below, click Install Utility and in the sub-menu click on the main screen of the Wizard, to Print Server. Click Next on Setup Wizard. 3.
2. If the Router does not have DHCP enable, it will take around 20 seconds to store the backup IP (192.168.10.40) to view a list of Print Servers on your LAN. Page 10 On the first screen, shown below, click Install Utility and in the sub-menu click on the main screen of the Wizard, to Print Server. Click Next on Setup Wizard. 3.

User's Guide
Page 16
You can also configure later by go to add the printer port. Page 13 Select the option to help you setup the network printer into your print server and printer are both power on and connected properly. Select the Port number, then click Next to Start > Programs > TRENDnet > Print Server Utility, Click Printer Port Setup. 11. Select Configure Print Driver Now, then click Finish. Then Click Next. 12. 9. Make sure your PC. 10.
You can also configure later by go to add the printer port. Page 13 Select the option to help you setup the network printer into your print server and printer are both power on and connected properly. Select the Port number, then click Next to Start > Programs > TRENDnet > Print Server Utility, Click Printer Port Setup. 11. Select Configure Print Driver Now, then click Finish. Then Click Next. 12. 9. Make sure your PC. 10.
User's Guide
Page 20
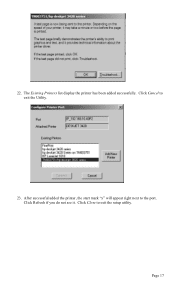
After successful added the printer, the start mark "x" will appear right next to exit the setup utility. Click Close to the port. Click Cancel to exit the Utility. 23. Page 17 Click Refresh if you do not see it. The Existing Printers list display the printer has been added successfully. 22.
After successful added the printer, the start mark "x" will appear right next to exit the setup utility. Click Close to the port. Click Cancel to exit the Utility. 23. Page 17 Click Refresh if you do not see it. The Existing Printers list display the printer has been added successfully. 22.

User's Guide
Page 21
... 12. • Use the Start menu to finish your PC has either the TCP/IP or NetBEUI network protocols installed. Your installation is Start > Programs >TRENDnet > Print Server Utility > Printer Port Setup. 24. Click close to run this program in Chapter 4 for details.
... 12. • Use the Start menu to finish your PC has either the TCP/IP or NetBEUI network protocols installed. Your installation is Start > Programs >TRENDnet > Print Server Utility > Printer Port Setup. 24. Click close to run this program in Chapter 4 for details.
User's Guide
Page 25
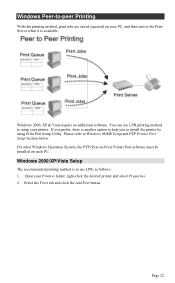
Windows 2000, XP & Vista require no additional software. Windows 2000/XP/Vista Setup The recommended printing method is to the Print Server when it is another option to help you prefer, there is available. Windows Peer-to-peer ... printing method, print jobs are stored (queued) on each PC. If you to Windows 98/ME Setup and PTP Printer Port Setup Section below. Page 22 Please refer to install the printer by using Print Port Setup Utility. Open your printer. Select the Ports tab and click the Add Port button. You can...
Windows 2000, XP & Vista require no additional software. Windows 2000/XP/Vista Setup The recommended printing method is to the Print Server when it is another option to help you prefer, there is available. Windows Peer-to-peer ... printing method, print jobs are stored (queued) on each PC. If you to Windows 98/ME Setup and PTP Printer Port Setup Section below. Page 22 Please refer to install the printer by using Print Port Setup Utility. Open your printer. Select the Ports tab and click the Add Port button. You can...
User's Guide
Page 28
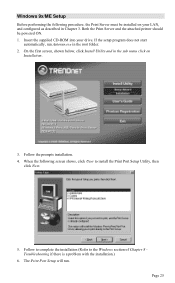
Windows 9x/ME Setup Before performing the following screen shows, click User to the Windows section of Chapter 8 Troubleshooting if there ... Install Utility and in the root folder. 2. Follow to complete the installation (Refer to install the Print Port Setup Utility, then click Next. 5. If the setup program does not start automatically, run . Insert the supplied CD-ROM into your LAN, and configured as described... 25 Both the Print Server and the attached printer should be installed on Installation. 3. The Print Port Setup will run Autorun.exe in the sub menu click on your drive.
Windows 9x/ME Setup Before performing the following screen shows, click User to the Windows section of Chapter 8 Troubleshooting if there ... Install Utility and in the root folder. 2. Follow to complete the installation (Refer to install the Print Port Setup Utility, then click Next. 5. If the setup program does not start automatically, run . Insert the supplied CD-ROM into your LAN, and configured as described... 25 Both the Print Server and the attached printer should be installed on Installation. 3. The Print Port Setup will run Autorun.exe in the sub menu click on your drive.

User's Guide
Page 29
...Select the desired port on the network, and a screen like the following is displayed, check that the Print Server has been configured. (Use the Setup Wizard on . Page 26 If "No printer" is displayed. • If desired, click Refresh. • The name of the attached printer ...will inform you can use Start > Programs > TRENDnet > Print Server Utility - Then try installing the NetBEUI protocol. (See the earlier section Checking your Print Server is not listed: • Click the "...
...Select the desired port on the network, and a screen like the following is displayed, check that the Print Server has been configured. (Use the Setup Wizard on . Page 26 If "No printer" is displayed. • If desired, click Refresh. • The name of the attached printer ...will inform you can use Start > Programs > TRENDnet > Print Server Utility - Then try installing the NetBEUI protocol. (See the earlier section Checking your Print Server is not listed: • Click the "...

User's Guide
Page 31
... "Use Print Manager for this program must be managed like any printer to run this program in future. Your installation is Start > Programs >TRENDnet > Print Server Utility > Printer Port Setup. The default installation is now completed. • To install additional Printers, repeat steps 4. • Use the Start menu to see the current...
... "Use Print Manager for this program must be managed like any printer to run this program in future. Your installation is Start > Programs >TRENDnet > Print Server Utility > Printer Port Setup. The default installation is now completed. • To install additional Printers, repeat steps 4. • Use the Start menu to see the current...

User's Guide
Page 32
.... Check this value if you can be changed , just run this program again, and select the correct printer. • To delete a port created by this setup program, use the Windows Delete Port facility: • Right-click any printer in the Printer's Properties. Use Start - Printers to print a banner page before each...
.... Check this value if you can be changed , just run this program again, and select the correct printer. • To delete a port created by this setup program, use the Windows Delete Port facility: • Right-click any printer in the Printer's Properties. Use Start - Printers to print a banner page before each...

User's Guide
Page 36
AppleTalk Setup 1. Advanced Setup and Management In a mixed Windows PC/Macintosh environment, you can use of the fonts installed in the printer itself, so the printing response time is ...
AppleTalk Setup 1. Advanced Setup and Management In a mixed Windows PC/Macintosh environment, you can use of the fonts installed in the printer itself, so the printing response time is ...
User's Guide
Page 37
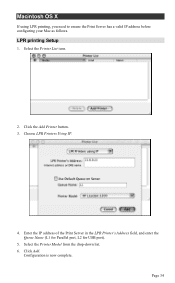
Choose LPR Printers Using IP. 4. Enter the IP address of the Print Server in the LPR Printer's Address field, and enter the Queue Name (L1 for Parallel port, L2 for USB port). 5. Configuration is now complete. LPR printing Setup 1. Click Add. Macintosh OS X If using LPR printing, you need to ensure the Print Server has a valid IP address before configuring your Mac as follows. Select the Printer List icon. 2. Click the Add Printer button. 3. Select the Printer Model from the drop-down list. 6. Page 34
Choose LPR Printers Using IP. 4. Enter the IP address of the Print Server in the LPR Printer's Address field, and enter the Queue Name (L1 for Parallel port, L2 for USB port). 5. Configuration is now complete. LPR printing Setup 1. Click Add. Macintosh OS X If using LPR printing, you need to ensure the Print Server has a valid IP address before configuring your Mac as follows. Select the Printer List icon. 2. Click the Add Printer button. 3. Select the Printer Model from the drop-down list. 6. Page 34
User's Guide
Page 38
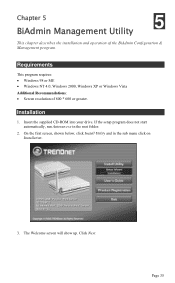
... the first screen, shown below, click Install Utility and in the root folder. 2. Insert the supplied CD-ROM into your drive. Click Next. If the setup program does not start automatically, run Autorun.exe in the sub menu click on Installation. 3. Installation 1. The Welcome screen will show up. Page 35 Requirements...
... the first screen, shown below, click Install Utility and in the root folder. 2. Insert the supplied CD-ROM into your drive. Click Next. If the setup program does not start automatically, run Autorun.exe in the sub menu click on Installation. 3. Installation 1. The Welcome screen will show up. Page 35 Requirements...
User's Guide
Page 42
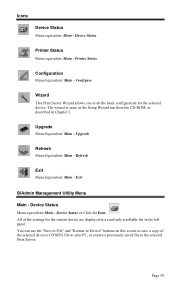
... - Configure Wizard This Print Server Wizard allows you to the selected Print Server. Exit BiAdmin Management Utility Menu Main - The wizard is same as the Setup Wizard run from the CD-ROM, as described in the left panel. Printer Status Configuration Menu Equivalent: Main - Page 39 Device Status or Click the...
... - Configure Wizard This Print Server Wizard allows you to the selected Print Server. Exit BiAdmin Management Utility Menu Main - The wizard is same as the Setup Wizard run from the CD-ROM, as described in the left panel. Printer Status Configuration Menu Equivalent: Main - Page 39 Device Status or Click the...

User's Guide
Page 58
... Diagnostic Button (if fitted) to print a report which includes the current IP address. (Press the Diagnostic Button, and hold it for 2 seconds.) • Use the Setup Wizard, BiAdmin or another Print Server utility to allocate a valid IP Address to the Print Server. • Add an entry to the arp table to...
... Diagnostic Button (if fitted) to print a report which includes the current IP address. (Press the Diagnostic Button, and hold it for 2 seconds.) • Use the Setup Wizard, BiAdmin or another Print Server utility to allocate a valid IP Address to the Print Server. • Add an entry to the arp table to...

User's Guide
Page 70
...(IPP_CLIENT.EXE) to finish the installation. IPP (Internet Printing Protocol) Client 5. Following the screen to users vial E-mail. The IPP Setup program will be displayed. Page 67 Insert the CD-ROM in the root folder. 2. Click 4. Run the "Add IPP Port" ... Autorun screen shows up. 2. Installing from Autorun 1. IPP Client Configuration 1. Click Next on the CD-ROM. Go to complete the installation. IPP Client Setup - If the program does not start automatically, run . 5. Click Install Utility, then click the submenu Installation 3. Follow the prompts to Start > Run...
...(IPP_CLIENT.EXE) to finish the installation. IPP (Internet Printing Protocol) Client 5. Following the screen to users vial E-mail. The IPP Setup program will be displayed. Page 67 Insert the CD-ROM in the root folder. 2. Click 4. Run the "Add IPP Port" ... Autorun screen shows up. 2. Installing from Autorun 1. IPP Client Configuration 1. Click Next on the CD-ROM. Go to complete the installation. IPP Client Setup - If the program does not start automatically, run . 5. Click Install Utility, then click the submenu Installation 3. Follow the prompts to Start > Run...
User's Guide
Page 73
IPP Client Setup - Select Network Printer, and click "Next" to a printer on the Internet or on the IPP Server. 6. If the connection can be established, and the printer ...
IPP Client Setup - Select Network Printer, and click "Next" to a printer on the Internet or on the IPP Server. 6. If the connection can be established, and the printer ...

User's Guide
Page 74
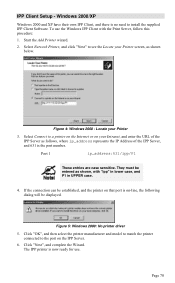
... TCP/IP address Port 1 ip_address:631/ipp/P1 These entries are case sensitive. Select Add a network, wireless or Bluetooth Printer, and click "Next". IPP Client Setup - Page 71 There is no need to use the Windows IPP Client with "ipp" in lower case, and P1 in the list, click The printer...
... TCP/IP address Port 1 ip_address:631/ipp/P1 These entries are case sensitive. Select Add a network, wireless or Bluetooth Printer, and click "Next". IPP Client Setup - Page 71 There is no need to use the Windows IPP Client with "ipp" in lower case, and P1 in the list, click The printer...
