
Quick Installation Guide
Page 2
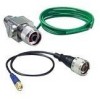
Before you start Package Contents 15AH-28B Quick Installation Guide Wall Mount Fasteners, washers and wall mount screws Installation Requirements The following items below are not included. Make sure to have each item on hand before installation. TV-IP100W, TV-IP201W, TV-IP301W) Dry Wall or Wood surface Power Cord Knife or box cutter Wire Stripper Screwdriver Pliers Electrical Tape TEW-ASAK TEW-L406 or TEW-L412 Outdoor Antenna (e.g. 1. Internet Camera Server (e.g. TEW-AO14D) 1 English Version 02.27.2007 Users must provide the items themselves.
Before you start Package Contents 15AH-28B Quick Installation Guide Wall Mount Fasteners, washers and wall mount screws Installation Requirements The following items below are not included. Make sure to have each item on hand before installation. TV-IP100W, TV-IP201W, TV-IP301W) Dry Wall or Wood surface Power Cord Knife or box cutter Wire Stripper Screwdriver Pliers Electrical Tape TEW-ASAK TEW-L406 or TEW-L412 Outdoor Antenna (e.g. 1. Internet Camera Server (e.g. TEW-AO14D) 1 English Version 02.27.2007 Users must provide the items themselves.

Quick Installation Guide
Page 3
You will need to mount the metal bracket onto the base of screws and washers to use these screws. 2. Save these screws later. 3. Lift up the latch and pull the roof upward. 2. Use the following 2 sets of the Internet Camera Server. The screws and washers can be found in the plastic bags included with the 15AH-28B. 2 English Remove the metal bracket from the camera enclosure by unscrewing the four screws. Hardware Installation Note: Configure your Internet Camera Server to match your network settings before installing the device. 1.
You will need to mount the metal bracket onto the base of screws and washers to use these screws. 2. Save these screws later. 3. Lift up the latch and pull the roof upward. 2. Use the following 2 sets of the Internet Camera Server. The screws and washers can be found in the plastic bags included with the 15AH-28B. 2 English Remove the metal bracket from the camera enclosure by unscrewing the four screws. Hardware Installation Note: Configure your Internet Camera Server to match your network settings before installing the device. 1.

Quick Installation Guide
Page 4
Save these screws later. 6. Note: The power cord is not included with 15AH-28B. 7. Flip over the camera housing and remove the rubber stoppers and washers. 5. Remove the circuit board from the camera enclosure by unscrewing the two screws. Cut the rubber insulation using a wire cutter. 4. Take a power cord and cut it near the female end of the power cord. Cut it using a knife or box cutter. 3 English You will need to use these screws.
Save these screws later. 6. Note: The power cord is not included with 15AH-28B. 7. Flip over the camera housing and remove the rubber stoppers and washers. 5. Remove the circuit board from the camera enclosure by unscrewing the two screws. Cut the rubber insulation using a wire cutter. 4. Take a power cord and cut it near the female end of the power cord. Cut it using a knife or box cutter. 3 English You will need to use these screws.
Quick Installation Guide
Page 5
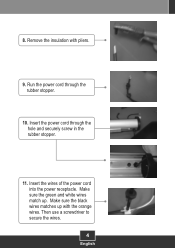
Insert the wires of the power cord into the power receptacle. Remove the insulation with the orange wires. Insert the power cord through the rubber stopper. 10. Make sure the black wires matches up . Run the power cord through the hole and securely screw in the rubber stopper. 11. Make sure the green and white wires match up with pliers. 9. Then use a screwdriver to secure the wires. 4 English 8.
Insert the wires of the power cord into the power receptacle. Remove the insulation with the orange wires. Insert the power cord through the rubber stopper. 10. Make sure the black wires matches up . Run the power cord through the hole and securely screw in the rubber stopper. 11. Make sure the green and white wires match up with pliers. 9. Then use a screwdriver to secure the wires. 4 English 8.

Quick Installation Guide
Page 6
... camera's power adapter and cut along the middle to expose the copper wiring. 5 English Mount the Internet Camera Server inside the camera enclosure with your Internet Camera Server. 15. Cut the rubber insulation using the wire cutter. Temporarily leave one hole unscrewed. Then screw in the last hole. 14. Note: This is the AC/DC adapter that is included with the screws. This example shows a TRENDnet...
... camera's power adapter and cut along the middle to expose the copper wiring. 5 English Mount the Internet Camera Server inside the camera enclosure with your Internet Camera Server. 15. Cut the rubber insulation using the wire cutter. Temporarily leave one hole unscrewed. Then screw in the last hole. 14. Note: This is the AC/DC adapter that is included with the screws. This example shows a TRENDnet...

Quick Installation Guide
Page 7
17. Insert the power adapter, and pigtail cable that comes with the TEW-ASAK through the rubber stopper and screw it in securely. 19. Make sure you do not cross the copper wires. 20. Connect the two ends of the mounting arm. 18. Run the power adapter, and TEW-L406/L412 antenna from the base to seal the cables back together. 6 English Use electrical tape to the top of the power adapter back by twisting the copper wiring.
17. Insert the power adapter, and pigtail cable that comes with the TEW-ASAK through the rubber stopper and screw it in securely. 19. Make sure you do not cross the copper wires. 20. Connect the two ends of the mounting arm. 18. Run the power adapter, and TEW-L406/L412 antenna from the base to seal the cables back together. 6 English Use electrical tape to the top of the power adapter back by twisting the copper wiring.

Quick Installation Guide
Page 8
21. Connect the TEW-L406/412 to the camera. 23. Connect the Ethernet cable and power adapter to the TEW-ASAK. 7 English Connect the pigtail cable to the camera enclosure using the two screws. 22. Reconnect the circuit board back to the TEW-ASAK. 24.
21. Connect the TEW-L406/412 to the camera. 23. Connect the Ethernet cable and power adapter to the TEW-ASAK. 7 English Connect the pigtail cable to the camera enclosure using the two screws. 22. Reconnect the circuit board back to the TEW-ASAK. 24.

Quick Installation Guide
Page 9
Connect the TEW-L406/412 to the outdoor antenna. (e.g. Close and secure the back panel. 27. Plug the power cord and the camera power adapter into an available power outlet. 8 English TEW-OA08OK) 26. 25.
Connect the TEW-L406/412 to the outdoor antenna. (e.g. Close and secure the back panel. 27. Plug the power cord and the camera power adapter into an available power outlet. 8 English TEW-OA08OK) 26. 25.
Quick Installation Guide
Page 10
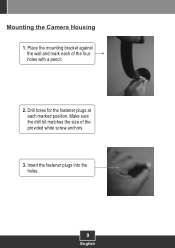
Insert the fastener plugs into the holes. 9 English Make sure the drill bit matches the size of the four holes with a pencil. 2. Mounting the Camera Housing 1. Drill holes for the fastener plugs at each of the provided white screw anchors. 3. Place the mounting bracket against the wall and mark each marked position.
Insert the fastener plugs into the holes. 9 English Make sure the drill bit matches the size of the four holes with a pencil. 2. Mounting the Camera Housing 1. Drill holes for the fastener plugs at each of the provided white screw anchors. 3. Place the mounting bracket against the wall and mark each marked position.

Quick Installation Guide
Page 11
Use the bracket screws to mount the mounting bracket to secure it. Align the Wall Mount bracket with the fasteners, and then use the provided wood screws to the housing. 5. Your installation is now complete. 10 English 4.
Use the bracket screws to mount the mounting bracket to secure it. Align the Wall Mount bracket with the fasteners, and then use the provided wood screws to the housing. 5. Your installation is now complete. 10 English 4.

Quick Installation Guide
Page 12
... contact TRENDnet's Technical Support Department. 11 A1: First, make sure to push the camera all the may to the front so that the lens is distorted. Second, mount the 15AH-28B so that you still encounter problems or have adjusted the focus on your camera. Troubleshooting Q1: After I put my Internet Camera Server in direct view of the sun. Q2: My antenna cable...
... contact TRENDnet's Technical Support Department. 11 A1: First, make sure to push the camera all the may to the front so that the lens is distorted. Second, mount the 15AH-28B so that you still encounter problems or have adjusted the focus on your camera. Troubleshooting Q1: After I put my Internet Camera Server in direct view of the sun. Q2: My antenna cable...
Quick Installation Guide
Page 13
...) number, accompanied by TRENDnet with any products returned to TRENDnet pursuant to any software, firmware, information, or memory data of customer contained in, stored on, or integrated with RMA number marked on the outside of the purchase. Replacement products may be new or reconditioned. This warranty is voided if (i) the product has been modified or repaired by any unauthorized service center, (ii) the product...
...) number, accompanied by TRENDnet with any products returned to TRENDnet pursuant to any software, firmware, information, or memory data of customer contained in, stored on, or integrated with RMA number marked on the outside of the purchase. Replacement products may be new or reconditioned. This warranty is voided if (i) the product has been modified or repaired by any unauthorized service center, (ii) the product...

Quick Installation Guide
Page 14
..., IMPROPER INSTALLATION OR TESTING, UNAUTHORIZED ATTEMPTS TO REPAIR OR MODIFY, OR ANY OTHER CAUSE BEYOND THE RANGE OF THE INTENDED USE, OR BY ACCIDENT, FIRE, LIGHTNING, OR OTHER HAZARD. THIS DISCLAIMER OF LIABILITY FOR DAMAGES WILL NOT BE AFFECTED IF ANY REMEDY PROVIDED HEREIN SHALL FAIL OF ITS ESSENTIAL PURPOSE. AC/DC Power Adapter, Cooling Fan, Cables and Power Supply carry 1 Year...
..., IMPROPER INSTALLATION OR TESTING, UNAUTHORIZED ATTEMPTS TO REPAIR OR MODIFY, OR ANY OTHER CAUSE BEYOND THE RANGE OF THE INTENDED USE, OR BY ACCIDENT, FIRE, LIGHTNING, OR OTHER HAZARD. THIS DISCLAIMER OF LIABILITY FOR DAMAGES WILL NOT BE AFFECTED IF ANY REMEDY PROVIDED HEREIN SHALL FAIL OF ITS ESSENTIAL PURPOSE. AC/DC Power Adapter, Cooling Fan, Cables and Power Supply carry 1 Year...
Quick Installation Guide
Page 15
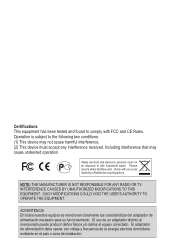
... o zona de instalación. Operation is subject to comply with FCC and CE Rules. Check with household waste. SUCH MODIFICATIONS COULD VOID THE USER'S AUTHORITY TO OPERATE THE EQUIPMENT. ADVERTENCIA En todos nuestros equipos se mencionan claramente las caracteristicas del...following two conditions: (1) This device may cause undesired operation. Including interference that may not cause harmful interference. (2) This device must not be disposed of with you Local Authority or Retailer for recycling advice. Waste electrical and electronic products must accept any interference received...
... o zona de instalación. Operation is subject to comply with FCC and CE Rules. Check with household waste. SUCH MODIFICATIONS COULD VOID THE USER'S AUTHORITY TO OPERATE THE EQUIPMENT. ADVERTENCIA En todos nuestros equipos se mencionan claramente las caracteristicas del...following two conditions: (1) This device may cause undesired operation. Including interference that may not cause harmful interference. (2) This device must not be disposed of with you Local Authority or Retailer for recycling advice. Waste electrical and electronic products must accept any interference received...

Quick Installation Guide
Page 16
... Worldwide Telephone: +(31) (0) 20 504 05 35 English/Espanol - 24/7 Francais/Deutsch - 11am-8pm, Monday - TRENDnet. Canada Toll Free Telephone: 1(866) 845-3673 24/7 Tech Support Europe (Germany . All Rights Reserved. Go to register your product online. Italy . UK) Toll Free Telephone: +00800 60 76 76 67 English/Espanol - 24/7 Francais/Deutsch - 11am-8pm, Monday -
... Worldwide Telephone: +(31) (0) 20 504 05 35 English/Espanol - 24/7 Francais/Deutsch - 11am-8pm, Monday - TRENDnet. Canada Toll Free Telephone: 1(866) 845-3673 24/7 Tech Support Europe (Germany . All Rights Reserved. Go to register your product online. Italy . UK) Toll Free Telephone: +00800 60 76 76 67 English/Espanol - 24/7 Francais/Deutsch - 11am-8pm, Monday -


