
Quick Installation Guide
Page 2
Indoor Antenna Installation 6 Version 02.23.2006 Outdoor Antenna Installation 1 2. How to install the surge arrestor 4 3. Table of Contents English ...1 1. Weatherproof tape for outdoor installations 5 4.
Indoor Antenna Installation 6 Version 02.23.2006 Outdoor Antenna Installation 1 2. How to install the surge arrestor 4 3. Table of Contents English ...1 1. Weatherproof tape for outdoor installations 5 4.
Quick Installation Guide
Page 3
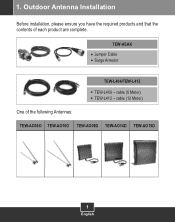
cable (6 Meter) TEW-L412 - cable (12 Meter) One of each product are complete. TEW-ASAK Jumper Cable Surge Arrestor TEW-L406/TEW-L412 TEW-L406 - 1. Outdoor Antenna Installation Before installation, please ensure you have the required products and that the contents of the following Antennas: TEW-AO08O TEW-AO10O TEW-AO09D TEW-AO14D TEW-AO19D 1 English
cable (6 Meter) TEW-L412 - cable (12 Meter) One of each product are complete. TEW-ASAK Jumper Cable Surge Arrestor TEW-L406/TEW-L412 TEW-L406 - 1. Outdoor Antenna Installation Before installation, please ensure you have the required products and that the contents of the following Antennas: TEW-AO08O TEW-AO10O TEW-AO09D TEW-AO14D TEW-AO19D 1 English
Quick Installation Guide
Page 4
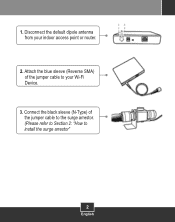
Attach the blue sleeve (Reverse SMA) of the jumper cable to the surge arrestor. (Please refer to Section 2: "How to your indoor access point or router. 2. Connect the black sleeve (N-Type) of the jumper cable to install the surge arrestor" 2 English Disconnect the default dipole antenna from your Wi-Fi Device. 3. 1.
Attach the blue sleeve (Reverse SMA) of the jumper cable to the surge arrestor. (Please refer to Section 2: "How to your indoor access point or router. 2. Connect the black sleeve (N-Type) of the jumper cable to install the surge arrestor" 2 English Disconnect the default dipole antenna from your Wi-Fi Device. 3. 1.
Quick Installation Guide
Page 5
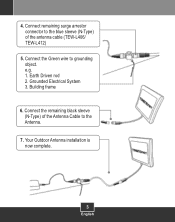
e.g. 1. Building frame 6. Connect the remaining black sleeve (N-Type) of the antenna cable (TEW-L406/ TEW-L412) 5. Earth Driven rod 2. Your Outdoor Antenna installation is now complete. 3 English Connect the Green wire to the Antenna. 7. Grounded Electrical System 3. 4. Connect remaining surge arrestor connector to the blue sleeve (N-Type) of the Antenna Cable to grounding object.
e.g. 1. Building frame 6. Connect the remaining black sleeve (N-Type) of the antenna cable (TEW-L406/ TEW-L412) 5. Earth Driven rod 2. Your Outdoor Antenna installation is now complete. 3 English Connect the Green wire to the Antenna. 7. Grounded Electrical System 3. 4. Connect remaining surge arrestor connector to the blue sleeve (N-Type) of the Antenna Cable to grounding object.
Quick Installation Guide
Page 6
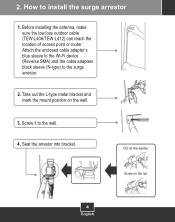
Attach the enclosed cable adapter's blue sleeve to the Wi-Fi device (Reverse SMA) and the cable adapters black sleeve (N-type) to the wall. 4. Screw it to the surge arrestor. 2. Put on the nut. 4 English 2. Before installing the antenna, make sure the low loss outdoor cable (TEW-L406/TEW-L412) can reach the location of access point or router. Seat the arrestor into bracket. Screw on the washer. Take out the L-type metal bracket and mark the mount position on the wall. 3. How to install the surge arrestor 1.
Attach the enclosed cable adapter's blue sleeve to the Wi-Fi device (Reverse SMA) and the cable adapters black sleeve (N-type) to the wall. 4. Screw it to the surge arrestor. 2. Put on the nut. 4 English 2. Before installing the antenna, make sure the low loss outdoor cable (TEW-L406/TEW-L412) can reach the location of access point or router. Seat the arrestor into bracket. Screw on the washer. Take out the L-type metal bracket and mark the mount position on the wall. 3. How to install the surge arrestor 1.
Quick Installation Guide
Page 7
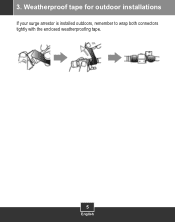
3. Weatherproof tape for outdoor installations If your surge arrestor is installed outdoors, remember to wrap both connectors tightly with the enclosed weatherproofing tape. 5 English
3. Weatherproof tape for outdoor installations If your surge arrestor is installed outdoors, remember to wrap both connectors tightly with the enclosed weatherproofing tape. 5 English
Quick Installation Guide
Page 8
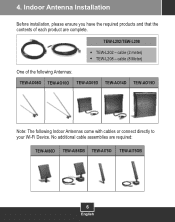
Indoor Antenna Installation Before installation, please ensure you have the required products and that the contents of the following Antennas: TEW-AO08O TEW-AO10O TEW-AO09D TEW-AO14D TEW-AO19D Note: The following Indoor Antennas come with cables or connect directly to your Wi-Fi Device. cable (8 Meter) One of each product are required: TEW-AI86D TEW-AI86DB TEW-AI75O TEW-AI75OB 6 English cable (2 meter) TEW-L208 - No additional cable assemblies are complete. TEW-L202/TEW-L208 TEW-L202 - 4.
Indoor Antenna Installation Before installation, please ensure you have the required products and that the contents of the following Antennas: TEW-AO08O TEW-AO10O TEW-AO09D TEW-AO14D TEW-AO19D Note: The following Indoor Antennas come with cables or connect directly to your Wi-Fi Device. cable (8 Meter) One of each product are required: TEW-AI86D TEW-AI86DB TEW-AI75O TEW-AI75OB 6 English cable (2 meter) TEW-L208 - No additional cable assemblies are complete. TEW-L202/TEW-L208 TEW-L202 - 4.
Quick Installation Guide
Page 9
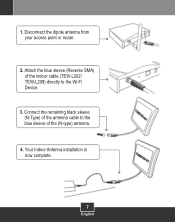
Your Indoor Antenna installation is now complete. 7 English Connect the remaining black sleeve (N-Type) of the (N-type) antenna. 4. 1. Disconnect the dipole antenna from your access point or router. 2. Attach the blue sleeve (Reverse SMA) of the indoor cable (TEW-L202/ TEW-L208) directly to the blue sleeve of the antenna cable to the Wi-Fi Device. 3.
Your Indoor Antenna installation is now complete. 7 English Connect the remaining black sleeve (N-Type) of the (N-type) antenna. 4. 1. Disconnect the dipole antenna from your access point or router. 2. Attach the blue sleeve (Reverse SMA) of the indoor cable (TEW-L202/ TEW-L208) directly to the blue sleeve of the antenna cable to the Wi-Fi Device. 3.
Quick Installation Guide
Page 10
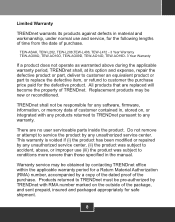
... TRENDnet must be new or reconditioned. Limited Warranty TRENDnet warrants its option and expense, repair the defective product or part, deliver to customer an equivalent product or part to replace the defective item, or refund to customer the purchase price paid for the following lengths of time from the date of purchase. Warranty service may be pre-authorized by any software, firmware, information...
... TRENDnet must be new or reconditioned. Limited Warranty TRENDnet warrants its option and expense, repair the defective product or part, deliver to customer an equivalent product or part to replace the defective item, or refund to customer the purchase price paid for the following lengths of time from the date of purchase. Warranty service may be pre-authorized by any software, firmware, information...
Quick Installation Guide
Page 11
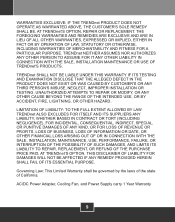
...RANGE OF THE INTENDED USE, OR BY ACCIDENT, FIRE, LIGHTNING, OR OTHER HAZARD. AC/DC Power Adapter, Cooling Fan, and Power Supply carry 1 Year Warranty 9 TRENDnet NEITHER ASSUMES NOR AUTHORIZES ANY OTHER PERSON TO ASSUME FOR IT ANY OTHER LIABILITY IN CONNECTION WITH THE SALE, INSTALLATION MAINTENANCE OR USE OF TRENDnet... AND FITNESS FOR A PARTICULAR PURPOSE. WARRANTIES EXCLUSIVE: IF THE TRENDnet PRODUCT DOES NOT OPERATE AS WARRANTED ABOVE, THE CUSTOMER'S SOLE REMEDY SHALL BE, AT TRENDnet'S OPTION, REPAIR OR REPLACEMENT. THIS DISCLAIMER OF LIABILITY FOR DAMAGES WILL NOT BE AFFECTED IF...
...RANGE OF THE INTENDED USE, OR BY ACCIDENT, FIRE, LIGHTNING, OR OTHER HAZARD. AC/DC Power Adapter, Cooling Fan, and Power Supply carry 1 Year Warranty 9 TRENDnet NEITHER ASSUMES NOR AUTHORIZES ANY OTHER PERSON TO ASSUME FOR IT ANY OTHER LIABILITY IN CONNECTION WITH THE SALE, INSTALLATION MAINTENANCE OR USE OF TRENDnet... AND FITNESS FOR A PARTICULAR PURPOSE. WARRANTIES EXCLUSIVE: IF THE TRENDnet PRODUCT DOES NOT OPERATE AS WARRANTED ABOVE, THE CUSTOMER'S SOLE REMEDY SHALL BE, AT TRENDnet'S OPTION, REPAIR OR REPLACEMENT. THIS DISCLAIMER OF LIABILITY FOR DAMAGES WILL NOT BE AFFECTED IF...
Quick Installation Guide
Page 12
Go to register your product online. TRENDnet Technical Support Product Warranty Registration Please take a moment to TRENDnet's website at http://www.trendnet.com 3135 Kashiwa Street Torrance, CA 90505 USA Copyright ©2006. TRENDnet. All Rights Reserved.
Go to register your product online. TRENDnet Technical Support Product Warranty Registration Please take a moment to TRENDnet's website at http://www.trendnet.com 3135 Kashiwa Street Torrance, CA 90505 USA Copyright ©2006. TRENDnet. All Rights Reserved.