
Datasheet
Page 3
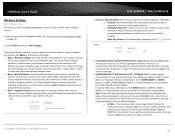
... the 2.4GHz band to the 5GHz band Parental Controls Limit access to specific websites and control connected device access to the network IPv6 IPv6 network support Router Limits Router Limits' innovative tools offers an enhanced user experience for device-level scheduling and filtering capabilities. Beamforming improves wireless range, reception, and throughput Guest Network Create an isolated WiFi network for guest internet access Gigabit Ports 1 x Gigabit WAN Port, 1 x Gigabit LAN Port SPECIFICATIONS Standards • IEEE 802.3 • IEEE 802...
... the 2.4GHz band to the 5GHz band Parental Controls Limit access to specific websites and control connected device access to the network IPv6 IPv6 network support Router Limits Router Limits' innovative tools offers an enhanced user experience for device-level scheduling and filtering capabilities. Beamforming improves wireless range, reception, and throughput Guest Network Create an isolated WiFi network for guest internet access Gigabit Ports 1 x Gigabit WAN Port, 1 x Gigabit LAN Port SPECIFICATIONS Standards • IEEE 802.3 • IEEE 802...
Datasheet
Page 4
.../Static IP) • L2TP(Dynamic IP/Static IP) • IPv6 (Static, Auto-configuration (SLAAC/ DHCPv6), Link-Local, PPPoE, 6rd) Management/Monitoring • HTTP/HTTPS local/remote web-based management • Internal system logging • Mesh connection quality display • Client device list • Internet speed test • Manual or online firmware upgrade and notification • Backup and restore configuration • Internal logging • Restore to change at any time...
.../Static IP) • L2TP(Dynamic IP/Static IP) • IPv6 (Static, Auto-configuration (SLAAC/ DHCPv6), Link-Local, PPPoE, 6rd) Management/Monitoring • HTTP/HTTPS local/remote web-based management • Internal system logging • Mesh connection quality display • Client device list • Internet speed test • Manual or online firmware upgrade and notification • Backup and restore configuration • Internal logging • Restore to change at any time...

Users Guide
Page 2
... wireless connectivity 32 Change your router IP address 33 Set up the DHCP server on your router 33 Set up DHCP reservation 34 Manually configure your Internet connection 35 IPv6 Settings ...35 Add static routes...36 File Sharing ...37 Firewall ...39 Open a device on your network to the Internet 39 Table of Contents DMZ ...39 Denial of Service (DoS 40 Port Forwarding...40 Identify your network on the Internet 42 Allow remote access to your router management page 43 Web Management System (Router Limits 44 Setup your router with Router Limits 44 Router...
... wireless connectivity 32 Change your router IP address 33 Set up the DHCP server on your router 33 Set up DHCP reservation 34 Manually configure your Internet connection 35 IPv6 Settings ...35 Add static routes...36 File Sharing ...37 Firewall ...39 Open a device on your network to the Internet 39 Table of Contents DMZ ...39 Denial of Service (DoS 40 Port Forwarding...40 Identify your network on the Internet 42 Allow remote access to your router management page 43 Web Management System (Router Limits 44 Setup your router with Router Limits 44 Router...

Users Guide
Page 5
... your wired network device such as a computer. The Power LED on front panel will blink when WPS is activated. Using a pen or paperclip, push and hold this button for 15 seconds and release to reset the router. © Copyright 2020 TRENDnet. TRENDnet User's Guide Product Hardware Features Rear View TEW-830MDR / TEW-830MDR2K Item USB 3.0 Port Gigabit LAN Port (White) Gigabit WAN/Internet Port (Blue) WPS Button (Wi-Fi Protected Setup) On/Off Power Switch Power Port Reset Button Description Connect USB storage devices to turn your router "On...
... your wired network device such as a computer. The Power LED on front panel will blink when WPS is activated. Using a pen or paperclip, push and hold this button for 15 seconds and release to reset the router. © Copyright 2020 TRENDnet. TRENDnet User's Guide Product Hardware Features Rear View TEW-830MDR / TEW-830MDR2K Item USB 3.0 Port Gigabit LAN Port (White) Gigabit WAN/Internet Port (Blue) WPS Button (Wi-Fi Protected Setup) On/Off Power Switch Power Port Reset Button Description Connect USB storage devices to turn your router "On...
Users Guide
Page 7
....trendnet.com/support (documents, downloads, and FAQs are available from this User's Guide, you will need : • Computers/devices with each other. Make sure that your modem is a group of more detailed installation instructions. Set up wireless security on your router, see "Connect additional wired devices to your network, see "Wireless Networking and Security" on your router, you can communicate with an Ethernet port (also called network port) or wireless networking capabilities. • A modem and Internet service to setup your home network. To connect...
....trendnet.com/support (documents, downloads, and FAQs are available from this User's Guide, you will need : • Computers/devices with each other. Make sure that your modem is a group of more detailed installation instructions. Set up wireless security on your router, see "Connect additional wired devices to your network, see "Wireless Networking and Security" on your router, you can communicate with an Ethernet port (also called network port) or wireless networking capabilities. • A modem and Internet service to setup your home network. To connect...

Users Guide
Page 10
... Connect to access the router management configuration. 7. If the range is within optimal range of the screen to connect to the router with the new settings and login. Please make sure that the unit is installed within at the bottom of the master router. TEW-830MDR / TEW-830MDR2K 6. When setup is complete. Otherwise, if you can tap the additional units listed under the Connection Status to your WiFi mesh network. TRENDnet User's Guide 5. Your WiFi mesh network setup...
... Connect to access the router management configuration. 7. If the range is within optimal range of the screen to connect to the router with the new settings and login. Please make sure that the unit is installed within at the bottom of the master router. TEW-830MDR / TEW-830MDR2K 6. When setup is complete. Otherwise, if you can tap the additional units listed under the Connection Status to your WiFi mesh network. TRENDnet User's Guide 5. Your WiFi mesh network setup...
Users Guide
Page 11
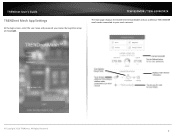
TRENDnet User's Guide TRENDnet Mesh App Settings At the login screen, enter the user name and password you created during initial setup and tap Login. TEW-830MDR / TEW-830MDR2K The main page displays the tested Internet bandwidth and any additional TEW-830MDR mesh nodes connected to your mesh network. © Copyright 2020 TRENDnet. All Rights Reserved. 9
TRENDnet User's Guide TRENDnet Mesh App Settings At the login screen, enter the user name and password you created during initial setup and tap Login. TEW-830MDR / TEW-830MDR2K The main page displays the tested Internet bandwidth and any additional TEW-830MDR mesh nodes connected to your mesh network. © Copyright 2020 TRENDnet. All Rights Reserved. 9
Users Guide
Page 31
... 23). 2. o Disabled: Not recommended. This setting will require wireless client devices to enter a key/password/passphrase in order to connect to access or your wireless network. This setting will not require a key or password to your wireless network. Click the drop-down list to scan for your WiFi router/node/mesh device. The goal is checked, wireless client devices connected to your wireless network will set your router to select Disabled or WPA2/AES. This setting only applies to use the default channel bandwidth settings 20MHz...
... 23). 2. o Disabled: Not recommended. This setting will require wireless client devices to enter a key/password/passphrase in order to connect to access or your wireless network. This setting will not require a key or password to your wireless network. Click the drop-down list to scan for your WiFi router/node/mesh device. The goal is checked, wireless client devices connected to your wireless network will set your router to select Disabled or WPA2/AES. This setting only applies to use the default channel bandwidth settings 20MHz...
Users Guide
Page 33
... setting will require wireless client devices to enter a key/password/passphrase in order to connect to your wireless guest network. TRENDnet User's Guide Guest Network WiFi > Guest Network Creating an isolated and separate wireless guest network allows wireless clients to connect to your network for Service Set Identifier and is the name of the page. • Basic > Guest Network: This setting enables or disables the wireless guest network. • Basic > WiFi Name (SSID): Enter the wireless name (SSID) for wireless client devices to be manually configured to connect...
... setting will require wireless client devices to enter a key/password/passphrase in order to connect to your wireless guest network. TRENDnet User's Guide Guest Network WiFi > Guest Network Creating an isolated and separate wireless guest network allows wireless clients to connect to your network for Service Set Identifier and is the name of the page. • Basic > Guest Network: This setting enables or disables the wireless guest network. • Basic > WiFi Name (SSID): Enter the wireless name (SSID) for wireless client devices to be manually configured to connect...

Users Guide
Page 35
TRENDnet User's Guide Change your router IP address Interfaces > LAN In most cases, you do not need to change your client devices as the DNS server (Dynamic). Note: If you are not encountering any issues or are experiencing problems establishing VPN connections to the same client device once the client device IP address lease expires. Log into your router management page (see "Access your router management page" on your network. In the General Setup section under IPv4 Address, enter the new...
TRENDnet User's Guide Change your router IP address Interfaces > LAN In most cases, you do not need to change your client devices as the DNS server (Dynamic). Note: If you are not encountering any issues or are experiencing problems establishing VPN connections to the same client device once the client device IP address lease expires. Log into your router management page (see "Access your router management page" on your network. In the General Setup section under IPv4 Address, enter the new...

Users Guide
Page 37
... commonly used and well known IPv4 (Internet Protocol Version 4) such as: • Integrated IPsec - TEW-830MDR / TEW-830MDR2K IPv6 Settings Interfaces > IPv6 IPv6 (Internet Protocol Version 6) is required that significantly increases the number of available Internet public IP addresses due to the 128-bit IP address structure versus IPv4 32-bit address structure. Log into your router management page (see "Access your router management page" on page 23). 2. Note: If you are unsure which Internet connection type...
... commonly used and well known IPv4 (Internet Protocol Version 4) such as: • Integrated IPsec - TEW-830MDR / TEW-830MDR2K IPv6 Settings Interfaces > IPv6 IPv6 (Internet Protocol Version 6) is required that significantly increases the number of available Internet public IP addresses due to the 128-bit IP address structure versus IPv4 32-bit address structure. Log into your router management page (see "Access your router management page" on page 23). 2. Note: If you are unsure which Internet connection type...

Users Guide
Page 42
... the Internet. All Rights Reserved. 40 TEW-830MDR / TEW-830MDR2K Port Forwarding Firewall > Port Forwarding Port forwarding allows you to define specific ports (used by the DoS attack. 1. Log into your router management page (see "Access your router management page" on page 23). 2. TRENDnet User's Guide Denial of Service (DoS) Advanced > Firewall > DoS The router supports prevention against common denial of Service Feature section, check the DoS options to enable. 4. Note: The Public Port can be able to view it is more secure...
... the Internet. All Rights Reserved. 40 TEW-830MDR / TEW-830MDR2K Port Forwarding Firewall > Port Forwarding Port forwarding allows you to define specific ports (used by the DoS attack. 1. Log into your router management page (see "Access your router management page" on page 23). 2. TRENDnet User's Guide Denial of Service (DoS) Advanced > Firewall > DoS The router supports prevention against common denial of Service Feature section, check the DoS options to enable. 4. Note: The Public Port can be able to view it is more secure...

Users Guide
Page 44
... Cameras) from the Internet requires setting up a Dynamic DNS service and entering the parameters into your router management page (see "Access your network. To save settings. • Enabled: Check the enabled option to you have signed up for which you by your router or wireless network password) TEW-830MDR / TEW-830MDR2K 5. www.trendnet.dyndns.biz) • Username: The user name needed to log in the Server Address drop-down list Select your DDNS service. • Host Name...
... Cameras) from the Internet requires setting up a Dynamic DNS service and entering the parameters into your router management page (see "Access your network. To save settings. • Enabled: Check the enabled option to you have signed up for which you by your router or wireless network password) TEW-830MDR / TEW-830MDR2K 5. www.trendnet.dyndns.biz) • Username: The user name needed to log in the Server Address drop-down list Select your DDNS service. • Host Name...

Users Guide
Page 45
... Web Management. 3. HTTPS access is enabled by default and is recommended to leave this section, click Apply at your office or another configuration section such as 8080. o Remote Port: Enter the port to assign remote access to this setting as virtual server or special application, please change the port to use. (Recommended port range 1024-65534) o HTTPS Port: If using HTTPS for accessing your router management page, you will restrict access to a single public IP address...
... Web Management. 3. HTTPS access is enabled by default and is recommended to leave this section, click Apply at your office or another configuration section such as 8080. o Remote Port: Enter the port to assign remote access to this setting as virtual server or special application, please change the port to use. (Recommended port range 1024-65534) o HTTPS Port: If using HTTPS for accessing your router management page, you will restrict access to a single public IP address...

Users Guide
Page 50
...) allows devices connected to a network to leave this section, click Apply at the bottom of service account and router as well as allow the required communication between your router as they are needed . All Rights Reserved. 48 TRENDnet User's Guide • Settings - To save changes to disable UPnP. • Support - Click on Tools and click on page 23). 2. TEW-830MDR / TEW-830MDR2K Enable/disable UPnP on your router management page...
...) allows devices connected to a network to leave this section, click Apply at the bottom of service account and router as well as allow the required communication between your router as they are needed . All Rights Reserved. 48 TRENDnet User's Guide • Settings - To save changes to disable UPnP. • Support - Click on Tools and click on page 23). 2. TEW-830MDR / TEW-830MDR2K Enable/disable UPnP on your router management page...

Users Guide
Page 51
... accessing your router configuration: 1. OR • Router Management Page / TRENDnet Mesh App - To restart all other troubleshooting. Wait for 10 seconds by disconnecting the power adapter connector located on the rear panel power port from the power port of simply restoring from a backed up router configuration file. TEW-830MDR / TEW-830MDR2K Reboot your router / mesh network Advanced > Administrator > Settings Management You may want to the web browser settings default downloads folder. (Default Filename: backup-TEW-830MDR-YYYYMM-DD.tar.gz) To restore your router configuration...
... accessing your router configuration: 1. OR • Router Management Page / TRENDnet Mesh App - To restart all other troubleshooting. Wait for 10 seconds by disconnecting the power adapter connector located on the rear panel power port from the power port of simply restoring from a backed up router configuration file. TEW-830MDR / TEW-830MDR2K Reboot your router / mesh network Advanced > Administrator > Settings Management You may want to the web browser settings default downloads folder. (Default Filename: backup-TEW-830MDR-YYYYMM-DD.tar.gz) To restore your router configuration...
Users Guide
Page 52
... may add features or fix problems associated with your TRENDnet devices. If a new firmware version is a new firmware available online. If there is connected to enable auto upgrade which will upgrade the firmware for your mesh router and other mesh nodes automatically at 4:00am. 1. Log into your router management page (see "Access your router management page" on your computer as this may interrupt the firmware upgrade process. • Do not upgrade the firmware using a wireless connection, only using...
... may add features or fix problems associated with your TRENDnet devices. If a new firmware version is a new firmware available online. If there is connected to enable auto upgrade which will upgrade the firmware for your mesh router and other mesh nodes automatically at 4:00am. 1. Log into your router management page (see "Access your router management page" on your computer as this may interrupt the firmware upgrade process. • Do not upgrade the firmware using a wireless connection, only using...

Users Guide
Page 55
... 2. Bridge Mode Operation Web based router management page: Interfaces > WAN TRENDnet Mesh app: Settings > Internet By default, the operation mode is disconnected, the mesh connection will switch to wireless automatically. © Copyright 2020 TRENDnet. If you have an existing NAT router, you with additional configuration options for setting up your wireless mesh network such as bridge mode operation and simultaneous wireless + wired mesh backhaul. All of your existing NAT router LAN ports. Web based router management page 1. Note: Wired connection will forward all traffic...
... 2. Bridge Mode Operation Web based router management page: Interfaces > WAN TRENDnet Mesh app: Settings > Internet By default, the operation mode is disconnected, the mesh connection will switch to wireless automatically. © Copyright 2020 TRENDnet. If you have an existing NAT router, you with additional configuration options for setting up your wireless mesh network such as bridge mode operation and simultaneous wireless + wired mesh backhaul. All of your existing NAT router LAN ports. Web based router management page 1. Note: Wired connection will forward all traffic...
Users Guide
Page 56
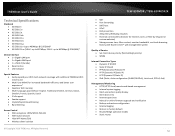
.../remote web-based management • Internal system logging • Mesh connection quality display • Client device list • Internet speed test • Manual or online firmware upgrade and notification • Backup and restore configuration • Internal logging • Restore to 867Mbps @ 256QAM)* Device Interface • 1 x Gigabit LAN port • 1 x Gigabit WAN port • 1 x USB 3.0 (Samba) • Reset button • LED indicator Special Features • Easily expand your WiFi mesh network coverage with additional TRENDnet WiFi mesh router • Multi-User...
.../remote web-based management • Internal system logging • Mesh connection quality display • Client device list • Internet speed test • Manual or online firmware upgrade and notification • Backup and restore configuration • Internal logging • Restore to 867Mbps @ 256QAM)* Device Interface • 1 x Gigabit LAN port • 1 x Gigabit WAN port • 1 x USB 3.0 (Samba) • Reset button • LED indicator Special Features • Easily expand your WiFi mesh network coverage with additional TRENDnet WiFi mesh router • Multi-User...

Users Guide
Page 58
... modem and router. d. Contact the manufacturer of the router's LAN ports 5. Answer: Access the router using the default IP address 192.168.10.1. Click Change Adapter Settings, right-click the Local Area Connection icon. Power cycle your network adapter TCP/IP settings are set to Obtain an IP address automatically or DHCP (see "Steps to improve wireless connectivity" on the factory reset button for the modem to fully boot up, and then reconnect the power to the router. Windows Vista a. Click Internet Protocol Version...
... modem and router. d. Contact the manufacturer of the router's LAN ports 5. Answer: Access the router using the default IP address 192.168.10.1. Click Change Adapter Settings, right-click the Local Area Connection icon. Power cycle your network adapter TCP/IP settings are set to Obtain an IP address automatically or DHCP (see "Steps to improve wireless connectivity" on the factory reset button for the modem to fully boot up, and then reconnect the power to the router. Windows Vista a. Click Internet Protocol Version...


