Datasheet
Page 1
... time, network performance, and additional router management options • Compatible with most popular cable/DSL Internet Service Providers using software utility • 2 detachable antennas provide high-speed performance and expansive wireless coverage • Advanced firewall protection with Network Address Translation ... for auto discovery and support for storage devices and print servers ) works with Windows 7/Vista/2000/XP • 3- TEW-673GRU rev:07.23.2010 Wirelessly stream HD multimedia using the uncongested 5GHz frequency while surfing the Internet using the Wi-Fi Protected ...
... time, network performance, and additional router management options • Compatible with most popular cable/DSL Internet Service Providers using software utility • 2 detachable antennas provide high-speed performance and expansive wireless coverage • Advanced firewall protection with Network Address Translation ... for auto discovery and support for storage devices and print servers ) works with Windows 7/Vista/2000/XP • 3- TEW-673GRU rev:07.23.2010 Wirelessly stream HD multimedia using the uncongested 5GHz frequency while surfing the Internet using the Wi-Fi Protected ...
User's Guide
Page 6
... Settings Menu ...59 Restart ...60 Reset...60 Date/Time ...61 Connected Devices...61 WPS Menu ...62 WPS ...62 Current PIN ...64 USB CONTROL CENTER UTILITY 65 Utility ...65 System...65 Configure Server ...66 Print Sharing ...66 Auto Connect Printer ...66 Network Scanner...67 Connecting USB Storage Device ...69 TECHNICAL SPECIFICATIONS 71 vi
... Settings Menu ...59 Restart ...60 Reset...60 Date/Time ...61 Connected Devices...61 WPS Menu ...62 WPS ...62 Current PIN ...64 USB CONTROL CENTER UTILITY 65 Utility ...65 System...65 Configure Server ...66 Print Sharing ...66 Auto Connect Printer ...66 Network Scanner...67 Connecting USB Storage Device ...69 TECHNICAL SPECIFICATIONS 71 vi
User's Guide
Page 7
...of this User's Guide Introduction: Describes the 300Mbps Wireless N Dual Band Gigabit Router with USB Port. Unpacking and Setup. USB Control Center Utility: Describes ways on your 300Mbps Wireless N Dual Band Gigabit Router with web-based configuration. 1 It provides a complete solution for Internet ... If you can connect the WLAN Router to setup your xDSL/Cable Modem. ABOUT THIS GUIDE Congratulations on how to use the utility for every user. This integrated access device combines Internet gateway functions with USB Port. Purpose This manual discusses how to install the...
...of this User's Guide Introduction: Describes the 300Mbps Wireless N Dual Band Gigabit Router with USB Port. Unpacking and Setup. USB Control Center Utility: Describes ways on your 300Mbps Wireless N Dual Band Gigabit Router with web-based configuration. 1 It provides a complete solution for Internet ... If you can connect the WLAN Router to setup your xDSL/Cable Modem. ABOUT THIS GUIDE Congratulations on how to use the utility for every user. This integrated access device combines Internet gateway functions with USB Port. Purpose This manual discusses how to install the...
User's Guide
Page 9
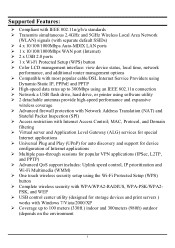
PSK, and WEP ¾ USB control center utility (designed for popular VPN applications (IPSec, L2TP, and PPTP) ¾ Advanced QoS support includes: Uplink speed control, IP prioritization and Wi-Fi Multimedia (WMM) ¾ ... ¾ High-speed data rates up to 300Mbps using an IEEE 802.11n connection ¾ Network a USB flash drive, hard drive, or printer using software utility ¾ 2 detachable antennas provide high-speed performance and expansive wireless coverage ¾ Advanced firewall protection with Network Address Translation (NAT) and Stateful Packet Inspection (SPI...
PSK, and WEP ¾ USB control center utility (designed for popular VPN applications (IPSec, L2TP, and PPTP) ¾ Advanced QoS support includes: Uplink speed control, IP prioritization and Wi-Fi Multimedia (WMM) ¾ ... ¾ High-speed data rates up to 300Mbps using an IEEE 802.11n connection ¾ Network a USB flash drive, hard drive, or printer using software utility ¾ 2 detachable antennas provide high-speed performance and expansive wireless coverage ¾ Advanced firewall protection with Network Address Translation (NAT) and Stateful Packet Inspection (SPI...
User's Guide
Page 10
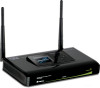
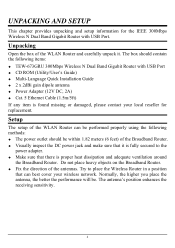
... that can be performed properly using the following methods: ‹ The power outlet should contain the following items: ‹ TEW-673GRU 300Mbps Wireless N Dual Band Gigabit Router with USB Port ‹ CD ROM (Utility/User's Guide) ‹ Multi-Language Quick Installation Guide ‹ 2 x 2dBi gain dipole antenna ‹ Power Adapter (12V DC, 2A...
... that can be performed properly using the following methods: ‹ The power outlet should contain the following items: ‹ TEW-673GRU 300Mbps Wireless N Dual Band Gigabit Router with USB Port ‹ CD ROM (Utility/User's Guide) ‹ Multi-Language Quick Installation Guide ‹ 2 x 2dBi gain dipole antenna ‹ Power Adapter (12V DC, 2A...

User's Guide
Page 20
Setup Wizard Setup wizard is provided as part of the WLAN Router. Step 1: Set your new password Set a new admin password of the web configuration utility. Please click "Next" to continue. Step 2: Choose time zone Select the time zone from the drop down list. The following screen will appear. Please click "Next" to continue. Users can simply follow the step-by-step process to get the wireless Router configuration ready to continue. 14 Please click "Next" to run in 6 easy steps by clicking on` the "Wizard" button on the function menu.
Setup Wizard Setup wizard is provided as part of the WLAN Router. Step 1: Set your new password Set a new admin password of the web configuration utility. Please click "Next" to continue. Step 2: Choose time zone Select the time zone from the drop down list. The following screen will appear. Please click "Next" to continue. Users can simply follow the step-by-step process to get the wireless Router configuration ready to continue. 14 Please click "Next" to run in 6 easy steps by clicking on` the "Wizard" button on the function menu.
User's Guide
Page 71
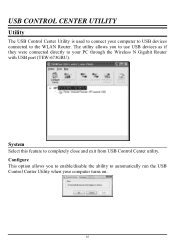
USB CONTROL CENTER UTILITY Utility The USB Control Center Utility is used to connect your computer turns on. 65 Configure This option allows you to use USB devices as if they were connected directly to your PC through the Wireless N Gigabit Router with USB port (TEW-673GRU). The utility allows you to enable/disable the ability to automatically run the USB Control Center Utility when your computer to USB devices connected to completely close and exit from USB Control Center utility. System Select this feature to the WLAN Router.
USB CONTROL CENTER UTILITY Utility The USB Control Center Utility is used to connect your computer turns on. 65 Configure This option allows you to use USB devices as if they were connected directly to your PC through the Wireless N Gigabit Router with USB port (TEW-673GRU). The utility allows you to enable/disable the ability to automatically run the USB Control Center Utility when your computer to USB devices connected to completely close and exit from USB Control Center utility. System Select this feature to the WLAN Router.
User's Guide
Page 72
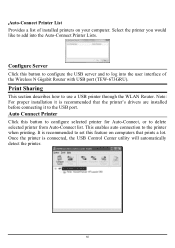
.... Note: For proper installation it is recommended that prints a lot. Configure Server Click this feature on your computer. It is connected, the USB Control Center utility will automatically detect the printer. 66 Print Sharing This section describes how to set this button to configure the USB server and to the USB... before connecting it to log into the Auto-Connect Printer Lists. Auto-Connect Printer List Provides a list of the Wireless N Gigabit Router with USB port (TEW-673GRU).
.... Note: For proper installation it is recommended that prints a lot. Configure Server Click this feature on your computer. It is connected, the USB Control Center utility will automatically detect the printer. 66 Print Sharing This section describes how to set this button to configure the USB server and to the USB... before connecting it to log into the Auto-Connect Printer Lists. Auto-Connect Printer List Provides a list of the Wireless N Gigabit Router with USB port (TEW-673GRU).

User's Guide
Page 73
Select the printer you click on the Network Scanner button on your computer. Set Auto-Connect Printer Provides a list of installed printers on the USB utility the below image will appear. Preview: Click to preview scanned image Scan: Click to begin scanning Cancel: Click to add into the Auto-Connect Printer ...
Select the printer you click on the Network Scanner button on your computer. Set Auto-Connect Printer Provides a list of installed printers on the USB utility the below image will appear. Preview: Click to preview scanned image Scan: Click to begin scanning Cancel: Click to add into the Auto-Connect Printer ...

User's Guide
Page 74
File Format: Select the file format Save Location: Click Browse and select the location where you would like to have the scanned files saved in . Back: Click to return to the USB Utility. 68 Next: Click to begin scanning Cancel: Click to cancel scanning job and to return to back to be previous screen. Name: Type the name of the folder you would like to have the scanned images stored in .
File Format: Select the file format Save Location: Click Browse and select the location where you would like to have the scanned files saved in . Back: Click to return to the USB Utility. 68 Next: Click to begin scanning Cancel: Click to cancel scanning job and to return to back to be previous screen. Name: Type the name of the folder you would like to have the scanned images stored in .

User's Guide
Page 75
Request to Connect Click this button to properly disconnect your network. Connecting USB Storage Device This section describes the how to use the utility when connecting to is already connected by another computer would like to connect to the USB device and will be sent to the other computer ...
Request to Connect Click this button to properly disconnect your network. Connecting USB Storage Device This section describes the how to use the utility when connecting to is already connected by another computer would like to connect to the USB device and will be sent to the other computer ...

Quick Installation Guide
Page 2
Installing the Utility 8 5. Scanning 11 7. Before You Start 1 2. Hardware Installation 2 3. Configure the Wireless Router 4 4. Storage 12 Troubleshooting 13 Version 12.21.2009 Printing 10 6. Table of Contents English 1 1.
Installing the Utility 8 5. Scanning 11 7. Before You Start 1 2. Hardware Installation 2 3. Configure the Wireless Router 4 4. Storage 12 Troubleshooting 13 Version 12.21.2009 Printing 10 6. Table of Contents English 1 1.

Quick Installation Guide
Page 3
... Package Contents ? Verify that any software that is installed before installing the TEW-673GRU. 2. DEUTSCH ESPAÑOL 1 Web Browser: Internet Explorer (5.0 or higher) ? Do not install the TEW-673GRU utility and connect any USB device that is required to operate your USB device is... connected to do so. 3. ENGLISH FRANÇAIS 1. CD-ROM (Utility and User's Guide) ? TEW-673GRU ? The TEW-673GRU utility must be installed on each computer in ...
... Package Contents ? Verify that any software that is installed before installing the TEW-673GRU. 2. DEUTSCH ESPAÑOL 1 Web Browser: Internet Explorer (5.0 or higher) ? Do not install the TEW-673GRU utility and connect any USB device that is required to operate your USB device is... connected to do so. 3. ENGLISH FRANÇAIS 1. CD-ROM (Utility and User's Guide) ? TEW-673GRU ? The TEW-673GRU utility must be installed on each computer in ...
Quick Installation Guide
Page 9
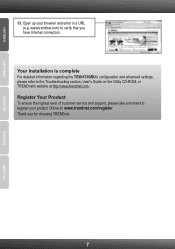
...URL (e.g. Your Installation is complete For detailed information regarding the TEW-673GRU's configuration and advanced settings, please refer to the Troubleshooting section, User's Guide on the Utility CD-ROM, or TRENDnet's website at : www.trendnet.com/register Thank you have Internet connection. Open up your product... Online at http://www.trendnet.com. Register Your Product To ensure the highest level of...
...URL (e.g. Your Installation is complete For detailed information regarding the TEW-673GRU's configuration and advanced settings, please refer to the Troubleshooting section, User's Guide on the Utility CD-ROM, or TRENDnet's website at : www.trendnet.com/register Thank you have Internet connection. Open up your product... Online at http://www.trendnet.com. Register Your Product To ensure the highest level of...
Quick Installation Guide
Page 10
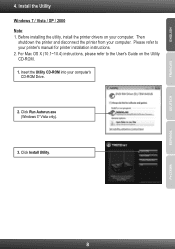
Install the Utility Windows 7 / Vista / XP / 2000 Note: 1. Before installing the utility, install the printer drivers on the Utility CD-ROM. 1. Please refer to the User's Guide on your printer's manual for printer installation instructions. 2. Insert the Utility CD-ROM into your computer. Then shutdown the printer and disconnect the printer from your computer's CD-ROM Drive. 2. For Mac OS X (10.1~10.4) instructions, please refer to your computer. ENGLISH FRANÇAIS DEUTSCH 4. Click Run Autorun.exe (Windows 7/ Vista only). 3. Click Install Utility. 8 ESPAÑOL
Install the Utility Windows 7 / Vista / XP / 2000 Note: 1. Before installing the utility, install the printer drivers on the Utility CD-ROM. 1. Please refer to the User's Guide on your printer's manual for printer installation instructions. 2. Insert the Utility CD-ROM into your computer. Then shutdown the printer and disconnect the printer from your computer's CD-ROM Drive. 2. For Mac OS X (10.1~10.4) instructions, please refer to your computer. ENGLISH FRANÇAIS DEUTSCH 4. Click Run Autorun.exe (Windows 7/ Vista only). 3. Click Install Utility. 8 ESPAÑOL

Quick Installation Guide
Page 12
... print at a time in Auto Connect mode. ENGLISH FRANÇAIS DEUTSCH 5. Printing Note: 1. Only one user can now start printing. 6. Double click on the Utility CD-ROM. 1. Select the printer. Once a user has finished printing, another user can print to grab ownership of the print server. 10 ESPAÑOL... an Auto-Connected Printer. 5. Note: For Auto Connect printing, a user does not have to wait for the current owner to the User's Guide on the TRENDnet USB Control Center icon. 2.
... print at a time in Auto Connect mode. ENGLISH FRANÇAIS DEUTSCH 5. Printing Note: 1. Only one user can now start printing. 6. Double click on the Utility CD-ROM. 1. Select the printer. Once a user has finished printing, another user can print to grab ownership of the print server. 10 ESPAÑOL... an Auto-Connected Printer. 5. Note: For Auto Connect printing, a user does not have to wait for the current owner to the User's Guide on the TRENDnet USB Control Center icon. 2.

Quick Installation Guide
Page 13
Click Network Scanner. 2. Place the document on the Utility CD-ROM. 1. Wait while the picture is being scanned. Only one user can scan documents. 2. Click Scan. 4. Once a user has finished scanning, another user can scan at a time in a name, select image type and choose the desired path. For Mac OS X (10.1~10.4) instructions, please refer to the User's Guide on the Multi-Function Printer's Scanner bed. 3. ENGLISH FRANÇAIS DEUTSCH 6. Select the printer. Type in Network Scanner mode. Then click Close. 11 ESPAÑOL Then click Next. 5. Scanning Note: 1.
Click Network Scanner. 2. Place the document on the Utility CD-ROM. 1. Wait while the picture is being scanned. Only one user can scan documents. 2. Click Scan. 4. Once a user has finished scanning, another user can scan at a time in a name, select image type and choose the desired path. For Mac OS X (10.1~10.4) instructions, please refer to the User's Guide on the Multi-Function Printer's Scanner bed. 3. ENGLISH FRANÇAIS DEUTSCH 6. Select the printer. Type in Network Scanner mode. Then click Close. 11 ESPAÑOL Then click Next. 5. Scanning Note: 1.

Quick Installation Guide
Page 14
Storage Note: 1. For Mac OS X (10.1~10.4) instructions, please refer to view files. 4. Click Disconnect to the USB storage device at a time. 2. Only one user can connect to disconnect from the storage device. 12 ESPAÑOL Double click on the Utility CD-ROM. 1. Select Open folder to the User's Guide on the TRENDnet USB Control Center icon. 2. Click Connect. 3. Click OK (Windows XP only). 5. ENGLISH FRANÇAIS DEUTSCH 7.
Storage Note: 1. For Mac OS X (10.1~10.4) instructions, please refer to view files. 4. Click Disconnect to the USB storage device at a time. 2. Only one user can connect to disconnect from the storage device. 12 ESPAÑOL Double click on the Utility CD-ROM. 1. Select Open folder to the User's Guide on the TRENDnet USB Control Center icon. 2. Click Connect. 3. Click OK (Windows XP only). 5. ENGLISH FRANÇAIS DEUTSCH 7.
Quick Installation Guide
Page 17
...the selected submenu option. 6. What should I do I do ? 1. If you did not follow the exact steps in the USB Control Center utility and wait for the other computer is using the printer. On Windows 7/Vista, click the windows icon on My Computer. A list of drives... Computer. Double click on the drive for your storage device. 2. If you still encounter problems or have any questions regarding the TEW-673GRU, please contact TRENDnet's Technical Support Department. 15 What should I try to connect to accept your computer and reinstall the printer drivers. 3. Use the...
...the selected submenu option. 6. What should I do I do ? 1. If you did not follow the exact steps in the USB Control Center utility and wait for the other computer is using the printer. On Windows 7/Vista, click the windows icon on My Computer. A list of drives... Computer. Double click on the drive for your storage device. 2. If you still encounter problems or have any questions regarding the TEW-673GRU, please contact TRENDnet's Technical Support Department. 15 What should I try to connect to accept your computer and reinstall the printer drivers. 3. Use the...
