Datasheet
Page 1
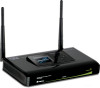
... data rates up to 300Mbps using an IEEE 802.11n connection • Network a USB flash drive, hard drive, or printer using software utility • 2 detachable antennas provide high-speed performance and expansive wireless coverage • Advanced firewall protection with ...with Internet Access Control; Gigabit Ethernet ports offer exceptional wired throughput performance. wireless 300Mbps Concurrent Dual Band Wireless N Gigabit Router TEW-673GRU(V1.0R) The 300Mbps Concurrent Dual Band Wireless N Gigabit Router delivers unsurpassed Dual Band wireless speed, coverage, and reliability...
... data rates up to 300Mbps using an IEEE 802.11n connection • Network a USB flash drive, hard drive, or printer using software utility • 2 detachable antennas provide high-speed performance and expansive wireless coverage • Advanced firewall protection with ...with Internet Access Control; Gigabit Ethernet ports offer exceptional wired throughput performance. wireless 300Mbps Concurrent Dual Band Wireless N Gigabit Router TEW-673GRU(V1.0R) The 300Mbps Concurrent Dual Band Wireless N Gigabit Router delivers unsurpassed Dual Band wireless speed, coverage, and reliability...
User's Guide
Page 6
... WPS Menu ...62 WPS ...62 Current PIN ...64 USB CONTROL CENTER UTILITY 65 Utility ...65 System...65 Configure Server ...66 Print Sharing ...66 Auto Connect Printer ...66 Network Scanner...67 Connecting USB Storage Device ...69 TECHNICAL SPECIFICATIONS 71 vi
... WPS Menu ...62 WPS ...62 Current PIN ...64 USB CONTROL CENTER UTILITY 65 Utility ...65 System...65 Configure Server ...66 Print Sharing ...66 Auto Connect Printer ...66 Network Scanner...67 Connecting USB Storage Device ...69 TECHNICAL SPECIFICATIONS 71 vi
User's Guide
Page 8
...and distribute files thus making good use of a button. for security and anti-hacking systems. 2 Resource sharing: Share resources such as printers, scanners and other on the less congested 5GHz frequency. Firewall: A built-in firewall function - Applications: Broadband Internet access: Several computers can...USB ports on the 2.4GHz frequency and the other peripherals. Share content by connecting USB flash drives, hard drives, or printers directly to the router. Wirelessly stream HD multimedia using the uncongested 5GHz frequency while surfing the Internet using the 2.4GHz ...
...and distribute files thus making good use of a button. for security and anti-hacking systems. 2 Resource sharing: Share resources such as printers, scanners and other on the less congested 5GHz frequency. Firewall: A built-in firewall function - Applications: Broadband Internet access: Several computers can...USB ports on the 2.4GHz frequency and the other peripherals. Share content by connecting USB flash drives, hard drives, or printers directly to the router. Wirelessly stream HD multimedia using the uncongested 5GHz frequency while surfing the Internet using the 2.4GHz ...
User's Guide
Page 9
..., PPPoE and PPTP ¾ High-speed data rates up to 300Mbps using an IEEE 802.11n connection ¾ Network a USB flash drive, hard drive, or printer using the Wi-Fi Protected Setup (WPS) button ¾ Complete wireless security with WPA/WPA2-RADIUS, WPA-PSK/WPA2- MAC, Protocol, and Domain filtering ¾...
..., PPPoE and PPTP ¾ High-speed data rates up to 300Mbps using an IEEE 802.11n connection ¾ Network a USB flash drive, hard drive, or printer using the Wi-Fi Protected Setup (WPS) button ¾ Complete wireless security with WPA/WPA2-RADIUS, WPA-PSK/WPA2- MAC, Protocol, and Domain filtering ¾...

User's Guide
Page 13
... be a useful tool when the manager forgot the password to login, and needs to restore the device back to share either USB storage devices or printers over the network. Rear Panel The figure below shows the rear panel of the 300Mbps Wireless N Dual Band Gigabit Router with USB Port. USB: Two...
... be a useful tool when the manager forgot the password to login, and needs to restore the device back to share either USB storage devices or printers over the network. Rear Panel The figure below shows the rear panel of the 300Mbps Wireless N Dual Band Gigabit Router with USB Port. USB: Two...
User's Guide
Page 72
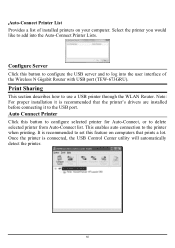
... USB Control Center utility will automatically detect the printer. 66 Select the printer you would like to the printer when printing. Print Sharing This section describes how to delete selected printer from Auto-Connect list. Note: For proper ...Printer Lists. It is recommended to set this button to configure the USB server and to the USB port. Auto Connect Printer Click this button to configure selected printer for Auto-Connect, or to use a USB printer through the WLAN Router. Auto-Connect Printer List Provides a list of the Wireless N Gigabit Router with USB port (TEW-673GRU...
... USB Control Center utility will automatically detect the printer. 66 Select the printer you would like to the printer when printing. Print Sharing This section describes how to delete selected printer from Auto-Connect list. Note: For proper ...Printer Lists. It is recommended to set this button to configure the USB server and to the USB port. Auto Connect Printer Click this button to configure selected printer for Auto-Connect, or to use a USB printer through the WLAN Router. Auto-Connect Printer List Provides a list of the Wireless N Gigabit Router with USB port (TEW-673GRU...

User's Guide
Page 73
Select the printer you click on the Network Scanner button on your computer. Paper Source: Select the type of scanner being used (Flatbed or Document Feeder) Type of ... would like to cancel scanning 67 Preview: Click to preview scanned image Scan: Click to begin scanning Cancel: Click to add into the Auto-Connect Printer Lists. Network Scanner This section describes the usage of file being scanned. Set Auto-Connect...
Select the printer you click on the Network Scanner button on your computer. Paper Source: Select the type of scanner being used (Flatbed or Document Feeder) Type of ... would like to cancel scanning 67 Preview: Click to preview scanned image Scan: Click to begin scanning Cancel: Click to add into the Auto-Connect Printer Lists. Network Scanner This section describes the usage of file being scanned. Set Auto-Connect...
Quick Installation Guide
Page 4
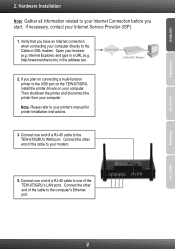
http://www.trendnet.com) in a URL (e.g. Internet Cable/DSL Modem 2. ESPAÑOL 2 Hardware Installation Note: Gather all information related to your Internet Connection before you have an ... address bar. Connect one end of a RJ-45 cable to the TEW-673GRU's WAN port. If you plan on connecting a multi-function printer to your computer. Note: Please refer to the USB port on the TEW-673GRU, install the printer drivers on your printer's manual for printer installation instructions. 3. Connect the other end of the cable to the...
http://www.trendnet.com) in a URL (e.g. Internet Cable/DSL Modem 2. ESPAÑOL 2 Hardware Installation Note: Gather all information related to your Internet Connection before you have an ... address bar. Connect one end of a RJ-45 cable to the TEW-673GRU's WAN port. If you plan on connecting a multi-function printer to your computer. Note: Please refer to the USB port on the TEW-673GRU, install the printer drivers on your printer's manual for printer installation instructions. 3. Connect the other end of the cable to the...
Quick Installation Guide
Page 5
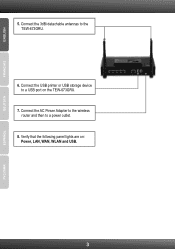
Connect the 3dBi detachable antennas to a power outlet. 8. Connect the AC Power Adapter to the wireless router and then to the TEW-673GRU. 6. Verify that the following panel lights are on the TEW-673GRU. 7. Connect the USB printer or USB storage device to a USB port on : Power, LAN, WAN, WLAN and USB. 3 ENGLISH FRANÇAIS DEUTSCH ESPAÑOL 5.
Connect the 3dBi detachable antennas to a power outlet. 8. Connect the AC Power Adapter to the wireless router and then to the TEW-673GRU. 6. Verify that the following panel lights are on the TEW-673GRU. 7. Connect the USB printer or USB storage device to a USB port on : Power, LAN, WAN, WLAN and USB. 3 ENGLISH FRANÇAIS DEUTSCH ESPAÑOL 5.
Quick Installation Guide
Page 10
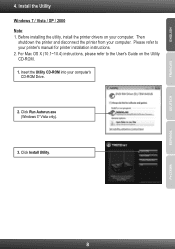
Then shutdown the printer and disconnect the printer from your computer's CD-ROM Drive. 2. Before installing the utility, install the printer drivers on the Utility CD-ROM. 1. Insert the Utility CD-ROM into your computer. Please refer to the User's Guide on your printer's manual for printer installation instructions. 2. Click Run Autorun.exe (Windows 7/ Vista only). 3. For Mac OS X (10.1~10.4) instructions, please refer to your computer. Click Install Utility. 8 ESPAÑOL ENGLISH FRANÇAIS DEUTSCH 4. Install the Utility Windows 7 / Vista / XP / 2000 Note: 1.
Then shutdown the printer and disconnect the printer from your computer's CD-ROM Drive. 2. Before installing the utility, install the printer drivers on the Utility CD-ROM. 1. Insert the Utility CD-ROM into your computer. Please refer to the User's Guide on your printer's manual for printer installation instructions. 2. Click Run Autorun.exe (Windows 7/ Vista only). 3. For Mac OS X (10.1~10.4) instructions, please refer to your computer. Click Install Utility. 8 ESPAÑOL ENGLISH FRANÇAIS DEUTSCH 4. Install the Utility Windows 7 / Vista / XP / 2000 Note: 1.

Quick Installation Guide
Page 12
... a user has finished printing, another user can now start printing. 6. Select the printer. Select the desired printer and click Apply. 4. User can print to the User's Guide on the TRENDnet USB Control Center icon. 2. Follow step 1 to click disconnect. Select the printer. Note: For Auto Connect printing, a user does not have to wait for...
... a user has finished printing, another user can now start printing. 6. Select the printer. Select the desired printer and click Apply. 4. User can print to the User's Guide on the TRENDnet USB Control Center icon. 2. Follow step 1 to click disconnect. Select the printer. Note: For Auto Connect printing, a user does not have to wait for...

Quick Installation Guide
Page 13
Click Network Scanner. 2. Then click Next. 5. Only one user can scan documents. 2. Then click Close. 11 ESPAÑOL ENGLISH FRANÇAIS DEUTSCH 6. Place the document on the Utility CD-ROM. 1. Click Scan. 4. For Mac OS X (10.1~10.4) instructions, please refer to the User's Guide on the Multi-Function Printer's Scanner bed. 3. Type in Network Scanner mode. Once a user has finished scanning, another user can scan at a time in a name, select image type and choose the desired path. Wait while the picture is being scanned. Scanning Note: 1. Select the printer.
Click Network Scanner. 2. Then click Next. 5. Only one user can scan documents. 2. Then click Close. 11 ESPAÑOL ENGLISH FRANÇAIS DEUTSCH 6. Place the document on the Utility CD-ROM. 1. Click Scan. 4. For Mac OS X (10.1~10.4) instructions, please refer to the User's Guide on the Multi-Function Printer's Scanner bed. 3. Type in Network Scanner mode. Once a user has finished scanning, another user can scan at a time in a name, select image type and choose the desired path. Wait while the picture is being scanned. Scanning Note: 1. Select the printer.
Quick Installation Guide
Page 17
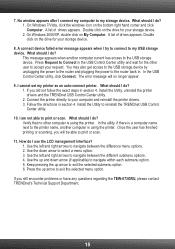
...I do ? 1. What should I do I cannot set my printer as an auto-connect printer. Once the user has finished printing or scanning, you still encounter problems or have any questions regarding the TEW-673GRU, please contact TRENDnet's Technical Support Department. 15 Use the left and right arrows to... the USB storage device. Use the up and down arrow to accept your computer and reinstall the printer drivers. 3. Keep pressing the up...
...I do ? 1. What should I do I cannot set my printer as an auto-connect printer. Once the user has finished printing or scanning, you still encounter problems or have any questions regarding the TEW-673GRU, please contact TRENDnet's Technical Support Department. 15 Use the left and right arrows to... the USB storage device. Use the up and down arrow to accept your computer and reinstall the printer drivers. 3. Keep pressing the up...
