
Datasheet
Page 1
...and compliant with IEEE 802.11b/g standards • Wi-Fi Protected Setup (WPS) connects wireless clients at the push of a button • Wi-Fi Multimedia (WMM) Quality of Service (QoS) technology prioritizes video and audio packets. TEW-650AP rev:09.08.2010 FEATURES • Compact high performance wireless n ... wireless encryption • Supports 64/128-bit WEP, WPA/WPA2-RADIUS (AP mode only) and WPA/WPA2-PSK • Quick and easy setup wizard supports Windows 7/Vista/XP Operating Systems • Indoor coverage up to 100 meters (328ft.)* • Outdoor coverage up to 4 SSIDs with ...
...and compliant with IEEE 802.11b/g standards • Wi-Fi Protected Setup (WPS) connects wireless clients at the push of a button • Wi-Fi Multimedia (WMM) Quality of Service (QoS) technology prioritizes video and audio packets. TEW-650AP rev:09.08.2010 FEATURES • Compact high performance wireless n ... wireless encryption • Supports 64/128-bit WEP, WPA/WPA2-RADIUS (AP mode only) and WPA/WPA2-PSK • Quick and easy setup wizard supports Windows 7/Vista/XP Operating Systems • Indoor coverage up to 100 meters (328ft.)* • Outdoor coverage up to 4 SSIDs with ...
User's Guide
Page 8
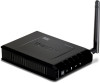
Introduction The 150Mbps Wireless N Access Point, model TEW-650AP, is designed to create a scalable high speed wireless n network ...A convenient on IEEE 802.11n (draft 2.0) technology and compliant with IEEE 802.11b/g standards z Wi-Fi Protected Setup (WPS) connects wireless clients at the push of a button z Wi-Fi Multimedia (WMM) Quality of Service (QoS... z Supports 64/128-bit WEP, WPA/WPA2-RADIUS (AP mode only) and WPA/WPA2-PSK z Quick and easy setup wizard supports Windows 7/Vista/XP Operating Systems z Indoor coverage up to 100 meters (328ft.)* z Outdoor coverage up to 300 meters...
Introduction The 150Mbps Wireless N Access Point, model TEW-650AP, is designed to create a scalable high speed wireless n network ...A convenient on IEEE 802.11n (draft 2.0) technology and compliant with IEEE 802.11b/g standards z Wi-Fi Protected Setup (WPS) connects wireless clients at the push of a button z Wi-Fi Multimedia (WMM) Quality of Service (QoS... z Supports 64/128-bit WEP, WPA/WPA2-RADIUS (AP mode only) and WPA/WPA2-PSK z Quick and easy setup wizard supports Windows 7/Vista/XP Operating Systems z Indoor coverage up to 100 meters (328ft.)* z Outdoor coverage up to 300 meters...

User's Guide
Page 12
Read the License Agreement and click Next to the LAN port on your CD-ROM drive. 2. Click Setup Wizard button. 3. Insert Setup Wizard CD into your monitor. The Welcome screen appears on the TEW-650AP, click Next button to continue. Connect an Ethernet cable from the LAN port on your Router to continue the installation. 4. Getting Started For a typical wireless setup at home or office, please do the following: 1. Page 12
Read the License Agreement and click Next to the LAN port on your CD-ROM drive. 2. Click Setup Wizard button. 3. Insert Setup Wizard CD into your monitor. The Welcome screen appears on the TEW-650AP, click Next button to continue. Connect an Ethernet cable from the LAN port on your Router to continue the installation. 4. Getting Started For a typical wireless setup at home or office, please do the following: 1. Page 12

User's Guide
Page 19
Read the License Agreement and click Next to continue. Insert Setup Wizard CD into your monitor. Page 19 Click Setup Wizard button. 3. Connect an Ethernet cable from the LAN port on your Router to the LAN port on your CD-ROM drive. 2. AP CLIENT MODE For a typical wireless setup at home, please do the following: 1. The Welcome screen appears on the TEW-650AP, click Next button to continue the installation. 4.
Read the License Agreement and click Next to continue. Insert Setup Wizard CD into your monitor. Page 19 Click Setup Wizard button. 3. Connect an Ethernet cable from the LAN port on your Router to the LAN port on your CD-ROM drive. 2. AP CLIENT MODE For a typical wireless setup at home, please do the following: 1. The Welcome screen appears on the TEW-650AP, click Next button to continue the installation. 4.

Quick Installation Guide
Page 4
Insert Utility CD-ROM into your wireless network. 2. Click Run Setup.exe (Windows 7/Vista only) 3. Disable any anti-virus and firewall programs before starting hardware installation. Click Setup Wizard. 4. 2. The best place for the Access Point. Hardware Installation Note: 1. For Windows Users 1. Click I accept the terms in the License Agreement and then click Next. 2 Locate an optimum location for the Access Point is usually at the center of your computer's CD-ROM drive. 2.
Insert Utility CD-ROM into your wireless network. 2. Click Run Setup.exe (Windows 7/Vista only) 3. Disable any anti-virus and firewall programs before starting hardware installation. Click Setup Wizard. 4. 2. The best place for the Access Point. Hardware Installation Note: 1. For Windows Users 1. Click I accept the terms in the License Agreement and then click Next. 2 Locate an optimum location for the Access Point is usually at the center of your computer's CD-ROM drive. 2.


