User Guide
Page 12
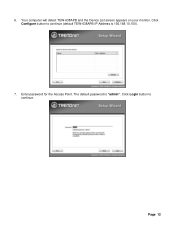
Click Login button to continue (default TEW-638APB IP Address is "admin". The default password is 192.168.10.100). 7. Your computer will detect TEW-638APB and the Device List screen appears on your monitor. Page 12 6. Click Configure button to continue. Enter password for the Access Point.
Click Login button to continue (default TEW-638APB IP Address is "admin". The default password is 192.168.10.100). 7. Your computer will detect TEW-638APB and the Device List screen appears on your monitor. Page 12 6. Click Configure button to continue. Enter password for the Access Point.
User Guide
Page 14
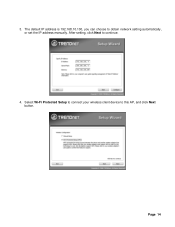
After setting, click Next to obtain network setting automatically, or set the IP address manually. The default IP address is 192.168.10.100, you can choose to continue. 4. Select Wi-Fi Protected Setup to connect your wireless client device to this AP, and click Next button. Page 14 3.
After setting, click Next to obtain network setting automatically, or set the IP address manually. The default IP address is 192.168.10.100, you can choose to continue. 4. Select Wi-Fi Protected Setup to connect your wireless client device to this AP, and click Next button. Page 14 3.
User Guide
Page 22
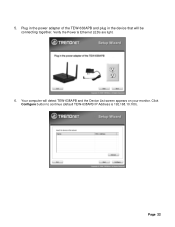
Your computer will be connecting together. Verify the Power & Ethernet LEDs are light. 6. Page 22 5. Plug in the power adapter of the TEW-638APB and plug in the device that will detect TEW-638APB and the Device List screen appears on your monitor. Click Configure button to continue (default TEW-638APB IP Address is 192.168.10.100).
Your computer will be connecting together. Verify the Power & Ethernet LEDs are light. 6. Page 22 5. Plug in the power adapter of the TEW-638APB and plug in the device that will detect TEW-638APB and the Device List screen appears on your monitor. Click Configure button to continue (default TEW-638APB IP Address is 192.168.10.100).
User Guide
Page 25
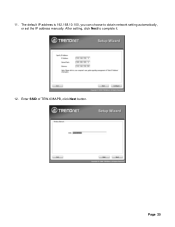
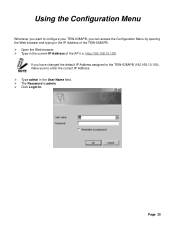
Enter SSID of TEW-638APB, click Next button. Page 25 The default IP address is 192.168.10.100, you can choose to complete it. 12. 11. After setting, click Next to obtain network setting automatically, or set the IP address manually.
Enter SSID of TEW-638APB, click Next button. Page 25 The default IP address is 192.168.10.100, you can choose to complete it. 12. 11. After setting, click Next to obtain network setting automatically, or set the IP address manually.
User Guide
Page 35
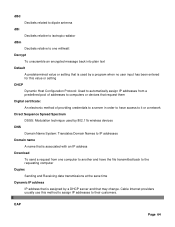
If you can access the Configuration Menu by opening the Web-browser and typing in the IP Address of the AP (i.e. Page 35 Using the Configuration Menu Whenever you want to configure your TEW-638APB, you have changed the default IP Address assigned to the TEW-638APB (192.168.10.100), make sure to enter the correct IP Address. ¾ Type admin in the current IP Address of the TEW-638APB. ¾ Open the Web browser. ¾ Type in the User Name field. ¾ The Password is admin. ¾ Click Login In. http://192.168.10.100).
If you can access the Configuration Menu by opening the Web-browser and typing in the IP Address of the AP (i.e. Page 35 Using the Configuration Menu Whenever you want to configure your TEW-638APB, you have changed the default IP Address assigned to the TEW-638APB (192.168.10.100), make sure to enter the correct IP Address. ¾ Type admin in the current IP Address of the TEW-638APB. ¾ Open the Web browser. ¾ Type in the User Name field. ¾ The Password is admin. ¾ Click Login In. http://192.168.10.100).

User Guide
Page 38
... fields. Assign any other reason you want the router to assign an IP address to the AP. IP Address The IP address of the router on the local area network. Default Gateway The IP address of the AP on the IP Address and Subnet Mask assigned in the range of the local area network.... LAN Connection Type Choose "Static IP (fixed IP)" if your router supports DHCP and you need to assign a fixed address ...
... fields. Assign any other reason you want the router to assign an IP address to the AP. IP Address The IP address of the router on the local area network. Default Gateway The IP address of the AP on the IP Address and Subnet Mask assigned in the range of the local area network.... LAN Connection Type Choose "Static IP (fixed IP)" if your router supports DHCP and you need to assign a fixed address ...
User Guide
Page 64
...providers usually use this value or setting DHCP Dynamic Host Configuration Protocol: Used to automatically assign IP addresses from one milliwatt Decrypt To unscramble an encrypted message back into plain text Default A predetermined value or setting that is used by a DHCP server and that request them ...a program when no user input has been entered for this method to assign IP addresses to the requesting computer Duplex Sending and Receiving data transmissions at the sane time Dynamic IP address IP address that is assigned by 802.11b wireless devices DNS Domain Name System: Translates...
...providers usually use this value or setting DHCP Dynamic Host Configuration Protocol: Used to automatically assign IP addresses from one milliwatt Decrypt To unscramble an encrypted message back into plain text Default A predetermined value or setting that is used by a DHCP server and that request them ...a program when no user input has been entered for this method to assign IP addresses to the requesting computer Duplex Sending and Receiving data transmissions at the sane time Dynamic IP address IP address that is assigned by 802.11b wireless devices DNS Domain Name System: Translates...
Quick Installation Guide
Page 6
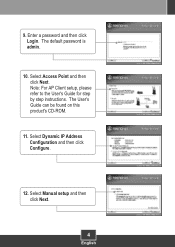
The default password is admin. 10. Select Manual setup and then click Next. 4 English Select Access Point and then click Next. Note: For AP Client setup, please refer to the User's Guide for step by step instructions. Select Dynamic IP Address Configuration and then click Configure. 12. The User's Guide can be found on this product's CD-ROM. 11. 9. Enter a password and then click Login.
The default password is admin. 10. Select Manual setup and then click Next. 4 English Select Access Point and then click Next. Note: For AP Client setup, please refer to the User's Guide for step by step instructions. Select Dynamic IP Address Configuration and then click Configure. 12. The User's Guide can be found on this product's CD-ROM. 11. 9. Enter a password and then click Login.


