
User Guide
Page 2
If this equipment does cause harmful interference to radio or television reception, which the receiver is subject to correct the interference by turning the equipment off and on a circuit different from that to provide reasonable protection against harmful interference in accordance with Part 15 of the following two conditions: (1) This device may not cause harmful interference, and (2) this equipment. This transmitter must accept any other antenna or transmitter. Operation is connected. This equipment should be installed and operated with FCC radiation exposure ...
If this equipment does cause harmful interference to radio or television reception, which the receiver is subject to correct the interference by turning the equipment off and on a circuit different from that to provide reasonable protection against harmful interference in accordance with Part 15 of the following two conditions: (1) This device may not cause harmful interference, and (2) this equipment. This transmitter must accept any other antenna or transmitter. Operation is connected. This equipment should be installed and operated with FCC radiation exposure ...
User Guide
Page 3
Compliance with the R&TTE Directive (1999/5/EC), the EMC Directive (89/336/EEC) and the Low Voltage Directive (73/23/EEC) issued by the Commission of their respective owners and are acknowledged. 3 European Union Notice: Radio products with the CE marking comply with these directives implies conformity to the following European Norms: z EN 60950 Product Safety z EN 300 328 Technical requirement for radio equipment z EN 301 489-1/-17 General EMC requirements for radio equipment Trademark recognition All product names used in this manual are the properties of the European Community.
Compliance with the R&TTE Directive (1999/5/EC), the EMC Directive (89/336/EEC) and the Low Voltage Directive (73/23/EEC) issued by the Commission of their respective owners and are acknowledged. 3 European Union Notice: Radio products with the CE marking comply with these directives implies conformity to the following European Norms: z EN 60950 Product Safety z EN 300 328 Technical requirement for radio equipment z EN 301 489-1/-17 General EMC requirements for radio equipment Trademark recognition All product names used in this manual are the properties of the European Community.
User Guide
Page 4
Table of Contents Getting Started with the TEW-638APB 5 Package Contents 5 Minimum System Requirements 5 Introduction 6 Features 6 Hardware Overview 7 Rear Panel 7 Front Panel 8 Installation Considerations 8 Getting Started 9 Access Point Mode 9 AP Client Mode 17 Using the Configuration Menu 29 Network 30 Wireless 32 Administrator 44 Glossary 48 4
Table of Contents Getting Started with the TEW-638APB 5 Package Contents 5 Minimum System Requirements 5 Introduction 6 Features 6 Hardware Overview 7 Rear Panel 7 Front Panel 8 Installation Considerations 8 Getting Started 9 Access Point Mode 9 AP Client Mode 17 Using the Configuration Menu 29 Network 30 Wireless 32 Administrator 44 Glossary 48 4
User Guide
Page 5
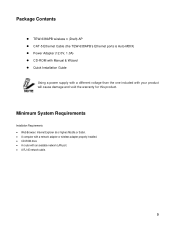
... installed. • CD-ROM drive • A router with your product will cause damage and void the warranty for this product. Package Contents z TEW-638APB wireless n (Draft) AP z CAT-5 Ethernet Cable (the TEW-638APB's Ethernet ports is Auto-MDIX) z Power Adapter (12.0V, 1.0A) z CD-ROM with Manual & Wizard z Quick Installation Guide Using a power supply...
... installed. • CD-ROM drive • A router with your product will cause damage and void the warranty for this product. Package Contents z TEW-638APB wireless n (Draft) AP z CAT-5 Ethernet Cable (the TEW-638APB's Ethernet ports is Auto-MDIX) z Power Adapter (12.0V, 1.0A) z CD-ROM with Manual & Wizard z Quick Installation Guide Using a power supply...

User Guide
Page 6
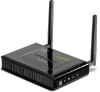
Features • Compact high performance wireless n access point • Wireless Bridge mode for the 802.11e Quality of Service (QoS) standard • 2 removable antennas to support high speed performance and expanded coverage • Supports Wi-Fi Protected Setup (WPS) feature allowing you to integrate other WPS devices into your network quickly • Indoor coverage up to 100 meters (328ft.)* • Outdoor coverage up to a 300Mbps data rate using an 802.wireless n • Expand a wireless network using Wireless Distribution System (WDS), Wireless Bridge and AP Client Modes....
Features • Compact high performance wireless n access point • Wireless Bridge mode for the 802.11e Quality of Service (QoS) standard • 2 removable antennas to support high speed performance and expanded coverage • Supports Wi-Fi Protected Setup (WPS) feature allowing you to integrate other WPS devices into your network quickly • Indoor coverage up to 100 meters (328ft.)* • Outdoor coverage up to a 300Mbps data rate using an 802.wireless n • Expand a wireless network using Wireless Distribution System (WDS), Wireless Bridge and AP Client Modes....

User Guide
Page 7
DC-IN The DC power input connector is a single jack socket to supply power to Router. Hardware Overview Rear View Auto MDI/MDIX 10/100Mbps LAN Ports This port automatically senses the cable type when connecting to the TEW-638APB. Reset Button Pressing the reset button restores the AP to its original factory default settings. Please use the Power Adapter provided on the TEW-638APB package. 7
DC-IN The DC power input connector is a single jack socket to supply power to Router. Hardware Overview Rear View Auto MDI/MDIX 10/100Mbps LAN Ports This port automatically senses the cable type when connecting to the TEW-638APB. Reset Button Pressing the reset button restores the AP to its original factory default settings. Please use the Power Adapter provided on the TEW-638APB package. 7
User Guide
Page 8
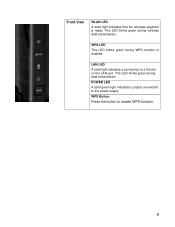
This LED blinks green during WPS function is ready. WPS LED This LED blinks green during data transmission POWER LED A solid green light indicates a proper connection to the power supply WPS Button Press the button to a Router on the LAN port. Front View WLAN LED A solid light indicates that the wireless segment is enabled. This LED blinks green during wireless data transmission. LAN LED A solid light indicates a connection to enable WPS function. 8
This LED blinks green during WPS function is ready. WPS LED This LED blinks green during data transmission POWER LED A solid green light indicates a proper connection to the power supply WPS Button Press the button to a Router on the LAN port. Front View WLAN LED A solid light indicates that the wireless segment is enabled. This LED blinks green during wireless data transmission. LAN LED A solid light indicates a connection to enable WPS function. 8
User Guide
Page 9
...ceiling can impede the wireless signal - a solid metal door or aluminum studs may limit the range. Typical ranges vary depending on range. Installation Considerations The TEW-638APB AP lets you access your network, using a wireless connection, from 3-90 feet (1-30 meters.) Position your devices so that the number of walls or ...ceilings is minimized. 2 Be aware of the direct line between the TEW-638APB and other network devices to a minimum - At a 2-degree angle it looks over 42 feet (14 meters) thick!
...ceiling can impede the wireless signal - a solid metal door or aluminum studs may limit the range. Typical ranges vary depending on range. Installation Considerations The TEW-638APB AP lets you access your network, using a wireless connection, from 3-90 feet (1-30 meters.) Position your devices so that the number of walls or ...ceilings is minimized. 2 Be aware of the direct line between the TEW-638APB and other network devices to a minimum - At a 2-degree angle it looks over 42 feet (14 meters) thick!

User Guide
Page 10
The Welcome screen appears on your CD-ROM drive. 2. Page 10 Read the License Agreement and click Next to continue the installation. Click Setup Wizard button. 3. Insert Setup Wizard CD into your monitor. Getting Started For a typical wireless setup at home or office, please do the following: 1.
The Welcome screen appears on your CD-ROM drive. 2. Page 10 Read the License Agreement and click Next to continue the installation. Click Setup Wizard button. 3. Insert Setup Wizard CD into your monitor. Getting Started For a typical wireless setup at home or office, please do the following: 1.

User Guide
Page 11
Connect an Ethernet cable from the LAN port on your Router to the LAN port on the TEW-638APB, click Next button to continue. 5. Page 11 Verify the Power & Ethernet LEDs are light. 4. Plug in the power adapter of the TEW-638APB and plug in the device that will be connecting together.
Connect an Ethernet cable from the LAN port on your Router to the LAN port on the TEW-638APB, click Next button to continue. 5. Page 11 Verify the Power & Ethernet LEDs are light. 4. Plug in the power adapter of the TEW-638APB and plug in the device that will be connecting together.
User Guide
Page 12
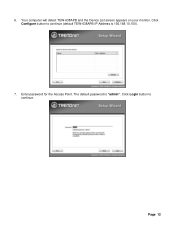
Enter password for the Access Point. The default password is 192.168.10.100). 7. Click Login button to continue (default TEW-638APB IP Address is "admin". Click Configure button to continue. Page 12 Your computer will detect TEW-638APB and the Device List screen appears on your monitor. 6.
Enter password for the Access Point. The default password is 192.168.10.100). 7. Click Login button to continue (default TEW-638APB IP Address is "admin". Click Configure button to continue. Page 12 Your computer will detect TEW-638APB and the Device List screen appears on your monitor. 6.
User Guide
Page 13
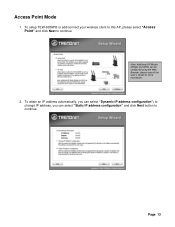
To setup TEW-638APB or add/connect your wireless client to this AP, please select "Access Point" and click Next to change IP address, you can select "Dynamic IP address configuration"; Page 13 To attain an IP address automatically, you can be configured using the Web Browser, please consult the User's Guide for more information. 2. to continue Note: Additional AP Modes (Bridge and WDS) can select "Static IP address configuration" and click Next button to continue. Access Point Mode 1.
To setup TEW-638APB or add/connect your wireless client to this AP, please select "Access Point" and click Next to change IP address, you can select "Dynamic IP address configuration"; Page 13 To attain an IP address automatically, you can be configured using the Web Browser, please consult the User's Guide for more information. 2. to continue Note: Additional AP Modes (Bridge and WDS) can select "Static IP address configuration" and click Next button to continue. Access Point Mode 1.
User Guide
Page 14
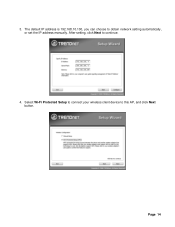
After setting, click Next to this AP, and click Next button. Select Wi-Fi Protected Setup to connect your wireless client device to continue. 4. The default IP address is 192.168.10.100, you can choose to obtain network setting automatically, or set the IP address manually. 3. Page 14
After setting, click Next to this AP, and click Next button. Select Wi-Fi Protected Setup to connect your wireless client device to continue. 4. The default IP address is 192.168.10.100, you can choose to obtain network setting automatically, or set the IP address manually. 3. Page 14
User Guide
Page 15
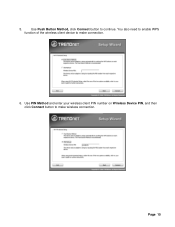
Page 15 Use PIN Method and enter your wireless client PIN number on Wireless Device PIN, and then click Connect button to make connection. 6. You also need to enable WPS function of the wireless client device to continue. 5. Use Push Button Method, click Connect button to make wireless connection.
Page 15 Use PIN Method and enter your wireless client PIN number on Wireless Device PIN, and then click Connect button to make connection. 6. You also need to enable WPS function of the wireless client device to continue. 5. Use Push Button Method, click Connect button to make wireless connection.

User Guide
Page 16
To set TEW-638APB security, select Manual setup and click Next button 8. Enter SSID of TEW-638APB, click Next button. Page 16 7.
To set TEW-638APB security, select Manual setup and click Next button 8. Enter SSID of TEW-638APB, click Next button. Page 16 7.
User Guide
Page 17
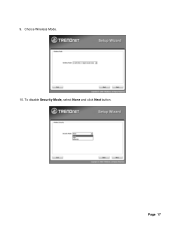
To disable Security Mode, select None and click Next button. Choice Wireless Mode. 10. Page 17 9.
To disable Security Mode, select None and click Next button. Choice Wireless Mode. 10. Page 17 9.
User Guide
Page 18
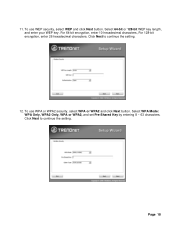
Select 64-bit or 128-bit WEP key length, and enter your WEP key. 11. To use WEP security, select WEP and click Next button. Click Next to continue the setting. 12. For 64-bit encryption, enter 10 hexadecimal characters, For 128-bit encryption, enter 26 hexadecimal characters. Click Next to continue the setting. Select WPA Mode: WPA Only, WPA2 Only, WPA or WPA2, and set Pre-Shared Key by entering 8 ~ 63 characters. Page 18 To use WPA or WPA2 security, select WPA or WPA2 and click Next button.
Select 64-bit or 128-bit WEP key length, and enter your WEP key. 11. To use WEP security, select WEP and click Next button. Click Next to continue the setting. 12. For 64-bit encryption, enter 10 hexadecimal characters, For 128-bit encryption, enter 26 hexadecimal characters. Click Next to continue the setting. Select WPA Mode: WPA Only, WPA2 Only, WPA or WPA2, and set Pre-Shared Key by entering 8 ~ 63 characters. Page 18 To use WPA or WPA2 security, select WPA or WPA2 and click Next button.

User Guide
Page 19
13. Once finished, click Configure to a text file in a desired location. It is recommended that you setting to continue. 14. Save you save or print your new settings. Confirm your wireless settings with the Save or Print buttons. Page 19
13. Once finished, click Configure to a text file in a desired location. It is recommended that you setting to continue. 14. Save you save or print your new settings. Confirm your wireless settings with the Save or Print buttons. Page 19
User Guide
Page 20
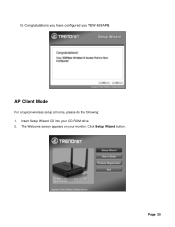
AP Client Mode For a typical wireless setup at home, please do the following: 1. Click Setup Wizard button. The Welcome screen appears on your CD-ROM drive. 2. Congratulations you have configured you TEW-638APB. Insert Setup Wizard CD into your monitor. Page 20 15.
AP Client Mode For a typical wireless setup at home, please do the following: 1. Click Setup Wizard button. The Welcome screen appears on your CD-ROM drive. 2. Congratulations you have configured you TEW-638APB. Insert Setup Wizard CD into your monitor. Page 20 15.

User Guide
Page 21
Read the License Agreement and click Next to continue. Page 21 3. Connect an Ethernet cable from the LAN port on your Router to the LAN port on the TEW-638APB, click Next button to continue the installation. 4.
Read the License Agreement and click Next to continue. Page 21 3. Connect an Ethernet cable from the LAN port on your Router to the LAN port on the TEW-638APB, click Next button to continue the installation. 4.
