

User's Guide
Page 6
Statistic ...41 Wireless ...42 Routing ...43 Static ...43 Dynamic ...44 Routing Table ...45 Access ...46 Filters ...46 Virtual Server...49 Special AP...50 DMZ ...51 Firewall Settings ...52 Management ...53 Remote Management ...53 Tools ...55 Restart ...55 Settings ...56 Firmware ...57 Ping Test ...58 USB CONTROL CENTER UTILITY 59 Utility ...59 System ...59 Tools ...59 Auto-Connect Printer List ...59 Print Sharing ...60 Auto Connect Printer ...60 Set Auto-Connect Printer...60 Network Scanner...61 Connecting USB Storage Device ...62 TECHNICAL SPECIFICATIONS 64 vi
Statistic ...41 Wireless ...42 Routing ...43 Static ...43 Dynamic ...44 Routing Table ...45 Access ...46 Filters ...46 Virtual Server...49 Special AP...50 DMZ ...51 Firewall Settings ...52 Management ...53 Remote Management ...53 Tools ...55 Restart ...55 Settings ...56 Firmware ...57 Ping Test ...58 USB CONTROL CENTER UTILITY 59 Utility ...59 System ...59 Tools ...59 Auto-Connect Printer List ...59 Print Sharing ...60 Auto Connect Printer ...60 Set Auto-Connect Printer...60 Network Scanner...61 Connecting USB Storage Device ...62 TECHNICAL SPECIFICATIONS 64 vi

User's Guide
Page 7
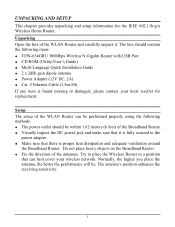
...Lists the technical (general, physical and environmental, performance and Routers settings) specifications of this 300Mbps Wireless N Gigabit Router with USB Port. If you get started with USB Port. Note: Run the CD and follow the steps in the Quick Installation Guide first to configure and operate for ... your purchase of the IEEE 802.11b/g/n Wireless Home Router. This integrated access device combines Internet gateway functions with USB Port. Helps you still have problems after doing so then proceed to the following paragraphs to your 300Mbps Wireless N Gigabit Router with...
...Lists the technical (general, physical and environmental, performance and Routers settings) specifications of this 300Mbps Wireless N Gigabit Router with USB Port. If you get started with USB Port. Note: Run the CD and follow the steps in the Quick Installation Guide first to configure and operate for ... your purchase of the IEEE 802.11b/g/n Wireless Home Router. This integrated access device combines Internet gateway functions with USB Port. Helps you still have problems after doing so then proceed to the following paragraphs to your 300Mbps Wireless N Gigabit Router with...
User's Guide
Page 11
... antenna, the better the performance will be performed properly using the following methods: ‹ The power outlet should contain the following items: ‹ TEW-634GRU 300Mbps Wireless N Gigabit Router with USB Port ‹ CD ROM (Utility/User's Guide) ‹ Multi-Language Quick Installation Guide ‹ 2 x 2dBi gain dipole antenna ‹ Power Adapter (12V...
... antenna, the better the performance will be performed properly using the following methods: ‹ The power outlet should contain the following items: ‹ TEW-634GRU 300Mbps Wireless N Gigabit Router with USB Port ‹ CD ROM (Utility/User's Guide) ‹ Multi-Language Quick Installation Guide ‹ 2 x 2dBi gain dipole antenna ‹ Power Adapter (12V...
User's Guide
Page 12
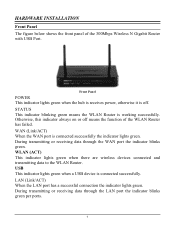
... lights green when a USB device is working successfully. LAN (Link/ACT) When the LAN port has a successful connection the indicator lights green. During transmitting or receiving data through the ... of the WLAN Router has failed. WAN (Link/ACT) When the WAN port is off means the function of the 300Mbps Wireless N Gigabit Router with USB Port. Front Panel POWER This indicator lights green when the hub is receives power, otherwise it is connected successfully the indicator lights green.
... lights green when a USB device is working successfully. LAN (Link/ACT) When the LAN port has a successful connection the indicator lights green. During transmitting or receiving data through the ... of the WLAN Router has failed. WAN (Link/ACT) When the WAN port is off means the function of the 300Mbps Wireless N Gigabit Router with USB Port. Front Panel POWER This indicator lights green when the hub is receives power, otherwise it is connected successfully the indicator lights green.

User's Guide
Page 13
WAN One 10/100/1000Mbps WAN port that connects to share either USB storage devices or printers over the network. USB One USB port to the xDSL/Cable modem for Internet connectivity. POWER Plug the power adapter to this power jack RESET Use a pin-shaped item to push ... to restore the device back to factory default settings. Rear Panel The figure below shows the rear panel of the 300Mbps Wireless N Gigabit Router with USB Port. Rear Panel Antenna There are two 2dBi gain antennas on the rear panel for connecting to 10Mbps, 100Mbps Ethernet or 10000Mbps Gigabit connections. LAN...
WAN One 10/100/1000Mbps WAN port that connects to share either USB storage devices or printers over the network. USB One USB port to the xDSL/Cable modem for Internet connectivity. POWER Plug the power adapter to this power jack RESET Use a pin-shaped item to push ... to restore the device back to factory default settings. Rear Panel The figure below shows the rear panel of the 300Mbps Wireless N Gigabit Router with USB Port. Rear Panel Antenna There are two 2dBi gain antennas on the rear panel for connecting to 10Mbps, 100Mbps Ethernet or 10000Mbps Gigabit connections. LAN...

User's Guide
Page 14
Side Panel The figure below shows the side panel of the switch back on a wall. It does not need to execute the Wi-Fi Protected Setup process. Hook the mounting holes of the 300Mbps Wireless N Gigabit Router with USB Port. Hanging Way User can mount the device on the screws and completed the wall-mount. 8 WPS (side panel) Push this button to mount the Nylon screw anchors into the Nylon screw anchors. Mount the Nylon screw anchors into a cement wall and then drive a screw into a wood wall.
Side Panel The figure below shows the side panel of the switch back on a wall. It does not need to execute the Wi-Fi Protected Setup process. Hook the mounting holes of the 300Mbps Wireless N Gigabit Router with USB Port. Hanging Way User can mount the device on the screws and completed the wall-mount. 8 WPS (side panel) Push this button to mount the Nylon screw anchors into the Nylon screw anchors. Mount the Nylon screw anchors into a cement wall and then drive a screw into a wood wall.

User's Guide
Page 65
... installed printers on . Select the printer you would like to your PC through the Wireless N Gigabit Router with USB port (TEW-634GRU). The utility allows you to enable/disable the ability to automatically run the USB Control Center Utility when your computer turns on your computer. System Select this feature to the WLAN Router...
... installed printers on . Select the printer you would like to your PC through the Wireless N Gigabit Router with USB port (TEW-634GRU). The utility allows you to enable/disable the ability to automatically run the USB Control Center Utility when your computer turns on your computer. System Select this feature to the WLAN Router...

User's Guide
Page 66
... Set Auto-Connect Printer Provides a list of the Wireless N Gigabit Router with USB port (TEW-634GRU). Configure Server Click this button to configure the USB server and to use a USB printer through the WLAN Router. Note: For proper installation it is connected, the USB Control Center utility will automatically detect the printer. Auto Connect Printer Click...
... Set Auto-Connect Printer Provides a list of the Wireless N Gigabit Router with USB port (TEW-634GRU). Configure Server Click this button to configure the USB server and to use a USB printer through the WLAN Router. Note: For proper installation it is connected, the USB Control Center utility will automatically detect the printer. Auto Connect Printer Click...
User's Guide
Page 67
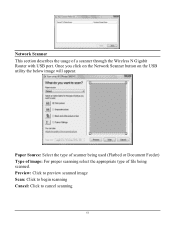
Paper Source: Select the type of scanner being used (Flatbed or Document Feeder) Type of image: For proper scanning select the appropriate type of a scanner through the Wireless N Gigabit Router with USB port. Preview: Click to preview scanned image Scan: Click to begin scanning Cancel: Click to cancel scanning 61 Network Scanner This section describes the usage of file being scanned. Once you click on the Network Scanner button on the USB utility the below image will appear.
Paper Source: Select the type of scanner being used (Flatbed or Document Feeder) Type of image: For proper scanning select the appropriate type of a scanner through the Wireless N Gigabit Router with USB port. Preview: Click to preview scanned image Scan: Click to begin scanning Cancel: Click to cancel scanning 61 Network Scanner This section describes the usage of file being scanned. Once you click on the Network Scanner button on the USB utility the below image will appear.

User's Guide
Page 68
Next: Click to begin scanning Cancel: Click to cancel scanning job and to return to back to USB storage device through the WLAN Router. 62 Connecting USB Storage Device This section describes the how to use the utility when connecting to the USB Utility. File Format: Select the file format Save Location: Click Browse and select the location where you would like to have the scanned files saved in . Name: Type the name of the folder you would like to have the scanned images stored in . Back: Click to return to tbe previous screen.
Next: Click to begin scanning Cancel: Click to cancel scanning job and to return to back to USB storage device through the WLAN Router. 62 Connecting USB Storage Device This section describes the how to use the utility when connecting to the USB Utility. File Format: Select the file format Save Location: Click Browse and select the location where you would like to have the scanned files saved in . Name: Type the name of the folder you would like to have the scanned images stored in . Back: Click to return to tbe previous screen.

User's Guide
Page 69
...by another computer would like to connect to the USB device and will automatically transfer to a USB device. Connect Click this button to establish connection to the selected USB device that another computer in your computer form the connected USB device. Request to Connect Click this button to... is not configured to approve or reject connection. Disconnect Click this button if the USB device you would like to ...
...by another computer would like to connect to the USB device and will automatically transfer to a USB device. Connect Click this button to establish connection to the selected USB device that another computer in your computer form the connected USB device. Request to Connect Click this button to... is not configured to approve or reject connection. Disconnect Click this button if the USB device you would like to ...

User's Guide
Page 70
...: IEEE 802.3/u Fast Ethernet, IEEE 802.3ab Gigabit Ethernet Wireless: IEEE 802.11b, IEEE 802.11g, IEEE 802.11n (draft 2.0), IEEE 802.11e QoS USB: v1.0, 1.1, 2.0 1 x 10/100/1000Mbps Auto-MDIX port (Internet) 4 x 10/100/1000Mbps Auto-MDIX ports Enable Wi-Fi Protected Setup function... A Port Dynamic IP, Static (Fixed) IP, PPPoE, PPTP, L2TP, BigPond MAC Address Filter, Domain/URL Filter, Protocol/IP Filter Power, LAN1~LAN4, WAN, WLAN, USB 12V DC, 2A external power adapter 18watts (max.) 201 x 115.8 x 37 mm ( 7.91 x 4.55 x 1.45 inches) W x D x H 383g (13.5 oz) Operation: 0°~ 40°C (32°...
...: IEEE 802.3/u Fast Ethernet, IEEE 802.3ab Gigabit Ethernet Wireless: IEEE 802.11b, IEEE 802.11g, IEEE 802.11n (draft 2.0), IEEE 802.11e QoS USB: v1.0, 1.1, 2.0 1 x 10/100/1000Mbps Auto-MDIX port (Internet) 4 x 10/100/1000Mbps Auto-MDIX ports Enable Wi-Fi Protected Setup function... A Port Dynamic IP, Static (Fixed) IP, PPPoE, PPTP, L2TP, BigPond MAC Address Filter, Domain/URL Filter, Protocol/IP Filter Power, LAN1~LAN4, WAN, WLAN, USB 12V DC, 2A external power adapter 18watts (max.) 201 x 115.8 x 37 mm ( 7.91 x 4.55 x 1.45 inches) W x D x H 383g (13.5 oz) Operation: 0°~ 40°C (32°...

Quick Installation Guide
Page 2
Before You Start 1 2. Using the USB port 9 Troubleshooting 15 Version 06.19.2009 Configure the Wireless Router 5 4. Table of Contents English ...1 1. Hardware Installation 3 3.
Before You Start 1 2. Using the USB port 9 Troubleshooting 15 Version 06.19.2009 Configure the Wireless Router 5 4. Table of Contents English ...1 1. Hardware Installation 3 3.

Quick Installation Guide
Page 3
Do not install the USB Control Center, connect printer to TEW-634GRU and connect computer to the router until instructed to use your multi-function printer or USB storage device. 1 English A computer with a wired or wireless network adapter properly installed ? 1. Multi-Language Quick ... ? Cat.5 Ethernet cable (1.5m/5ft) ? Before You Start Package Contents ? The USB Control Center must be installed on each computer in order to do so. 2. Broadband Internet ? Utility CD-ROM ? TEW-634GRU ? AC Power Adapter (12V, 2A) Installation Requirements ? Installed Cable or DSL Modem...
Do not install the USB Control Center, connect printer to TEW-634GRU and connect computer to the router until instructed to use your multi-function printer or USB storage device. 1 English A computer with a wired or wireless network adapter properly installed ? 1. Multi-Language Quick ... ? Cat.5 Ethernet cable (1.5m/5ft) ? Before You Start Package Contents ? The USB Control Center must be installed on each computer in order to do so. 2. Broadband Internet ? Utility CD-ROM ? TEW-634GRU ? AC Power Adapter (12V, 2A) Installation Requirements ? Installed Cable or DSL Modem...
Quick Installation Guide
Page 4
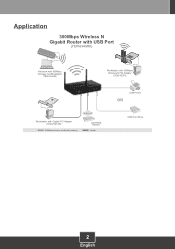
Application 300Mbps Wireless N Gigabit Router with USB Port (TEW-634GRU) Notebook with 300Mbps Wireless N USB Adapter (TEW-624UB) Workstation with 300Mbps Wireless N PCI Adapter (TEW-623PI) Internet Workstation with Gigabit PCI Adapter (TEG-PCITXR) 300Mbps wireless multimedia sharing Cable/DSL Modem Gigabit OR USB Printer USB Hard Drive 2 English
Application 300Mbps Wireless N Gigabit Router with USB Port (TEW-634GRU) Notebook with 300Mbps Wireless N USB Adapter (TEW-624UB) Workstation with 300Mbps Wireless N PCI Adapter (TEW-623PI) Internet Workstation with Gigabit PCI Adapter (TEG-PCITXR) 300Mbps wireless multimedia sharing Cable/DSL Modem Gigabit OR USB Printer USB Hard Drive 2 English

Quick Installation Guide
Page 5
... connection when connecting your computer directly to your browser (e.g. Verify that you plan on connecting a multifunction printer to the USB port on the TEW-634GRU, install the printer drivers to your computer. http://www.trendnet.com) in a URL (e.g. Internet Explorer) and type in the address bar. Then shutdown the printer and disconnect the printer...
... connection when connecting your computer directly to your browser (e.g. Verify that you plan on connecting a multifunction printer to the USB port on the TEW-634GRU, install the printer drivers to your computer. http://www.trendnet.com) in a URL (e.g. Internet Explorer) and type in the address bar. Then shutdown the printer and disconnect the printer...

Quick Installation Guide
Page 6
Connect the other end of a RJ-45 cable to the TEW-634GRU's WAN port. Connect one end of a RJ-45 cable to one end of the cable to the computer's Ethernet port. 5. Verify that the following panel lights are on: Power, LAN, WAN, WLAN and USB. 4 English Connect the AC Power Adapter to the wireless router and then to the TEW-634GRU. 6. Connect one of the cable to your modem. 4. 3. Connect the other end of the TEW-634GRU's LAN ports. Connect the 2dBi detachable antennas to a power outlet. 7.
Connect the other end of a RJ-45 cable to the TEW-634GRU's WAN port. Connect one end of a RJ-45 cable to one end of the cable to the computer's Ethernet port. 5. Verify that the following panel lights are on: Power, LAN, WAN, WLAN and USB. 4 English Connect the AC Power Adapter to the wireless router and then to the TEW-634GRU. 6. Connect one of the cable to your modem. 4. 3. Connect the other end of the TEW-634GRU's LAN ports. Connect the 2dBi detachable antennas to a power outlet. 7.

Quick Installation Guide
Page 11
4. Then shutdown the printer and disconnect the printer from your computer's CD-ROM Drive. 2. Click Install Utility. 4. Insert the Utility CD-ROM into your computer. Please refer to your printer's manual for printer installation instructions. 1. Click Run Autorun.exe (Windows Vista only). 3. Click Next. 9 English Using the USB port Install the Utility Note: Before installing the utility, install the printer drivers to your computer.
4. Then shutdown the printer and disconnect the printer from your computer's CD-ROM Drive. 2. Click Install Utility. 4. Insert the Utility CD-ROM into your computer. Please refer to your printer's manual for printer installation instructions. 1. Click Run Autorun.exe (Windows Vista only). 3. Click Next. 9 English Using the USB port Install the Utility Note: Before installing the utility, install the printer drivers to your computer.

Quick Installation Guide
Page 12
Connect the USB printer or USB storage device to the printer. 1. Once a user has finished printing, another user can print at a time in Auto Connect mode. Follow the InstallShield Wizard instructions. Click AutoConnect Printer and click Set AutoConnect Printer. 10 English Printing Note: Only one user can print to the USB port on the TRENDnet USB Control Center icon. 2. Select the printer. Double click on the TEW-634GRU. 5. Then click Finish. 6.
Connect the USB printer or USB storage device to the printer. 1. Once a user has finished printing, another user can print at a time in Auto Connect mode. Follow the InstallShield Wizard instructions. Click AutoConnect Printer and click Set AutoConnect Printer. 10 English Printing Note: Only one user can print to the USB port on the TRENDnet USB Control Center icon. 2. Select the printer. Double click on the TEW-634GRU. 5. Then click Finish. 6.

Quick Installation Guide
Page 13
Select the desired printer and click Apply. 4.Click OK. 5. Select the printer. The USB Device Control Center will now show the printer as an AutoConnected Printer. 6. Then click Disconnect. (Optional). Follow step 1 to click disconnect. User can now start printing. 7. Note: For Auto Connect printing, a user does not have to wait for the current owner to grab ownership of the print server. 11 English 3.
Select the desired printer and click Apply. 4.Click OK. 5. Select the printer. The USB Device Control Center will now show the printer as an AutoConnected Printer. 6. Then click Disconnect. (Optional). Follow step 1 to click disconnect. User can now start printing. 7. Note: For Auto Connect printing, a user does not have to wait for the current owner to grab ownership of the print server. 11 English 3.
