
User Guide
Page 5
... NETWORK TCP/IP SETTING 8 Windows 95/98/ME...8 Windows 2000 ...9 Windows XP ...10 CONFIGURATION 11 Login to the WLAN Router through Wireless LAN ...11 Login to the WLAN Router...11 Using the Web Browser...11 Setup Wizard...12 Advanced configuration...22 Main ...22 LAN & DHCP Server...22 WAN ...23 Password... ...24 Time ...25 Dynamic DNS...26 Wireless ...27 Basic ...27 Security ...28 Advanced ...30 Wi-Fi Protected Setup ...31 Status ......
... NETWORK TCP/IP SETTING 8 Windows 95/98/ME...8 Windows 2000 ...9 Windows XP ...10 CONFIGURATION 11 Login to the WLAN Router through Wireless LAN ...11 Login to the WLAN Router...11 Using the Web Browser...11 Setup Wizard...12 Advanced configuration...22 Main ...22 LAN & DHCP Server...22 WAN ...23 Password... ...24 Time ...25 Dynamic DNS...26 Wireless ...27 Basic ...27 Security ...28 Advanced ...30 Wi-Fi Protected Setup ...31 Status ......

User Guide
Page 7
... IEEE 802.11b/g/n Wireless Home Router. Overview of this IEEE 802.11b/g/n Wireless Broadband Router. Connecting the WLAN Router. Technical Specifications. Lists the technical (general, physical and environmental, performance and Routers settings) specifications of the IEEE 802.11b/g/n Wireless Home Router. If you get started...office resource sharing, and it is easy to setup your router. Identifying External Components. Tells how you can connect the IEEE 802.11b/g/n Wireless Home Router to install the router with wireless LAN and Fast Ethernet switch. Describes the front panel, ...
... IEEE 802.11b/g/n Wireless Home Router. Overview of this IEEE 802.11b/g/n Wireless Broadband Router. Connecting the WLAN Router. Technical Specifications. Lists the technical (general, physical and environmental, performance and Routers settings) specifications of the IEEE 802.11b/g/n Wireless Home Router. If you get started...office resource sharing, and it is easy to setup your router. Identifying External Components. Tells how you can connect the IEEE 802.11b/g/n Wireless Home Router to install the router with wireless LAN and Fast Ethernet switch. Describes the front panel, ...

User Guide
Page 10
... the better the performance will be performed properly using the following methods: ‹ The power outlet should contain the following items: ‹ TEW-632BRP Wireless N Home Router ‹ Easy Go Installation CD ‹ Multi-Language Quick Installation Guide ‹ 2 x 2dBi gain dipole antenna ‹ External power ...the box of the antennas. Do not place heavy objects on the Broadband Router. ‹ Fix the direction of the WLAN Router and carefully unpack it is fully secured to place the Wireless Router in a position that there is found missing or damaged, please contact your...
... the better the performance will be performed properly using the following methods: ‹ The power outlet should contain the following items: ‹ TEW-632BRP Wireless N Home Router ‹ Easy Go Installation CD ‹ Multi-Language Quick Installation Guide ‹ 2 x 2dBi gain dipole antenna ‹ External power ...the box of the antennas. Do not place heavy objects on the Broadband Router. ‹ Fix the direction of the WLAN Router and carefully unpack it is fully secured to place the Wireless Router in a position that there is found missing or damaged, please contact your...

User Guide
Page 11
.... WAN (Link/ACT) The indicators light green when the WAN port is off means the function of the IEEE 802.11b/g/n Wireless Home Router. Front Panel POWER This indicator lights green when the hub is receives power, otherwise it is connected to the WLAN...data from the xDSL/Cable modem. WLAN (ACT) This indicator lights green when there are wireless devices connected and transmitting data to a xDSL/Cable modem successfully. SYSTEM This indicator blinking green means the WLAN Router is working successfully. These indicators blinking green while the LAN ports were accessing data. 5...
.... WAN (Link/ACT) The indicators light green when the WAN port is off means the function of the IEEE 802.11b/g/n Wireless Home Router. Front Panel POWER This indicator lights green when the hub is receives power, otherwise it is connected to the WLAN...data from the xDSL/Cable modem. WLAN (ACT) This indicator lights green when there are wireless devices connected and transmitting data to a xDSL/Cable modem successfully. SYSTEM This indicator blinking green means the WLAN Router is working successfully. These indicators blinking green while the LAN ports were accessing data. 5...

User Guide
Page 12
... Internet connectivity. Side Panel The figure below shows the rear panel of the IEEE 802.11b/g/n Wireless Home Router. Rear Panel The figure below shows the side panel of the IEEE 802.11b/g/n Wireless Home Router. WAN In the four port broadband Router, there is an RJ-45 10/100Mbps Auto-MDIX port for... wireless connection. Rear Panel Antenna There are two 2dBi gain antennas on the rear panel for the WAN ...
... Internet connectivity. Side Panel The figure below shows the rear panel of the IEEE 802.11b/g/n Wireless Home Router. Rear Panel The figure below shows the side panel of the IEEE 802.11b/g/n Wireless Home Router. WAN In the four port broadband Router, there is an RJ-45 10/100Mbps Auto-MDIX port for... wireless connection. Rear Panel Antenna There are two 2dBi gain antennas on the rear panel for the WAN ...

User Guide
Page 13
... xDSL or Cable modem. 3. Then you can be seen instantly: 1. When the LAN Port is connected to the WAN port of the WLAN Router. Hardware connections Connecting the WLAN Router 1. With the power source on the computer system; When the WAN Port is connected to the unit. Plug in one WLAN... Router functions both as a connection-sharing unit and as a switch. Since the IEEE 802.11b/g/n Wireless Home Router has four ports, you do not have to buy a switch to connect these computers since one end...
... xDSL or Cable modem. 3. Then you can be seen instantly: 1. When the LAN Port is connected to the WAN port of the WLAN Router. Hardware connections Connecting the WLAN Router 1. With the power source on the computer system; When the WAN Port is connected to the unit. Plug in one WLAN... Router functions both as a connection-sharing unit and as a switch. Since the IEEE 802.11b/g/n Wireless Home Router has four ports, you do not have to buy a switch to connect these computers since one end...
User Guide
Page 17
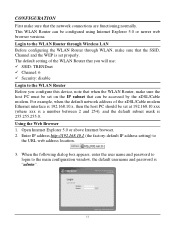
... WLAN Router that you will use: 9 SSID: TRENDnet 9 Channel: 6 9 Security: disable Login to the main configuration window, the default username and password is 255.255.255.0. When the following dialog box appears, enter the user name and password to login to the WLAN Router Before ...web browser versions. Enter IP address http://192.168.10.1 (the factory-default IP address setting) to the WLAN Router through Wireless LAN Before configuring the WLAN Router through WLAN, make sure that the network connections are functioning normally. The default setting of the xDSL/Cable modem ...
... WLAN Router that you will use: 9 SSID: TRENDnet 9 Channel: 6 9 Security: disable Login to the main configuration window, the default username and password is 255.255.255.0. When the following dialog box appears, enter the user name and password to login to the WLAN Router Before ...web browser versions. Enter IP address http://192.168.10.1 (the factory-default IP address setting) to the WLAN Router through Wireless LAN Before configuring the WLAN Router through WLAN, make sure that the network connections are functioning normally. The default setting of the xDSL/Cable modem ...

User Guide
Page 18
User can simply follow the step-by clicking on` the "Wizard" button on the function menu. The following screen will appear. Step 1: Set your new password Setting the new admin password of the web configuration utility. Step 2: Choose time zone Select the time zone from the drop down list. Please click "Next" to run in 6 easy steps by -step process to get the wireless Router configuration ready to continue. Setup Wizard Setup wizard is provided as part of the WLAN Router. Please click "Next" to continue. Please click "Next" to continue.
User can simply follow the step-by clicking on` the "Wizard" button on the function menu. The following screen will appear. Step 1: Set your new password Setting the new admin password of the web configuration utility. Step 2: Choose time zone Select the time zone from the drop down list. Please click "Next" to run in 6 easy steps by -step process to get the wireless Router configuration ready to continue. Setup Wizard Setup wizard is provided as part of the WLAN Router. Please click "Next" to continue. Please click "Next" to continue.

User Guide
Page 27
... connection Click "Enable" to reboot the WLAN Router. The new settings will be the same as wireless devices attempting to connect to the WLAN Router. Please click "Restart" to enable Wireless LAN. If user enables the Wireless LAN, type the SSID in the text box and select a communications channel. If user does not want to... back to quit without any changes. Step 6: Setup completed The Setup wizard is now completed. The SSID and channel must be effective after the WLAN Router restarts.
... connection Click "Enable" to reboot the WLAN Router. The new settings will be the same as wireless devices attempting to connect to the WLAN Router. Please click "Restart" to enable Wireless LAN. If user enables the Wireless LAN, type the SSID in the text box and select a communications channel. If user does not want to... back to quit without any changes. Step 6: Setup completed The Setup wizard is now completed. The SSID and channel must be effective after the WLAN Router restarts.

User Guide
Page 33
... enables users to enable and disable the wireless LAN function, create a SSID, and select the channel for wireless communications. Enable/Disable: Enables or disables wireless LAN via the WLAN Router. Channel: Select a transmission channel for the wireless device to access the LAN and WAN via the WLAN Router. Select if you are using both 802.11n...
... enables users to enable and disable the wireless LAN function, create a SSID, and select the channel for wireless communications. Enable/Disable: Enables or disables wireless LAN via the WLAN Router. Channel: Select a transmission channel for the wireless device to access the LAN and WAN via the WLAN Router. Select if you are using both 802.11n...

User Guide
Page 34
There are four options: Disabled, WEP, WPA, WPA2 and WPA-Auto. WEP Encryption WEP: Open System and Shared Key requires the user to set to open system. SSID Broadcast: While SSID Broadcast is set a WEP key to exchange data with other wireless clients that have access. Security Authentication Type: The authentication type default is enabled, all wireless clients will be able to ensure only authorized clients have the same WEP key.. Mode: Select the key type: ASCII or HEX For security purposes, users may want to disable SSID Broadcast to view the WLAN Router's SSID.
There are four options: Disabled, WEP, WPA, WPA2 and WPA-Auto. WEP Encryption WEP: Open System and Shared Key requires the user to set to open system. SSID Broadcast: While SSID Broadcast is set a WEP key to exchange data with other wireless clients that have access. Security Authentication Type: The authentication type default is enabled, all wireless clients will be able to ensure only authorized clients have the same WEP key.. Mode: Select the key type: ASCII or HEX For security purposes, users may want to disable SSID Broadcast to view the WLAN Router's SSID.

User Guide
Page 37
...: Clicking this button will invoke the Push Button Configuration (PBC) method of the WLAN Router LAN, WAN and Wireless connections, and view logs and statistics pertaining to view the status of WPS. It is only used when WLAN Router acts as a Registrar. Status This selection enables users to connections and packet transfers. The...
...: Clicking this button will invoke the Push Button Configuration (PBC) method of the WLAN Router LAN, WAN and Wireless connections, and view logs and statistics pertaining to view the status of WPS. It is only used when WLAN Router acts as a Registrar. Status This selection enables users to connections and packet transfers. The...

User Guide
Page 38
..." to release all IP addresses assigned to client stations connected to view the WLAN Router's LAN, Wireless and WAN configurations. Device Information This screen enables users to the WAN via the WLAN Router. Click "DHCP Table" to the WLAN Router LAN interface. Firmware Version: Displays the latest build of client stations currently connected to...
..." to release all IP addresses assigned to client stations connected to view the WLAN Router's LAN, Wireless and WAN configurations. Device Information This screen enables users to the WAN via the WLAN Router. Click "DHCP Table" to the WLAN Router LAN interface. Firmware Version: Displays the latest build of client stations currently connected to...

User Guide
Page 40
...your SMTP server address here. SMTP Password: If the SMTP Authentication enabled, fill in the password of packet transmission via the WLAN Router's LAN, Wireless and WAN ports (in the log: System Activity: Displays information related to : Type an email address for authentication, fill in ...Statistic This screen displays a table that have not been transferred successfully. Send to WLAN Router operation. Syslog Server: Type the IP address of the Syslog Server if user wants the WLAN Router to immediately send the current log. Debug Information: Displays information related to . Log ...
...your SMTP server address here. SMTP Password: If the SMTP Authentication enabled, fill in the password of packet transmission via the WLAN Router's LAN, Wireless and WAN ports (in the log: System Activity: Displays information related to : Type an email address for authentication, fill in ...Statistic This screen displays a table that have not been transferred successfully. Send to WLAN Router operation. Syslog Server: Type the IP address of the Syslog Server if user wants the WLAN Router to immediately send the current log. Debug Information: Displays information related to . Log ...

User Guide
Page 42
MAC Address: Displays the wireless client's MAC address. Connected Time: Displays how long the wireless client has been connected to the WLAN Router. Wireless This screen enables users to view information about wireless devices that are connected to the WLAN Router.
MAC Address: Displays the wireless client's MAC address. Connected Time: Displays how long the wireless client has been connected to the WLAN Router. Wireless This screen enables users to view information about wireless devices that are connected to the WLAN Router.

Quick Installation Guide
Page 6
Write down the new router information on the CD sleeve for your own reference and click Next. When this screen appears, the router has been configured successfully, click Next. 4 English 9. Note: For wireless clients, please make sure the SSID and the encryption information matches the router settings. 11. Select a encryption type and enter the security key for your wireless network and then click Next. 10.
Write down the new router information on the CD sleeve for your own reference and click Next. When this screen appears, the router has been configured successfully, click Next. 4 English 9. Note: For wireless clients, please make sure the SSID and the encryption information matches the router settings. 11. Select a encryption type and enter the security key for your wireless network and then click Next. 10.

Quick Installation Guide
Page 8
... means you are replacing the current router with the wireless TEW-632BRP, please select Yes and click Next to continue. When secure access to your router window appears, please go to section 2 step 7 to continue. If you have a DSL/Cable modem router. Click Next. To replace current router 1. To replace current router, select Yes and then click Next...
... means you are replacing the current router with the wireless TEW-632BRP, please select Yes and click Next to continue. When secure access to your router window appears, please go to section 2 step 7 to continue. If you have a DSL/Cable modem router. Click Next. To replace current router 1. To replace current router, select Yes and then click Next...
Quick Installation Guide
Page 9
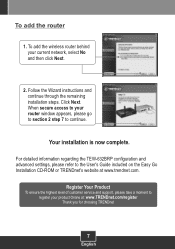
... Easy Go Installation CD-ROM or TRENDnet's website at : www.TRENDnet.com/register Thank you for choosing TRENDnet 7 English For detailed information regarding the TEW-632BRP configuration and advanced settings, please refer to your current network, select No and then click Next. 2. To add the router 1. To add the wireless router behind your router window appears, please go to...
... Easy Go Installation CD-ROM or TRENDnet's website at : www.TRENDnet.com/register Thank you for choosing TRENDnet 7 English For detailed information regarding the TEW-632BRP configuration and advanced settings, please refer to your current network, select No and then click Next. 2. To add the router 1. To add the wireless router behind your router window appears, please go to...

Quick Installation Guide
Page 10
...http://192.168.10.1 and hit enter. 2) Click on . During setup, the Easy Go Setup wizard will check the operation of the TEW-632BRP Wireless Router. Unplug the power to start the Installation. A6: Network Magic™ is the default IP address of your computer's CD-ROM Drive....Setup CD-ROM or contact TRENDnet's Technical Support Department. 8 If you are correct, but I can access the web configuration page by opening your computer's CD-ROM is set to on Basic -> Network Settings. 3) Under Router Settings, change the Router IP address to the Router. What should I do...
...http://192.168.10.1 and hit enter. 2) Click on . During setup, the Easy Go Setup wizard will check the operation of the TEW-632BRP Wireless Router. Unplug the power to start the Installation. A6: Network Magic™ is the default IP address of your computer's CD-ROM Drive....Setup CD-ROM or contact TRENDnet's Technical Support Department. 8 If you are correct, but I can access the web configuration page by opening your computer's CD-ROM is set to on Basic -> Network Settings. 3) Under Router Settings, change the Router IP address to the Router. What should I do...


