
User Guide
Page 18
The following screen will appear. Setup Wizard Setup wizard is provided as part of the WLAN Router. Please click "Next" to run in 6 easy steps by clicking on` the "Wizard" button on the function menu. User can simply follow the step-by-step process to get the wireless Router configuration ready to continue. Please click "Next" to continue. Step 2: Choose time zone Select the time zone from the drop down list. Step 1: Set your new password Setting the new admin password of the web configuration utility. Please click "Next" to continue.
The following screen will appear. Setup Wizard Setup wizard is provided as part of the WLAN Router. Please click "Next" to run in 6 easy steps by clicking on` the "Wizard" button on the function menu. User can simply follow the step-by-step process to get the wireless Router configuration ready to continue. Please click "Next" to continue. Step 2: Choose time zone Select the time zone from the drop down list. Step 1: Set your new password Setting the new admin password of the web configuration utility. Please click "Next" to continue.

User Guide
Page 27
The new settings will be the same as wireless devices attempting to connect to the WLAN Router. Please click "Restart" to modify the setting by clicking "Back". The SSID and channel must be effective after the WLAN Router restarts. Step 6: Setup completed The Setup wizard is now completed. User ...also can go back to reboot the WLAN Router. If user enables the Wireless LAN, type the SSID in the text box and select a communications channel. Step 5: Set Wireless LAN connection Click "Enable" to quit without any changes. If user does ...
The new settings will be the same as wireless devices attempting to connect to the WLAN Router. Please click "Restart" to modify the setting by clicking "Back". The SSID and channel must be effective after the WLAN Router restarts. Step 6: Setup completed The Setup wizard is now completed. User ...also can go back to reboot the WLAN Router. If user enables the Wireless LAN, type the SSID in the text box and select a communications channel. Step 5: Set Wireless LAN connection Click "Enable" to quit without any changes. If user does ...

User Guide
Page 39
... enables users to 200 entries. The log displays up to view a running log of the log and begin a new log Click "Refresh" to set Router Log parameters. The Log screen commands are overwritten by new entries. Message: Displays summary information about the log entry. Log Setting This screen enables users to renew log... just before the current page Click "Next Page" to view the page just after the current page Click "Clear Log" to delete the contents of Router system statistics, events, and activities.
... enables users to 200 entries. The log displays up to view a running log of the log and begin a new log Click "Refresh" to set Router Log parameters. The Log screen commands are overwritten by new entries. Message: Displays summary information about the log entry. Log Setting This screen enables users to renew log... just before the current page Click "Next Page" to view the page just after the current page Click "Clear Log" to delete the contents of Router system statistics, events, and activities.

User Guide
Page 50
Private Port: Type the port number of the computer on the WAN that will be used to erase all fields and enter new information. Cancel: Click Cancel button to act as a virtual server, remote users requesting Web or FTP services through the WAN are listed in the table ...at the bottom of the screen. If the WLAN Router is set as a virtual server. Virtual Server This screen enables users to local servers in the LAN. Delete: Select a listed item and click "Delete" to...
Private Port: Type the port number of the computer on the WAN that will be used to erase all fields and enter new information. Cancel: Click Cancel button to act as a virtual server, remote users requesting Web or FTP services through the WAN are listed in the table ...at the bottom of the screen. If the WLAN Router is set as a virtual server. Virtual Server This screen enables users to local servers in the LAN. Delete: Select a listed item and click "Delete" to...
User Guide
Page 52
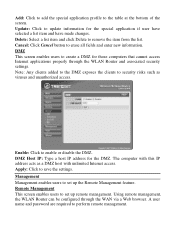
...through the WAN via a Web browser. DMZ This screen enables users to save the settings. Using remote management, the WLAN Router can be configured through the WLAN Router and associated security settings. Management Management enables users to set up the Remote Management feature. Delete: Select a list item and...with this IP address acts as viruses and unauthorized access. Add: Click to add the special application profile to erase all fields and enter new information. Cancel: Click Cancel button to the table at the bottom of the screen. DMZ Host IP: Type a host IP address for...
...through the WAN via a Web browser. DMZ This screen enables users to save the settings. Using remote management, the WLAN Router can be configured through the WLAN Router and associated security settings. Management Management enables users to set up the Remote Management feature. Delete: Select a list item and...with this IP address acts as viruses and unauthorized access. Add: Click to add the special application profile to erase all fields and enter new information. Cancel: Click Cancel button to the table at the bottom of the screen. DMZ Host IP: Type a host IP address for...

Quick Installation Guide
Page 6
When this screen appears, the router has been configured successfully, click Next. 4 English Select a encryption type and enter the security key for your wireless network and then click Next. 10. Note: For wireless clients, please make sure the SSID and the encryption information matches the router settings. 11. 9. Write down the new router information on the CD sleeve for your own reference and click Next.
When this screen appears, the router has been configured successfully, click Next. 4 English Select a encryption type and enter the security key for your wireless network and then click Next. 10. Note: For wireless clients, please make sure the SSID and the encryption information matches the router settings. 11. 9. Write down the new router information on the CD sleeve for your own reference and click Next.


