
User Guide
Page 3
...Connect to the Switch/Hub 4 Check the installation 4 Configuring the Wireless LAN Access Point 5 Login to real-time information anywhere in their organization. Hardware Installation. Technical Specifications. With a WLAN (IEEE 802.11g) Access Point, a mobile computer can locate your purchase of this manual for ...Configuration 20 Technical Specifications 21 ABOUT THIS GUIDE Congratulations on your PC wherever you build a wireless network easily! Easy-to install the WLAN Access Point. Purpose This manual discusses how to -use utilities are not available under wired networks. ...
...Connect to the Switch/Hub 4 Check the installation 4 Configuring the Wireless LAN Access Point 5 Login to real-time information anywhere in their organization. Hardware Installation. Technical Specifications. With a WLAN (IEEE 802.11g) Access Point, a mobile computer can locate your purchase of this manual for ...Configuration 20 Technical Specifications 21 ABOUT THIS GUIDE Congratulations on your PC wherever you build a wireless network easily! Easy-to install the WLAN Access Point. Purpose This manual discusses how to -use utilities are not available under wired networks. ...

User Guide
Page 4
...can best cover your AP is connected to factory default setting, once you press the "RESET" button within 10 seconds, the LED of the Wireless Access Point can be replaced with auto-sensing for connecting to either 10/100Mbps Fast Ethernet connections, connect this port to the AP's power jack. It can... be . The best place for the Wireless LAN Access Point (AP). Normally, the higher you place the antenna, the better the performance will be performed using the following items: ‹ One...
...can best cover your AP is connected to factory default setting, once you press the "RESET" button within 10 seconds, the LED of the Wireless Access Point can be replaced with auto-sensing for connecting to either 10/100Mbps Fast Ethernet connections, connect this port to the AP's power jack. It can... be . The best place for the Wireless LAN Access Point (AP). Normally, the higher you place the antenna, the better the performance will be performed using the following items: ‹ One...

User Guide
Page 5
...from the local LAN. For example, when the default network address of the default IP address of the RJ45 network cable to the Wireless Access Point. Enter IP address http://192.168.1.100 (the factory-default IP address setting) to the Switch/Hub, the LAN port's LED...up to the address location. 4 5 If the LAN Port's Link indicator does not light up indicating a normal status. 2. CONFIGURING THE WIRELESS LAN ACCESS POINT The Wireless Access Point has a Web GUI interface for configuration. With the power source on the same IP network. Login to the Switch/Hub port, 2. Plug...
...from the local LAN. For example, when the default network address of the default IP address of the RJ45 network cable to the Wireless Access Point. Enter IP address http://192.168.1.100 (the factory-default IP address setting) to the Switch/Hub, the LAN port's LED...up to the address location. 4 5 If the LAN Port's Link indicator does not light up indicating a normal status. 2. CONFIGURING THE WIRELESS LAN ACCESS POINT The Wireless Access Point has a Web GUI interface for configuration. With the power source on the same IP network. Login to the Switch/Hub port, 2. Plug...

User Guide
Page 6
Type a name or leave the username dialog box empty to login. The system will show the station summary of the Access Point The screen will check only the password that was set in the left side of the main screen: Network, Security, Status, Clients, Tools and Configuration. ... the AP when you first login the AP because the default setting is without a password. There are six main functions included in the system before . Point the selections in the password you entered before . There is a screen to enter the Network password, type in the left side of the menu screen...
Type a name or leave the username dialog box empty to login. The system will show the station summary of the Access Point The screen will check only the password that was set in the left side of the main screen: Network, Security, Status, Clients, Tools and Configuration. ... the AP when you first login the AP because the default setting is without a password. There are six main functions included in the system before . Point the selections in the password you entered before . There is a screen to enter the Network password, type in the left side of the menu screen...

User Guide
Page 7
...: this AP. it may result in compliance with the regulatory standards of these countries. 8 Wireless LAN Settings: to configure the wireless networking settings. ¾ Wireless Network Name (SSID): It is the channel selection of each country regulatory domain, select the country... G-only: choosing this Wireless Device, users are using wireless connection. Wireless Settings The Wireless Settings contain two settings, Radio Setting and Wireless LAN Setting. Static IP: Click on the DHCP for ensuring that prevents the unintentional merging of the Access Point. II. Network The ...
...: this AP. it may result in compliance with the regulatory standards of these countries. 8 Wireless LAN Settings: to configure the wireless networking settings. ¾ Wireless Network Name (SSID): It is the channel selection of each country regulatory domain, select the country... G-only: choosing this Wireless Device, users are using wireless connection. Wireless Settings The Wireless Settings contain two settings, Radio Setting and Wireless LAN Setting. Static IP: Click on the DHCP for ensuring that prevents the unintentional merging of the Access Point. II. Network The ...
User Guide
Page 8
...within the range of the screen, and click apply to add the AP to your AP radio channel. Security This function is to prevent unauthorized access to a wireless network, and it can connect to communicate. 2. In Addition, make sure you configure all WDS APs to work on the list. ¾... to remove the WDS Link that you want to connect or disconnect to this AP, and select Reject to protect wireless communication from eavesdropping. When this Access Point. Click the "Add WDS Link" button, a window will scan only other APs channel within the range of other APs. After the AP is...
...within the range of the screen, and click apply to add the AP to your AP radio channel. Security This function is to prevent unauthorized access to a wireless network, and it can connect to communicate. 2. In Addition, make sure you configure all WDS APs to work on the list. ¾... to remove the WDS Link that you want to connect or disconnect to this AP, and select Reject to protect wireless communication from eavesdropping. When this Access Point. Click the "Add WDS Link" button, a window will scan only other APs channel within the range of other APs. After the AP is...

User Guide
Page 10
... password when the station or the client leaves the Networking Group (BSS, Basic Service Set). Wireless Statistics This screen shows the statistics of the system. Wi-Fi Protected Access (WPA) Wi-Fi Protected Access (WPA) is the newest and best available standard in the time for clients to re-key... and the clients. ¾ Use WPA with Pre-Shared Key: type in the numbers of the Station, Wireless Statistics and Event Reporting. Station This screen will show the status summary of the wireless AP. 14 15 II. V. Rekeying packets: type in 8 ~ 63 characters inside the dialog box to ...
... password when the station or the client leaves the Networking Group (BSS, Basic Service Set). Wireless Statistics This screen shows the statistics of the system. Wi-Fi Protected Access (WPA) Wi-Fi Protected Access (WPA) is the newest and best available standard in the time for clients to re-key... and the clients. ¾ Use WPA with Pre-Shared Key: type in the numbers of the Station, Wireless Statistics and Event Reporting. Station This screen will show the status summary of the wireless AP. 14 15 II. V. Rekeying packets: type in 8 ~ 63 characters inside the dialog box to ...

User Guide
Page 11
Wireless Clients This function shows the list of the wireless clients that you can use for WDS Links, refer to WDS Links on the AP, press "Reset Event Log" to this AP. I. Access Points This function shows the list of the Wireless Access Point that this AP can connect with, this is the list that connected to clear the record of the wireless surrounded this AP. Clients This function shows the list of the event happened. III. II. Event Report This screen shows the event happened on page 9. 16 17
Wireless Clients This function shows the list of the wireless clients that you can use for WDS Links, refer to WDS Links on the AP, press "Reset Event Log" to this AP. I. Access Points This function shows the list of the Wireless Access Point that this AP can connect with, this is the list that connected to clear the record of the wireless surrounded this AP. Clients This function shows the list of the event happened. III. II. Event Report This screen shows the event happened on page 9. 16 17

User Guide
Page 13
...~ 11 Channels (US, Canada, China) 1 ~ 13 Channels (Europe) 1 ~ 14 Channels (Japan) 64 bit / 128 bit WEP Encryption, WPA Fast Ethernet: 100Mbps Wireless: Up to unlock it . ohm STP (100 m) 1 x 10/100Mbps RJ45 port 1 x 2dBi Diversity Antenna Physical and Environmental DC 5V, 1.2A 6W (Max) Operating...~ 90% 124 x 86 x 40 mm (4.9 x 3.4 x 1.6 inches) (without antenna) FCC Class B, CE Mark B, 21 You need to have physical access to the Access Point to 54Mbps (with Automatic Scale Back) 54Mbps: Typical -68dBm @10% PER 1Mbps: Typical -81dBm @8% PER 802.11g: Minimum 12dBm typically 802.11b: Minimum 15dBm...
...~ 11 Channels (US, Canada, China) 1 ~ 13 Channels (Europe) 1 ~ 14 Channels (Japan) 64 bit / 128 bit WEP Encryption, WPA Fast Ethernet: 100Mbps Wireless: Up to unlock it . ohm STP (100 m) 1 x 10/100Mbps RJ45 port 1 x 2dBi Diversity Antenna Physical and Environmental DC 5V, 1.2A 6W (Max) Operating...~ 90% 124 x 86 x 40 mm (4.9 x 3.4 x 1.6 inches) (without antenna) FCC Class B, CE Mark B, 21 You need to have physical access to the Access Point to 54Mbps (with Automatic Scale Back) 54Mbps: Typical -68dBm @10% PER 1Mbps: Typical -81dBm @8% PER 802.11g: Minimum 12dBm typically 802.11b: Minimum 15dBm...

Quick Installation Guide
Page 2
Prepare for Installation 1 2. Install Hardware 2 3. Configure TCP/IP Settings 3 4. Configure the Access Point 7 Troubleshooting 14 Table of Contents English ...1 1.
Prepare for Installation 1 2. Install Hardware 2 3. Configure TCP/IP Settings 3 4. Configure the Access Point 7 Troubleshooting 14 Table of Contents English ...1 1.

Quick Installation Guide
Page 3
This guide will help you have : 1. If you for purchasing TRENDnet's TEW-430APB Wireless G LAN Access Point. Verify Package Contents Please make sure you set-up the Access Point, you run into problems, please refer to your network Switch. 1 English TCP/IP protocol installed on the Computer. 3. English QIG 1. A Web Browser such as Internet ...
This guide will help you have : 1. If you for purchasing TRENDnet's TEW-430APB Wireless G LAN Access Point. Verify Package Contents Please make sure you set-up the Access Point, you run into problems, please refer to your network Switch. 1 English TCP/IP protocol installed on the Computer. 3. English QIG 1. A Web Browser such as Internet ...

Quick Installation Guide
Page 4
... your wireless network. 2. Make sure you are on: Power, LAN, WLAN. 2 English using a wired computer to configure the Access Point,please connect this computer to . 2. LAN POWER WLAN Verify Hardware Installation Check to make sure the following Access Point front panel lights are using a different power adapter may damage the unit. Install Hardware 1. POWER TEW-430APB 3 2 NOTE...
... your wireless network. 2. Make sure you are on: Power, LAN, WLAN. 2 English using a wired computer to configure the Access Point,please connect this computer to . 2. LAN POWER WLAN Verify Hardware Installation Check to make sure the following Access Point front panel lights are using a different power adapter may damage the unit. Install Hardware 1. POWER TEW-430APB 3 2 NOTE...

Quick Installation Guide
Page 5
... you do see this message before you do not see the TCP/IP window. If you see the window above, then go to be accessed and configured, the computer's TCP/IP settings need to the next picture. Under the Configuration tab, locate and select TCP/IP with the corresponding... network card. Configure TCP/IP Settings Before the Access Point can be changed. (That includes your wireless card's IP address, too.) Windows 95/98/98SE/ME 1. Double-Click the Network Icon, and the Network Properties box will...
... you do see this message before you do not see the TCP/IP window. If you see the window above, then go to be accessed and configured, the computer's TCP/IP settings need to the next picture. Under the Configuration tab, locate and select TCP/IP with the corresponding... network card. Configure TCP/IP Settings Before the Access Point can be changed. (That includes your wireless card's IP address, too.) Windows 95/98/98SE/ME 1. Double-Click the Network Icon, and the Network Properties box will...

Quick Installation Guide
Page 7
...1. Right-Click on the Local Area Connection icon, then click on the Desktop. 2. Find the Start button located on Properties. At this point, the installation may require files from your CD-ROM drive and select CD-ROM drive. 8. If you are prompted for the location of ...your Windows CD-ROM. Double-Click the Network Connection icon. 4. The Local Area Connection Properties box will appear. 5 English Click Yes to access and configure the Access Point. Click Start, click Settings, and then click on Control Panel. 3. 7. NOTE: If the message does not appear, manually restart your ...
...1. Right-Click on the Local Area Connection icon, then click on the Desktop. 2. Find the Start button located on Properties. At this point, the installation may require files from your CD-ROM drive and select CD-ROM drive. 8. If you are prompted for the location of ...your Windows CD-ROM. Double-Click the Network Connection icon. 4. The Local Area Connection Properties box will appear. 5 English Click Yes to access and configure the Access Point. Click Start, click Settings, and then click on Control Panel. 3. 7. NOTE: If the message does not appear, manually restart your ...
Quick Installation Guide
Page 8
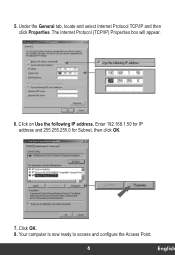
Under the General tab, locate and select Internet Protocol TCP/IP and then click Properties. Click OK. 8. Click on Use the following IP address. Your computer is now ready to access and configure the Access Point. 6 English The Internet Protocol (TCP/IP) Properties box will appear. 6. Enter 192.168.1.50 for IP address and 255.255.255.0 for Subnet, then click OK. 7. 5.
Under the General tab, locate and select Internet Protocol TCP/IP and then click Properties. Click OK. 8. Click on Use the following IP address. Your computer is now ready to access and configure the Access Point. 6 English The Internet Protocol (TCP/IP) Properties box will appear. 6. Enter 192.168.1.50 for IP address and 255.255.255.0 for Subnet, then click OK. 7. 5.

Quick Installation Guide
Page 9
The TEW-430APB's configuration page will appear. 7 English To configure the Wireless Settings, click on the Wireless option on the left panel, and select Basic Settings. The setting's window will appear. 2. Configure the Access Point From a Wired Computer 1. 4. Open a web browser (Internet Explorer or Netscape) and enter http://192.168.1.100 in the address bar, then press the Enter key.
The TEW-430APB's configuration page will appear. 7 English To configure the Wireless Settings, click on the Wireless option on the left panel, and select Basic Settings. The setting's window will appear. 2. Configure the Access Point From a Wired Computer 1. 4. Open a web browser (Internet Explorer or Netscape) and enter http://192.168.1.100 in the address bar, then press the Enter key.

Quick Installation Guide
Page 10
Enter any AP Name for your wireless network will be using, and select a channel. (For example: Wireless AP, Home AP, or Office AP). 4. Create a SSID that your Access Point. On Radio Settings, click on the change region... 8 English 3.
Enter any AP Name for your wireless network will be using, and select a channel. (For example: Wireless AP, Home AP, or Office AP). 4. Create a SSID that your Access Point. On Radio Settings, click on the change region... 8 English 3.

Quick Installation Guide
Page 12
Go to the Configuration section and select Infrastructure for the SSID and select Channel 6 if applicable, then click Apply. 10 English Enter AP for Network Mode. default Channel - 6 1. On your wireless computer, open up your Wireless Utility Program. 2. From a Wireless Computer (Using TRENDnet's TEW-226PC as an example in this section) The default settings of the Access Point are: SSID -
Go to the Configuration section and select Infrastructure for the SSID and select Channel 6 if applicable, then click Apply. 10 English Enter AP for Network Mode. default Channel - 6 1. On your wireless computer, open up your Wireless Utility Program. 2. From a Wireless Computer (Using TRENDnet's TEW-226PC as an example in this section) The default settings of the Access Point are: SSID -

Quick Installation Guide
Page 13
Now, open up your Wireless Utility Program. Go to the Access Point. 4. It should show Your wireless PC's connection information to the Status section of your browser (Internet Explorer or Netscape) and enter http://192.168.1.100 at the address bar, and then press the Enter key. The TEW-430APB's configuration page will appear. 11 English 3.
Now, open up your Wireless Utility Program. Go to the Access Point. 4. It should show Your wireless PC's connection information to the Status section of your browser (Internet Explorer or Netscape) and enter http://192.168.1.100 at the address bar, and then press the Enter key. The TEW-430APB's configuration page will appear. 11 English 3.

Quick Installation Guide
Page 14
5. On Radio Settings, click on the left panel, and select Basic Settings. Enter any AP Name for your wireless network will appear. 6. Create a SSID that your Access Point. The settings window will be using, and select a channel. (For example: Wireless AP, Home AP, or Office AP). 7. To configure the Wireless Settings, click on the Wireless option on the change region... 12 English
5. On Radio Settings, click on the left panel, and select Basic Settings. Enter any AP Name for your wireless network will appear. 6. Create a SSID that your Access Point. The settings window will be using, and select a channel. (For example: Wireless AP, Home AP, or Office AP). 7. To configure the Wireless Settings, click on the Wireless option on the change region... 12 English

