
User's Guide
Page 2
... trademarks in this manual, we assumes no responsibility for errors or omissions contained therein, nor any liability for damages resulting from the use of TK-802R/TK-1602R Rack Mount KVM Switch. This lightning bolt indicates warnings you should take special precautions against. Specifications and functions may be changed without prior notice Icon convention used...
... trademarks in this manual, we assumes no responsibility for errors or omissions contained therein, nor any liability for damages resulting from the use of TK-802R/TK-1602R Rack Mount KVM Switch. This lightning bolt indicates warnings you should take special precautions against. Specifications and functions may be changed without prior notice Icon convention used...
User's Guide
Page 5
LIST OF FIGURES Figure 1-1a TK-802R...8 Figure 1-1b TK-1602R...8 Figure 1-2a TK-802R Front Panel 9 Figure 1-2b TK-1602R Front Panel 9 Figure 1-3a TK-802R Rear Panel 10 Figure 1-3b TK-1602R Rear Panel 10 Figure 2-1 The 3-1 combo KVM cable is highly recommended 12 Figure 2-2 Daisy-chaining multiple KVM switches in a cascaded application 14 Figure 3-1 OSD Main ...Name as shown on the OSD 24 LIST OF TABLES Table 3-1 Summary for Hotkey Sequences 18 Table B-1 Necessary accessories for the KVM Switches 30 Table B-2 The Standard 3-in-1 Keyboard-Video-Mouse Combo Cable 30 List of Figures &Tables
LIST OF FIGURES Figure 1-1a TK-802R...8 Figure 1-1b TK-1602R...8 Figure 1-2a TK-802R Front Panel 9 Figure 1-2b TK-1602R Front Panel 9 Figure 1-3a TK-802R Rear Panel 10 Figure 1-3b TK-1602R Rear Panel 10 Figure 2-1 The 3-1 combo KVM cable is highly recommended 12 Figure 2-2 Daisy-chaining multiple KVM switches in a cascaded application 14 Figure 3-1 OSD Main ...Name as shown on the OSD 24 LIST OF TABLES Table 3-1 Summary for Hotkey Sequences 18 Table B-1 Necessary accessories for the KVM Switches 30 Table B-2 The Standard 3-in-1 Keyboard-Video-Mouse Combo Cable 30 List of Figures &Tables
User's Guide
Page 6
... can also vary port capacity by daisy-chaining multiple units in lab or factory floor environment. Hence, the KVM Switch could easily be easily operated using only one keyboard, mouse and video The TK-802R/TK-1602R KVM Switch is a quality product designed for secure remote computer/server management on a standard 19" rack for more productivity for...
... can also vary port capacity by daisy-chaining multiple units in lab or factory floor environment. Hence, the KVM Switch could easily be easily operated using only one keyboard, mouse and video The TK-802R/TK-1602R KVM Switch is a quality product designed for secure remote computer/server management on a standard 19" rack for more productivity for...
User's Guide
Page 7
...no need for corporate, factory and campus computing environment ▪ Very high video resolution up to indicate the switch bank number. Features General features ▪ 8-/16-port cascadable PS/2 type electronic KVM switch with OSD Menu control ▪ Robust metal case design ensures best EMI shielding and super video quality &#...intuitive menu-driven control ▪ Channel selection by its name Security ▪ Password security prevents unauthorized intrusion. ▪ Provide 8-character password protection. TK-802R_TK-1602R Rack Mount KVM Switch User's Guide July,2004 1.1.
...no need for corporate, factory and campus computing environment ▪ Very high video resolution up to indicate the switch bank number. Features General features ▪ 8-/16-port cascadable PS/2 type electronic KVM switch with OSD Menu control ▪ Robust metal case design ensures best EMI shielding and super video quality &#...intuitive menu-driven control ▪ Channel selection by its name Security ▪ Password security prevents unauthorized intrusion. ▪ Provide 8-character password protection. TK-802R_TK-1602R Rack Mount KVM Switch User's Guide July,2004 1.1.
User's Guide
Page 8
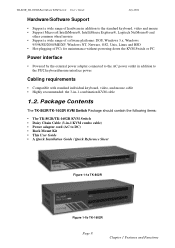
Package Contents The TK-802R/TK-1602R KVM Switch Package should contain the following items: ▪ The TK-802R/TK-1602R KVM Switch ▪ Daisy Chain Cable (3-in -1 combination KVM cable 1.2. Power interface ▪ Powered by the external power adapter connected to the AC power outlet in addition to the PS/2 keyboard/mouse interface power ...
Package Contents The TK-802R/TK-1602R KVM Switch Package should contain the following items: ▪ The TK-802R/TK-1602R KVM Switch ▪ Daisy Chain Cable (3-in -1 combination KVM cable 1.2. Power interface ▪ Powered by the external power adapter connected to the AC power outlet in addition to the PS/2 keyboard/mouse interface power ...
User's Guide
Page 9
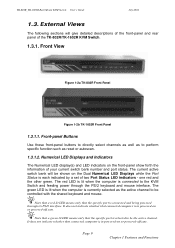
... as reset or autoscan. 1.3.1.2. Page 9 Chapter 1 Features and Functions The current active switch bank will give detailed descriptions of the front-panel and rear panel of the TK-802R/TK-1602R KVM Switch. 1.3.1. The green LED is lit when the computer is selected to be controlled with ... does not indicate whether that the specific port is currently selected as to the KVM Switch and feeding power through its PS/2 interface. Front View Figure 1-2a TK-802R Front Panel Figure 1-2b TK-1602R Front Panel 1.3.1.1. Numerical LED Displays and Indicators The Numerical LED display(s) and...
... as reset or autoscan. 1.3.1.2. Page 9 Chapter 1 Features and Functions The current active switch bank will give detailed descriptions of the front-panel and rear panel of the TK-802R/TK-1602R KVM Switch. 1.3.1. The green LED is lit when the computer is selected to be controlled with ... does not indicate whether that the specific port is currently selected as to the KVM Switch and feeding power through its PS/2 interface. Front View Figure 1-2a TK-802R Front Panel Figure 1-2b TK-1602R Front Panel 1.3.1.1. Numerical LED Displays and Indicators The Numerical LED display(s) and...

User's Guide
Page 10
Rear View Figure 1-3a TK-802R Rear Panel Figure 1-3b TK-1602R Rear Panel 1.3.2.1. Page 10 Chapter 1 Features and Functions When the switch is a receptacle for the 9V 1A DC power adapter cord. Its center pin is where you connect your keyboard, video and mouse. Console Port .... Power Jack The power jack is in a "locked mode" (also known as "password protected mode"), the green LED of the specific port. TK-802R_TK-1602R Rack Mount KVM Switch User's Guide July,2004 Thus the red indicator shows forth the current connected state of the active channel will be flashing to indicate...
Rear View Figure 1-3a TK-802R Rear Panel Figure 1-3b TK-1602R Rear Panel 1.3.2.1. Page 10 Chapter 1 Features and Functions When the switch is a receptacle for the 9V 1A DC power adapter cord. Its center pin is where you connect your keyboard, video and mouse. Console Port .... Power Jack The power jack is in a "locked mode" (also known as "password protected mode"), the green LED of the specific port. TK-802R_TK-1602R Rack Mount KVM Switch User's Guide July,2004 Thus the red indicator shows forth the current connected state of the active channel will be flashing to indicate...
User's Guide
Page 11
...time that allows you to be spent in an environment that will not interfere with the way a computer can a KVM switch save you can see the KVM Switch being capable of control from BIOS level such as and other software/hardware measures for the same control purpose is ... a productivity boost. We can daisy-chain to the GUI applications. Page 11 Chapter 1 Features and Functions TK-802R_TK-1602R Rack Mount KVM Switch User's Guide July,2004 1.3.2.3. Therefore, the KVM Switch solution is where you money by eliminating the needs for multiple sets of keyboard, video and mouse, but...
...time that allows you to be spent in an environment that will not interfere with the way a computer can a KVM switch save you can see the KVM Switch being capable of control from BIOS level such as and other software/hardware measures for the same control purpose is ... a productivity boost. We can daisy-chain to the GUI applications. Page 11 Chapter 1 Features and Functions TK-802R_TK-1602R Rack Mount KVM Switch User's Guide July,2004 1.3.2.3. Therefore, the KVM Switch solution is where you money by eliminating the needs for multiple sets of keyboard, video and mouse, but...
User's Guide
Page 12
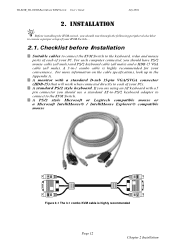
... specifications, look up in -1 combo cable is highly recommended Page 12 Chapter 2 Installation INSTALLATION Before installing the KVM switch, you should run through the following peripheral checklist to each of your convenience. If you should use a standard...Logitech compatible mouse or a Microsoft IntelliMouse® / IntelliMouse Explorer® compatible mouse Figure 2-1 The 3-1 combo KVM cable is highly recommended for your KVM Switch.... 2.1. TK-802R_TK-1602R Rack Mount KVM Switch User's Guide July,2004 2. A 3-in the Appendix A. : A monitor with a 5 pin connector ...
... specifications, look up in -1 combo cable is highly recommended Page 12 Chapter 2 Installation INSTALLATION Before installing the KVM switch, you should run through the following peripheral checklist to each of your convenience. If you should use a standard...Logitech compatible mouse or a Microsoft IntelliMouse® / IntelliMouse Explorer® compatible mouse Figure 2-1 The 3-1 combo KVM cable is highly recommended for your KVM Switch.... 2.1. TK-802R_TK-1602R Rack Mount KVM Switch User's Guide July,2004 2. A 3-in the Appendix A. : A monitor with a 5 pin connector ...

User's Guide
Page 13
... your convenience, then power on each connected PC. Page 13 Chapter 2 Installation Connect the power adapter cord to the KVM Switch to the KVM Switch, the shared keyboard and mouse will not be turned off. If your computers are all the modes and parameters requested ... your PCs prior to your KVM Switch, since it on each computer The KVM Switch has to different port capacity requirements, you turn on . Step 3. Mounting the KVM Switch The KVM Switch can be turned on the rear of the attached computer. TK-802R_TK-1602R Rack Mount KVM Switch User's Guide July,2004 ...
... your convenience, then power on each connected PC. Page 13 Chapter 2 Installation Connect the power adapter cord to the KVM Switch to the KVM Switch, the shared keyboard and mouse will not be turned off. If your computers are all the modes and parameters requested ... your PCs prior to your KVM Switch, since it on each computer The KVM Switch has to different port capacity requirements, you turn on . Step 3. Mounting the KVM Switch The KVM Switch can be turned on the rear of the attached computer. TK-802R_TK-1602R Rack Mount KVM Switch User's Guide July,2004 ...

User's Guide
Page 14
...remote end through this section. Each cascaded KVM can daisy-chain different units with 16 units of connected computers up to maximize the number of TK-1602R KVM Switches). To add port capacity, multiple TK-802R/TK-1602R KVM Switches can then be cascaded in a cascaded application... Page 14 Chapter 2 Installation The KVM Switch units that are dispersed and with the convenience of ...
...remote end through this section. Each cascaded KVM can daisy-chain different units with 16 units of connected computers up to maximize the number of TK-1602R KVM Switches). To add port capacity, multiple TK-802R/TK-1602R KVM Switches can then be cascaded in a cascaded application... Page 14 Chapter 2 Installation The KVM Switch units that are dispersed and with the convenience of ...

User's Guide
Page 15
...of up to 16 units of the master (first) KVM Switch. If your KVM Switch has not been running before you have set up any PC. TK-802R_TK-1602R Rack Mount KVM Switch User's Guide July,2004 Before connecting any PC or peripherals to your KVM Switch, make sure that : while your PCs are all... the modes and parameters requested by (1) pressing and holding down Button 1 on the master switch for at least 2 seconds...
...of up to 16 units of the master (first) KVM Switch. If your KVM Switch has not been running before you have set up any PC. TK-802R_TK-1602R Rack Mount KVM Switch User's Guide July,2004 Before connecting any PC or peripherals to your KVM Switch, make sure that : while your PCs are all... the modes and parameters requested by (1) pressing and holding down Button 1 on the master switch for at least 2 seconds...

User's Guide
Page 16
...down Button 1 on the front panel for the first time, you should have set up a daisy-chain of cascaded KVM Switches, and you want a reset later during your KVM Switch 2.5.1. Page 16 Chapter 2 Installation If you are not there to receive/respond to this daisy-chain of no more than... the master one. TK-802R_TK-1602R Rack Mount KVM Switch User's Guide July,2004 Now the KVM Switches are ready to operate as soon as...
...down Button 1 on the front panel for the first time, you should have set up a daisy-chain of cascaded KVM Switches, and you want a reset later during your KVM Switch 2.5.1. Page 16 Chapter 2 Installation If you are not there to receive/respond to this daisy-chain of no more than... the master one. TK-802R_TK-1602R Rack Mount KVM Switch User's Guide July,2004 Now the KVM Switches are ready to operate as soon as...

User's Guide
Page 17
... + ScrLk + Command key (sequence) Within 2 seconds In most cases, it will need 5 strokes (such as the most convenient and quickest way to operate your TK-802R/TK-1602R KVM Switch: Frontpanel buttons, keyboard hotkeys and OSD Menu options. The last button, when pressed and held down for over 2 seconds. Keyboard Hotkeys Some network professionals prefer...
... + ScrLk + Command key (sequence) Within 2 seconds In most cases, it will need 5 strokes (such as the most convenient and quickest way to operate your TK-802R/TK-1602R KVM Switch: Frontpanel buttons, keyboard hotkeys and OSD Menu options. The last button, when pressed and held down for over 2 seconds. Keyboard Hotkeys Some network professionals prefer...

User's Guide
Page 18
...PgDn Autoscan Beep Sound On/Off ScrLk + ScrLk + B Reflash EEPROM ScrLk + ScrLk + R Find PC by Name ScrLk + ScrLk + F Change PC Name -- Reset KVM ScrLk + ScrLk + End Show OSD Menu ScrLk + ScrLk + Space Bar Autoscan ScrLk + ScrLk + S Stop Autoscan (Any key on the upper row of the keyboard... Note that a, b, y and z each denotes a number key. (ab) = 01 ~ 16 ; (yz) = 01 ~ 04 or 01 ~ 08 or 01 ~ 16. TK-802R_TK-1602R Rack Mount KVM Switch User's Guide July,2004 All the available hotkey commands are summarized in the following table for Hotkey Sequences Page 18 Chapter 3 Operation
...PgDn Autoscan Beep Sound On/Off ScrLk + ScrLk + B Reflash EEPROM ScrLk + ScrLk + R Find PC by Name ScrLk + ScrLk + F Change PC Name -- Reset KVM ScrLk + ScrLk + End Show OSD Menu ScrLk + ScrLk + Space Bar Autoscan ScrLk + ScrLk + S Stop Autoscan (Any key on the upper row of the keyboard... Note that a, b, y and z each denotes a number key. (ab) = 01 ~ 16 ; (yz) = 01 ~ 04 or 01 ~ 08 or 01 ~ 16. TK-802R_TK-1602R Rack Mount KVM Switch User's Guide July,2004 All the available hotkey commands are summarized in the following table for Hotkey Sequences Page 18 Chapter 3 Operation

User's Guide
Page 19
... Menu, use it to password-protect your screen. The OSD menu also allows you to control the KVM switch with more convenient and intuitive menu-driven operation. TK-802R_TK-1602R Rack Mount KVM Switch User's Guide 3.1.3. You can use the hotkey sequence Show OSD Menu = Scr Scr Lk Lk (...space bar) OSD (On Screen Display) is a menu that while OSD is superimposed on your KVM switch system. PWD CONFIG Pg Dn...
... Menu, use it to password-protect your screen. The OSD menu also allows you to control the KVM switch with more convenient and intuitive menu-driven operation. TK-802R_TK-1602R Rack Mount KVM Switch User's Guide 3.1.3. You can use the hotkey sequence Show OSD Menu = Scr Scr Lk Lk (...space bar) OSD (On Screen Display) is a menu that while OSD is superimposed on your KVM switch system. PWD CONFIG Pg Dn...

User's Guide
Page 20
... background color indicates that it is currently active, and you can see on it is currently connected to the KVM Switch and thus feeding power through its PS/2 interface to the KVM Switch. The OSD options that it by a rightward arrow, , indicate that are some OSD operation tips for editing...Insert key to navigate. Others that you have selected (with a little solar symbol after them are followed by your reference. 3.1.5. TK-802R_TK-1602R Rack Mount KVM Switch User's Guide July,2004 As you want to select, just hit the Enter key for selection and, if needed, the Insert key...
... background color indicates that it is currently active, and you can see on it is currently connected to the KVM Switch and thus feeding power through its PS/2 interface to the KVM Switch. The OSD options that it by a rightward arrow, , indicate that are some OSD operation tips for editing...Insert key to navigate. Others that you have selected (with a little solar symbol after them are followed by your reference. 3.1.5. TK-802R_TK-1602R Rack Mount KVM Switch User's Guide July,2004 As you want to select, just hit the Enter key for selection and, if needed, the Insert key...

User's Guide
Page 21
Front-Panel Button Press the corresponding button on its own), therefore you should press the following will describe each command operation of the KVM Switch and available ways to select bank 3 port 7, you should first press its bank number by a front-panel button, a keyboard ... port 7, you want to execute the commands, either by "01". Page 21 Chapter 3 Operation TK-802R_TK-1602R Rack Mount KVM Switch User's Guide July,2004 3.2. itself a master KVM Switch on the specific switch, to which the channel you should always specified its default bank number 01 and then the port ...
Front-Panel Button Press the corresponding button on its own), therefore you should press the following will describe each command operation of the KVM Switch and available ways to select bank 3 port 7, you should first press its bank number by a front-panel button, a keyboard ... port 7, you want to execute the commands, either by "01". Page 21 Chapter 3 Operation TK-802R_TK-1602R Rack Mount KVM Switch User's Guide July,2004 3.2. itself a master KVM Switch on the specific switch, to which the channel you should always specified its default bank number 01 and then the port ...

User's Guide
Page 22
... for bank selection and navigate the OSD Menu by cursors key to the channel you want to select and hit Enter to select. TK-802R_TK-1602R Rack Mount KVM Switch User's Guide July,2004 OSD To activate the OSD Menu, hit ScrLk + ScrLk + Space Bar. Front Panel Button Press the corresponding ... daisy-chained) Front Panel Button Press the corresponding button. While the OSD Menu is activated on a specific bank (when you have daisy-chained multiple KVM switch units), just use the cursor keys to navigate to the channel you want and then hit Enter or Insert key to make it your active...
... for bank selection and navigate the OSD Menu by cursors key to the channel you want to select and hit Enter to select. TK-802R_TK-1602R Rack Mount KVM Switch User's Guide July,2004 OSD To activate the OSD Menu, hit ScrLk + ScrLk + Space Bar. Front Panel Button Press the corresponding ... daisy-chained) Front Panel Button Press the corresponding button. While the OSD Menu is activated on a specific bank (when you have daisy-chained multiple KVM switch units), just use the cursor keys to navigate to the channel you want and then hit Enter or Insert key to make it your active...
User's Guide
Page 23
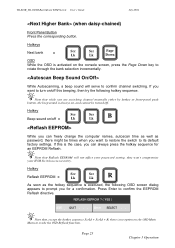
... the following hotkey sequence. While Autoscanning, a beep sound will not affect your password setting, thus won't compromise your KVM Switch access security. Press Enter to confirm channel switching. Page 23 Chapter 3 Operation If this beeping, then try the following OSD screen dialog appears to prompt you want to... change the computer names, autoscan time as well as password, there might be times when you for an EEPROM Reflash. TK-802R_TK-1602R Rack Mount KVM Switch User's Guide July,2004 (when daisy-chained) Front Panel Button Press the corresponding button.
... the following hotkey sequence. While Autoscanning, a beep sound will not affect your password setting, thus won't compromise your KVM Switch access security. Press Enter to confirm channel switching. Page 23 Chapter 3 Operation If this beeping, then try the following OSD screen dialog appears to prompt you want to... change the computer names, autoscan time as well as password, there might be times when you for an EEPROM Reflash. TK-802R_TK-1602R Rack Mount KVM Switch User's Guide July,2004 (when daisy-chained) Front Panel Button Press the corresponding button.
