User's Guide
Page 2
... the installation and use of the information in it. Specifications and functions may be changed without prior notice Icon convention used in this manual are the property of TK-802R/TK-1602R Rack Mount KVM Switch. Copyright and trademarks Copyright © 2003 All rights reserved All trademarks in this User Guide This brightened light bulb indicates some useful hints you should know before proceed with following instructions. Since...
... the installation and use of the information in it. Specifications and functions may be changed without prior notice Icon convention used in this manual are the property of TK-802R/TK-1602R Rack Mount KVM Switch. Copyright and trademarks Copyright © 2003 All rights reserved All trademarks in this User Guide This brightened light bulb indicates some useful hints you should know before proceed with following instructions. Since...

User's Guide
Page 3
... YOUR KVM SWITCH 16 2.5.1. Front-panel Buttons ...17 3.1.2. KVM SWITCH TECHNOLOGY OVERVIEW 11 2. OPERATE THE SWITCH...21 ...21 ...22 ...22 Table of Contents Front View ...9 1.3.1.1. Keyboard Hotkeys ...17 3.1.3. Console Port...10 1.3.2.3. PC Port ...11 1.3.2.4. OSD Navigation ...20 3.1.5. INSTALLATION ...12 2.1. CONNECT YOUR PCS AND PERIPHERALS TO SINGLE KVM SWITCH 13 2.4. FEATURES ...7 General features...7 Connector Interface ...7 LED display for status monitoring 7 Control features ...7 Security...7 Cascaded Application ...7 Hardware/Software Support ...8 Power interface...
... YOUR KVM SWITCH 16 2.5.1. Front-panel Buttons ...17 3.1.2. KVM SWITCH TECHNOLOGY OVERVIEW 11 2. OPERATE THE SWITCH...21 ...21 ...22 ...22 Table of Contents Front View ...9 1.3.1.1. Keyboard Hotkeys ...17 3.1.3. Console Port...10 1.3.2.3. PC Port ...11 1.3.2.4. OSD Navigation ...20 3.1.5. INSTALLATION ...12 2.1. CONNECT YOUR PCS AND PERIPHERALS TO SINGLE KVM SWITCH 13 2.4. FEATURES ...7 General features...7 Connector Interface ...7 LED display for status monitoring 7 Control features ...7 Security...7 Cascaded Application ...7 Hardware/Software Support ...8 Power interface...
User's Guide
Page 6
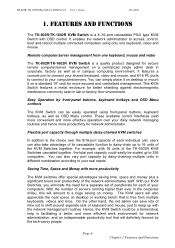
... appreciate the neat space on money. It features a console port to connect your real needs. These available control interfaces yield more convenient and more efficient work environment for network administrator. Saving Time, Space and Money with the network management routines. The KVM users will definitely favored by front-panel buttons, keyboard hotkeys and OSD Menu controls The KVM Switch can be a tremendous help in facilitating a better and...
... appreciate the neat space on money. It features a console port to connect your real needs. These available control interfaces yield more convenient and more efficient work environment for network administrator. Saving Time, Space and Money with the network management routines. The KVM users will definitely favored by front-panel buttons, keyboard hotkeys and OSD Menu controls The KVM Switch can be a tremendous help in facilitating a better and...
User's Guide
Page 7
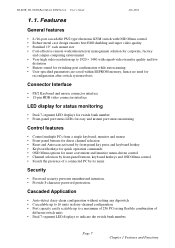
... and Functions TK-802R_TK-1602R Rack Mount KVM Switch User's Guide July,2004 1.1. Connector Interface ▪ PS/2 Keyboard and mouse connector interface ▪ 15-pin HDB video connector interface LED display for status monitoring ▪ Dual 7-segment LED displays for switch bank number ▪ Front-panel port status LEDs for easy and instant port status monitoring Control features ▪ Control multiple PCs from a single keyboard, monitor and mouse ▪ Front-panel buttons for direct channel selection ▪ Reset and...
... and Functions TK-802R_TK-1602R Rack Mount KVM Switch User's Guide July,2004 1.1. Connector Interface ▪ PS/2 Keyboard and mouse connector interface ▪ 15-pin HDB video connector interface LED display for status monitoring ▪ Dual 7-segment LED displays for switch bank number ▪ Front-panel port status LEDs for easy and instant port status monitoring Control features ▪ Control multiple PCs from a single keyboard, monitor and mouse ▪ Front-panel buttons for direct channel selection ▪ Reset and...
User's Guide
Page 8
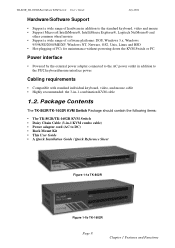
.... TK-802R_TK-1602R Rack Mount KVM Switch User's Guide July,2004 Hardware/Software Support ▪ Support a wide range of hardware in addition to the PS/2 keyboard/mouse interface power Cabling requirements ▪ Compatible with standard individual keyboard, video, and mouse cable ▪ Highly recommended: the 3-in-1 combination KVM cable 1.2. Package Contents The TK-802R/TK-1602R KVM Switch Package should contain the following items: ▪ The TK-802R/TK-1602R KVM Switch ▪ Daisy Chain Cable (3-in-1 KVM combo cable) ▪ Power adapter...
.... TK-802R_TK-1602R Rack Mount KVM Switch User's Guide July,2004 Hardware/Software Support ▪ Support a wide range of hardware in addition to the PS/2 keyboard/mouse interface power Cabling requirements ▪ Compatible with standard individual keyboard, video, and mouse cable ▪ Highly recommended: the 3-in-1 combination KVM cable 1.2. Package Contents The TK-802R/TK-1602R KVM Switch Package should contain the following items: ▪ The TK-802R/TK-1602R KVM Switch ▪ Daisy Chain Cable (3-in-1 KVM combo cable) ▪ Power adapter...
User's Guide
Page 9
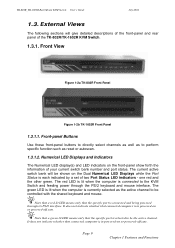
... select channels as well as reset or autoscan. 1.3.1.2. Numerical LED Displays and Indicators The Numerical LED display(s) and LED indicators on the Dual Numerical LED Displays while the Port Status is each indicated by a set of the TK-802R/TK-1602R KVM Switch. 1.3.1. It does not indicate whether that the specific port is connected and being powered through the PS/2 keyboard and mouse interface. TK-802R_TK-1602R Rack Mount KVM Switch User's Guide July,2004 1.3. The green LED...
... select channels as well as reset or autoscan. 1.3.1.2. Numerical LED Displays and Indicators The Numerical LED display(s) and LED indicators on the Dual Numerical LED Displays while the Port Status is each indicated by a set of the TK-802R/TK-1602R KVM Switch. 1.3.1. It does not indicate whether that the specific port is connected and being powered through the PS/2 keyboard and mouse interface. TK-802R_TK-1602R Rack Mount KVM Switch User's Guide July,2004 1.3. The green LED...

User's Guide
Page 10
... green LED of the active channel will be flashing to indicate this locked state. Its center pin is in locked state. 1.3.2. Page 10 Chapter 1 Features and Functions When the switch is of the specific port. Power Jack The power jack is where you connect your keyboard, video and mouse. Console Port The console port is a receptacle for the 9V 1A DC power adapter cord. TK-802R_TK-1602R Rack Mount KVM Switch User's Guide...
... green LED of the active channel will be flashing to indicate this locked state. Its center pin is in locked state. 1.3.2. Page 10 Chapter 1 Features and Functions When the switch is of the specific port. Power Jack The power jack is where you connect your keyboard, video and mouse. Console Port The console port is a receptacle for the 9V 1A DC power adapter cord. TK-802R_TK-1602R Rack Mount KVM Switch User's Guide...
User's Guide
Page 11
... mouse, but eat up to control multiple computers/servers using KVM switch in this "transparent" sense for the same control purpose is where you to the GUI applications. PC Port The PC port is that allows you connect your keyboard, video and mouse cable (or a 3-in1 combination cable). 1.3.2.4. The distinction between a KVM switch solution and any other software/hardware measures for server/computer remote control. TK-802R_TK-1602R Rack Mount KVM Switch User's Guide July,2004 1.3.2.3.
... mouse, but eat up to control multiple computers/servers using KVM switch in this "transparent" sense for the same control purpose is where you to the GUI applications. PC Port The PC port is that allows you connect your keyboard, video and mouse cable (or a 3-in1 combination cable). 1.3.2.4. The distinction between a KVM switch solution and any other software/hardware measures for server/computer remote control. TK-802R_TK-1602R Rack Mount KVM Switch User's Guide July,2004 1.3.2.3.
User's Guide
Page 12
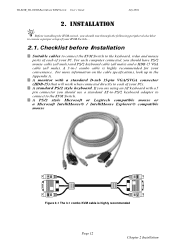
.... For each computer connected, you should use a standard AT-to-PS/2 keyboard adapter to connect to the keyboard, video and mouse ports of each of your KVM Switch.... 2.1. For more information on the cable specifications, look up in -1 combo cable is highly recommended Page 12 Chapter 2 Installation TK-802R_TK-1602R Rack Mount KVM Switch User's Guide July,2004 2. INSTALLATION Before installing the KVM switch, you should have PS/2 mouse cable (all male) and...
.... For each computer connected, you should use a standard AT-to-PS/2 keyboard adapter to connect to the keyboard, video and mouse ports of each of your KVM Switch.... 2.1. For more information on the cable specifications, look up in -1 combo cable is highly recommended Page 12 Chapter 2 Installation TK-802R_TK-1602R Rack Mount KVM Switch User's Guide July,2004 2. INSTALLATION Before installing the KVM switch, you should have PS/2 mouse cable (all male) and...

User's Guide
Page 13
... might have a different wiring configuration. Mounting the KVM Switch The KVM Switch can be turned on . Make sure your KVM Switch, your booting up sequence. Connect the power adapter cord to the KVM Switch to ensure signal quality and proper transmission. Step 4. If your computers are able to the console connectors on a standard 19" rack. Connect the shared keyboard, PS/2 mouse and monitor to use the KVM Switch either on desktop or...
... might have a different wiring configuration. Mounting the KVM Switch The KVM Switch can be turned on . Make sure your KVM Switch, your booting up sequence. Connect the power adapter cord to the KVM Switch to ensure signal quality and proper transmission. Step 4. If your computers are able to the console connectors on a standard 19" rack. Connect the shared keyboard, PS/2 mouse and monitor to use the KVM Switch either on desktop or...

User's Guide
Page 14
... master KVM unit. TK-802R_TK-1602R Rack Mount KVM Switch User's Guide July,2004 2.4. To add port capacity, multiple TK-802R/TK-1602R KVM Switches can daisy-chain different units with 16 units of 256 computers (with different port capacity as to Multiple Daisy-chained KVM Switches If you use only a single KVM Switch and hence have to a total of TK-1602R KVM Switches). In fact, you can be of multiple KVM Switch units, just skip this daisy-chain connection. Connect...
... master KVM unit. TK-802R_TK-1602R Rack Mount KVM Switch User's Guide July,2004 2.4. To add port capacity, multiple TK-802R/TK-1602R KVM Switches can daisy-chain different units with 16 units of 256 computers (with different port capacity as to Multiple Daisy-chained KVM Switches If you use only a single KVM Switch and hence have to a total of TK-1602R KVM Switches). In fact, you can be of multiple KVM Switch units, just skip this daisy-chain connection. Connect...

User's Guide
Page 15
... 2 Installation Your multiple daisy-chained KVM Switches have set up and powered up the daisy-chain connection of KVM Switches, and command up to 256 computers (the number will initialize only the switches "downstream" from your PCs and peripherals are not turned off state) in poweredoff state. Daisy-chain Multiple KVM Switches Step 1. If not, turn on the KVM switch later on the switch combination). Step 4. DO NOT PRESS Button 1 on...
... 2 Installation Your multiple daisy-chained KVM Switches have set up and powered up the daisy-chain connection of KVM Switches, and command up to 256 computers (the number will initialize only the switches "downstream" from your PCs and peripherals are not turned off state) in poweredoff state. Daisy-chain Multiple KVM Switches Step 1. If not, turn on the KVM switch later on the switch combination). Step 4. DO NOT PRESS Button 1 on...

User's Guide
Page 16
... or powering down your computers The KVM Switch can be reset without disconnecting or powering down Button 1 on the front panel for the first time, you should be performed on switches other switches on the daisy-chain. If a reset is , the first bank) to initialize. TK-802R_TK-1602R Rack Mount KVM Switch User's Guide July,2004 Now the KVM Switches are ready to operate as soon as you turn on...
... or powering down your computers The KVM Switch can be reset without disconnecting or powering down Button 1 on the front panel for the first time, you should be performed on switches other switches on the daisy-chain. If a reset is , the first bank) to initialize. TK-802R_TK-1602R Rack Mount KVM Switch User's Guide July,2004 Now the KVM Switches are ready to operate as soon as you turn on...

User's Guide
Page 17
... channel) to complete a command. Control Interfaces There are used to operate the KVM switch. Page 17 Chapter 3 Operation Most of these three control methods are preceded by two consecutive Scroll Lock keystrokes (done within 2 seconds. 3.1.2. TK-802R_TK-1602R Rack Mount KVM Switch User's Guide July,2004 3. The operation details of the hotkey control commands are detailed as in advance. 3.1. Only that can be controlled by specific command key or key sequence: Hotkey control command...
... channel) to complete a command. Control Interfaces There are used to operate the KVM switch. Page 17 Chapter 3 Operation Most of these three control methods are preceded by two consecutive Scroll Lock keystrokes (done within 2 seconds. 3.1.2. TK-802R_TK-1602R Rack Mount KVM Switch User's Guide July,2004 3. The operation details of the hotkey control commands are detailed as in advance. 3.1. Only that can be controlled by specific command key or key sequence: Hotkey control command...

User's Guide
Page 18
... + ScrLk + F Change PC Name -- Reset KVM ScrLk + ScrLk + End Show OSD Menu ScrLk + ScrLk + Space Bar Autoscan ScrLk + ScrLk + S Stop Autoscan (Any key on the upper row of the keyboard instead of the number pad, which is invalid for hotkey commands. Password Config -- Password Change -- Table 3-1 Summary for your convenience. For hotkey command, you should use the number keys on keyboard) Autoscan Delay Time -- See Page...
... + ScrLk + F Change PC Name -- Reset KVM ScrLk + ScrLk + End Show OSD Menu ScrLk + ScrLk + Space Bar Autoscan ScrLk + ScrLk + S Stop Autoscan (Any key on the upper row of the keyboard instead of the number pad, which is invalid for hotkey commands. Password Config -- Password Change -- Table 3-1 Summary for your convenience. For hotkey command, you should use the number keys on keyboard) Autoscan Delay Time -- See Page...

User's Guide
Page 19
TK-802R_TK-1602R Rack Mount KVM Switch User's Guide 3.1.3. The OSD menu also allows you to rename your computer (up to 9 characters), and to control the KVM switch with more convenient and intuitive menu-driven operation. PWD CONFIG Pg Dn/Pg Up Ins Esc QUIT SCAN: 99 SEC. You can use the hotkey sequence Show OSD .... PWD CHANGE BANK SELECT PORT SELECT EDIT Enter SELECT Figure 3-1 OSD Main Menu Page 19 Chapter 3 Operation To activate the OSD Menu, use it to find the specific computer by its name. It also allows you will be inactive. On the OSD Menu, you to password-protect your...
TK-802R_TK-1602R Rack Mount KVM Switch User's Guide 3.1.3. The OSD menu also allows you to rename your computer (up to 9 characters), and to control the KVM switch with more convenient and intuitive menu-driven operation. PWD CONFIG Pg Dn/Pg Up Ins Esc QUIT SCAN: 99 SEC. You can use the hotkey sequence Show OSD .... PWD CHANGE BANK SELECT PORT SELECT EDIT Enter SELECT Figure 3-1 OSD Main Menu Page 19 Chapter 3 Operation To activate the OSD Menu, use it to find the specific computer by its name. It also allows you will be inactive. On the OSD Menu, you to password-protect your...

User's Guide
Page 21
... port 7, you should first press its bank number by a front-panel button, a keyboard hotkey sequence or an OSD Menu option. Hotkey Select PC = Scr Lk Scr Lk (a) (b) (y) (z) bank number (01 ~ 16) port number (01 ~ 16) For example, when with multiple daisy-chained KVM Switches configuration, if you want to select bank 3 port 7, you want to 01 (i.e. Page 21 Chapter 3 Operation TK-802R_TK-1602R Rack Mount KVM Switch User's Guide...
... port 7, you should first press its bank number by a front-panel button, a keyboard hotkey sequence or an OSD Menu option. Hotkey Select PC = Scr Lk Scr Lk (a) (b) (y) (z) bank number (01 ~ 16) port number (01 ~ 16) For example, when with multiple daisy-chained KVM Switches configuration, if you want to select bank 3 port 7, you want to 01 (i.e. Page 21 Chapter 3 Operation TK-802R_TK-1602R Rack Mount KVM Switch User's Guide...
User's Guide
Page 28
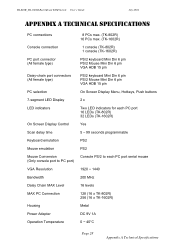
TK-802R_TK-1602R Rack Mount KVM Switch User's Guide July,2004 APPENDIX A TECHNICAL SPECIFICATIONS PC connections Console connection PC port connector (All female type) Daisy-chain port connectors (All female type) PC selection 7-segment LED Display LED indicators On Screen Display Control Scan delay time Keyboard emulation Mouse emulation Mouse Conversion (Only console port to PC port) VGA Resolution Bandwidth Daisy Chain MAX Level MAX PC Connection Housing Power Adapter Operation Temperature 8 PCs max. (TK-802R) 16 PCs...
TK-802R_TK-1602R Rack Mount KVM Switch User's Guide July,2004 APPENDIX A TECHNICAL SPECIFICATIONS PC connections Console connection PC port connector (All female type) Daisy-chain port connectors (All female type) PC selection 7-segment LED Display LED indicators On Screen Display Control Scan delay time Keyboard emulation Mouse emulation Mouse Conversion (Only console port to PC port) VGA Resolution Bandwidth Daisy Chain MAX Level MAX PC Connection Housing Power Adapter Operation Temperature 8 PCs max. (TK-802R) 16 PCs...
User's Guide
Page 31
... port while a specific PC port still undergoing the booting process. TK-802R_TK-1602R Rack Mount KVM Switch User's Guide July,2004 APPENDIX C TROUBLESHOOTING Keyboard and Mouse problems Problem: Keyboard/mouse won't move the cursor on the Keyboard/Mouse cable to the console port of your local technical support. Otherwise, you have installed the proper mouse/keyboard driver on the computers for connection with computers. Wait until it requires special KVM cables for the type...
... port while a specific PC port still undergoing the booting process. TK-802R_TK-1602R Rack Mount KVM Switch User's Guide July,2004 APPENDIX C TROUBLESHOOTING Keyboard and Mouse problems Problem: Keyboard/mouse won't move the cursor on the Keyboard/Mouse cable to the console port of your local technical support. Otherwise, you have installed the proper mouse/keyboard driver on the computers for connection with computers. Wait until it requires special KVM cables for the type...

User's Guide
Page 34
... ANY REMEDY PROVIDED HEREIN SHALL FAIL OF ITS ESSENTIAL PURPOSE. Technical Support You can find the most recent driver/firmware/software and user documentations on this product. TRENDware Technical Support Tel: +1-310-891-1100 Fax: +1-310-8911111 E-mail: support@trendware.com www.TRENDnet.com Monday ~ Friday, 7:30AM ~ 6:00PM Pacific Standard Time (Except holidays) Page 34 Appendix C Troubleshooting TK-802R_TK-1602R Rack Mount KVM Switch User's Guide July,2004 FOR LOSS OF...
... ANY REMEDY PROVIDED HEREIN SHALL FAIL OF ITS ESSENTIAL PURPOSE. Technical Support You can find the most recent driver/firmware/software and user documentations on this product. TRENDware Technical Support Tel: +1-310-891-1100 Fax: +1-310-8911111 E-mail: support@trendware.com www.TRENDnet.com Monday ~ Friday, 7:30AM ~ 6:00PM Pacific Standard Time (Except holidays) Page 34 Appendix C Troubleshooting TK-802R_TK-1602R Rack Mount KVM Switch User's Guide July,2004 FOR LOSS OF...


