
User Guide
Page 7
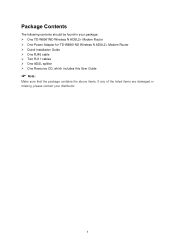
Package Contents The following contents should be found in your package: ¾ One TD-W8961ND Wireless N ADSL2+ Modem Router ¾ One Power Adapter for TD-W8961ND Wireless N ADSL2+ Modem Router ¾ Quick Installation Guide ¾ One RJ45 cable ¾ Two RJ11 cables ¾ One ADSL splitter ¾ One Resource CD, which includes this User Guide ) Note: Make sure that the package contains the above items. If any of the listed items are damaged or missing, please contact your distributor. 1
Package Contents The following contents should be found in your package: ¾ One TD-W8961ND Wireless N ADSL2+ Modem Router ¾ One Power Adapter for TD-W8961ND Wireless N ADSL2+ Modem Router ¾ Quick Installation Guide ¾ One RJ45 cable ¾ Two RJ11 cables ¾ One ADSL splitter ¾ One Resource CD, which includes this User Guide ) Note: Make sure that the package contains the above items. If any of the listed items are damaged or missing, please contact your distributor. 1
User Guide
Page 8
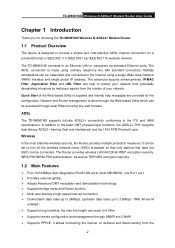
....11b wireless network. In addition to an Ethernet LAN or computers via standard Ethernet ports. TD-W8961ND Wireless N ADSL2+ Modem Router User Guide Chapter 1 Introduction Thank you for choosing the TD-W8961ND Wireless N ADSL2+ Modem Router. 1.1 Product Overview The device is designed to provide a .... Wireless In the most attentive wireless security, the Router provides multiple protection measures. Multiple workstations can be connected. The TD-W8961ND connects to the basic DMT physical layer functions, the ADSL2+ PHY supports dual latency ADSL2+ framing (fast and interleaved)...
....11b wireless network. In addition to an Ethernet LAN or computers via standard Ethernet ports. TD-W8961ND Wireless N ADSL2+ Modem Router User Guide Chapter 1 Introduction Thank you for choosing the TD-W8961ND Wireless N ADSL2+ Modem Router. 1.1 Product Overview The device is designed to provide a .... Wireless In the most attentive wireless security, the Router provides multiple protection measures. Multiple workstations can be connected. The TD-W8961ND connects to the basic DMT physical layer functions, the ADSL2+ PHY supports dual latency ADSL2+ framing (fast and interleaved)...
User Guide
Page 9
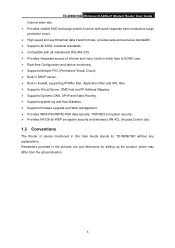
TD-W8961ND Wireless N ADSL2+ Modem Router User Guide Internet when idle. ¾ Provides reliable ESD and surge-protect function with quick response semi-...differ from the actual situation. 3 Parameters provided in the pictures are just references for setting up the product, which face to SOHO user. ¾ Real-time Configuration and device monitoring. ¾ Supports Multiple PVC (Permanent Virtual Circuit). ¾ Built-in DHCP server... and wireless LAN ACL (Access Control List). 1.3 Conventions The Router or device mentioned in this User Guide stands for TD-W8961ND without any explanations.
TD-W8961ND Wireless N ADSL2+ Modem Router User Guide Internet when idle. ¾ Provides reliable ESD and surge-protect function with quick response semi-...differ from the actual situation. 3 Parameters provided in the pictures are just references for setting up the product, which face to SOHO user. ¾ Real-time Configuration and device monitoring. ¾ Supports Multiple PVC (Permanent Virtual Circuit). ¾ Built-in DHCP server... and wireless LAN ACL (Access Control List). 1.3 Conventions The Router or device mentioned in this User Guide stands for TD-W8961ND without any explanations.
User Guide
Page 10
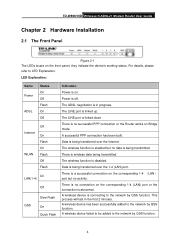
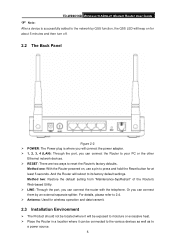
... (LAN) port but no successful PPP connection or the Router works on the corresponding 1-4 (LAN) port or the connection is linked up. Data is a successful connection on . There is being transferred over the 1-4 (LAN) port. A wireless device has been successfully ... is no activity. The wireless function is enabled but no connection on Bridge mode. This process will last in progress. TD-W8961ND Wireless N ADSL2+ Modem Router User Guide Chapter 2 Hardware Installation 2.1 The Front Panel Figure 2-1 The LEDs locate on the front panel, they indicate the device's...
... (LAN) port but no successful PPP connection or the Router works on the corresponding 1-4 (LAN) port or the connection is linked up. Data is a successful connection on . There is being transferred over the 1-4 (LAN) port. A wireless device has been successfully ... is no activity. The wireless function is enabled but no connection on Bridge mode. This process will last in progress. TD-W8961ND Wireless N ADSL2+ Modem Router User Guide Chapter 2 Hardware Installation 2.1 The Front Panel Figure 2-1 The LEDs locate on the front panel, they indicate the device's...
User Guide
Page 11
... transmit. 2.3 Installation Environment ¾ The Product should not be connected to the various devices as well as to reset the Router's factory defaults. TD-W8961ND Wireless N ADSL2+ Modem Router User Guide ) Note: After a device is where you will connect the power adapter. ¾ 1, 2, 3, 4 (LAN): Through the port, you can connect them by QSS function...
... transmit. 2.3 Installation Environment ¾ The Product should not be connected to the various devices as well as to reset the Router's factory defaults. TD-W8961ND Wireless N ADSL2+ Modem Router User Guide ) Note: After a device is where you will connect the power adapter. ¾ 1, 2, 3, 4 (LAN): Through the port, you can connect them by QSS function...
User Guide
Page 12
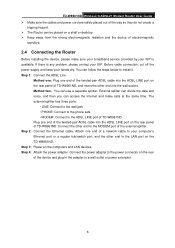
If there is available. Step 2: Connect the Ethernet cable. TD-W8961ND Wireless N ADSL2+ Modem Router User Guide ¾ Make sure the cables and power cord are safely placed out of the way so they do not create a tripping hazard. ¾ The Router ... of the external splitter. Step 4: Attach the power adapter. Before cable connection, cut off the power supply and keep your ISP. Step 3: Power on the TD-W8961ND. Connect the power adapter to install it. Method two:You can follow the steps below to the power connector on the rear panel of...
If there is available. Step 2: Connect the Ethernet cable. TD-W8961ND Wireless N ADSL2+ Modem Router User Guide ¾ Make sure the cables and power cord are safely placed out of the way so they do not create a tripping hazard. ¾ The Router ... of the external splitter. Step 4: Attach the power adapter. Before cable connection, cut off the power supply and keep your ISP. Step 3: Power on the TD-W8961ND. Connect the power adapter to install it. Method two:You can follow the steps below to the power connector on the rear panel of...
User Guide
Page 13
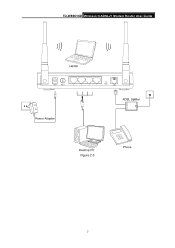
TD-W8961ND Wireless N ADSL2+ Modem Router User Guide Figure 2-3 7
TD-W8961ND Wireless N ADSL2+ Modem Router User Guide Figure 2-3 7
User Guide
Page 14
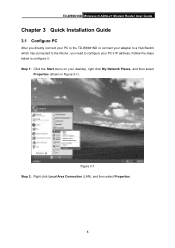
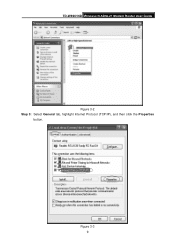
Figure 3-1 Step 2: Right click Local Area Connection (LAN), and then select Properties. 8 Follow the steps below to configure your desktop, right click My Network Places, and then select Properties (shown in Figure 3-1). Step 1: Click the Start menu on your PC's IP address. TD-W8961ND Wireless N ADSL2+ Modem Router User Guide Chapter 3 Quick Installation Guide 3.1 Configure PC After you directly connect your PC to the TD-W8961ND or connect your adapter to a Hub/Switch which has connected to the Router, you need to configure it.
Figure 3-1 Step 2: Right click Local Area Connection (LAN), and then select Properties. 8 Follow the steps below to configure your desktop, right click My Network Places, and then select Properties (shown in Figure 3-1). Step 1: Click the Start menu on your PC's IP address. TD-W8961ND Wireless N ADSL2+ Modem Router User Guide Chapter 3 Quick Installation Guide 3.1 Configure PC After you directly connect your PC to the TD-W8961ND or connect your adapter to a Hub/Switch which has connected to the Router, you need to configure it.
User Guide
Page 15
TD-W8961ND Wireless N ADSL2+ Modem Router User Guide Figure 3-2 Step 3: Select General tab, highlight Internet Protocol (TCP/IP), and then click the Properties button. Figure 3-3 9
TD-W8961ND Wireless N ADSL2+ Modem Router User Guide Figure 3-2 Step 3: Select General tab, highlight Internet Protocol (TCP/IP), and then click the Properties button. Figure 3-3 9
User Guide
Page 16
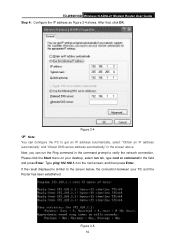
..., you can configure the PC to the screen below, the connection between your desktop, select run the Ping command in the field and press Enter. TD-W8961ND Wireless N ADSL2+ Modem Router User Guide Step 4: Configure the IP address as Figure 3-4 shows.
..., you can configure the PC to the screen below, the connection between your desktop, select run the Ping command in the field and press Enter. TD-W8961ND Wireless N ADSL2+ Modem Router User Guide Step 4: Configure the IP address as Figure 3-4 shows.
User Guide
Page 17
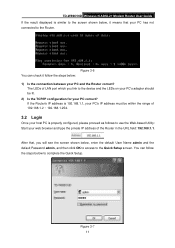
The LEDs of the Router in the URL field: 192.168.1.1. You can check it means that , you link to the device and the LEDs on your PC's adapter should be within the range of 192.168.1.2 ~ 192.168.1.254. 3.2 Login Once your host ... your web browser and type the private IP address of LAN port which you will see the screen shown below to complete the Quick Setup. TD-W8961ND Wireless N ADSL2+ Modem Router User Guide If the result displayed is similar to the screen shown below, it follow the steps below , enter the default...
The LEDs of the Router in the URL field: 192.168.1.1. You can check it means that , you link to the device and the LEDs on your PC's adapter should be within the range of 192.168.1.2 ~ 192.168.1.254. 3.2 Login Once your host ... your web browser and type the private IP address of LAN port which you will see the screen shown below to complete the Quick Setup. TD-W8961ND Wireless N ADSL2+ Modem Router User Guide If the result displayed is similar to the screen shown below, it follow the steps below , enter the default...
User Guide
Page 18
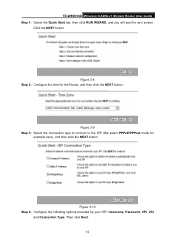
Figure 3-10 Step 4: Configure the following options provided by your ISP: Username, Password, VPI, VCI and Connection Type. Figure 3-9 Step 3: Select the connection type to connect to the ISP (We select PPPoE/PPPoA mode for the Router, and then click the NEXT button. Then click Next. 12 Click the NEXT button. TD-W8961ND Wireless N ADSL2+ Modem Router User Guide Step 1: Select the Quick Start tab, then click RUN WIZARD, and you will see the next screen. Figure 3-8 Step 2: Configure the time for example here), and then click the NEXT button.
Figure 3-10 Step 4: Configure the following options provided by your ISP: Username, Password, VPI, VCI and Connection Type. Figure 3-9 Step 3: Select the connection type to connect to the ISP (We select PPPoE/PPPoA mode for the Router, and then click the NEXT button. Then click Next. 12 Click the NEXT button. TD-W8961ND Wireless N ADSL2+ Modem Router User Guide Step 1: Select the Quick Start tab, then click RUN WIZARD, and you will see the next screen. Figure 3-8 Step 2: Configure the time for example here), and then click the NEXT button.
User Guide
Page 19
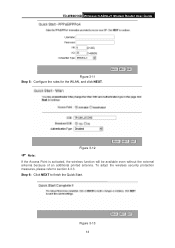
To adopt the wireless security protection measures, please refer to finish the Quick Start. Figure 3-13 13 Figure 3-12 ) Note: If the Access Point is activated, the wireless function will be available even without the external antenna because of an additional printed antenna. TD-W8961ND Wireless N ADSL2+ Modem Router User Guide Figure 3-11 Step 5: Configure the rules for the WLAN, and click NEXT. Step 6: Click NEXT to section 4.3.3.
To adopt the wireless security protection measures, please refer to finish the Quick Start. Figure 3-13 13 Figure 3-12 ) Note: If the Access Point is activated, the wireless function will be available even without the external antenna because of an additional printed antenna. TD-W8961ND Wireless N ADSL2+ Modem Router User Guide Figure 3-11 Step 5: Configure the rules for the WLAN, and click NEXT. Step 6: Click NEXT to section 4.3.3.

User Guide
Page 20
...configure and manage the device. The information will be able to configure the corresponding function. TD-W8961ND Wireless N ADSL2+ Modem Router User Guide Chapter 4 Software Configuration This User Guide recommends using the "Quick Installation Guide" for first-time installation. On the center of the Web-based Utility, there are... you will vary depending on the settings of the Web-based Utility; Figure 4-1 Click any of the main menus. For advanced users, if you will be able to view the device information, including LAN, WAN and ADSL. submenus will get help from this chapter...
...configure and manage the device. The information will be able to configure the corresponding function. TD-W8961ND Wireless N ADSL2+ Modem Router User Guide Chapter 4 Software Configuration This User Guide recommends using the "Quick Installation Guide" for first-time installation. On the center of the Web-based Utility, there are... you will vary depending on the settings of the Web-based Utility; Figure 4-1 Click any of the main menus. For advanced users, if you will be able to view the device information, including LAN, WAN and ADSL. submenus will get help from this chapter...
User Guide
Page 21
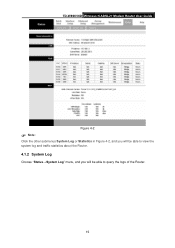
TD-W8961ND Wireless N ADSL2+ Modem Router User Guide Figure 4-2 ) Note: Click the other submenus System Log or Statistics in Figure 4-2, and you will be able to view the system log and traffic statistics about the Router. 4.1.2 System Log Choose "Status→System Log" menu, and you will be able to query the logs of the Router. 15
TD-W8961ND Wireless N ADSL2+ Modem Router User Guide Figure 4-2 ) Note: Click the other submenus System Log or Statistics in Figure 4-2, and you will be able to view the system log and traffic statistics about the Router. 4.1.2 System Log Choose "Status→System Log" menu, and you will be able to query the logs of the Router. 15
User Guide
Page 22
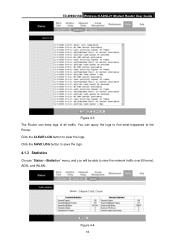
Figure 4-4 16 Click the SAVE LOG button to save the logs. 4.1.3 Statistics Choose "Status→Statistics" menu, and you will be able to clear the logs. Click the CLEAR LOG button to view the network traffic over Ethernet, ADSL and WLAN. You can keep logs of all traffic. TD-W8961ND Wireless N ADSL2+ Modem Router User Guide Figure 4-3 The Router can query the logs to find what happened to the Router.
Figure 4-4 16 Click the SAVE LOG button to save the logs. 4.1.3 Statistics Choose "Status→Statistics" menu, and you will be able to clear the logs. Click the CLEAR LOG button to view the network traffic over Ethernet, ADSL and WLAN. You can keep logs of all traffic. TD-W8961ND Wireless N ADSL2+ Modem Router User Guide Figure 4-3 The Router can query the logs to find what happened to the Router.
User Guide
Page 23
TD-W8961ND Wireless N ADSL2+ Modem Router User Guide ¾ Interface: You can select Ethernet, ADSL and WLAN to view the corresponding network traffic over different ports. ¾ Select Ethernet, and you will see ...
TD-W8961ND Wireless N ADSL2+ Modem Router User Guide ¾ Interface: You can select Ethernet, ADSL and WLAN to view the corresponding network traffic over different ports. ¾ Select Ethernet, and you will see ...
User Guide
Page 24
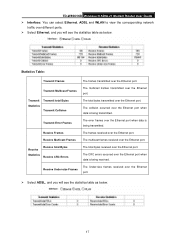
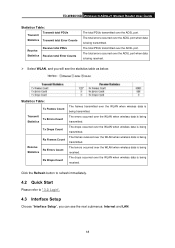
... is being transmitted. The total errors occurred over the WLAN when wireless data is being received. The frames received over the ADSL port. TD-W8961ND Wireless N ADSL2+ Modem Router User Guide Statistics Table: Transmit total PDUs Transmit Statistics Transmit total Error Counts Receive Statistics Receive total PDUs Receive total Error Counts The total PDUs...
... is being transmitted. The total errors occurred over the WLAN when wireless data is being received. The frames received over the ADSL port. TD-W8961ND Wireless N ADSL2+ Modem Router User Guide Statistics Table: Transmit total PDUs Transmit Statistics Transmit total Error Counts Receive Statistics Receive total PDUs Receive total Error Counts The total PDUs...

User Guide
Page 25
TD-W8961ND Wireless N ADSL2+ Modem Router User Guide Figure 4-5 Click any of them, and you will be able to configure the corresponding function. 4.3.1 Internet Choose "Interface Setup→Internet" menu, you can configure the parameters for WAN ports in the next screen (shown in Figure 4-6). Figure 4-6 19
TD-W8961ND Wireless N ADSL2+ Modem Router User Guide Figure 4-5 Click any of them, and you will be able to configure the corresponding function. 4.3.1 Internet Choose "Interface Setup→Internet" menu, you can configure the parameters for WAN ports in the next screen (shown in Figure 4-6). Figure 4-6 19
User Guide
Page 26
... you apply 8 different virtual circuits from 0 to 255. Please input the value provided by your ISP. Please choose the designed type that , you . TD-W8961ND Wireless N ADSL2+ Modem Router User Guide ¾ ATM VC: ATM settings are used for Cable services. The valid range is from 32 to 65535 (1 to use ATM QoS to...
... you apply 8 different virtual circuits from 0 to 255. Please input the value provided by your ISP. Please choose the designed type that , you . TD-W8961ND Wireless N ADSL2+ Modem Router User Guide ¾ ATM VC: ATM settings are used for Cable services. The valid range is from 32 to 65535 (1 to use ATM QoS to...


