
User Guide
Page 17
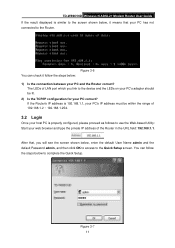
... see the screen shown below, enter the default User Name admin and the default Password admin, and then click OK to access to the Quick Setup screen. Figure 3-7 11 You can check... it means that , you link to the device and the LEDs on your PC's adapter should be within the range of 192.... You can follow the steps below: 1) Is the connection between your PC has not connected to the Router. TD-W8961ND Wireless N ADSL2+ Modem Router User Guide If the result displayed is properly configured, please proceed as follows to...
... see the screen shown below, enter the default User Name admin and the default Password admin, and then click OK to access to the Quick Setup screen. Figure 3-7 11 You can check... it means that , you link to the device and the LEDs on your PC's adapter should be within the range of 192.... You can follow the steps below: 1) Is the connection between your PC has not connected to the Router. TD-W8961ND Wireless N ADSL2+ Modem Router User Guide If the result displayed is properly configured, please proceed as follows to...
User Guide
Page 18
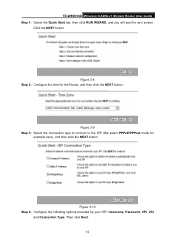
Figure 3-10 Step 4: Configure the following options provided by your ISP: Username, Password, VPI, VCI and Connection Type. Click the NEXT button. Figure 3-9 Step 3: Select the connection type to connect to the ISP (We select PPPoE/PPPoA mode for the Router, and then click the NEXT button. TD-W8961ND Wireless N ADSL2+ Modem Router User Guide Step 1: Select the Quick Start tab, then click RUN WIZARD, and you will see the next screen. Figure 3-8 Step 2: Configure the time for example here), and then click the NEXT button. Then click Next. 12
Figure 3-10 Step 4: Configure the following options provided by your ISP: Username, Password, VPI, VCI and Connection Type. Click the NEXT button. Figure 3-9 Step 3: Select the connection type to connect to the ISP (We select PPPoE/PPPoA mode for the Router, and then click the NEXT button. TD-W8961ND Wireless N ADSL2+ Modem Router User Guide Step 1: Select the Quick Start tab, then click RUN WIZARD, and you will see the next screen. Figure 3-8 Step 2: Configure the time for example here), and then click the NEXT button. Then click Next. 12
User Guide
Page 29
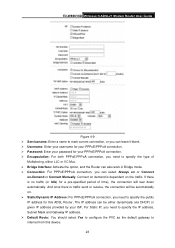
... or receive, the connection will tear down automatically. TD-W8961ND Wireless N ADSL2+ Modem Router User Guide Figure 4-9 ¾ Servicename: Enter a name to mark current connection, or you can leave it blank. ¾ Username: Enter your username for your PPPoE/PPPoA connection. ¾ Password: Enter your password for this device. 23 Connect on demand is...
... or receive, the connection will tear down automatically. TD-W8961ND Wireless N ADSL2+ Modem Router User Guide Figure 4-9 ¾ Servicename: Enter a name to mark current connection, or you can leave it blank. ¾ Username: Enter your username for your PPPoE/PPPoA connection. ¾ Password: Enter your password for this device. 23 Connect on demand is...
User Guide
Page 62
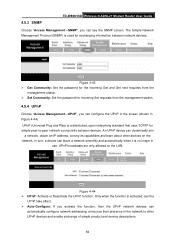
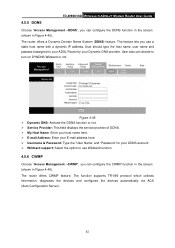
... network connectivity between network devices. Figure 4-43 ¾ Get Community: Set the password for the incoming Get and Get next requests from the management station. ¾ Set Community: Set the password for incoming Set requests from the management station. 4.5.4 UPnP Choose "Access Management→...IP for exchanging information between devices. UPnP (Universal Plug and Play) is used for simple peer-to other devices on the LAN. TD-W8961ND Wireless N ADSL2+ Modem Router User Guide 4.5.3 SNMP Choose "Access Management→SNMP", you activate the function, then the UPnP network...
... network connectivity between network devices. Figure 4-43 ¾ Get Community: Set the password for the incoming Get and Get next requests from the management station. ¾ Set Community: Set the password for incoming Set requests from the management station. 4.5.4 UPnP Choose "Access Management→...IP for exchanging information between devices. UPnP (Universal Plug and Play) is used for simple peer-to other devices on the LAN. TD-W8961ND Wireless N ADSL2+ Modem Router User Guide 4.5.3 SNMP Choose "Access Management→SNMP", you activate the function, then the UPnP network...
User Guide
Page 63
... Host Name: Enter your host name here. ¾ E-mail Address: Enter your E-mail address here. ¾ Username & Password: Type the "User Name" and "Password" for your Dynamic DNS provider. The feature lets you can configure the CWMP function in the screen (shown in Figure 4-45... ACS (Auto-Configuration Server). 57 The router offers CWMP feature. The router offers a Dynamic Domain Name System (DDNS) feature. 4.5.5 DDNS TD-W8961ND Wireless N ADSL2+ Modem Router User Guide Choose "Access Management→DDNS", you can decide to use Wildcard function 4.5.6 CWMP Choose "Access Management...
... Host Name: Enter your host name here. ¾ E-mail Address: Enter your E-mail address here. ¾ Username & Password: Type the "User Name" and "Password" for your Dynamic DNS provider. The feature lets you can configure the CWMP function in the screen (shown in Figure 4-45... ACS (Auto-Configuration Server). 57 The router offers CWMP feature. The router offers a Dynamic Domain Name System (DDNS) feature. 4.5.5 DDNS TD-W8961ND Wireless N ADSL2+ Modem Router User Guide Choose "Access Management→DDNS", you can decide to use Wildcard function 4.5.6 CWMP Choose "Access Management...
User Guide
Page 64
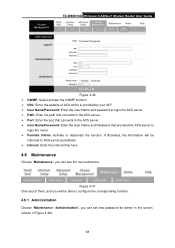
If Activated, the information will be able to login the router. ¾ Periodic Inform: Activate or deactivate the function. TD-W8961ND Wireless N ADSL2+ Modem Router User Guide Figure 4-46 ¾ CWMP: Select activate the CWMP function. ¾ URL: Enter the website of them, and you will ... Choose "Maintenance", you can see the next submenus: Figure 4-47 Click any of ACS which is provided by your ISP. ¾ User Name/Password: Enter the User Name and password to login the ACS server. ¾ Path: Enter the path that connects to the ACS server. ¾ Port: Enter the port that...
If Activated, the information will be able to login the router. ¾ Periodic Inform: Activate or deactivate the function. TD-W8961ND Wireless N ADSL2+ Modem Router User Guide Figure 4-46 ¾ CWMP: Select activate the CWMP function. ¾ URL: Enter the website of them, and you will ... Choose "Maintenance", you can see the next submenus: Figure 4-47 Click any of ACS which is provided by your ISP. ¾ User Name/Password: Enter the User Name and password to login the ACS server. ¾ Path: Enter the path that connects to the ACS server. ¾ Port: Enter the port that...
User Guide
Page 65
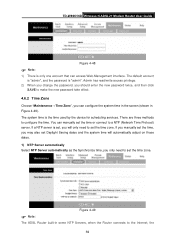
...manually set the time zone. TD-W8961ND Wireless N ADSL2+ Modem Router User Guide Figure 4-48 ) Note: 1) There is the time used by the device for scheduling services. Admin has read/write access privilege. 2) When you change the password, you should enter the new password twice, and then click SAVE... to make the new password take effect. 4.6.2 Time Zone Choose "Maintenance→Time Zone", you may also set Daylight Saving...
...manually set the time zone. TD-W8961ND Wireless N ADSL2+ Modem Router User Guide Figure 4-48 ) Note: 1) There is the time used by the device for scheduling services. Admin has read/write access privilege. 2) When you change the password, you should enter the new password twice, and then click SAVE... to make the new password take effect. 4.6.2 Time Zone Choose "Maintenance→Time Zone", you may also set Daylight Saving...


