
User Guide
Page 5
... 4.3.1 4.3.2 4.3.3 4.3.4 4.3.5 WAN ...22 LAN...33 MAC Clone ...36 Security...37 Routing ...40 IV Quick Installation Guide 8 3.1 Configure PC...8 3.2 Login ...12 3.3 Quick Setup...13 3.3.1 3.3.2 3.3.3 3.3.4 3.3.5 PPPoA ...14 PPPoE ...15 MER...17 IPoA ...18 Bridging ...19 Chapter 4. Introduction 2 1.1 Product Overview ...2 1.2 Main Features ...2 1.3 Supporting Protocol 3 1.4 Transmit Data-rate ...3 1.5 ATM Property ...3 1.6 System ...
... 4.3.1 4.3.2 4.3.3 4.3.4 4.3.5 WAN ...22 LAN...33 MAC Clone ...36 Security...37 Routing ...40 IV Quick Installation Guide 8 3.1 Configure PC...8 3.2 Login ...12 3.3 Quick Setup...13 3.3.1 3.3.2 3.3.3 3.3.4 3.3.5 PPPoA ...14 PPPoE ...15 MER...17 IPoA ...18 Bridging ...19 Chapter 4. Introduction 2 1.1 Product Overview ...2 1.2 Main Features ...2 1.3 Supporting Protocol 3 1.4 Transmit Data-rate ...3 1.5 ATM Property ...3 1.6 System ...
User Guide
Page 19
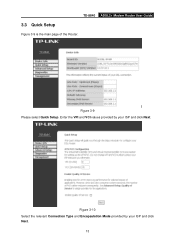
Figure 3-10 Select the relevant Connection Type and Encapsulation Mode provided by your ISP and click Next. 13 TD-8840 ADSL2+ Modem Router User Guide 3.3 Quick Setup Figure 3-9 is the main page of the Router. Enter the VPI and VCI values provided by your ISP and click Next. Figure 3-9 Please select Quick Setup.
Figure 3-10 Select the relevant Connection Type and Encapsulation Mode provided by your ISP and click Next. 13 TD-8840 ADSL2+ Modem Router User Guide 3.3 Quick Setup Figure 3-9 is the main page of the Router. Enter the VPI and VCI values provided by your ISP and click Next. Figure 3-9 Please select Quick Setup.

User Guide
Page 26
Please click the Save/Reboot button to take effect. Figure 3-23 Figure 3-24 ) Note: After you complete any setup, the new setup must be saved and the Router must be restarted for the configuration to restart. 20 TD-8840 ADSL2+ Modem Router User Guide b) Click Save/Reboot.
Please click the Save/Reboot button to take effect. Figure 3-23 Figure 3-24 ) Note: After you complete any setup, the new setup must be saved and the Router must be restarted for the configuration to restart. 20 TD-8840 ADSL2+ Modem Router User Guide b) Click Save/Reboot.

User Guide
Page 27
Software Configuration This User Guide recommends using the "Quick Installation Guide" for first-time installation. Figure 4-2 21 Figure 4-1 4.2 Quick Setup Please refer to 3.3 Quick Setup. 4.3 Advanced Setup Choose "Advanced Setup", and you can configure and manage the device. 4.1 Device Info The Device Info page provides the current information about this device and make use ... you can see the submenus as shown in Figure 4-2. After your successful login, you want to configure the advanced settings through the Web-based Utility. TD-8840 ADSL2+ Modem Router User Guide Chapter 4.
Software Configuration This User Guide recommends using the "Quick Installation Guide" for first-time installation. Figure 4-2 21 Figure 4-1 4.2 Quick Setup Please refer to 3.3 Quick Setup. 4.3 Advanced Setup Choose "Advanced Setup", and you can configure and manage the device. 4.1 Device Info The Device Info page provides the current information about this device and make use ... you can see the submenus as shown in Figure 4-2. After your successful login, you want to configure the advanced settings through the Web-based Utility. TD-8840 ADSL2+ Modem Router User Guide Chapter 4.
User Guide
Page 28
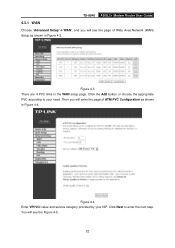
Figure 4-3 There are 4 PVC links in Figure 4-4. Click the Add button or choose the appropriate PVC according to enter the next step. Click Next to your ISP. Then you will see the page of ATM PVC Configuration as shown in Figure 4-3. You will see the Figure 4-5. 22 TD-8840 ADSL2+ Modem Router User Guide 4.3.1 WAN Choose "Advanced Setup"Æ"WAN", and you will enter the page of Wide Area Network (WAN) Setup as shown in the WAN setup page. Figure 4-4 Enter VPI/VCI value and service category provided by your need.
Figure 4-3 There are 4 PVC links in Figure 4-4. Click the Add button or choose the appropriate PVC according to enter the next step. Click Next to your ISP. Then you will see the page of ATM PVC Configuration as shown in Figure 4-3. You will see the Figure 4-5. 22 TD-8840 ADSL2+ Modem Router User Guide 4.3.1 WAN Choose "Advanced Setup"Æ"WAN", and you will enter the page of Wide Area Network (WAN) Setup as shown in the WAN setup page. Figure 4-4 Enter VPI/VCI value and service category provided by your need.

User Guide
Page 38
TD-8840 ADSL2+ Modem Router User Guide Figure 4-18 Figure 4-19 ) Note: After completing any setup, the new setup must be saved and the Router must be restarted for the configuration to restart as shown in Figure 4-20. 32 Please click the Save/Reboot button to go into effect.
TD-8840 ADSL2+ Modem Router User Guide Figure 4-18 Figure 4-19 ) Note: After completing any setup, the new setup must be saved and the Router must be restarted for the configuration to restart as shown in Figure 4-20. 32 Please click the Save/Reboot button to go into effect.

User Guide
Page 39
TD-8840 ADSL2+ Modem Router User Guide Figure 4-20 ) Note: All of the network. An address code that determines the size of the above setup is 192.168.1.1. ¾ Subnet Mask - The default setting is under windows XP OS. 4.3.2 LAN Choose "Advanced Setup→LAN" menu, and you can see and configure the Local Area Network (LAN) parameters in the screen as the subnet mask. 33 Figure 4-21 ¾ IP Address - Then you can access the Web-based Utility via this IP address. Enter an IP address for the Router. Normally use 255.255.255.0 as shown in Figure 4-21.
TD-8840 ADSL2+ Modem Router User Guide Figure 4-20 ) Note: All of the network. An address code that determines the size of the above setup is 192.168.1.1. ¾ Subnet Mask - The default setting is under windows XP OS. 4.3.2 LAN Choose "Advanced Setup→LAN" menu, and you can see and configure the Local Area Network (LAN) parameters in the screen as the subnet mask. 33 Figure 4-21 ¾ IP Address - Then you can access the Web-based Utility via this IP address. Enter an IP address for the Router. Normally use 255.255.255.0 as shown in Figure 4-21.

User Guide
Page 42
... Save/Reboot button to save the settings and reboot the Router. ) Note: The function won 't take effect until the router reboots. 4.3.3 MAC Clone Choose "Advanced Setup→MAC Clone" menu, you can configure the MAC address of the WAN on your ISP requires you register the MAC Address of WAN port... to register the MAC address, please enter the correct MAC address into this MAC address will be down. 36 TD-8840 ADSL2+ Modem Router User Guide see the new entry as shown in the WAN MAC Address field. Figure 4-24 Some ISPs require that is managing...
... Save/Reboot button to save the settings and reboot the Router. ) Note: The function won 't take effect until the router reboots. 4.3.3 MAC Clone Choose "Advanced Setup→MAC Clone" menu, you can configure the MAC address of the WAN on your ISP requires you register the MAC Address of WAN port... to register the MAC address, please enter the correct MAC address into this MAC address will be down. 36 TD-8840 ADSL2+ Modem Router User Guide see the new entry as shown in the WAN MAC Address field. Figure 4-24 Some ISPs require that is managing...

User Guide
Page 43
... on their MAC addresses. The MAC Address Filtering feature allows you to Figure 4-26. Figure 4-25 4.3.4.1. The default setting is FORWARDED. TD-8840 ADSL2+ Modem Router User Guide 4.3.4 Security Choose "Advanced Setup→Security" menu, you can change the policy by clicking the Change Policy button to go to the Change MAC Filtering...
... on their MAC addresses. The MAC Address Filtering feature allows you to Figure 4-26. Figure 4-25 4.3.4.1. The default setting is FORWARDED. TD-8840 ADSL2+ Modem Router User Guide 4.3.4 Security Choose "Advanced Setup→Security" menu, you can change the policy by clicking the Change Policy button to go to the Change MAC Filtering...

User Guide
Page 46
TD-8840 ADSL2+ Modem Router User Guide Figure 4-30 To remove an existing entry, follow the steps below . 4.3.5 Routing Choose "Advanced Setup→Routing" menu, you can see two submenus under the Routing menu as shown in Figure 4-32. 40 Click the Remove button below . 1. Default Gateway Choose "Routing→Default Gateway" menu, you can configure the Default Gateway routing in the next screen as shown in Figure 4-29. 2. Check the box in the Remove column of the entry as shown in Figure 4-31. Figure 4-31 4.3.5.1.
TD-8840 ADSL2+ Modem Router User Guide Figure 4-30 To remove an existing entry, follow the steps below . 4.3.5 Routing Choose "Advanced Setup→Routing" menu, you can see two submenus under the Routing menu as shown in Figure 4-32. 40 Click the Remove button below . 1. Default Gateway Choose "Routing→Default Gateway" menu, you can configure the Default Gateway routing in the next screen as shown in Figure 4-29. 2. Check the box in the Remove column of the entry as shown in Figure 4-31. Figure 4-31 4.3.5.1.
User Guide
Page 48
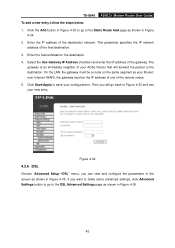
... of your ADSL Router that will go to Figure 4-33 and see your new entry. The gateway is an immediate neighbor of the final destination. 3. TD-8840 ADSL2+ Modem Router User Guide To add a new entry, follow the steps below. 1. over Internet (WAN), the gateway must be the IP address of... destination network. On the LAN, the gateway must be a router on the same segment as shown in Figure 4-35. Figure 4-34 4.3.6 DSL Choose "Advanced Setup→DSL" menu, you want to make some advanced settings, click Advanced Settings button to go back to the DSL Advanced Settings page as your...
... of your ADSL Router that will go to Figure 4-33 and see your new entry. The gateway is an immediate neighbor of the final destination. 3. TD-8840 ADSL2+ Modem Router User Guide To add a new entry, follow the steps below. 1. over Internet (WAN), the gateway must be the IP address of... destination network. On the LAN, the gateway must be a router on the same segment as shown in Figure 4-35. Figure 4-34 4.3.6 DSL Choose "Advanced Setup→DSL" menu, you want to make some advanced settings, click Advanced Settings button to go back to the DSL Advanced Settings page as your...

User Guide
Page 60
... Next. Click Create to create the dial-up a connection or network" in the left of this page. TD-8840 ADSL2+ Modem Router User Guide Figure 5-1 ¾ Click "Set up connection. ¾ Click Close to finish the setup. ¾ To connect to the Internet next time, click the Start button; After that, you have...
... Next. Click Create to create the dial-up a connection or network" in the left of this page. TD-8840 ADSL2+ Modem Router User Guide Figure 5-1 ¾ Click "Set up connection. ¾ Click Close to finish the setup. ¾ To connect to the Internet next time, click the Start button; After that, you have...

User Guide
Page 61
..., DNS, Value of VPI/VCI, Encapsulation mode of AAL5 and so on. 2. What related parameters are both bright, but can 't be working NIC. 3) Check the setup of ADSL. You may use any one of AAL5 1) This product supports the PPP protocol over ATM (PPPoA) 、 PPP over Ethernet (PPPoE)、MAC... VCI is inaccessible? 1) Use the order of ping 192.168.1.1 to access the Internet by ISP. 3) Encapsulation mode of AAL5 and so on your computer. TD-8840 ADSL2+ Modem Router User Guide Appendix A: FAQ 1. About Connection protocol, VCI/VPI, Encapsulation mode of the five protocols above.
..., DNS, Value of VPI/VCI, Encapsulation mode of AAL5 and so on. 2. What related parameters are both bright, but can 't be working NIC. 3) Check the setup of ADSL. You may use any one of AAL5 1) This product supports the PPP protocol over ATM (PPPoA) 、 PPP over Ethernet (PPPoE)、MAC... VCI is inaccessible? 1) Use the order of ping 192.168.1.1 to access the Internet by ISP. 3) Encapsulation mode of AAL5 and so on your computer. TD-8840 ADSL2+ Modem Router User Guide Appendix A: FAQ 1. About Connection protocol, VCI/VPI, Encapsulation mode of the five protocols above.

