
User Guide
Page 4
IV Package Contents The following items should be found in your package: ¾ One TD-8810 External ADSL2+ Router ¾ One AC power Adapter for TD-8810 External ADSL2+ Router ¾ One Resource CD for TD-8810 External ADSL2+ Router, including: • This Guide • Quick installation Guide Program • Other Helpful Information ¾ Quick installation Guide ¾ One RJ45 cable ¾ Two RJ11 cable ¾ One ADSL splitter ) Note: Make sure that the box contains the above items. If any of the listed items are damaged or missing, please contact with your distributor.
IV Package Contents The following items should be found in your package: ¾ One TD-8810 External ADSL2+ Router ¾ One AC power Adapter for TD-8810 External ADSL2+ Router ¾ One Resource CD for TD-8810 External ADSL2+ Router, including: • This Guide • Quick installation Guide Program • Other Helpful Information ¾ Quick installation Guide ¾ One RJ45 cable ¾ Two RJ11 cable ¾ One ADSL splitter ) Note: Make sure that the box contains the above items. If any of the listed items are damaged or missing, please contact with your distributor.

User Guide
Page 6
...the TD-8810 External ADSL2+ Router. 1.1 Product Overview With the excellent circuit design and high quality production, we guarantee the ADSL Router's high performance, great stability and easy to configure the Router but also uses external utility software. The TD-8810 uses integrated ADSL transceiver. The TD-8810 not...framing (fast and interleaved) and the I.432 ATM Physical Layer. With standard Ethernet interface, it from our website (http://www.tp-link.com). 1.2 Main Features ¾ High speed and asymmetry data transmit mode, provides safe and exclusive bandwidth ¾ Support ...
...the TD-8810 External ADSL2+ Router. 1.1 Product Overview With the excellent circuit design and high quality production, we guarantee the ADSL Router's high performance, great stability and easy to configure the Router but also uses external utility software. The TD-8810 uses integrated ADSL transceiver. The TD-8810 not...framing (fast and interleaved) and the I.432 ATM Physical Layer. With standard Ethernet interface, it from our website (http://www.tp-link.com). 1.2 Main Features ¾ High speed and asymmetry data transmit mode, provides safe and exclusive bandwidth ¾ Support ...

User Guide
Page 7
Supports RFC2516 (PPPoE) - Supports RFC1483 (EoA) (Bridged *and Router) - Supports RFC1577 (IPoA) ) Note: "*" needs the third-party software. 1.4 Transmit data-rate ¾ Max download data-rate: 24Mbps ¾ Max upload data-... ¾ Operating temperature: 0 ℃~40 ℃ ¾ Storage temperature: -40 ℃~70 ℃ ¾ Humidity: 10%~90% (non-condensing) 1.8 Conventions The Router or TD-8810, or device mentioned in this User guide stands for TD-8810 External 2 Supports RFC2364 (PPPoA) - I.432 ATM physical layer compliant - TD-8810 External ADSL2+ Router User Guide -
Supports RFC2516 (PPPoE) - Supports RFC1483 (EoA) (Bridged *and Router) - Supports RFC1577 (IPoA) ) Note: "*" needs the third-party software. 1.4 Transmit data-rate ¾ Max download data-rate: 24Mbps ¾ Max upload data-... ¾ Operating temperature: 0 ℃~40 ℃ ¾ Storage temperature: -40 ℃~70 ℃ ¾ Humidity: 10%~90% (non-condensing) 1.8 Conventions The Router or TD-8810, or device mentioned in this User guide stands for TD-8810 External 2 Supports RFC2364 (PPPoA) - I.432 ATM physical layer compliant - TD-8810 External ADSL2+ Router User Guide -
User Guide
Page 8
TD-8810 External ADSL2+ Router User Guide ADSL2+ Router without any explanations. You can set the parameters according to your demand. 3 Parameters provided in the pictures are just references for setting up the product, which may differ from the actual situation.
TD-8810 External ADSL2+ Router User Guide ADSL2+ Router without any explanations. You can set the parameters according to your demand. 3 Parameters provided in the pictures are just references for setting up the product, which may differ from the actual situation.
User Guide
Page 9
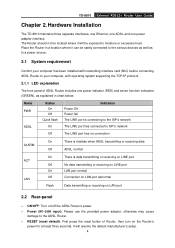
TD-8810 External ADSL2+ Router User Guide Chapter 2. Hardware Installation The TD-8810 maintains three separate interfaces, one Ethernet, one ADSL and one power indicator (RED) and seven function indicators (GREEN), as explained in chart below: Name ... well as to a power source. 2.1 System requirement Confirm your computer has been installed with networking interface card (NIC) before connecting ADSL Router to moisture or excessive heat. The Router should not be located where it can be exposed to your computer, with operating system supporting the TCP/IP protocol. 2.1.1 LED explanation...
TD-8810 External ADSL2+ Router User Guide Chapter 2. Hardware Installation The TD-8810 maintains three separate interfaces, one Ethernet, one ADSL and one power indicator (RED) and seven function indicators (GREEN), as explained in chart below: Name ... well as to a power source. 2.1 System requirement Confirm your computer has been installed with networking interface card (NIC) before connecting ADSL Router to moisture or excessive heat. The Router should not be located where it can be exposed to your computer, with operating system supporting the TCP/IP protocol. 2.1.1 LED explanation...

User Guide
Page 10
... port of Splitter. Step 4: Check the line connection to a standard electrical outlet. Power up finally. Figure 2-1 5 TD-8810 External ADSL2+ Router User Guide ¾ LAN: Connect with your computer's NIC. Step 2: Connect category 5 cable with the TD-8810 ADSL Router LINE port by telephone line. While you need to use a telephone, please attach telephone line into the...
... port of Splitter. Step 4: Check the line connection to a standard electrical outlet. Power up finally. Figure 2-1 5 TD-8810 External ADSL2+ Router User Guide ¾ LAN: Connect with your computer's NIC. Step 2: Connect category 5 cable with the TD-8810 ADSL Router LINE port by telephone line. While you need to use a telephone, please attach telephone line into the...
User Guide
Page 11
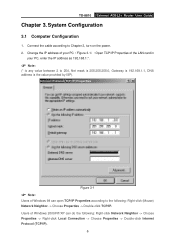
... Chapter 2, turn on the power. 2. Users of Windows 98 can do the following : Right-click (Mouse) Network Neighbor -> Choose Properties -> Double-click TCP/IP. TD-8810 External ADSL2+ Router User Guide Chapter 3. Figure 3-1 ) Note: Users of Windows 2000/NT/XP can open TCP/IP Properties according to the following : Right-click Network Neighbor -> Choose...
... Chapter 2, turn on the power. 2. Users of Windows 98 can do the following : Right-click (Mouse) Network Neighbor -> Choose Properties -> Double-click TCP/IP. TD-8810 External ADSL2+ Router User Guide Chapter 3. Figure 3-1 ) Note: Users of Windows 2000/NT/XP can open TCP/IP Properties according to the following : Right-click Network Neighbor -> Choose...
User Guide
Page 12
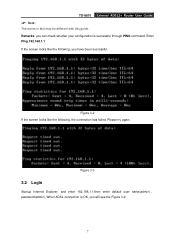
Enter Ping 192.168.1.1 If the screen looks like the following , you will see the Figure 3-2. 7 Figure 3-2 If the screen looks like the following , the connection has failed. Please try again. TD-8810 ) Note: The words in fact may be different with this guide. External ADSL2+ Router User Guide Remarks: you can check whether your configuration is OK, you have been successful. Figure 3-3 3.2 Login Startup Internet Explorer, and enter 192.168.1.1;then enter default user name(admin) 、 password(admin), When ADSL connection is successful through PING command.
Enter Ping 192.168.1.1 If the screen looks like the following , you will see the Figure 3-2. 7 Figure 3-2 If the screen looks like the following , the connection has failed. Please try again. TD-8810 ) Note: The words in fact may be different with this guide. External ADSL2+ Router User Guide Remarks: you can check whether your configuration is OK, you have been successful. Figure 3-3 3.2 Login Startup Internet Explorer, and enter 192.168.1.1;then enter default user name(admin) 、 password(admin), When ADSL connection is successful through PING command.
User Guide
Page 13
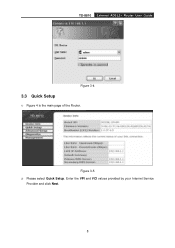
Figure 3-5 2) Please select Quick Setup. Enter the VPI and VCI values provided by your Internet Service Provider and click Next. 8 TD-8810 External ADSL2+ Router User Guide Figure 3-4 3.3 Quick Setup 1) Figure 4 is the main page of the Router.
Figure 3-5 2) Please select Quick Setup. Enter the VPI and VCI values provided by your Internet Service Provider and click Next. 8 TD-8810 External ADSL2+ Router User Guide Figure 3-4 3.3 Quick Setup 1) Figure 4 is the main page of the Router.
User Guide
Page 14
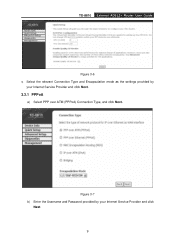
Figure 3-7 b) Enter the Username and Password provided by your Internet Service Provider and click Next. 9 TD-8810 External ADSL2+ Router User Guide Figure 3-6 3) Select the relevant Connection Type and Encapsulation mode as the settings provided by your Internet Service Provider and click Next. 3.3.1 PPPoA a) Select PPP over ATM (PPPoA) Connection Type, and click Next.
Figure 3-7 b) Enter the Username and Password provided by your Internet Service Provider and click Next. 9 TD-8810 External ADSL2+ Router User Guide Figure 3-6 3) Select the relevant Connection Type and Encapsulation mode as the settings provided by your Internet Service Provider and click Next. 3.3.1 PPPoA a) Select PPP over ATM (PPPoA) Connection Type, and click Next.
User Guide
Page 15
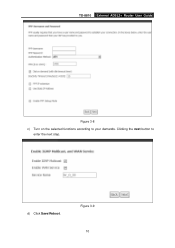
d) Click Save/Reboot. Figure 3-9 10 TD-8810 External ADSL2+ Router User Guide Figure 3-8 c) Turn on the selected functions according to enter the next step. Clicking the next button to your demands.
d) Click Save/Reboot. Figure 3-9 10 TD-8810 External ADSL2+ Router User Guide Figure 3-8 c) Turn on the selected functions according to enter the next step. Clicking the next button to your demands.

User Guide
Page 16
Figure 3-11 b) Enter the Username and Password provided by your Internet Service Provider and click Next. 11 TD-8810 External ADSL2+ Router User Guide Figure 3-10 3.3.2 PPPoE a) Select PPP over Ethernet (PPPoE) Connection Type, and click Next.
Figure 3-11 b) Enter the Username and Password provided by your Internet Service Provider and click Next. 11 TD-8810 External ADSL2+ Router User Guide Figure 3-10 3.3.2 PPPoE a) Select PPP over Ethernet (PPPoE) Connection Type, and click Next.
User Guide
Page 18
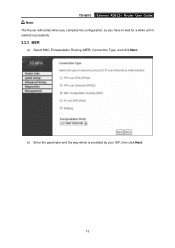
b) Enter the parameter and the way which is provided by your ISP, then click Next. 13 TD-8810 External ADSL2+ Router User Guide Note: The Router will restart when you complete the configuration, so you have to wait for a while until it restarts successfully. 3.3.3 MER a) Select MAC Encapsulation Routing (MER) Connection Type, and click Next.
b) Enter the parameter and the way which is provided by your ISP, then click Next. 13 TD-8810 External ADSL2+ Router User Guide Note: The Router will restart when you complete the configuration, so you have to wait for a while until it restarts successfully. 3.3.3 MER a) Select MAC Encapsulation Routing (MER) Connection Type, and click Next.
User Guide
Page 19
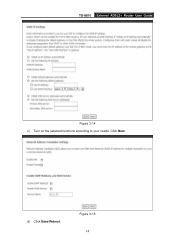
Figure 3-15 14 d) Click Save/Reboot. Click Next. TD-8810 External ADSL2+ Router User Guide Figure 3-14 c) Turn on the selected functions according to your needs.
Figure 3-15 14 d) Click Save/Reboot. Click Next. TD-8810 External ADSL2+ Router User Guide Figure 3-14 c) Turn on the selected functions according to your needs.

User Guide
Page 20
TD-8810 External ADSL2+ Router User Guide Figure 3-16 3.3.4 IPoA a) Select IP over ATM (IPoA) Connection Type, and click Next. Figure 3-17 15
TD-8810 External ADSL2+ Router User Guide Figure 3-16 3.3.4 IPoA a) Select IP over ATM (IPoA) Connection Type, and click Next. Figure 3-17 15

User Guide
Page 21
Figure 3-19 16 Figure 3-18 c) Turn on the selected functions according to your ISP, then click Next. TD-8810 External ADSL2+ Router User Guide b) Enter the parameter and the way which is provided by your needs. Click Next d) Click Save/Reboot.
Figure 3-19 16 Figure 3-18 c) Turn on the selected functions according to your ISP, then click Next. TD-8810 External ADSL2+ Router User Guide b) Enter the parameter and the way which is provided by your needs. Click Next d) Click Save/Reboot.
User Guide
Page 22
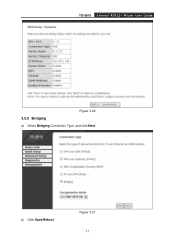
b) Click Save/Reboot. Figure 3-21 17 TD-8810 External ADSL2+ Router User Guide Figure 3-20 3.3.5 Bridging a) Select Bridging Connection Type, and click Next.
b) Click Save/Reboot. Figure 3-21 17 TD-8810 External ADSL2+ Router User Guide Figure 3-20 3.3.5 Bridging a) Select Bridging Connection Type, and click Next.
User Guide
Page 23
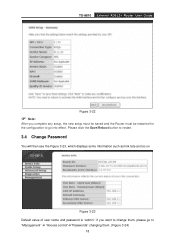
Please click the Save/Reboot button to go to "Management" Æ "Access control"Æ"Passwords" changing them. (Figure 3-24) 18 TD-8810 External ADSL2+ Router User Guide Figure 3-22 ) Note: After you want to change them, please go into effect. if you complete any setup, the new setup must be saved and the Router must be restarted for the configuration to restart. 3.4 Change Password You will then see the Figure 3-23, which displays some information such as link rate and so on Figure 3-23 Default value of user name and password is "admin";
Please click the Save/Reboot button to go to "Management" Æ "Access control"Æ"Passwords" changing them. (Figure 3-24) 18 TD-8810 External ADSL2+ Router User Guide Figure 3-22 ) Note: After you want to change them, please go into effect. if you complete any setup, the new setup must be saved and the Router must be restarted for the configuration to restart. 3.4 Change Password You will then see the Figure 3-23, which displays some information such as link rate and so on Figure 3-23 Default value of user name and password is "admin";
User Guide
Page 24
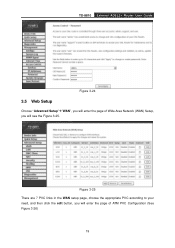
TD-8810 External ADSL2+ Router User Guide Figure 3-24 3.5 Web Setup Choose "Advanced Setup"Æ"WAN", you will enter the page of Wide Area Network (WAN) Setup, you will see the Figure 3-25. Figure 3-25 There are 7 PVC links in the WAN setup page, choose the appropriate PVC according to your need, and then click the edit button, you will enter the page of ATM PVC Configuration (See Figure 3-26) 19
TD-8810 External ADSL2+ Router User Guide Figure 3-24 3.5 Web Setup Choose "Advanced Setup"Æ"WAN", you will enter the page of Wide Area Network (WAN) Setup, you will see the Figure 3-25. Figure 3-25 There are 7 PVC links in the WAN setup page, choose the appropriate PVC according to your need, and then click the edit button, you will enter the page of ATM PVC Configuration (See Figure 3-26) 19

User Guide
Page 25
Figure 3-27 After choosing the proper protocol, enter the correct parameters supported by your ISP, click next to acquire the local type of network protocol and Encapsulation mode. Enable 20 TD-8810 External ADSL2+ Router User Guide Figure 3-26 Enter VPI/VCI value and service category which is provided by your ISP. You will see the Figure 3-27. ) Note: The type of network protocol selected may be different in different areas, there are five types (Figure 3-27), So you should ask your ISP to enter the next step.
Figure 3-27 After choosing the proper protocol, enter the correct parameters supported by your ISP, click next to acquire the local type of network protocol and Encapsulation mode. Enable 20 TD-8810 External ADSL2+ Router User Guide Figure 3-26 Enter VPI/VCI value and service category which is provided by your ISP. You will see the Figure 3-27. ) Note: The type of network protocol selected may be different in different areas, there are five types (Figure 3-27), So you should ask your ISP to enter the next step.


