User Guide
Page 5
Product Overview 1 1.1 Product main specification 1 1.2 Supporting protocol 1 1.3 Transmit data-rate 1 1.4 ATM property 2 1.5 System support 2 1.6 Working environment 2 1.7 Electric parameter 2 Chapter 2. How to use 6 3.1 Computer Configuration 6 3.2 Login...7 3.3 Setup ...8 3.4 Software Dial 9 Appendix A: Default Configuration 10 CONTENTS Chapter 1. Hardware Installation Guide 3 2.1 System requirement 3 2.2 LED explanation 3 2.3 Rear-panel...4 2.4 Hardware installation procedures 4 Chapter 3.
Product Overview 1 1.1 Product main specification 1 1.2 Supporting protocol 1 1.3 Transmit data-rate 1 1.4 ATM property 2 1.5 System support 2 1.6 Working environment 2 1.7 Electric parameter 2 Chapter 2. How to use 6 3.1 Computer Configuration 6 3.2 Login...7 3.3 Setup ...8 3.4 Software Dial 9 Appendix A: Default Configuration 10 CONTENTS Chapter 1. Hardware Installation Guide 3 2.1 System requirement 3 2.2 LED explanation 3 2.3 Rear-panel...4 2.4 Hardware installation procedures 4 Chapter 3.
User Guide
Page 13
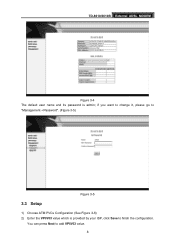
if you want to change it, please go to "Management→Password". (Figure 3-5) Figure 3-5 3.3 Setup 1) Choose ATM PVCs Configuration (See Figure 3-6) 2) Enter the VPI/VCI value which is admin; You can press Next to add VPI/VCI value. 8 TD-8610/8610B External ADSL MODEM Figure 3-4 The default user name and its password is provided by your ISP, click Save to finish the configuration.
if you want to change it, please go to "Management→Password". (Figure 3-5) Figure 3-5 3.3 Setup 1) Choose ATM PVCs Configuration (See Figure 3-6) 2) Enter the VPI/VCI value which is admin; You can press Next to add VPI/VCI value. 8 TD-8610/8610B External ADSL MODEM Figure 3-4 The default user name and its password is provided by your ISP, click Save to finish the configuration.

