EAP120 V1 Datasheet
Page 5
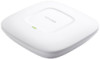
...Power Supply 4.4 watts 9.6 watts RJ45*1 Kensington Lock Slot Reset Button, Power On/O Button 7.1 x 7.1 x 1.9 in any form or by any means or used to change without permission from TP-LINK Technologies Co., Ltd. www.tp-link.com Specifications are trademarks or registered trademarks of their respective ...TP-LINK Technologies Co., Ltd. Operating Humidity: 10%~90% non-condensing; TP-LINK is a registered trademark of the specifications may be reproduced in . (180*180*47.5mm) Ceiling /Wall mounting (Kits included) CE, FCC, RoHS 300Mbps Wireless N Gigabit Ceiling Mount Access Point EAP120...
...Power Supply 4.4 watts 9.6 watts RJ45*1 Kensington Lock Slot Reset Button, Power On/O Button 7.1 x 7.1 x 1.9 in any form or by any means or used to change without permission from TP-LINK Technologies Co., Ltd. www.tp-link.com Specifications are trademarks or registered trademarks of their respective ...TP-LINK Technologies Co., Ltd. Operating Humidity: 10%~90% non-condensing; TP-LINK is a registered trademark of the specifications may be reproduced in . (180*180*47.5mm) Ceiling /Wall mounting (Kits included) CE, FCC, RoHS 300Mbps Wireless N Gigabit Ceiling Mount Access Point EAP120...
EAP120 V1 QIG
Page 5
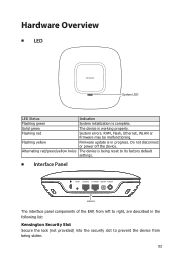
... Secure the lock (not provided) into the security slot to prevent the device from left to its factory default settings. ■■ Interface Panel RESET CONSOLE ETHERNET ON/OFF POWER ARROW 1 The interface panel components of the EAP, from being stolen. 02 Firmware update is being... reset to right, are described in progress. Hardware Overview ■■ LED System LED LED Status Flashing green Solid green Flashing red Flashing yellow Alternating ...
... Secure the lock (not provided) into the security slot to prevent the device from left to its factory default settings. ■■ Interface Panel RESET CONSOLE ETHERNET ON/OFF POWER ARROW 1 The interface panel components of the EAP, from being stolen. 02 Firmware update is being... reset to right, are described in progress. Hardware Overview ■■ LED System LED LED Status Flashing green Solid green Flashing red Flashing yellow Alternating ...
EAP120 V1 QIG
Page 6
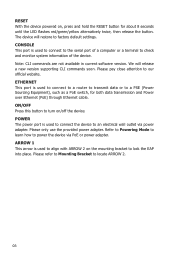
Refer to Powering Mode to learn how to power the device via power adapter. RESET With the device powered on /off the device. The device will release a new version supporting CLI commands soon. ARROW 1 This arrow is used to align ...with ARROW 2 on the mounting bracket to turn on , press and hold the RESET button for both data transmission and Power over Ethernet (PoE) through Ethernet cable. Note: CLI commands are not available in current software version. ON/OFF...
Refer to Powering Mode to learn how to power the device via power adapter. RESET With the device powered on /off the device. The device will release a new version supporting CLI commands soon. ARROW 1 This arrow is used to align ...with ARROW 2 on the mounting bracket to turn on , press and hold the RESET button for both data transmission and Power over Ethernet (PoE) through Ethernet cable. Note: CLI commands are not available in current software version. ON/OFF...

EAP120 V1 QIG
Page 10
5. Attach the EAP to the mounting bracket by aligning ARROW 1 with ARROW 2, as shown below. ARROW 2 ARROW 1 RESET CONSOLE ETHERNET ON/OFF POWER 6. Turn the EAP clockwise until it locks into place. 07
5. Attach the EAP to the mounting bracket by aligning ARROW 1 with ARROW 2, as shown below. ARROW 2 ARROW 1 RESET CONSOLE ETHERNET ON/OFF POWER 6. Turn the EAP clockwise until it locks into place. 07

EAP120 V1 QIG
Page 12
Powering Mode The EAP can be powered via a PSE device (e.g., a PoE switch) or its power adapter. 09 Turn the EAP clockwise until it locks into place. 6. ARROW 1 ARROW 2 5. Hang the EAP on the EAP. 4. Attach the EAP to the Ethernet port on the screws. Make sure the EAP is firmly seated against the wall. 7. Connect the Ethernet cable to the mounting bracket by aligning ARROW 1 with ARROW 2. RESET CONSOLE ETHERNET ON/OFF POWER 4.
Powering Mode The EAP can be powered via a PSE device (e.g., a PoE switch) or its power adapter. 09 Turn the EAP clockwise until it locks into place. 6. ARROW 1 ARROW 2 5. Hang the EAP on the EAP. 4. Attach the EAP to the Ethernet port on the screws. Make sure the EAP is firmly seated against the wall. 7. Connect the Ethernet cable to the mounting bracket by aligning ARROW 1 with ARROW 2. RESET CONSOLE ETHERNET ON/OFF POWER 4.
EAP120 V1 QIG
Page 18
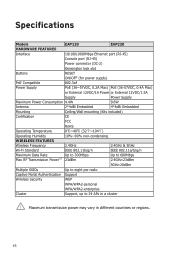
Specifications Models EAP120 EAP220 HARDWARE FEATURES Interface 10/100/1000Mbps Ethernet port (RJ-45) Console port (RJ-45) Power connector (DC-2) Kensington lock slot Buttons RESET ON/OFF (for power supply) PoE Compatible 802.3af Power Supply PoE (36~57VDC, 0.2A Max) PoE (36-57VDC, 0.4A Max) or External 12VDC/1A ...
Specifications Models EAP120 EAP220 HARDWARE FEATURES Interface 10/100/1000Mbps Ethernet port (RJ-45) Console port (RJ-45) Power connector (DC-2) Kensington lock slot Buttons RESET ON/OFF (for power supply) PoE Compatible 802.3af Power Supply PoE (36~57VDC, 0.2A Max) PoE (36-57VDC, 0.4A Max) or External 12VDC/1A ...


