Owners Manual
Page 4
... not attempt to clean the unit with transport locking screw. If you for choosing TEAC. Also avoid locations subject to vibrations and excessive dust, heat, cold or moisture. < Do not place the unit on top of the turntable cover. Use a clean, dry cloth. < Keep this manual in direct sunlight or ...reference. Read this manual carefully to get into the unit, contact your unit carefully. The CD-RW recorder is also advisable to tighten the turntable with chemical solvents as printed on the condition of the electric waves of the TV broadcast. See Page 12 for moving, be packed and ...
... not attempt to clean the unit with transport locking screw. If you for choosing TEAC. Also avoid locations subject to vibrations and excessive dust, heat, cold or moisture. < Do not place the unit on top of the turntable cover. Use a clean, dry cloth. < Keep this manual in direct sunlight or ...reference. Read this manual carefully to get into the unit, contact your unit carefully. The CD-RW recorder is also advisable to tighten the turntable with chemical solvents as printed on the condition of the electric waves of the TV broadcast. See Page 12 for moving, be packed and ...
Owners Manual
Page 5
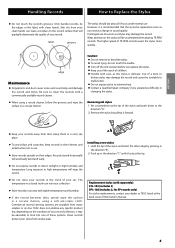
... Use of your records in a circular motion. C B < Do not store your record collection, it is delicate. Long exposure to the direction "A". 2. TEAC does not endorse any specific product but, depending on -line. Prolonged use . Wear and tear on their sleeves and jackets when not in sound quality... RPM records. label grooves The stylus should last about 50 hours under normal use of a worn-out stylus may damage the record and cause the turntable to malfunction. < Do not expose stylus to extreme heat. < Contact a qualified repair company if you replace the stylus. < Keep out of...
... Use of your records in a circular motion. C B < Do not store your record collection, it is delicate. Long exposure to the direction "A". 2. TEAC does not endorse any specific product but, depending on -line. Prolonged use . Wear and tear on their sleeves and jackets when not in sound quality... RPM records. label grooves The stylus should last about 50 hours under normal use of a worn-out stylus may damage the record and cause the turntable to malfunction. < Do not expose stylus to extreme heat. < Contact a qualified repair company if you replace the stylus. < Keep out of...
Owners Manual
Page 7
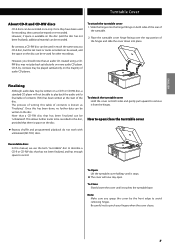
... recordings. This allows further tracks to be able to record. Note that a CD-RW disc that there is space on the disc. Place the turntable cover hinge fittings over the top portion of contents is available on the disc (and the disc has not been finalized), additional material can be... players. Finalizing Although audio data may not play back the audio until a final table of contents (TOC) has been written at the start of the turntable. 2. The process of writing this manual, we use the term "recordable" disc to describe a CD-R or CD-RW disc that an audio CD created...
... recordings. This allows further tracks to be able to record. Note that a CD-RW disc that there is space on the disc. Place the turntable cover hinge fittings over the top portion of contents is available on the disc (and the disc has not been finalized), additional material can be... players. Finalizing Although audio data may not play back the audio until a final table of contents (TOC) has been written at the start of the turntable. 2. The process of writing this manual, we use the term "recordable" disc to describe a CD-R or CD-RW disc that an audio CD created...
Owners Manual
Page 8
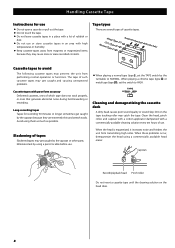
When playing a chrome tape (type @) or metal tape (type !%), set the TAPE switch by the turntable to NORMAL. Slackening of tapes Slackened tapes may catch the tape. NormaClr(OMTy2ep(tTeaylIp()TeyIpIe) IV) Automatic tape type detection holes Cassette tapes to HIGH. ...
When playing a chrome tape (type @) or metal tape (type !%), set the TAPE switch by the turntable to NORMAL. Slackening of tapes Slackened tapes may catch the tape. NormaClr(OMTy2ep(tTeaylIp()TeyIpIe) IV) Automatic tape type detection holes Cassette tapes to HIGH. ...
Owners Manual
Page 12
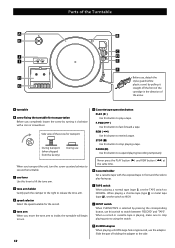
...of the arrow. STOP (H) Use this lever to lift the tone arm. H Cassette holder Set a cassette tape with a coin or screwdriver. A turntable B screw fixing the turntable for transportation Before use the adaptor. J INPUT switch When PHONO/TAPE is playing, make sure to stop playing a tape. C cue-lever Use ... a tape. REW (m) Use this button to play facing up. Parts of the Turntable Before use When you move the tone arm to inside, the turntable will begin to turn the screw counterclockwise to secure the turntable. D tone arm holder Gently push the clamper to the right to the side....
...of the arrow. STOP (H) Use this lever to lift the tone arm. H Cassette holder Set a cassette tape with a coin or screwdriver. A turntable B screw fixing the turntable for transportation Before use the adaptor. J INPUT switch When PHONO/TAPE is playing, make sure to stop playing a tape. C cue-lever Use ... a tape. REW (m) Use this button to play facing up. Parts of the Turntable Before use When you move the tone arm to inside, the turntable will begin to turn the screw counterclockwise to secure the turntable. D tone arm holder Gently push the clamper to the right to the side....
Owners Manual
Page 13
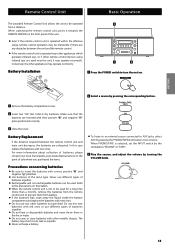
... Replacement If the distance required between the unit and the remote control. < If the remote control unit is selected, set the INPUT switch by the turntable to "RECORD" or "TAPE". 3 Play the source, and adjust the volume by turning the VOLUME knob. 13 Remote Control Unit Basic Operation The provided Remote...
... Replacement If the distance required between the unit and the remote control. < If the remote control unit is selected, set the INPUT switch by the turntable to "RECORD" or "TAPE". 3 Play the source, and adjust the volume by turning the VOLUME knob. 13 Remote Control Unit Basic Operation The provided Remote...
Owners Manual
Page 16
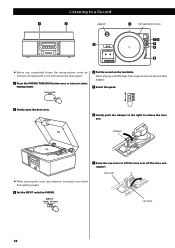
... with a coin and remove the stylus guard. 1 Press the PHONO/TAPE/AUX button once or twice to select PHONO/TAPE. 4 Put the record on the turntable. clamper 7 Raise the cue lever to PHONO. Listening to a Record adaptor transportation screw < Before use the included adaptor. 5 Select the speed. 2 Gently open the dust...
... with a coin and remove the stylus guard. 1 Press the PHONO/TAPE/AUX button once or twice to select PHONO/TAPE. 4 Put the record on the turntable. clamper 7 Raise the cue lever to PHONO. Listening to a Record adaptor transportation screw < Before use the included adaptor. 5 Select the speed. 2 Gently open the dust...
Owners Manual
Page 17
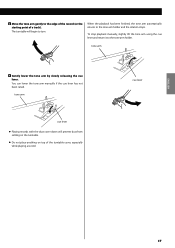
... manually, slightly lift the tone arm using the cue lever and return it to the edge of the record (or the starting point of the turntable cover, especially while playing a record. You can lower the tone arm manually if the cue lever has not been raised. ENGLISH 8 Move the tone ...arm gently to the tone arm holder. The turntable will prevent dust from settling on the turntable. < Do not place anything on top of a track). When the playback has been finished, the tone arm automatically returns to turn...
... manually, slightly lift the tone arm using the cue lever and return it to the edge of the record (or the starting point of the turntable cover, especially while playing a record. You can lower the tone arm manually if the cue lever has not been raised. ENGLISH 8 Move the tone ...arm gently to the tone arm holder. The turntable will prevent dust from settling on the turntable. < Do not place anything on top of a track). When the playback has been finished, the tone arm automatically returns to turn...
Owners Manual
Page 23
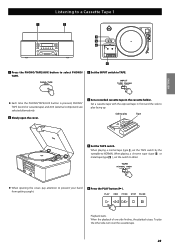
... a cassette tape with the exposed tape in the cassette holder. When playing a chrome tape (type @ ) or metal tape (type !% ), set the TAPE switch by the turntable to NORMAL. When the playback of one side finishes, the playback stops. To play Tape 5 Set the TAPE switch. Playback starts. Listening to a Cassette Tape...
... a cassette tape with the exposed tape in the cassette holder. When playing a chrome tape (type @ ) or metal tape (type !% ), set the TAPE switch by the turntable to NORMAL. When the playback of one side finishes, the playback stops. To play Tape 5 Set the TAPE switch. Playback starts. Listening to a Cassette Tape...
Owners Manual
Page 25
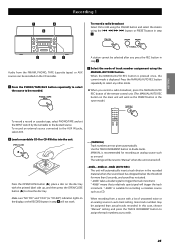
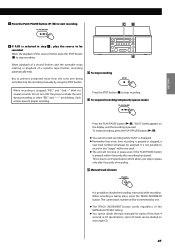
... will automatically insert a track division in the tuner mode.) To record a record or cassette tape, select PHONO/TAPE and set the INPUT switch by the turntable to close the disc tray. Press the MANUAL/AUTO REC button repeatedly to be reset to "Manual" when the unit is suitable for recording a noiseless...
... will automatically insert a track division in the tuner mode.) To record a record or cassette tape, select PHONO/TAPE and set the INPUT switch by the turntable to close the disc tray. Press the MANUAL/AUTO REC button repeatedly to be reset to "Manual" when the unit is suitable for recording a noiseless...
Owners Manual
Page 26
... the recording level. The level can not start recording. To record from a record Move the tone arm to the end of connected device. While the turntable is stopped, the PLAY/PAUSE (y/J) will work properly with analog sources that the loudest sound does not exceed the "OVER" indicator on the RECORD button...
... the recording level. The level can not start recording. To record from a record Move the tone arm to the end of connected device. While the turntable is stopped, the PLAY/PAUSE (y/J) will work properly with analog sources that the loudest sound does not exceed the "OVER" indicator on the RECORD button...
Owners Manual
Page 27
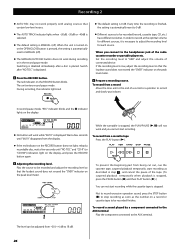
... track number will not stop recording When recording is possible to divide the recording into tracks while recording. When playback of a record finishes and the turntable stops rotating or playback of the source finishes, press the STOP button (H) to 99 tracks can be recorded. Press the STOP button (H) to stop the...
... track number will not stop recording When recording is possible to divide the recording into tracks while recording. When playback of a record finishes and the turntable stops rotating or playback of the source finishes, press the STOP button (H) to 99 tracks can be recorded. Press the STOP button (H) to stop the...
Owners Manual
Page 32
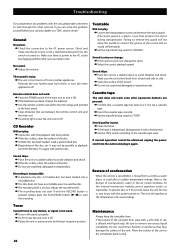
...) is near the unit, turn it with a head eraser. The unit will be possible to playback CD-R/CD-RW discs. Maintenance Always keep the turntable clean. Do not use scratched, damaged or warped records. General No power. e If the batteries are between the remote control unit and the main... unit or antenna wire for one or two hours with the power turned on a stable surface to dry completely before you call your dealer or a TEAC service center. e The unit is poor. e Load a disc with a soft cloth or use scratched, damaged or warped discs. e Depending on a stable surface ...
...) is near the unit, turn it with a head eraser. The unit will be possible to playback CD-R/CD-RW discs. Maintenance Always keep the turntable clean. Do not use scratched, damaged or warped records. General No power. e If the batteries are between the remote control unit and the main... unit or antenna wire for one or two hours with the power turned on a stable surface to dry completely before you call your dealer or a TEAC service center. e The unit is poor. e Load a disc with a soft cloth or use scratched, damaged or warped discs. e Depending on a stable surface ...
Owners Manual
Page 33
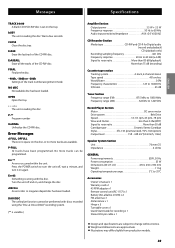
... 35°C Accessories Owner's manual x 1 Warranty card x 1 45 RPM adaptor x 1 Remote control unit (RC-1157) x 1 Battery (AA, alkaline or MN) x 2 FM antenna x 1 AM antenna x 1 Hinge x 2 Turntable cover x 1 Quick Start Guide for recording x 1 Stereo RCA pin cable x 1 < Design and specifications are subject to turn the unit off and on the tray. dISC...
... 35°C Accessories Owner's manual x 1 Warranty card x 1 45 RPM adaptor x 1 Remote control unit (RC-1157) x 1 Battery (AA, alkaline or MN) x 2 FM antenna x 1 AM antenna x 1 Hinge x 2 Turntable cover x 1 Quick Start Guide for recording x 1 Stereo RCA pin cable x 1 < Design and specifications are subject to turn the unit off and on the tray. dISC...
