Owners Manual
Page 2
...) Unplug this apparatus during lightning storms or when unused for your outlet, consult an electrician for replacement of the obsolete outlet. 10) Protect the power cord from being walked on or pinched particularly at plugs, convenience receptacles, and the point where...of the polarized or groundingtype plug. A polarized plug has two blades with the manufacturer's instructions. 8) Do not install near water. 6) Clean only with the apparatus. NO USER-SERVICEABLE PARTS INSIDE. Servicing is damaged, liquid has been spilled or objects have fallen into your safety. CAUTION: TO...
...) Unplug this apparatus during lightning storms or when unused for your outlet, consult an electrician for replacement of the obsolete outlet. 10) Protect the power cord from being walked on or pinched particularly at plugs, convenience receptacles, and the point where...of the polarized or groundingtype plug. A polarized plug has two blades with the manufacturer's instructions. 8) Do not install near water. 6) Clean only with the apparatus. NO USER-SERVICEABLE PARTS INSIDE. Servicing is damaged, liquid has been spilled or objects have fallen into your safety. CAUTION: TO...
Owners Manual
Page 3
...batteries installed) shall not be located close enough to the AC outlet so that you can cause hearing loss. CAUTION < DO NOT REMOVE THE EXTERNAL CASES OR CABINETS TO EXPOSE THE ELECTRONICS. ENGLISH 3 DO NOT USE THE PRODUCT UNTIL IT HAS BEEN REPAIRED. < USE OF CONTROLS OR ... grasp the power cord plug at any objects filled with Class ! NO USER SERVICEABLE PARTS ARE WITHIN. < IF YOU ARE EXPERIENCING PROBLEMS WITH THIS PRODUCT, CONTACT TEAC FOR A SERVICE REFERRAL. WARNING: TO PREVENT FIRE OR SHOCK HAZARD, DO NOT EXPOSE THIS APPLIANCE TO RAIN OR MOISTURE. < Do not install this apparatus ...
...batteries installed) shall not be located close enough to the AC outlet so that you can cause hearing loss. CAUTION < DO NOT REMOVE THE EXTERNAL CASES OR CABINETS TO EXPOSE THE ELECTRONICS. ENGLISH 3 DO NOT USE THE PRODUCT UNTIL IT HAS BEEN REPAIRED. < USE OF CONTROLS OR ... grasp the power cord plug at any objects filled with Class ! NO USER SERVICEABLE PARTS ARE WITHIN. < IF YOU ARE EXPERIENCING PROBLEMS WITH THIS PRODUCT, CONTACT TEAC FOR A SERVICE REFERRAL. WARNING: TO PREVENT FIRE OR SHOCK HAZARD, DO NOT EXPOSE THIS APPLIANCE TO RAIN OR MOISTURE. < Do not install this apparatus ...
Owners Manual
Page 4
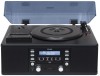
... or packing the unit for instructions. 4 See Page 12 for moving, be between 5°C and 35°C (41°F and 95°F). Contents Before using the unit 4 Handling Records 5 How to Replace the Stylus 5 Discs 6 Turntable Cover 7 Handling Cassette Tape 8 Connection 9 Unit Functions and Remote Control 10 Parts of the Turntable 12 Remote Control Unit 13 Basic Operation 13...
... or packing the unit for instructions. 4 See Page 12 for moving, be between 5°C and 35°C (41°F and 95°F). Contents Before using the unit 4 Handling Records 5 How to Replace the Stylus 5 Discs 6 Turntable Cover 7 Handling Cassette Tape 8 Connection 9 Unit Functions and Remote Control 10 Parts of the Turntable 12 Remote Control Unit 13 Basic Operation 13...
Owners Manual
Page 5
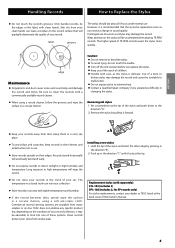
... into one of this Owner's manual. 5 Be sure to extreme heat. < Contact a qualified repair company if you notice a change in the trunk of your dealer or TEAC listed at the back cover of these systems. Clean records protect your records away from undue wear. Removing old stylus 1. C B < Do not store your records in sound quality. Replacement stylus (sold separately): STL-103...
... into one of this Owner's manual. 5 Be sure to extreme heat. < Contact a qualified repair company if you notice a change in the trunk of your dealer or TEAC listed at the back cover of these systems. Clean records protect your records away from undue wear. Removing old stylus 1. C B < Do not store your records in sound quality. Replacement stylus (sold separately): STL-103...
Owners Manual
Page 6
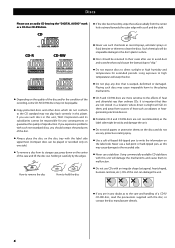
...you should be played or recorded only on the center of the recording, some CD-R/CD-RW discs may not play any disc that...play back correctly in a location where direct sunlight will fall on them to direct sunlight or high humidity and temperature for any consequences or guarantee the quality of this unit, TEAC...discs are not recommended, as this player. Playing such discs may cause irreparable harm to the playing mechanisms. < CD-R and CD..., or contact the disc manufacturer directly. 6 If you experience problems with such non-standard discs, you are more sensitive to hold...
...you should be played or recorded only on the center of the recording, some CD-R/CD-RW discs may not play any disc that...play back correctly in a location where direct sunlight will fall on them to direct sunlight or high humidity and temperature for any consequences or guarantee the quality of this unit, TEAC...discs are not recommended, as this player. Playing such discs may cause irreparable harm to the playing mechanisms. < CD-R and CD..., or contact the disc manufacturer directly. 6 If you experience problems with such non-standard discs, you are more sensitive to hold...
Owners Manual
Page 8
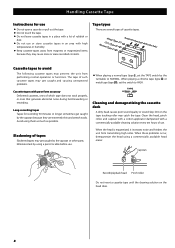
... may get caught and causing unexpected problems. < When playing a normal tape (type !), set the switch to avoid The following cassette tapes may prevent the unit from performing normal operation or functions. The tape of tapes Slackened tapes may get caught by the turntable to NORMAL. Handling Cassette Tape Instructions for recording 90 minutes or longer sometimes...
... may get caught and causing unexpected problems. < When playing a normal tape (type !), set the switch to avoid The following cassette tapes may prevent the unit from performing normal operation or functions. The tape of tapes Slackened tapes may get caught by the turntable to NORMAL. Handling Cassette Tape Instructions for recording 90 minutes or longer sometimes...

Owners Manual
Page 9
...q white jack (L: left channel) red plug q red jack (R: right channel) D AC Power Cord Plug this unit. < Be sure to use with the AC power cord. CAUTION: < Switch off the power to all other wires such as power cords, speaker wires or interconnect wires as far away as possible from these jacks to find...the loop antenna on a window frame, etc., in an FM station and extend the lead to a CD player, cassette tape deck, etc. Keep all equipment before making connections. < Read the instructions of each component you move your unit to the slot in the antenna base. C AUX IN/OUT jacks ...
...q white jack (L: left channel) red plug q red jack (R: right channel) D AC Power Cord Plug this unit. < Be sure to use with the AC power cord. CAUTION: < Switch off the power to all other wires such as power cords, speaker wires or interconnect wires as far away as possible from these jacks to find...the loop antenna on a window frame, etc., in an FM station and extend the lead to a CD player, cassette tape deck, etc. Keep all equipment before making connections. < Read the instructions of each component you move your unit to the slot in the antenna base. C AUX IN/OUT jacks ...
Owners Manual
Page 10
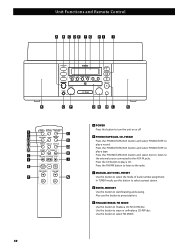
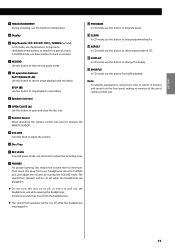
...Control A POWER Press this button to finalize a CD-R/CD-RW disc. E FINALIZE/ERASE, FM MODE Use this button to preset stations. Use this button to turn the unit on or off. Press the FM/AM button to listen to play...MANUAL/AUTO REC, PRESET Use this button to select FM MODE. 10 D ENTER, MEMORY Use this button to the AUX IN jacks. B PHONO/TAPE/AUX, CD, FM/AM Press the PHONO/TAPE/AUX button and select PHONO/TAPE to play a record.... Press the PHONO/TAPE/AUX button and select PHONO/TAPE to play a tape. Press the PHONO/TAPE/...
...Control A POWER Press this button to finalize a CD-R/CD-RW disc. E FINALIZE/ERASE, FM MODE Use this button to preset stations. Use this button to turn the unit on or off. Press the FM/AM button to listen to play...MANUAL/AUTO REC, PRESET Use this button to select FM MODE. 10 D ENTER, MEMORY Use this button to the AUX IN jacks. B PHONO/TAPE/AUX, CD, FM/AM Press the PHONO/TAPE/AUX button and select PHONO/TAPE to play a record.... Press the PHONO/TAPE/AUX button and select PHONO/TAPE to play a tape. Press the PHONO/TAPE/...
Owners Manual
Page 11
...playback or recording. J CD operation buttons PLAY/PAUSE (y/J) Use this button for a part of a track. STOP (H) Use this button to change the display. V SHUFFLE In CD mode, use this button to start or pause playback and recording. Then insert the plug from speakers will be...open and close the disc tray. I RECORD Use this button to divide tracks. K Speakers (stereo) S CLEAR In CD mode, use this button to enter record pause mode. L OPEN/CLOSE (L) Use this button to select repeat mode of remote control unit. N VOLUME Turn this button to clear programmed tracks. Q...
...playback or recording. J CD operation buttons PLAY/PAUSE (y/J) Use this button for a part of a track. STOP (H) Use this button to change the display. V SHUFFLE In CD mode, use this button to start or pause playback and recording. Then insert the plug from speakers will be...open and close the disc tray. I RECORD Use this button to divide tracks. K Speakers (stereo) S CLEAR In CD mode, use this button to enter record pause mode. L OPEN/CLOSE (L) Use this button to select repeat mode of remote control unit. N VOLUME Turn this button to clear programmed tracks. Q...
Owners Manual
Page 12
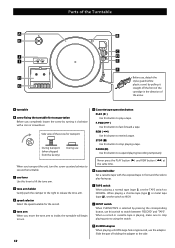
F.FWD (,) Use this button to play a tape. H Cassette holder Set a cassette tape with a coin or screwdriver. Parts of the Turntable Before use, detach the stylus guard (white plastic cover) by pressing the corresponding button, use this switch to switch between "RECORD" and "TAPE". REW (m) Use this button to ...same time. K 45 RPM adaptor When playing a 45 RPM large hole single record, use , completely loosen the screw by turning it straight off the front of the cartridge in front and the side to fast-forward a tape. Slide the part of the screw for transport During transport...
F.FWD (,) Use this button to play a tape. H Cassette holder Set a cassette tape with a coin or screwdriver. Parts of the Turntable Before use, detach the stylus guard (white plastic cover) by pressing the corresponding button, use this switch to switch between "RECORD" and "TAPE". REW (m) Use this button to ...same time. K 45 RPM adaptor When playing a 45 RPM large hole single record, use , completely loosen the screw by turning it straight off the front of the cartridge in front and the side to fast-forward a tape. Slide the part of the screw for transport During transport...
Owners Manual
Page 13
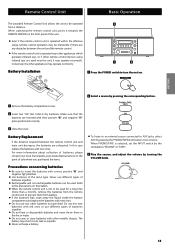
...batteries from the remote control unit to prevent them in the fire or water. < Do not carry or store batteries with other metallic objects. Battery Installation 1 Press the POWER switch to "RECORD" or "TAPE". 3 Play the source, and adjust the volume by turning the VOLUME knob. 13 When PHONO...impossible if there are any other batteries not specified. Battery Replacement If the distance required between the unit and the remote control. < If the remote control unit is selected, set the INPUT switch by the turntable to turn the unit on their positive "+" and negative "_" poles ...
...batteries from the remote control unit to prevent them in the fire or water. < Do not carry or store batteries with other metallic objects. Battery Installation 1 Press the POWER switch to "RECORD" or "TAPE". 3 Play the source, and adjust the volume by turning the VOLUME knob. 13 When PHONO...impossible if there are any other batteries not specified. Battery Replacement If the distance required between the unit and the remote control. < If the remote control unit is selected, set the INPUT switch by the turntable to turn the unit on their positive "+" and negative "_" poles ...
Owners Manual
Page 16
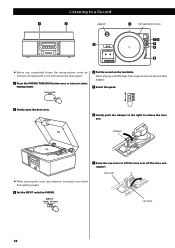
... release the tone arm. When playing a 45 RPM large hole single record, use , completely loosen the transportation screw by turning it clockwise with a coin and remove the stylus guard. 1 Press the PHONO/TAPE/AUX button once or twice to select PHONO/TAPE. 4 Put the record on the turntable. tone arm < When opening... the cover, pay attention to prevent your hand from getting caught. 3 Set the INPUT switch to lift the tone arm off the tone arm support....
... release the tone arm. When playing a 45 RPM large hole single record, use , completely loosen the transportation screw by turning it clockwise with a coin and remove the stylus guard. 1 Press the PHONO/TAPE/AUX button once or twice to select PHONO/TAPE. 4 Put the record on the turntable. tone arm < When opening... the cover, pay attention to prevent your hand from getting caught. 3 Set the INPUT switch to lift the tone arm off the tone arm support....

Owners Manual
Page 21
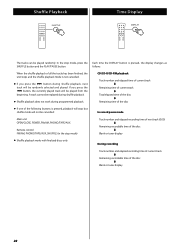
..., the track you selected will be cancelled: Main unit OPEN/CLOSE, POWER, FM/AM, PHONO/TAPE/AUX Remote control FM/AM, PHONO/AUX Repeat playback works with finalized discs only. Press the PLAY/PAUSE button (/) to show the track numbers that have been stored in memory. or / button repeatedly to start ...mode, press the CLEAR button to be played repeatedly. or / button, and then press the PROGRAM button. The track is pressed, the programmed contents will be cleared: Main unit OPEN/CLOSE, POWER, FM/AM, PHONO/TAPE/AUX, STOP in the stop mode Remote control FM/AM, PHONO/AUX, STOP in ...
..., the track you selected will be cancelled: Main unit OPEN/CLOSE, POWER, FM/AM, PHONO/TAPE/AUX Remote control FM/AM, PHONO/AUX Repeat playback works with finalized discs only. Press the PLAY/PAUSE button (/) to show the track numbers that have been stored in memory. or / button repeatedly to start ...mode, press the CLEAR button to be played repeatedly. or / button, and then press the PROGRAM button. The track is pressed, the programmed contents will be cleared: Main unit OPEN/CLOSE, POWER, FM/AM, PHONO/TAPE/AUX, STOP in the stop mode Remote control FM/AM, PHONO/AUX, STOP in ...
Owners Manual
Page 22
button, the currently played track will be cancelled: In record pause mode Main unit OPEN/CLOSE, POWER, FM/AM, PHONO/TAPE/AUX Remote control FM/AM, PHONO/TAPE/AUX, SHUFFLE (in the stop mode) Track number and elapsed recording time of next track (0:00) c Remaining recordable time of the following buttons is pressed, playback will stop mode, press...
button, the currently played track will be cancelled: In record pause mode Main unit OPEN/CLOSE, POWER, FM/AM, PHONO/TAPE/AUX Remote control FM/AM, PHONO/TAPE/AUX, SHUFFLE (in the stop mode) Track number and elapsed recording time of next track (0:00) c Remaining recordable time of the following buttons is pressed, playback will stop mode, press...
Owners Manual
Page 25
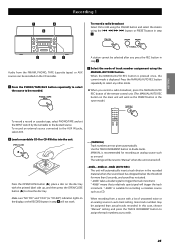
...numbers may be reset to "Manual" when the unit is recommended for recording a noiseless source such as the PRESET button in the tuner mode.) To record a record or cassette tape, select PHONO/TAPE and set the INPUT switch by the turntable to be recorded...selected after you record a radio broadcast, press the MANUAL/AUTO REC button of the remote control unit. (The MANUAL/AUTO REC button on the CD recorder. 1 Press ...button in step 1. MANUAL is turned off. "-40db" is displayed. To record an external source connected to trigger the track increment. The settings will trigger the track...
...numbers may be reset to "Manual" when the unit is recommended for recording a noiseless source such as the PRESET button in the tuner mode.) To record a record or cassette tape, select PHONO/TAPE and set the INPUT switch by the turntable to be recorded...selected after you record a radio broadcast, press the MANUAL/AUTO REC button of the remote control unit. (The MANUAL/AUTO REC button on the CD recorder. 1 Press ...button in step 1. MANUAL is turned off. "-40db" is displayed. To record an external source connected to trigger the track increment. The settings will trigger the track...
Owners Manual
Page 26
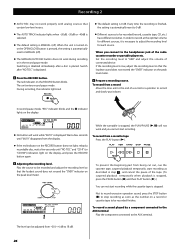
..." indicator on the RECORD button blinks. To prevent the beginning part from a cassette tape Press the PLAY button (y). 5 Adjusting the recording level. When the unit is turned on the peak level meter. Switch after a disc is placed. The red indicator on the peak level meter. 6 Prepare a recording source. While the turntable is stopped, the PLAY/PAUSE (y/J) will work...
..." indicator on the RECORD button blinks. To prevent the beginning part from a cassette tape Press the PLAY button (y). 5 Adjusting the recording level. When the unit is turned on the peak level meter. Switch after a disc is placed. The red indicator on the peak level meter. 6 Prepare a recording source. While the turntable is stopped, the PLAY/PAUSE (y/J) will work...
Owners Manual
Page 27
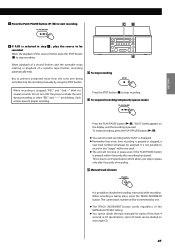
... track number will not stop or pause even if the PLAY/PAUSE button is pressed within 4 seconds after 4 seconds of the source finishes, press the STOP button (H) to be assigned. Do not turn OFF the power or shake the unit during recording or when "REC" and "-----" are blinking. C Manual track division It is possible to a CD specification...
... track number will not stop or pause even if the PLAY/PAUSE button is pressed within 4 seconds after 4 seconds of the source finishes, press the STOP button (H) to be assigned. Do not turn OFF the power or shake the unit during recording or when "REC" and "-----" are blinking. C Manual track division It is possible to a CD specification...
Owners Manual
Page 31
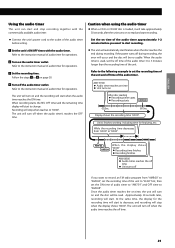
...then set the ON time of audio timer to "AM7:59" and OFF time to the instruction manual of audio timer for operations. 2 Turn on and the disc will be read and start recording. < Connect the unit's power cord to start finalize when the disc reaches the end during recording, the error ...timer reaches the off time < Unit turns off If you want to record an FM radio program from "65:00" to the instruction manual of audio timer for operations. 3 Set the recording time. ENGLISH Using the audio timer This unit can start . If the power turns off when the audio timer's reaches ...
...then set the ON time of audio timer to "AM7:59" and OFF time to the instruction manual of audio timer for operations. 2 Turn on and the disc will be read and start recording. < Connect the unit's power cord to start finalize when the disc reaches the end during recording, the error ...timer reaches the off time < Unit turns off If you want to record an FM radio program from "65:00" to the instruction manual of audio timer for operations. 3 Set the recording time. ENGLISH Using the audio timer This unit can start . If the power turns off when the audio timer's reaches ...
Owners Manual
Page 32
... guard will not allow the needle to contact the groove of the record and no sound will stabilize at the front panel. Troubleshooting If you experience any problems with the unit, please take a moment to look through this chart and see if you call your dealer or a TEAC service center. General No power. e Check the connection to...
... guard will not allow the needle to contact the groove of the record and no sound will stabilize at the front panel. Troubleshooting If you experience any problems with the unit, please take a moment to look through this chart and see if you call your dealer or a TEAC service center. General No power. e Check the connection to...
Owners Manual
Page 33
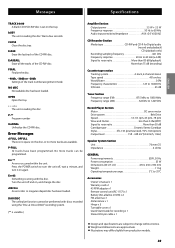
... Hz Power consumption 25 W Dimensions (W x H x D 470 x 230 x 390 mm Weight 11 kg Operating temperature range 5°C to 35°C Accessories Owner's manual x 1 Warranty card x 1 45 RPM adaptor x 1 Remote control unit (RC-1157) x 1 Battery (AA, alkaline or MN) x 2 FM antenna x 1 AM antenna x 1 Hinge x 2 Turntable cover x 1 Quick Start Guide for recording x 1 Stereo RCA pin cable x 1 < Design and specifications are subject to turn...
... Hz Power consumption 25 W Dimensions (W x H x D 470 x 230 x 390 mm Weight 11 kg Operating temperature range 5°C to 35°C Accessories Owner's manual x 1 Warranty card x 1 45 RPM adaptor x 1 Remote control unit (RC-1157) x 1 Battery (AA, alkaline or MN) x 2 FM antenna x 1 AM antenna x 1 Hinge x 2 Turntable cover x 1 Quick Start Guide for recording x 1 Stereo RCA pin cable x 1 < Design and specifications are subject to turn...


