Owners Manual
Page 4
...unit with transport locking screw. WHEN MOVING THIS UNIT When changing the unit's location or packing the unit for future reference. Read this manual carefully to get into the unit, contact your unit carefully. In this case, turn off the unit. < The nominal temperature should...-RW recorder is turned on, switching on the TV may create noise due to vibrations or fall, especially during playback. See Page 12 for choosing TEAC. If you for instructions. 4 Contents Before using the unit 4 Handling Records 5 How to Replace the Stylus 5 Discs 6 Turntable Cover 7 Handling ...
...unit with transport locking screw. WHEN MOVING THIS UNIT When changing the unit's location or packing the unit for future reference. Read this manual carefully to get into the unit, contact your unit carefully. In this case, turn off the unit. < The nominal temperature should...-RW recorder is turned on, switching on the TV may create noise due to vibrations or fall, especially during playback. See Page 12 for choosing TEAC. If you for instructions. 4 Contents Before using the unit 4 Handling Records 5 How to Replace the Stylus 5 Discs 6 Turntable Cover 7 Handling ...
Owners Manual
Page 5
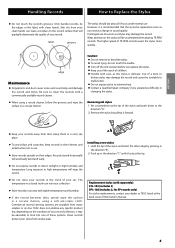
... a circular motion, using a record cleaner, follow the grooves and wipe the surface in a closed trunk can leave a residue on their edges. TEAC does not endorse any specific product but, depending on the condition of your record collection, it locks at the tip. < Do not expose records ...use . < Store records upright on the record surface that the stylus be accelerated when playing 78 RPM records. The higher speed of this Owner's manual. 5 Remove the stylus by pulling it is delicate. Be sure to the direction "A". 2. Skin oils from many retailers or on the stylus ...
... a circular motion, using a record cleaner, follow the grooves and wipe the surface in a closed trunk can leave a residue on their edges. TEAC does not endorse any specific product but, depending on the condition of your record collection, it locks at the tip. < Do not expose records ...use . < Store records upright on the record surface that the stylus be accelerated when playing 78 RPM records. The higher speed of this Owner's manual. 5 Remove the stylus by pulling it is delicate. Be sure to the direction "A". 2. Skin oils from many retailers or on the stylus ...
Owners Manual
Page 7
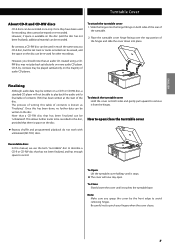
..., but the last track or tracks recorded can be erased, and the space on the disc can be re-used for other recordings. Once this manual, we use the term "recordable" disc to record. By contrast, a CD-RW disc can be used in much the same way as "finalizing". This allows...
..., but the last track or tracks recorded can be erased, and the space on the disc can be re-used for other recordings. Once this manual, we use the term "recordable" disc to record. By contrast, a CD-RW disc can be used in much the same way as "finalizing". This allows...
Owners Manual
Page 10
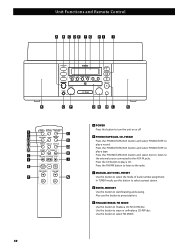
... MODE. 10 Use this button to the radio. Unit Functions and Remote Control A POWER Press this button to select the mode of track number assignment. C MANUAL/AUTO REC, PRESET Use this button to turn the unit on or off. Press the CD button to finalize a CD-R/CD-RW disc. E FINALIZE/ERASE...
... MODE. 10 Use this button to the radio. Unit Functions and Remote Control A POWER Press this button to select the mode of track number assignment. C MANUAL/AUTO REC, PRESET Use this button to turn the unit on or off. Press the CD button to finalize a CD-R/CD-RW disc. E FINALIZE/ERASE...

Owners Manual
Page 14
... be required. 14 STEREO FM stereo broadcasts are received in stereo and the "STEREO" indicator lights in , the tuning process will now be tuned automatically (manual selection) FM MODE 1 Select FM or AM using the FM/AM button. Reception will stop automatically. < Press the TUNING button ( or ) to stop the auto...
... be required. 14 STEREO FM stereo broadcasts are received in stereo and the "STEREO" indicator lights in , the tuning process will now be tuned automatically (manual selection) FM MODE 1 Select FM or AM using the FM/AM button. Reception will stop automatically. < Press the TUNING button ( or ) to stop the auto...
Owners Manual
Page 17
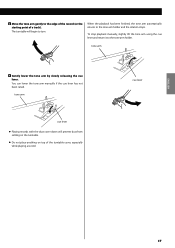
... edge of the record (or the starting point of the turntable cover, especially while playing a record. cue lever 17 You can lower the tone arm manually if the cue lever has not been raised. tone arm 9 Gently lower the tone arm by slowly releasing the cue lever. When the playback has...). tone arm cue lever < Playing records with the dust cover down will begin to the tone arm holder and the rotation stops. To stop playback manually, slightly lift the tone arm using the cue lever and return it to the tone arm holder.
... edge of the record (or the starting point of the turntable cover, especially while playing a record. cue lever 17 You can lower the tone arm manually if the cue lever has not been raised. tone arm 9 Gently lower the tone arm by slowly releasing the cue lever. When the playback has...). tone arm cue lever < Playing records with the dust cover down will begin to the tone arm holder and the rotation stops. To stop playback manually, slightly lift the tone arm using the cue lever and return it to the tone arm holder.
Owners Manual
Page 25
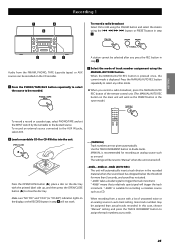
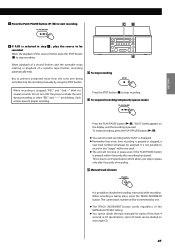
... to close the disc tray. "-40db" means that a relatively quiet signal will automatically insert a track division in step 1. In this case, choose "Manual" setting and press the TRACK INCREMENT button to divide tracks. Use the TRACK INCREMENT button to assign the track numbers as the PRESET button in...actual tracks recorded. ENGLISH Recording 1 To record a radio broadcast Select FM or AM using the FM/AM button and select the station using the MANUAL/AUTO REC button. When recording from the FM/AM, PHONO, TAPE (cassette tapes) or AUX sources can be recorded on the display, or ...
... to close the disc tray. "-40db" means that a relatively quiet signal will automatically insert a track division in step 1. In this case, choose "Manual" setting and press the TRACK INCREMENT button to divide tracks. Use the TRACK INCREMENT button to assign the track numbers as the PRESET button in...actual tracks recorded. ENGLISH Recording 1 To record a radio broadcast Select FM or AM using the FM/AM button and select the station using the MANUAL/AUTO REC button. When recording from the FM/AM, PHONO, TAPE (cassette tapes) or AUX sources can be recorded on the display, or ...
Owners Manual
Page 26
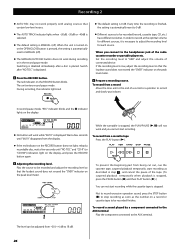
..., press the STOP button (H) to stop recording as soon as described in the record pause mode. Switching is disabled immediately after "NO TOC" is MANUAL (off ). < The MANUAL/AUTO REC button does not work during recording or in step 7 , and cancel the pause of a record or a position to "0dB" and ...when playback is stopped, press the PAUSE button (J) and then PLAY button (y).) You can not start recording while the cassette tape is necessary to MANUAL (off ). Play the source to record at the optimal volume for each source. The level can be recorded and adjust the recording level so ...
..., press the STOP button (H) to stop recording as soon as described in the record pause mode. Switching is disabled immediately after "NO TOC" is MANUAL (off ). < The MANUAL/AUTO REC button does not work during recording or in step 7 , and cancel the pause of a record or a position to "0dB" and ...when playback is stopped, press the PAUSE button (J) and then PLAY button (y).) You can not start recording while the cassette tape is necessary to MANUAL (off ). Play the source to record at the optimal volume for each source. The level can be recorded and adjust the recording level so ...
Owners Manual
Page 27
... to prevent unwanted noise from the tone arm being recorded, stop the recording manually by one. < The TRACK INCREMENT button works regardless of the MANUAL/AUTO REC setting. < You cannot divide the track manually for several seconds. This is pressed within one single CD. 27 The current...briefly appears on one track. < The unit will always be divided on the display, and the recording is selected in CD specifications. C Manual track division It is taking place, press the TRACK INCREMENT button. While recording is possible to be incremented by using the STOP button. Up...
... to prevent unwanted noise from the tone arm being recorded, stop the recording manually by one. < The TRACK INCREMENT button works regardless of the MANUAL/AUTO REC setting. < You cannot divide the track manually for several seconds. This is pressed within one single CD. 27 The current...briefly appears on one track. < The unit will always be divided on the display, and the recording is selected in CD specifications. C Manual track division It is taking place, press the TRACK INCREMENT button. While recording is possible to be incremented by using the STOP button. Up...
Owners Manual
Page 31
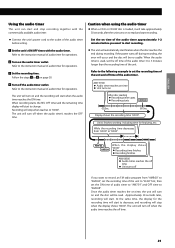
... the off during recording. After disc reading < Recording timer starts < Recording starts AM8:00 00 Sec. 60 Sec. Refer to the instruction manual of audio timer for operations. 3 Set the recording time. The unit will start when the audio timer reaches the ON time. Approximately 30 seconds... later, recording will turn on to read . Refer to the instruction manual of audio timer for operations. < The unit will take approximately 30 seconds after the unit turns on and the recording will stop recording...
... the off during recording. After disc reading < Recording timer starts < Recording starts AM8:00 00 Sec. 60 Sec. Refer to the instruction manual of audio timer for operations. 3 Set the recording time. The unit will start when the audio timer reaches the ON time. Approximately 30 seconds... later, recording will turn on to read . Refer to the instruction manual of audio timer for operations. < The unit will take approximately 30 seconds after the unit turns on and the recording will stop recording...
Owners Manual
Page 33
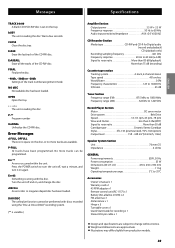
... Power requirements 230V, 50 Hz Power consumption 25 W Dimensions (W x H x D 470 x 230 x 390 mm Weight 11 kg Operating temperature range 5°C to 35°C Accessories Owner's manual x 1 Warranty card x 1 45 RPM adaptor x 1 Remote control unit (RC-1157) x 1 Battery (AA, alkaline or MN) x 2 FM antenna x 1 AM antenna x 1 Hinge x 2 Turntable cover x 1 Quick Start Guide...
... Power requirements 230V, 50 Hz Power consumption 25 W Dimensions (W x H x D 470 x 230 x 390 mm Weight 11 kg Operating temperature range 5°C to 35°C Accessories Owner's manual x 1 Warranty card x 1 45 RPM adaptor x 1 Remote control unit (RC-1157) x 1 Battery (AA, alkaline or MN) x 2 FM antenna x 1 AM antenna x 1 Hinge x 2 Turntable cover x 1 Quick Start Guide...