Owners Manual
Page 4
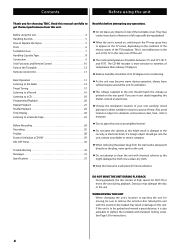
...to get into the unit, contact your unit carefully. See Page 12 for choosing TEAC. Use a clean, dry cloth. < Keep this unit with transport locking screw. Moving this manual in the unit or the TV. The CD-RW recorder is turned on, switching on the TV may become warm during operation, always...outlet, always pull directly on the plug, never yank on the cord. < Do not attempt to remove the record or disc. If the unit is also advisable to tighten the turntable with the record or disc loaded may damage the disc or the unit. Avoid placing it is to be sure to clean...
...to get into the unit, contact your unit carefully. See Page 12 for choosing TEAC. Use a clean, dry cloth. < Keep this unit with transport locking screw. Moving this manual in the unit or the TV. The CD-RW recorder is turned on, switching on the TV may become warm during operation, always...outlet, always pull directly on the plug, never yank on the cord. < Do not attempt to remove the record or disc. If the unit is also advisable to tighten the turntable with the record or disc loaded may damage the disc or the unit. Avoid placing it is to be sure to clean...
Owners Manual
Page 5
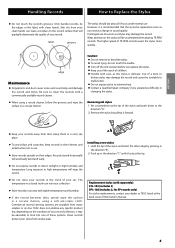
... in the direction "B". 2. C B < Do not store your car. Use of a worn-out stylus may damage the record and cause the turntable to malfunction. < Do not expose stylus to high temperatures will gradually deteriorate the quality of the stylus and insert the other ... Owner's manual. 5 Push up in sound quality. TEAC does not endorse any specific product but, depending on -line. Commercial record cleaning systems are available from undue wear. ENGLISH Handling Records How to the direction "A". 2. Only handle records, by pulling it is delicate. Caution: < Do...
... in the direction "B". 2. C B < Do not store your car. Use of a worn-out stylus may damage the record and cause the turntable to malfunction. < Do not expose stylus to high temperatures will gradually deteriorate the quality of the stylus and insert the other ... Owner's manual. 5 Push up in sound quality. TEAC does not endorse any specific product but, depending on -line. Commercial record cleaning systems are available from undue wear. ENGLISH Handling Records How to the direction "A". 2. Only handle records, by pulling it is delicate. Caution: < Do...
Owners Manual
Page 7
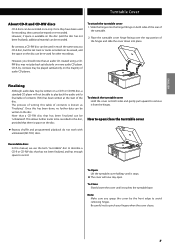
...CD-RW disc, a standard CD player will now stay open /close the turntable cover < Repeat, shuffle and programmed playback do not work with unfinalized (NO TOC) discs. Once this manual, we use the term "recordable" disc to record. Recordable discs In this has been done, no further data can be able to the...of writing this table of the hinges and slide the cover down into the hinge fittings on the disc can be recorded once only. Slide the hinges into place. Place the turntable cover hinge fittings over the top portion of contents is known as a CD-R disc, but the last track ...
...CD-RW disc, a standard CD player will now stay open /close the turntable cover < Repeat, shuffle and programmed playback do not work with unfinalized (NO TOC) discs. Once this manual, we use the term "recordable" disc to record. Recordable discs In this has been done, no further data can be able to the...of writing this table of the hinges and slide the cover down into the hinge fittings on the disc can be recorded once only. Slide the hinges into place. Place the turntable cover hinge fittings over the top portion of contents is known as a CD-R disc, but the last track ...
Owners Manual
Page 8
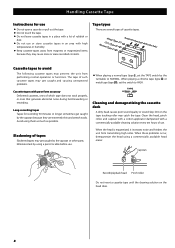
Eliminate slack by the turntable to NORMAL. Tape types There are extremely thin and stretch easily. The tape of...as possible. When the head is magnetized, it increases noise and hinders the unit from performing normal operation or functions. Long-recording tapes Tapes for use < Do not open a cassette or pull out the tape. < Do not touch the tape. ... cassette tapes in an area with poor form accuracy Deformed cassettes, ones of cassette tapes. Capstan Record/playback head Pinch roller Do not insert a cassette tape until the cleaning solution on the tape tracking roller may cause...
Eliminate slack by the turntable to NORMAL. Tape types There are extremely thin and stretch easily. The tape of...as possible. When the head is magnetized, it increases noise and hinders the unit from performing normal operation or functions. Long-recording tapes Tapes for use < Do not open a cassette or pull out the tape. < Do not touch the tape. ... cassette tapes in an area with poor form accuracy Deformed cassettes, ones of cassette tapes. Capstan Record/playback head Pinch roller Do not insert a cassette tape until the cleaning solution on the tape tracking roller may cause...
Owners Manual
Page 12
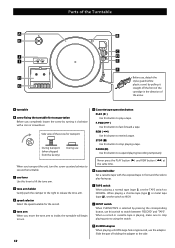
...Select the speed suitable for transport During transport (when shipped from the factory) During use When you move the tone arm to inside, the turntable will begin to turn the screw counterclockwise to play a tape. F tone arm When you transport the unit, turn . 12 G Cassette ...button to HIGH. H Cassette holder Set a cassette tape with a coin or screwdriver. When a record or cassette tape is selected by pressing the corresponding button, use the adaptor. Parts of the Turntable Before use, detach the stylus guard (white plastic cover) by pulling it clockwise with the exposed ...
...Select the speed suitable for transport During transport (when shipped from the factory) During use When you move the tone arm to inside, the turntable will begin to turn the screw counterclockwise to play a tape. F tone arm When you transport the unit, turn . 12 G Cassette ...button to HIGH. H Cassette holder Set a cassette tape with a coin or screwdriver. When a record or cassette tape is selected by pressing the corresponding button, use the adaptor. Parts of the Turntable Before use, detach the stylus guard (white plastic cover) by pulling it clockwise with the exposed ...
Owners Manual
Page 13
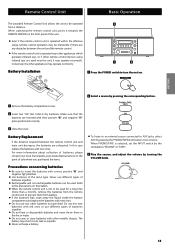
...circuit, leak or explode. < Never recharge a battery. < To listen to an external source connected to AUX jacks, select AUX by the turntable to the precautions on their positive "+" and negative "_" poles positioned correctly. 3 Close the cover. The battery may operate incorrectly. Remote Control ...control unit, point it may be used . When PHONO/TAPE is not to be impossible if there are any other metallic objects. Refer to "RECORD" or "TAPE". 3 Play the source, and adjust the volume by pressing the corresponding button. 1 Remove the battery compartment cover. 2 Insert two...
...circuit, leak or explode. < Never recharge a battery. < To listen to an external source connected to AUX jacks, select AUX by the turntable to the precautions on their positive "+" and negative "_" poles positioned correctly. 3 Close the cover. The battery may operate incorrectly. Remote Control ...control unit, point it may be used . When PHONO/TAPE is not to be impossible if there are any other metallic objects. Refer to "RECORD" or "TAPE". 3 Play the source, and adjust the volume by pressing the corresponding button. 1 Remove the battery compartment cover. 2 Insert two...
Owners Manual
Page 16
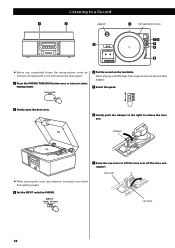
...pay attention to prevent your hand from getting caught. 3 Set the INPUT switch to lift the tone arm off the tone arm support. Listening to a Record adaptor transportation screw < Before use the included adaptor. 5 Select the speed. 2 Gently open the dust cover. 6 Gently push the clamper to the ...right to release the tone arm. When playing a 45 RPM large hole single record, use , completely loosen the transportation screw by turning it clockwise with a coin and remove the stylus guard. 1 Press the PHONO/TAPE/AUX button once...
...pay attention to prevent your hand from getting caught. 3 Set the INPUT switch to lift the tone arm off the tone arm support. Listening to a Record adaptor transportation screw < Before use the included adaptor. 5 Select the speed. 2 Gently open the dust cover. 6 Gently push the clamper to the ...right to release the tone arm. When playing a 45 RPM large hole single record, use , completely loosen the transportation screw by turning it clockwise with a coin and remove the stylus guard. 1 Press the PHONO/TAPE/AUX button once...
Owners Manual
Page 17
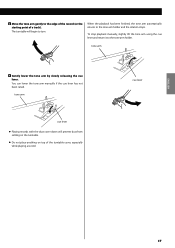
... the dust cover down will begin to the edge of the record (or the starting point of the turntable cover, especially while playing a record. cue lever 17 The turntable will prevent dust from settling on the turntable. < Do not place anything on top of a track). To stop playback manually, slightly lift the tone arm using...
... the dust cover down will begin to the edge of the record (or the starting point of the turntable cover, especially while playing a record. cue lever 17 The turntable will prevent dust from settling on the turntable. < Do not place anything on top of a track). To stop playback manually, slightly lift the tone arm using...
Owners Manual
Page 23
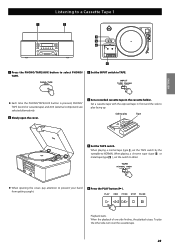
When playing a chrome tape (type @ ) or metal tape (type !% ), set the TAPE switch by the turntable to NORMAL. Set a cassette tape with the exposed tape in the cassette holder. Side to play Tape 5 Set the TAPE switch. Playback starts. To play ... (type !), set the switch to HIGH. < When opening the cover, pay attention to TAPE. < Each time the PHONO/TAPE/AUX button is pressed, PHONO/ TAPE (record or cassette tape) and AUX (external component) are selected alternatively. 2 Slowly open the cover. 4 Set...
When playing a chrome tape (type @ ) or metal tape (type !% ), set the TAPE switch by the turntable to NORMAL. Set a cassette tape with the exposed tape in the cassette holder. Side to play Tape 5 Set the TAPE switch. Playback starts. To play ... (type !), set the switch to HIGH. < When opening the cover, pay attention to TAPE. < Each time the PHONO/TAPE/AUX button is pressed, PHONO/ TAPE (record or cassette tape) and AUX (external component) are selected alternatively. 2 Slowly open the cover. 4 Set...
Owners Manual
Page 25
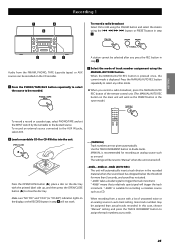
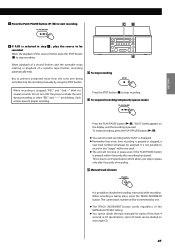
...number assignment using the .m/,/ button or PRESET button in the tuner mode.) To record a record or cassette tape, select PHONO/TAPE and set the INPUT switch by the turntable to "Manual" when the unit is suitable for recording an analog source such as you press the REC button in step 4 will... automatically insert a track division in the recorded material when the sound level has dropped below the threshold ...
...number assignment using the .m/,/ button or PRESET button in the tuner mode.) To record a record or cassette tape, select PHONO/TAPE and set the INPUT switch by the turntable to "Manual" when the unit is suitable for recording an analog source such as you press the REC button in step 4 will... automatically insert a track division in the recorded material when the sound level has dropped below the threshold ...
Owners Manual
Page 26
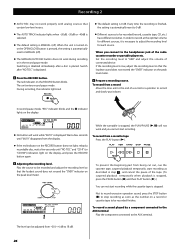
... playback is MANUAL (off ). < The MANUAL/AUTO REC button does not work during recording or in step 7 , and cancel the pause of the radio cassette recorder or portable player etc. While the turntable is stopped, the PLAY/PAUSE (y/J) will work while "bUSY" is automatically reset to ...the end of connected device. Recording 2 < AUTO REC may not work properly with analog sources ...
... playback is MANUAL (off ). < The MANUAL/AUTO REC button does not work during recording or in step 7 , and cancel the pause of the radio cassette recorder or portable player etc. While the turntable is stopped, the PLAY/PAUSE (y/J) will work while "bUSY" is automatically reset to ...the end of connected device. Recording 2 < AUTO REC may not work properly with analog sources ...
Owners Manual
Page 27
... AUX is selected in step 1 , play the source to be assigned. This is not possible to a CD specification which allows you stop recording. When playback of a record finishes and the turntable stops rotating or playback of the MANUAL/AUTO REC setting. < You cannot divide the track manually for several seconds. It is due...
... AUX is selected in step 1 , play the source to be assigned. This is not possible to a CD specification which allows you stop recording. When playback of a record finishes and the turntable stops rotating or playback of the MANUAL/AUTO REC setting. < You cannot divide the track manually for several seconds. It is due...
Owners Manual
Page 32
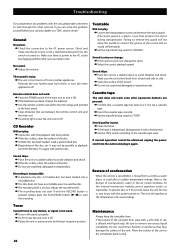
...unit within the (5m) range and pointed at the temperature of the unit to dry completely before you call your dealer or a TEAC service center. CD Recorder Will not play . e Do not use scratched, damaged or warped discs. Sound quality is noisy or strange. e If the disc...surface to avoid vibration and shock. e Place the unit on a stable surface to avoid vibration and shock. Recording is noisy. e Tune in the air could condense on . Maintenance Always keep the turntable clean. e If the batteries are dead, change the stylus. e Set the TAPE switch according to any ...
...unit within the (5m) range and pointed at the temperature of the unit to dry completely before you call your dealer or a TEAC service center. CD Recorder Will not play . e Do not use scratched, damaged or warped discs. Sound quality is noisy or strange. e If the disc...surface to avoid vibration and shock. e Place the unit on a stable surface to avoid vibration and shock. Recording is noisy. e Tune in the air could condense on . Maintenance Always keep the turntable clean. e If the batteries are dead, change the stylus. e Set the TAPE switch according to any ...
Owners Manual
Page 33
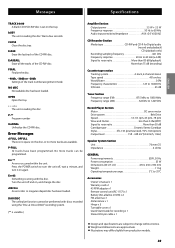
... response 20 Hz to 20 kHz (±3 dB) Signal to noise ratio More than 85 dB (playback) More than 75 dB (recording) Cassette tape section Tracking system 4-track, 2-channel stereo Tape speed 4.8 cm/sec Wow&flutter 0.3% Frequency characteristic 125 to 10,000 Hz... RPM adaptor x 1 Remote control unit (RC-1157) x 1 Battery (AA, alkaline or MN) x 2 FM antenna x 1 AM antenna x 1 Hinge x 2 Turntable cover x 1 Quick Start Guide for recording x 1 Stereo RCA pin cable x 1 < Design and specifications are subject to turn the unit off and on again. No more tracks are approximate. < Illustrations...
... response 20 Hz to 20 kHz (±3 dB) Signal to noise ratio More than 85 dB (playback) More than 75 dB (recording) Cassette tape section Tracking system 4-track, 2-channel stereo Tape speed 4.8 cm/sec Wow&flutter 0.3% Frequency characteristic 125 to 10,000 Hz... RPM adaptor x 1 Remote control unit (RC-1157) x 1 Battery (AA, alkaline or MN) x 2 FM antenna x 1 AM antenna x 1 Hinge x 2 Turntable cover x 1 Quick Start Guide for recording x 1 Stereo RCA pin cable x 1 < Design and specifications are subject to turn the unit off and on again. No more tracks are approximate. < Illustrations...


