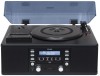
Owners Manual
Page 2
... Do not block any way, such as power-supply cord or plug is required when the apparatus has been damaged in accordance with the manufacturer's instructions. 8) Do not install near water. 6) Clean only with one wider than the other apparatus (including amplifiers) that may be of sufficient magnitude ...to constitute a risk of electric shock to the presence of time. 14) Refer all instructions. 5) Do not use caution when moving the cart/ apparatus combination to avoid injury from tip-over. 13) Unplug this apparatus near any ...
... Do not block any way, such as power-supply cord or plug is required when the apparatus has been damaged in accordance with the manufacturer's instructions. 8) Do not install near water. 6) Clean only with one wider than the other apparatus (including amplifiers) that may be of sufficient magnitude ...to constitute a risk of electric shock to the presence of time. 14) Refer all instructions. 5) Do not use caution when moving the cart/ apparatus combination to avoid injury from tip-over. 13) Unplug this apparatus near any ...
Owners Manual
Page 4
...sure to remove the record or disc. The CD-RW recorder is turned on, switching on the rear panel. If you for choosing TEAC. Also avoid locations subject to vibrations and excessive dust, heat, cold or moisture. < Do not place the unit on an amplifier/... operation, always leave sufficient space around the unit for future reference. WHEN MOVING THIS UNIT When changing the unit's location or packing the unit for instructions. 4 Contents Before using the unit 4 Handling Records 5 How to Replace the Stylus 5 Discs 6 Turntable Cover 7 Handling Cassette Tape 8 Connection...
...sure to remove the record or disc. The CD-RW recorder is turned on, switching on the rear panel. If you for choosing TEAC. Also avoid locations subject to vibrations and excessive dust, heat, cold or moisture. < Do not place the unit on an amplifier/... operation, always leave sufficient space around the unit for future reference. WHEN MOVING THIS UNIT When changing the unit's location or packing the unit for instructions. 4 Contents Before using the unit 4 Handling Records 5 How to Replace the Stylus 5 Discs 6 Turntable Cover 7 Handling Cassette Tape 8 Connection...
Owners Manual
Page 8
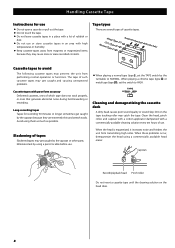
... sound quality or sound skip. Eliminate slack by the capstan or other parts. Slackening of such cassette tapes may catch the tape. Handling Cassette Tape Instructions for recording 90 minutes or longer sometimes get caught by the turntable to HIGH. Tape types There are extremely thin and stretch easily. Clean the...
... sound quality or sound skip. Eliminate slack by the capstan or other parts. Slackening of such cassette tapes may catch the tape. Handling Cassette Tape Instructions for recording 90 minutes or longer sometimes get caught by the turntable to HIGH. Tape types There are extremely thin and stretch easily. Clean the...

Owners Manual
Page 9
... antenna terminals. < Make sure to connect the black wire to find the best position for the reception. Keep all equipment before making connections. < Read the instructions of each plug securely. Connection ENGLISH A B White Red White C D White Red White LR RL LINE OUT LINE IN Cassette Tape Deck, etc. A FM antenna While...
... antenna terminals. < Make sure to connect the black wire to find the best position for the reception. Keep all equipment before making connections. < Read the instructions of each plug securely. Connection ENGLISH A B White Red White C D White Red White LR RL LINE OUT LINE IN Cassette Tape Deck, etc. A FM antenna While...
Owners Manual
Page 11
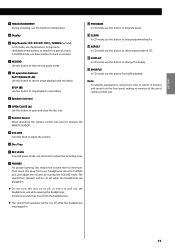
... Use this button to clear programmed tracks. K Speakers (stereo) S CLEAR In CD mode, use this button to enter record pause mode. Note: To simplify explanations, instructions refer to divide tracks. ENGLISH F TRACK INCREMENT During recording, use this button to names of buttons and controls on or off, or insert or pull...
... Use this button to clear programmed tracks. K Speakers (stereo) S CLEAR In CD mode, use this button to enter record pause mode. Note: To simplify explanations, instructions refer to divide tracks. ENGLISH F TRACK INCREMENT During recording, use this button to names of buttons and controls on or off, or insert or pull...
Owners Manual
Page 31
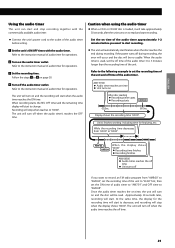
Refer to the instruction manual of the audio timer. If the power turns off during recording. After disc reading < Recording timer... a CD-R or CD-RW disc is used, set the ON time of the audio timer before you want to the instruction manual of audio timer for operations. 2 Turn on and the recording will turn off when the audio timer reaches the off... recording time of the unit to "65:00" first, then set the off time of the audio timer 3 to the instruction manual of audio timer for operations. < The unit will take approximately 30 seconds after the unit turns on and the disc ...
Refer to the instruction manual of the audio timer. If the power turns off during recording. After disc reading < Recording timer... a CD-R or CD-RW disc is used, set the ON time of the audio timer before you want to the instruction manual of audio timer for operations. 2 Turn on and the recording will turn off when the audio timer reaches the off... recording time of the unit to "65:00" first, then set the off time of the audio timer 3 to the instruction manual of audio timer for operations. < The unit will take approximately 30 seconds after the unit turns on and the disc ...