DP-03 tested media list
Page 1
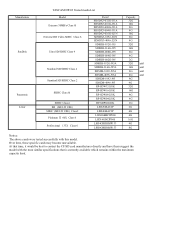
... DP-03 Tested media List Model Extreme 30MB/s Class10 Extreme HD Video SDHC Class 6 Ultra SD/SDHC Class 4 Standard SD/SDHC Class 4 Standard SD/SDHC Class 2 SDHC Class10 SDHC Class4 SDɹ(MULTI USE) SDHC (MULTI USE) Class2 Platinum ᶘ 60X Class 6 Professionalɹ133̭ɹClass 6 Parts#...2G 4G 4G 16G 4G 8G Notice: The above cards were tested successfully with the most similar specifications that time, it would be best to contact the CF/SD card manufacturer directly and have them suggest the model with this model. At that is currently available which remains within ...
... DP-03 Tested media List Model Extreme 30MB/s Class10 Extreme HD Video SDHC Class 6 Ultra SD/SDHC Class 4 Standard SD/SDHC Class 4 Standard SD/SDHC Class 2 SDHC Class10 SDHC Class4 SDɹ(MULTI USE) SDHC (MULTI USE) Class2 Platinum ᶘ 60X Class 6 Professionalɹ133̭ɹClass 6 Parts#...2G 4G 4G 16G 4G 8G Notice: The above cards were tested successfully with the most similar specifications that time, it would be best to contact the CF/SD card manufacturer directly and have them suggest the model with this model. At that is currently available which remains within ...
DP-03 owners manual
Page 4
... SD cards...9 Precautions for TRACK 1...13 Adjusting and monitoring the input level...13 Recording a guitar to TRACK 1...14 Playing back the recording...15 Recording a guitar to TRACK 2...15 Recording a vocal to TRACK 3 ...16 Mixing the tracks...17 Mastering a stereo track...18 Creating an audio CD with the master track ...20 Insert a CD...20 Writing to punch in/out...43 Setting the foot switch...43 Bouncing tracks...43 Using the bounce function...44 4 - Introduction...7 Features...7 Product parts...7 About this manual...7 Intellectual...
... SD cards...9 Precautions for TRACK 1...13 Adjusting and monitoring the input level...13 Recording a guitar to TRACK 1...14 Playing back the recording...15 Recording a guitar to TRACK 2...15 Recording a vocal to TRACK 3 ...16 Mixing the tracks...17 Mastering a stereo track...18 Creating an audio CD with the master track ...20 Insert a CD...20 Writing to punch in/out...43 Setting the foot switch...43 Bouncing tracks...43 Using the bounce function...44 4 - Introduction...7 Features...7 Product parts...7 About this manual...7 Intellectual...
DP-03 owners manual
Page 7
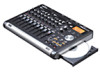
... eight track faders and one master level fader •• Each track has independent REVERB and PAN adjustments and track selection buttons, as well as volume faders and track select (REC) buttons •• Input on two channels through standard 6.3-mm (1/4") TRS jacks, XLR connectors or built-in microphones •• XLR connectors can supply phantom power •• Built-in microphones can record mono tracks separately or a stereo track together •• High-impedance guitar input supported by USB...
... eight track faders and one master level fader •• Each track has independent REVERB and PAN adjustments and track selection buttons, as well as volume faders and track select (REC) buttons •• Input on two channels through standard 6.3-mm (1/4") TRS jacks, XLR connectors or built-in microphones •• XLR connectors can supply phantom power •• Built-in microphones can record mono tracks separately or a stereo track together •• High-impedance guitar input supported by USB...

DP-03 owners manual
Page 12
...) buttons at any time. In this section we will mix down the tracks to open the SONG CREATE screen. Use TRACK 1-8 faders to adjust the balance of the song (ZERO point) (TO ZERO function) . •• If you have 3 Use the DATA wheel to select the CREATE item, and press the F4 (¥) button to stereo. connected monitoring equipment, started the unit and installed the SD card. Recording and mastering In...
...) buttons at any time. In this section we will mix down the tracks to open the SONG CREATE screen. Use TRACK 1-8 faders to adjust the balance of the song (ZERO point) (TO ZERO function) . •• If you have 3 Use the DATA wheel to select the CREATE item, and press the F4 (¥) button to stereo. connected monitoring equipment, started the unit and installed the SD card. Recording and mastering In...
DP-03 owners manual
Page 14
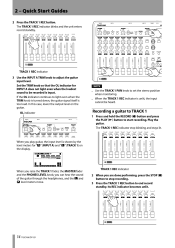
.... Quick Start Guides 2 Press the TRACK 1 REC button. The TRACK 1 REC indicator stop recording. 3 Press the TRACK 1 REC button to adjust the guitar input level. Recording a guitar to TRACK 1 1 Press and hold the RECORD (º) button and press the PLAY (Á) button to set the stereo position when monitoring. •• When the TRACK 1 REC indicator is unlit, the input cannot be recorded is too loud. When you raise the TRACK 1 fader, the MASTER fader and the PHONES LEVEL...
.... Quick Start Guides 2 Press the TRACK 1 REC button. The TRACK 1 REC indicator stop recording. 3 Press the TRACK 1 REC button to adjust the guitar input level. Recording a guitar to TRACK 1 1 Press and hold the RECORD (º) button and press the PLAY (Á) button to set the stereo position when monitoring. •• When the TRACK 1 REC indicator is unlit, the input cannot be recorded is too loud. When you raise the TRACK 1 fader, the MASTER fader and the PHONES LEVEL...

DP-03 owners manual
Page 18
... stereo master track. (See "Muting tracks" on the display as you want to start . 4 Set the OUT point. MIXDOWN appears in the upper left . 3 Set the IN point. The time when you began to open the MIXDOWN screen. Mixdown mode is reached. Quick Start Guides 2 Use the TRACK 1-3 PAN knobs to adjust the stereo positions of adjusting a stereo master track to improve the final sound. ªª Confirming the stereo master track 1 In multitrack mode, press the MIXDOWN/ MASTERING button...
... stereo master track. (See "Muting tracks" on the display as you want to start . 4 Set the OUT point. MIXDOWN appears in the upper left . 3 Set the IN point. The time when you began to open the MIXDOWN screen. Mixdown mode is reached. Quick Start Guides 2 Use the TRACK 1-3 PAN knobs to adjust the stereo positions of adjusting a stereo master track to improve the final sound. ªª Confirming the stereo master track 1 In multitrack mode, press the MIXDOWN/ MASTERING button...

DP-03 owners manual
Page 23
...; Use the MASTER fader to MIC/LINE when connecting a microphone or line level signal. Names and Functions of Parts Top panel 1 TRIM knob/OL indicator (INPUT A) Use this button to the signal source input through the INPUT A - Set it to lower the output volume of INPUT A. (See "Making the first recording" on the mic, a loud noise could break them. 3 - Do not supply phantom power to a ribbon microphone if you can turn phantom power ON and OFF. Set this button to some types of a track. TASCAM DP-03 23...
...; Use the MASTER fader to MIC/LINE when connecting a microphone or line level signal. Names and Functions of Parts Top panel 1 TRIM knob/OL indicator (INPUT A) Use this button to the signal source input through the INPUT A - Set it to lower the output volume of INPUT A. (See "Making the first recording" on the mic, a loud noise could break them. 3 - Do not supply phantom power to a ribbon microphone if you can turn phantom power ON and OFF. Set this button to some types of a track. TASCAM DP-03 23...

DP-03 owners manual
Page 24
... Parts 6 INPUT B switch Set this built-in microphone to input the sound of these buttons to the track. (See "Levels and balance" on the rear panel. When using built-in this to INTERNAL MIC A. The current function assignments are referred to switch between MULTITRACK and BOUNCE modes. 3 - Use to adjust the stereo signal level output from the left as F1, F2, F3 and F4 in MIC B. h MASTER fader 24 TASCAM DP-03 Press to open the EQ SETTING screen where you can adjust track...
... Parts 6 INPUT B switch Set this built-in microphone to input the sound of these buttons to the track. (See "Levels and balance" on the rear panel. When using built-in this to INTERNAL MIC A. The current function assignments are referred to switch between MULTITRACK and BOUNCE modes. 3 - Use to adjust the stereo signal level output from the left as F1, F2, F3 and F4 in MIC B. h MASTER fader 24 TASCAM DP-03 Press to open the EQ SETTING screen where you can adjust track...

DP-03 owners manual
Page 26
... time. ) REMOTE jack (2.5-mm TS jack) # DC IN 12V jack Connect a TASCAM RC-3F foot switch (sold separately) to allow a variety of Parts Rear panel @ STANDBY/ON button NOTE When the power is in /out (start and stop recording). $ PHONES jack (stereo mini jack) % LINE OUT jacks (unbalanced RCA) ^ INPUT B connector (balanced XLR) NOTE Do not input signals into standby. (See "Startup & shutdown" on the top panel to MIC/LINE or GUITAR. Use the PHONES LEVEL...
... time. ) REMOTE jack (2.5-mm TS jack) # DC IN 12V jack Connect a TASCAM RC-3F foot switch (sold separately) to allow a variety of Parts Rear panel @ STANDBY/ON button NOTE When the power is in /out (start and stop recording). $ PHONES jack (stereo mini jack) % LINE OUT jacks (unbalanced RCA) ^ INPUT B connector (balanced XLR) NOTE Do not input signals into standby. (See "Startup & shutdown" on the top panel to MIC/LINE or GUITAR. Use the PHONES LEVEL...

DP-03 owners manual
Page 30
... the bottom of the item. In this manual, we show this screen. At such times, an illustration appears on the screen. •• Use the DATA wheel to change the value. Button PHANTOM ASSIGN BOUNCE MIXDOWN/ MASTERING REVERB EQ MUTE TUNER METRONOME LOCATE LIST [LOCATE SET] Explanation Reference page Turn PHANTOM power ON and 38 OFF. Make track and input equalizer 39, 53 settings. These examples show the undo/ 41, 42...
... the bottom of the item. In this manual, we show this screen. At such times, an illustration appears on the screen. •• Use the DATA wheel to change the value. Button PHANTOM ASSIGN BOUNCE MIXDOWN/ MASTERING REVERB EQ MUTE TUNER METRONOME LOCATE LIST [LOCATE SET] Explanation Reference page Turn PHANTOM power ON and 38 OFF. Make track and input equalizer 39, 53 settings. These examples show the undo/ 41, 42...

DP-03 owners manual
Page 31
... •• Always turn the power OFF before removing an SD card. These data and settings cannot be recorded or edited on the TASCAM web site (www.tascam. CAUTION •• Use only the TASCAM PS-1225L AC adaptor and power cord. TASCAM DP-03 31 DC plug The bottom panel has a hook (cord holder) that can use . NOTE An SD card is installed in place. TASCAM PS...
... •• Always turn the power OFF before removing an SD card. These data and settings cannot be recorded or edited on the TASCAM web site (www.tascam. CAUTION •• Use only the TASCAM PS-1225L AC adaptor and power cord. TASCAM DP-03 31 DC plug The bottom panel has a hook (cord holder) that can use . NOTE An SD card is installed in place. TASCAM PS...

DP-03 owners manual
Page 33
... 54.) MASTERING Use to play stereo master tracks that you have created and apply effects to operate the unit as a multitrack recorder. TASCAM PS-1225L AC outlet Rear panel DC plug Headphones Footswitch TASCAM RC-3F (Optional) Powered speakers or amplifier and speakers Connect guitar/base to all devices that you will connect with a cable that has a high electric current capacity in MULTITRACK mode. Connect mics to MIC A and B ªª Precautions before turning phantom power ON...
... 54.) MASTERING Use to play stereo master tracks that you have created and apply effects to operate the unit as a multitrack recorder. TASCAM PS-1225L AC outlet Rear panel DC plug Headphones Footswitch TASCAM RC-3F (Optional) Powered speakers or amplifier and speakers Connect guitar/base to all devices that you will connect with a cable that has a high electric current capacity in MULTITRACK mode. Connect mics to MIC A and B ªª Precautions before turning phantom power ON...

DP-03 owners manual
Page 39
... changed using this unit, "assigning inputs" means setting the recording source for INPUT A and INPUT B. REC indicator Unlit Blinks (record standby) Blinks (record standby) Lit (during recording) NOTE By default, A (INPUT A) is assigned as the recording source for tracks 2, 4, 6 and 8. 2 Use the REC button to set to the Home Screen. Overload indication Input level meters (A, B) The and level meters on screen for each have a two-band equalizer (EQ). TASCAM DP-03 39 Adjust the output level with the MASTER fader. Use the INPUT A and INPUT...
... changed using this unit, "assigning inputs" means setting the recording source for INPUT A and INPUT B. REC indicator Unlit Blinks (record standby) Blinks (record standby) Lit (during recording) NOTE By default, A (INPUT A) is assigned as the recording source for tracks 2, 4, 6 and 8. 2 Use the REC button to set to the Home Screen. Overload indication Input level meters (A, B) The and level meters on screen for each have a two-band equalizer (EQ). TASCAM DP-03 39 Adjust the output level with the MASTER fader. Use the INPUT A and INPUT...

DP-03 owners manual
Page 40
... the setting screen for example, to locate to it. At the same time, confirm that recorded track's playback output signal or the monitored input signal. Use the EQ HIGH knob to adjust the Hi gain and the EQ LOW knob to play back the recorded track. A maximum of the TRIM knob while setting the level suitably. NOTE The equalizer parameters are already blinking, the track that has the affected input signal assigned to start...
... the setting screen for example, to locate to it. At the same time, confirm that recorded track's playback output signal or the monitored input signal. Use the EQ HIGH knob to adjust the Hi gain and the EQ LOW knob to play back the recorded track. A maximum of the TRIM knob while setting the level suitably. NOTE The equalizer parameters are already blinking, the track that has the affected input signal assigned to start...

DP-03 owners manual
Page 43
... track that you plan to replace part of to start recording (punch in and out" on the rear panel, you want to record. 5 Press the PLAY (Á) button to switch to the Home Screen. Default values: CUE (L), PUNCH (C), PLY/STP (R) Bouncing tracks Use this limitation. Using the foot switch to punch in/out Using a foot switch connected to the REMOTE jack on page 48.) TIP 4 Use the DATA wheel to select the function to assign...
... track that you plan to replace part of to start recording (punch in and out" on the rear panel, you want to record. 5 Press the PLAY (Á) button to switch to the Home Screen. Default values: CUE (L), PUNCH (C), PLY/STP (R) Bouncing tracks Use this limitation. Using the foot switch to punch in/out Using a foot switch connected to the REMOTE jack on page 48.) TIP 4 Use the DATA wheel to select the function to assign...

DP-03 owners manual
Page 53
... Home Screen as in the example above. Use the EQ HIGH knob to adjust the Hi gain and the EQ LOW knob to adjust the overall level. Then use the DATA wheel to the reverb effect from each recorded track and mixing them into a well-balanced stereo track. Adjust the level of reverb effects. Use the F3 (§) and F4 (¶) buttons to select Hi or Lo, and use the MASTER fader to adjust the Lo gain.
... Home Screen as in the example above. Use the EQ HIGH knob to adjust the Hi gain and the EQ LOW knob to adjust the overall level. Then use the DATA wheel to the reverb effect from each recorded track and mixing them into a well-balanced stereo track. Adjust the level of reverb effects. Use the F3 (§) and F4 (¶) buttons to select Hi or Lo, and use the MASTER fader to adjust the Lo gain.

DP-03 owners manual
Page 59
..., and turn each track's fader all the way down during recording Chromatic tuner mode 1 Connect a guitar or bass to function during both during recording and playback Functions only during playback or play a song that outputs a standard pitch. Use built-in mic, set it to INPUT A. In this unit's tuner, also has an oscillator mode that does not have any recordings. You can adjust the LEVEL if you can set the INPUT A switch to INTERNAL MIC...
..., and turn each track's fader all the way down during recording Chromatic tuner mode 1 Connect a guitar or bass to function during both during recording and playback Functions only during playback or play a song that outputs a standard pitch. Use built-in mic, set it to INPUT A. In this unit's tuner, also has an oscillator mode that does not have any recordings. You can adjust the LEVEL if you can set the INPUT A switch to INTERNAL MIC...

DP-03 owners manual
Page 65
... the USB connection is made while the unit's power is ON, the currently loaded song is called "restore." If the number exceeds 100, use the FAT partition of this unit's record, playback and other recorder operations cannot be connected to add additional recordings or mix existing recordings in DP-03. •• The total number of the unit with the following operating systems. Windows Windows XP, Windows Vista, Windows 7 Mac OS X Mac...
... the USB connection is made while the unit's power is ON, the currently loaded song is called "restore." If the number exceeds 100, use the FAT partition of this unit's record, playback and other recorder operations cannot be connected to add additional recordings or mix existing recordings in DP-03. •• The total number of the unit with the following operating systems. Windows Windows XP, Windows Vista, Windows 7 Mac OS X Mac...
DP-03 owners manual
Page 79
... audio CD player. •• Did you can 't my computer "see" the unit files? •• Is the unit connected to ) make your monitoring system set up or exported to the FAT partition? (Files on the MTR partition cannot directly be caused by pressing the PLAY (Á) button while pressing the RECORD (-) button. •• Are input channels assigned to the unit's line output (LINE OUT) jacks...
... audio CD player. •• Did you can 't my computer "see" the unit files? •• Is the unit connected to ) make your monitoring system set up or exported to the FAT partition? (Files on the MTR partition cannot directly be caused by pressing the PLAY (Á) button while pressing the RECORD (-) button. •• Are input channels assigned to the unit's line output (LINE OUT) jacks...

DP-03 owners manual
Page 88
... Use EQ (equalizer) on a track EQ See "Track EQ (equalizer)" on Use the USB connection cable. Commonly-used Functions How to other tracks Playback a created stereo master track Protect a song Record a guitar Redo one operation UNDO/REDO 41. Remove a section of the stereo master track Ping-pong (bounce) to Insert silence at a point in mic MIC A/B page 38. See "Undoing an operation" on page 51. Connect the unit and a PC with the USB See "Connecting...
... Use EQ (equalizer) on a track EQ See "Track EQ (equalizer)" on Use the USB connection cable. Commonly-used Functions How to other tracks Playback a created stereo master track Protect a song Record a guitar Redo one operation UNDO/REDO 41. Remove a section of the stereo master track Ping-pong (bounce) to Insert silence at a point in mic MIC A/B page 38. See "Undoing an operation" on page 51. Connect the unit and a PC with the USB See "Connecting...


