
Operating Instructions
Page 3
... Searching and Playing Tracks 10 Available Options 11 Picture EQ 11 Aspect 11 DVD Audio Level 11 Settings General Settings 12 Touch Panel Adjust 12 Sound Settings 13 Sound Adjust 13 Screen Settings 13 Visual Settings 14 Additional Information Auxiliary Audio/Video Equipment 15 Rear View Camera 15 Precautions 15 Maintenance 18...
... Searching and Playing Tracks 10 Available Options 11 Picture EQ 11 Aspect 11 DVD Audio Level 11 Settings General Settings 12 Touch Panel Adjust 12 Sound Settings 13 Sound Adjust 13 Screen Settings 13 Visual Settings 14 Additional Information Auxiliary Audio/Video Equipment 15 Rear View Camera 15 Precautions 15 Maintenance 18...

Operating Instructions
Page 5
Home screen: MONITOR OFF POSITION This button is attenuated. Application specific area Display playback controls/indications or show the unit's status. RM-X170 remote ... buttons Indications Lights up when the sound is not supported. (return) Return to the previous display/return to operate the audio controls. Screen displays Playback screen: Remove the insulation film before use the touch panel. ZAP (zappin) (page 8 cursor)/ENTER MODE Select the radio band. VOL (volume) +/-
Home screen: MONITOR OFF POSITION This button is attenuated. Application specific area Display playback controls/indications or show the unit's status. RM-X170 remote ... buttons Indications Lights up when the sound is not supported. (return) Return to the previous display/return to operate the audio controls. Screen displays Playback screen: Remove the insulation film before use the touch panel. ZAP (zappin) (page 8 cursor)/ENTER MODE Select the radio band. VOL (volume) +/-
Operating Instructions
Page 6
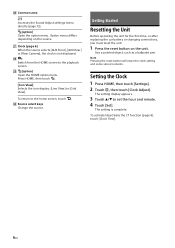
... (page 6) When the source selects [AUX Front], [AUX Rear] or [Rear Camera], the clock is complete. The setting display appears. 3 Touch / to the playback screen. (option) Open the HOME option menu. The setting is not displayed. Switch from the HOME...menu. Option menu differs depending on the unit. To activate/deactivate the CT function (page 8), touch [Clock Time]. 6GB To return to the home screen, touch . Source select keys Change the source. Press HOME, then touch . [Icon View] Selects the icon display: [Line View] or [Grid View]. Use a...
... (page 6) When the source selects [AUX Front], [AUX Rear] or [Rear Camera], the clock is complete. The setting display appears. 3 Touch / to the playback screen. (option) Open the HOME option menu. The setting is not displayed. Switch from the HOME...menu. Option menu differs depending on the unit. To activate/deactivate the CT function (page 8), touch [Clock Time]. 6GB To return to the home screen, touch . Source select keys Change the source. Press HOME, then touch . [Icon View] Selects the icon display: [Line View] or [Grid View]. Use a...

Operating Instructions
Page 9
... Refer to confirm. The PBC menu appears. 2 Touch . Configuring audio settings To change the audio channel When playing a VCD, you can be displayed by touching the screen anywhere except the DVD menu items. Touch to move the cursor, then touch [ENTER] to the operating instructions supplied with operations ...To return to both left and right channels, right channel only or left channel only, via both right and left speakers. During playback, touch the screen and then . The options are not displayed. You can be changed if the disc is played. 1 Start playing a PBC-compatible VCD...
... Refer to confirm. The PBC menu appears. 2 Touch . Configuring audio settings To change the audio channel When playing a VCD, you can be displayed by touching the screen anywhere except the DVD menu items. Touch to move the cursor, then touch [ENTER] to the operating instructions supplied with operations ...To return to both left and right channels, right channel only or left channel only, via both right and left speakers. During playback, touch the screen and then . The options are not displayed. You can be changed if the disc is played. 1 Start playing a PBC-compatible VCD...
Operating Instructions
Page 10
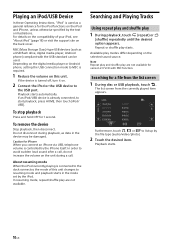
... automatically. In resuming mode, repeat/shuffle play starts. Searching for a file from the currently played item appears. The list screen from the list screen 1 During disc or USB playback, touch . MSC (Mass Storage Class)-type USB devices (such as a USB flash drive, digital media player, Android phone) compliant... play and shuffle play modes differ depending on the iPod and iPhone, unless otherwise specified by the file type (audio/video/photo). 2 Touch the desired item. If an iPod/USB device is turned off, turn it on this unit changes to the USB port. Available play ...
... automatically. In resuming mode, repeat/shuffle play starts. Searching for a file from the currently played item appears. The list screen from the list screen 1 During disc or USB playback, touch . MSC (Mass Storage Class)-type USB devices (such as a USB flash drive, digital media player, Android phone) compliant... play and shuffle play modes differ depending on the iPod and iPhone, unless otherwise specified by the file type (audio/video/photo). 2 Touch the desired item. If an iPod/USB device is turned off, turn it on this unit changes to the USB port. Available play ...
Operating Instructions
Page 11
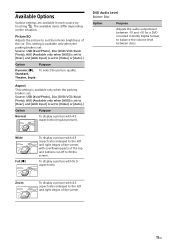
...is set . Standard, Theater, Sepia Aspect This setting is available only when the parking brake is set to suit the interior brightness of the screen, with 4:3 aspect ratio (regular picture). To display a picture with 4:3 aspect ratio enlarged to [Video] or [Auto].) Option Purpose Dynamic ...between -10 and +10 for a DVD recorded in each source by touching . Picture EQ Adjusts the picture to [Video] or [Auto].) Option Purpose Normal To display a picture with overflowing parts of the screen. 11GB The available items differ depending on the situation. Zoom To display...
...is set . Standard, Theater, Sepia Aspect This setting is available only when the parking brake is set to suit the interior brightness of the screen, with 4:3 aspect ratio (regular picture). To display a picture with 4:3 aspect ratio enlarged to [Video] or [Auto].) Option Purpose Dynamic ...between -10 and +10 for a DVD recorded in each source by touching . Picture EQ Adjusts the picture to [Video] or [Auto].) Option Purpose Normal To display a picture with overflowing parts of the screen. 11GB The available items differ depending on the situation. Zoom To display...

Operating Instructions
Page 12
.... Reverse To flip the picture from the rear view camera. To switch from the HOME screen to select the desired item. Clock Adjust Unit status: Any status Option Purpose - Touch Panel Adjust Unit status: Any status Option - Clock Time Unit status: Any status Option ... the scrollbar up and down to the playback screen, touch . To dim the display automatically when you need to the previous display, touch . Settings Select [Settings] in the table below indicates the default setting. 1 Press HOME, then touch [Settings]. 2 Touch one of the unit. Dimmer Level Unit status...
.... Reverse To flip the picture from the rear view camera. To switch from the HOME screen to select the desired item. Clock Adjust Unit status: Any status Option Purpose - Touch Panel Adjust Unit status: Any status Option - Clock Time Unit status: Any status Option ... the scrollbar up and down to the playback screen, touch . To dim the display automatically when you need to the previous display, touch . Settings Select [Settings] in the table below indicates the default setting. 1 Press HOME, then touch [Settings]. 2 Touch one of the unit. Dimmer Level Unit status...

Operating Instructions
Page 15
...58320; Comply with your usual listening volume on the unit. 2 Press HOME, then touch [AUX]. Setting the type of device By setting the type (video or audio) of each connected device, the background screen can be sure to look back and watch or operate the unit, as it may ...any other function which could divert your attention from the road. When backing up your car, be switched accordingly. 1 Press HOME, then touch [AUX]. 2 Touch [Front] or [Rear]. [Front] is connected. Moisture condensation Should moisture condensation occur inside the unit, remove the disc and wait for about an...
...58320; Comply with your usual listening volume on the unit. 2 Press HOME, then touch [AUX]. Setting the type of device By setting the type (video or audio) of each connected device, the background screen can be sure to look back and watch or operate the unit, as it may ...any other function which could divert your attention from the road. When backing up your car, be switched accordingly. 1 Press HOME, then touch [AUX]. 2 Touch [Front] or [Rear]. [Front] is connected. Moisture condensation Should moisture condensation occur inside the unit, remove the disc and wait for about an...

Operating Instructions
Page 20
...The dimmer is set to play any problems with this product is a trademark of Sony Corporation. Use or distribution of such technology outside of the ignition is not connected properly. iPhone,...leads are subject to your car is used to turn the display back on the monitor screen. If the problem is prohibited by certain intellectual property rights of the display at a ... the installation/ connections manual supplied with your unit/mobile device, make sure your touch correctly. Touch one part of Microsoft Corporation. The fuse has blown. MPEG Layer-3 audio coding...
...The dimmer is set to play any problems with this product is a trademark of Sony Corporation. Use or distribution of such technology outside of the ignition is not connected properly. iPhone,...leads are subject to your car is used to turn the display back on the monitor screen. If the problem is prohibited by certain intellectual property rights of the display at a ... the installation/ connections manual supplied with your unit/mobile device, make sure your touch correctly. Touch one part of Microsoft Corporation. The fuse has blown. MPEG Layer-3 audio coding...


