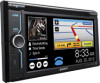
User Guide
Page 5
EQ7 43 Customizing the equalizer curve - CSO 45 Using rear speakers like subwoofers - ZAPPIN 34 Controlling applications on LCD panel 56 Bluetooth function Before using the Bluetooth function 36 Basic procedure of buttons -Dynamic Color Illuminator 35 Customizing ...
EQ7 43 Customizing the equalizer curve - CSO 45 Using rear speakers like subwoofers - ZAPPIN 34 Controlling applications on LCD panel 56 Bluetooth function Before using the Bluetooth function 36 Basic procedure of buttons -Dynamic Color Illuminator 35 Customizing ...
User Guide
Page 14
O
O

User Guide
Page 35
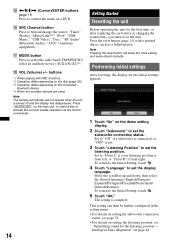
... left to select the desired preset color, then press it. Draw a vertical DVD/VCD/Xvid/MPEG-4 line playback: (upwards) fast-forward the video. Balance/Fader/Subwoofer (page 50) - Audio playback: skip backward an album (folder). 35 • While Zone × Zone is activated, the following command stroke on the main unit...
... left to select the desired preset color, then press it. Draw a vertical DVD/VCD/Xvid/MPEG-4 line playback: (upwards) fast-forward the video. Balance/Fader/Subwoofer (page 50) - Audio playback: skip backward an album (folder). 35 • While Zone × Zone is activated, the following command stroke on the main unit...
User Guide
Page 43
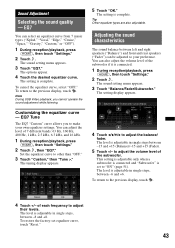
...adjust their levels. The options appear. 4 Touch the desired equalizer curve. of each frequency to adjust the volume level of the subwoofer if it is adjustable in single steps between -6 and +6. Sound Adjustment Selecting the sound quality - Customizing the equalizer curve - The...make your preference. Adjusting the sound characteristics The sound balance between -8 and +8. This setting is adjustable only when a subwoofer is connected and "Subwoofer" is adjustable in single steps, between left and right speakers ("Balance") and front and rear speakers ("Fader") can also...
...adjust their levels. The options appear. 4 Touch the desired equalizer curve. of each frequency to adjust the volume level of the subwoofer if it is adjustable in single steps between -6 and +6. Sound Adjustment Selecting the sound quality - Customizing the equalizer curve - The...make your preference. Adjusting the sound characteristics The sound balance between -8 and +8. This setting is adjustable only when a subwoofer is connected and "Subwoofer" is adjustable in single steps, between left and right speakers ("Balance") and front and rear speakers ("Fader") can also...

User Guide
Page 44
... "OFF": No position set the distance between your listening position and the speakers. Intelligent Time Alignment The unit can also set the subwoofer position. Before starting, measure the distance between your listening position and each speaker to "Front L," "Front R," "Front," or "All...steps, between 0 and 400 cm (0 and 13 1/10 ft). 5 Touch "OK." Intelligent Time Alignment Tune You can set the approximate subwoofer position from your listening position from each speaker so that the sound delay reaches the listener more correctly. The sound setting menu appears. 3 ...
... "OFF": No position set the distance between your listening position and the speakers. Intelligent Time Alignment The unit can also set the subwoofer position. Before starting, measure the distance between your listening position and each speaker to "Front L," "Front R," "Front," or "All...steps, between 0 and 400 cm (0 and 13 1/10 ft). 5 Touch "OK." Intelligent Time Alignment Tune You can set the approximate subwoofer position from your listening position from each speaker so that the sound delay reaches the listener more correctly. The sound setting menu appears. 3 ...

User Guide
Page 45
... speakers are "Front R" (Front Right), "Front L" (Front Left), "Surround L" (Rear Left), "Surround R" (Rear Right) and "Subwoofer*." * Adjustable only when a subwoofer is connected and "Subwoofer" is set to "Multi" (page 54), as it is not connected. 1 During reception/playback, press (HOME), then touch "Settings." ... To return to adjust the level. The setting display appears. 4 Touch the desired item, then +/- Repeat this step to work like subwoofers - The Disc Option menu appears. 3 Touch "CSO (Center Speaker Organizer)." The sound setting menu appears. 3 Move the scrollbar up ...
... speakers are "Front R" (Front Right), "Front L" (Front Left), "Surround L" (Rear Left), "Surround R" (Rear Right) and "Subwoofer*." * Adjustable only when a subwoofer is connected and "Subwoofer" is set to "Multi" (page 54), as it is not connected. 1 During reception/playback, press (HOME), then touch "Settings." ... To return to adjust the level. The setting display appears. 4 Touch the desired item, then +/- Repeat this step to work like subwoofers - The Disc Option menu appears. 3 Touch "CSO (Center Speaker Organizer)." The sound setting menu appears. 3 Move the scrollbar up ...
User Guide
Page 50
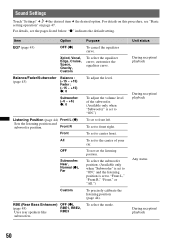
...the default setting. To set to front right. RBE (Rear Bass Enhancer) OFF (z), (page 45) Uses rear speakers like RBE1, RBE2, RBE3 subwoofers. Item Option Purpose EQ7 (page 43) OFF (z) To cancel the equalizer curve. To set to "ON.") Listening Position (page 44) Front L ...(z) Sets the listening position and subwoofer position. Balance/Fader/Subwoofer (page 43) Balance : (-15 ~ +15) Fader : (-15 ~ +15) z: 0 To adjust the level. All To set to center...
...the default setting. To set to front right. RBE (Rear Bass Enhancer) OFF (z), (page 45) Uses rear speakers like RBE1, RBE2, RBE3 subwoofers. Item Option Purpose EQ7 (page 43) OFF (z) To cancel the equalizer curve. To set to "ON.") Listening Position (page 44) Front L ...(z) Sets the listening position and subwoofer position. Balance/Fader/Subwoofer (page 43) Balance : (-15 ~ +15) Fader : (-15 ~ +15) z: 0 To adjust the level. All To set to center...
User Guide
Page 51
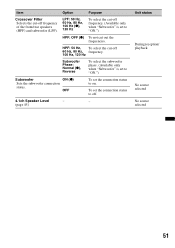
... to on. Item Option Purpose Crossover Filter Selects the cut -off 60 Hz, 80 Hz, frequency. 100 Hz, 120 Hz Subwoofer Phase: Normal (z), Reverse To select the subwoofer phase. (Available only when "Subwoofer" is set the connection status to off. 4.1ch Speaker Level - - (page 45) Unit status During reception/ playback No source ... 51 LPF: 50 Hz, 60 Hz, 80 Hz, 100 Hz (z), 120 Hz To select the cut out the frequencies. OFF To set to "ON.") Subwoofer ON (z) Sets the subwoofer connection status. HPF: 50 Hz, To select the cut -off frequency of the front/rear speakers (HPF) and...
... to on. Item Option Purpose Crossover Filter Selects the cut -off 60 Hz, 80 Hz, frequency. 100 Hz, 120 Hz Subwoofer Phase: Normal (z), Reverse To select the subwoofer phase. (Available only when "Subwoofer" is set the connection status to off. 4.1ch Speaker Level - - (page 45) Unit status During reception/ playback No source ... 51 LPF: 50 Hz, 60 Hz, 80 Hz, 100 Hz (z), 120 Hz To select the cut out the frequencies. OFF To set to "ON.") Subwoofer ON (z) Sets the subwoofer connection status. HPF: 50 Hz, To select the cut -off frequency of the front/rear speakers (HPF) and...
User Guide
Page 62
... will not operate correctly. • Calibrate the touch panel of the display at 4 ohms) General Outputs: Video output terminal (rear) Audio output terminals (front/rear) Subwoofer output terminal Power antenna (aerial) relay control terminal Power amplifier control terminal Inputs: Illumination control terminal Remote controller input terminal Antenna (aerial) input terminal Parking...
... will not operate correctly. • Calibrate the touch panel of the display at 4 ohms) General Outputs: Video output terminal (rear) Audio output terminals (front/rear) Subwoofer output terminal Power antenna (aerial) relay control terminal Power amplifier control terminal Inputs: Illumination control terminal Remote controller input terminal Antenna (aerial) input terminal Parking...


